
Why Polypropylene Shrouds Complicate Dirt Bike Graphics Adhesion
Dirt bike graphics fail on polypropylene shrouds for one measurable reason: low surface energy. Polypropylene is a non-polar, low-energy plastic that typically sits between 29 and 31 dyne/cm. Most pressure-sensitive adhesives need a substrate at roughly 38 dyne/cm or higher to wet out fully and form a continuous bond. Below that threshold, contact is partial, and adhesion depends on weak van der Waals forces rather than full molecular contact.
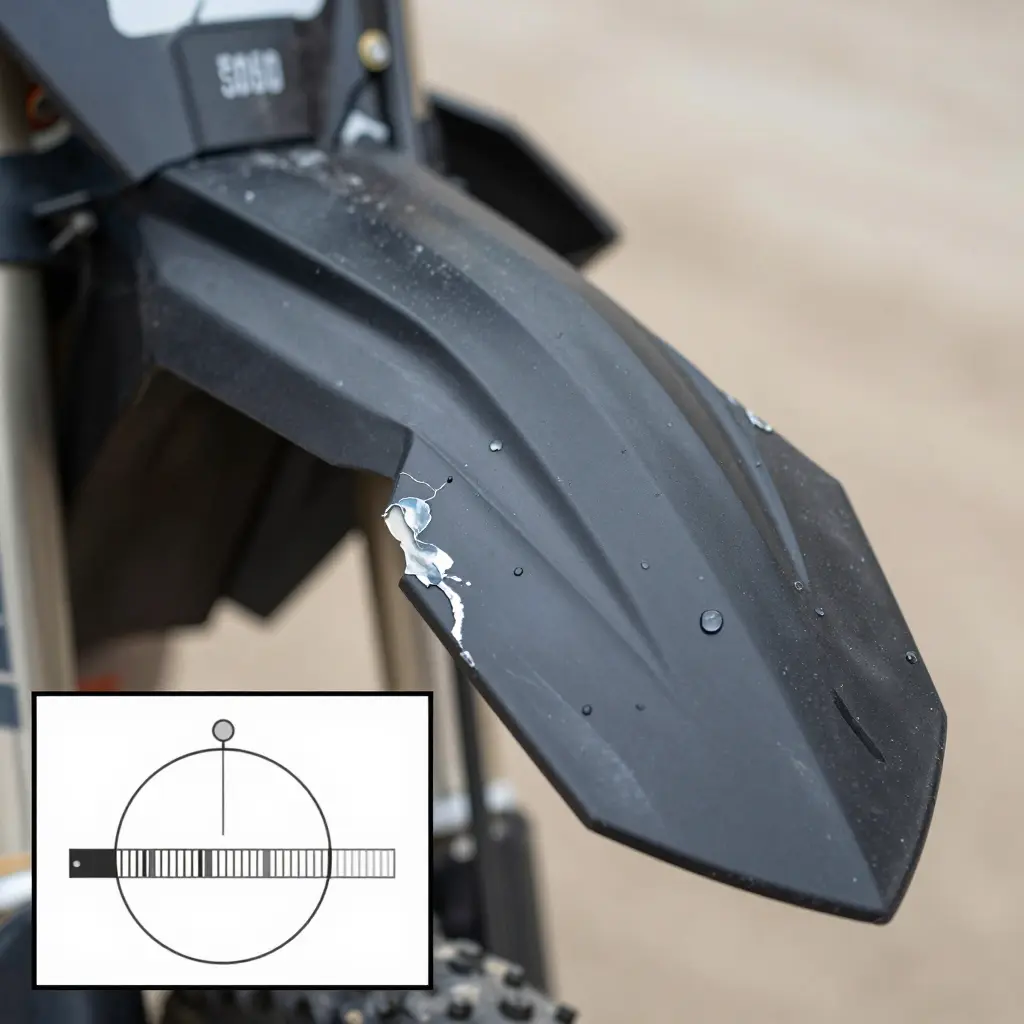
That gap is why swapping adhesive before testing surface energy produces peeling and lifting. Extra tack or a thicker glue line cannot compensate for a surface the adhesive cannot wet. The symptoms follow a pattern: curled edges, lifted corners, and graphics that shear off after a single wash or pressure-wash cycle.
Polypropylene also does not behave like the plastics riders tend to lump it with. ABS, polycarbonate, and most clear-coated panels take vinyl readily because their surface energy clears the bonding threshold. Untreated polypropylene does not, and it often carries mold-release residue and oxidation that push its effective energy lower still. Assuming every shroud is ABS is a common installation error.
Order of operations matters more than the product. Before you explore custom dirt bike graphics or reach for a different adhesive, confirm what the substrate actually is and measure its surface energy. Flame treatment, plasma, or a dedicated primer raises that number. A new adhesive on its own does not.
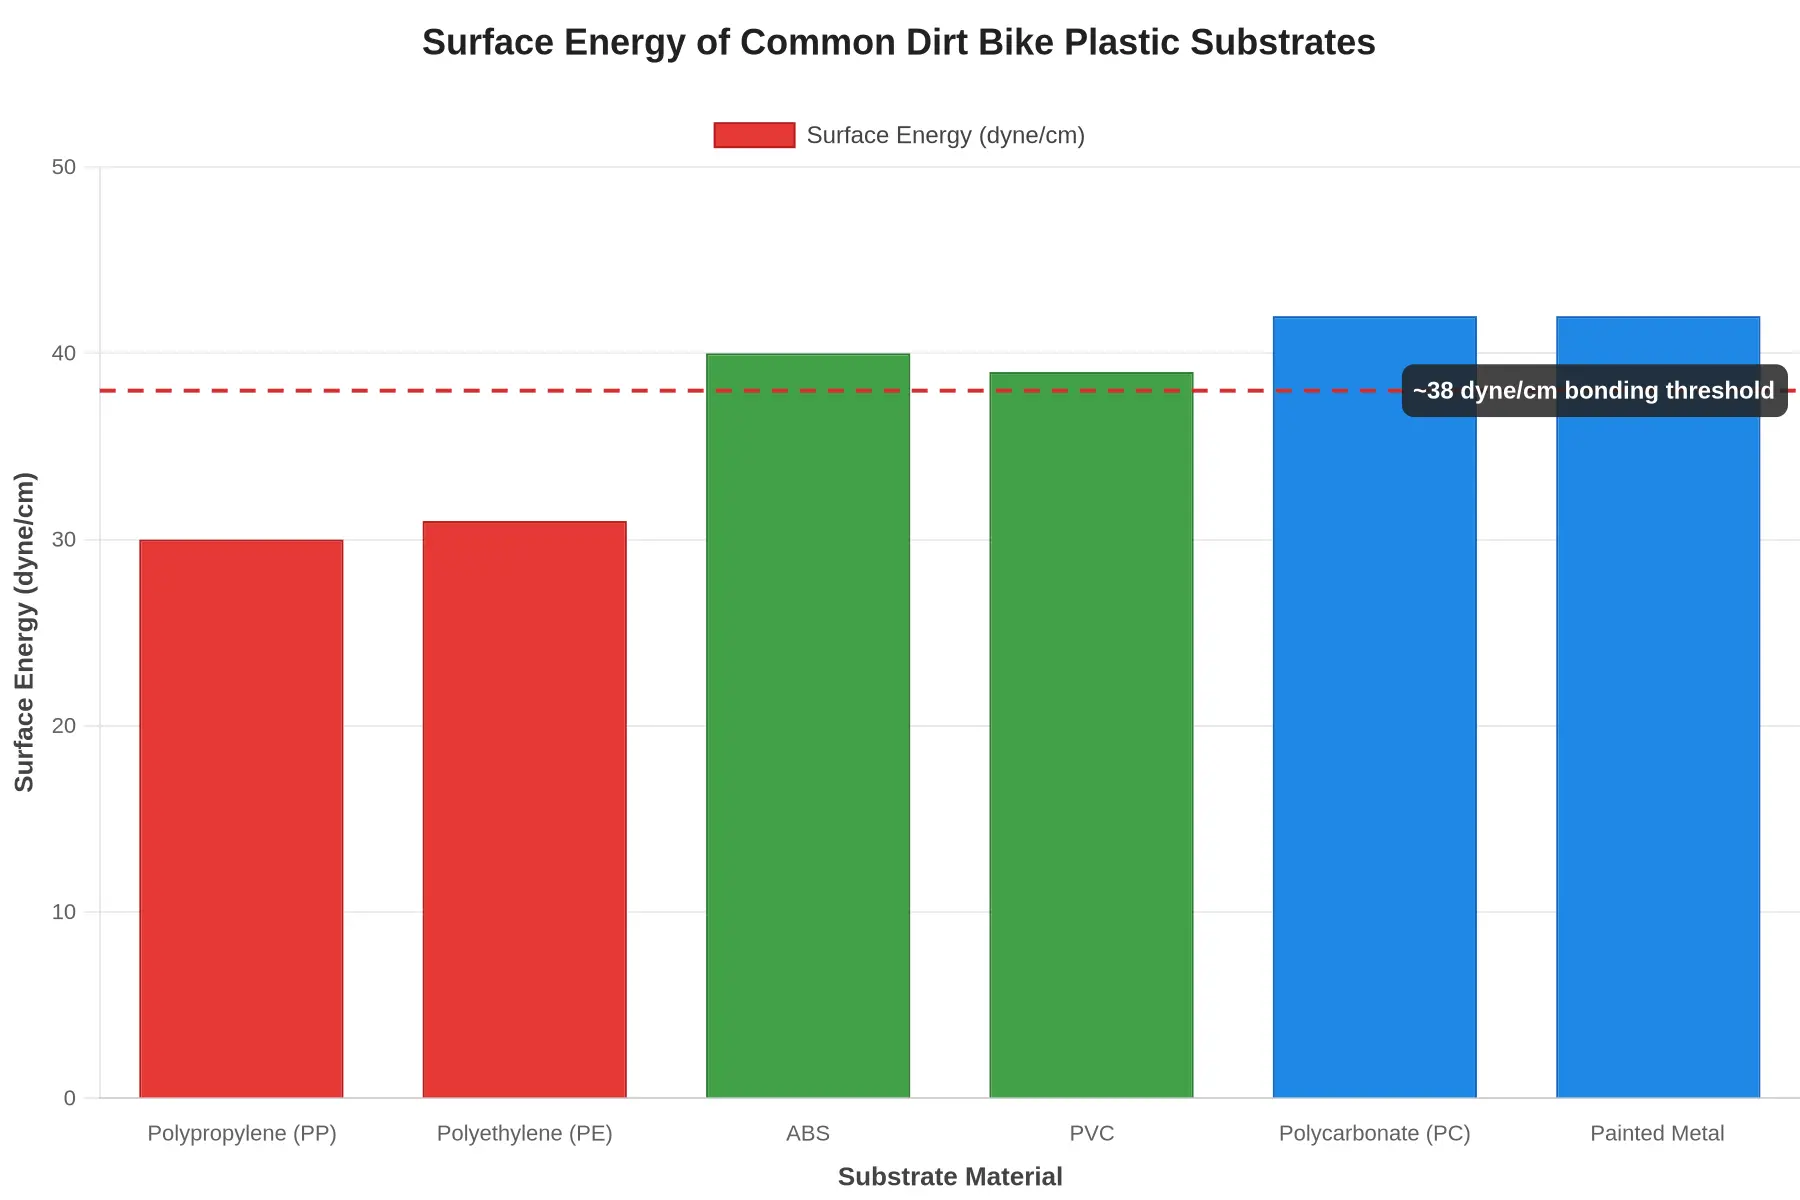
Figure: Surface energy of common dirt bike and powersports substrates (dyne/cm). The dashed line marks the ~38 dyne/cm threshold below which reliable pressure-sensitive adhesive bonding becomes unpredictable.
PP (about 30 dyne/cm) and PE (about 31) sit well below the ~38 dyne/cm that pressure-sensitive adhesives need to wet out and grip a surface. ABS (42-45), PVC (38-41), polycarbonate (42-46), and painted metal (about 42) all clear that bar, which is why vinyl clings to them and slides off an untreated shroud. On PP and PE the decal is not what fails; the surface will not let a standard adhesive bite, so it has to be raised first. Ordering the right dirt bike graphics kits covers one half of the job, and treating the plastic covers the other.
Surface Energy and Dyne Levels: Turning a Guess Into a Number
Surface energy measures how readily a liquid spreads across a solid surface. Every plastic has a value, and it decides whether an adhesive can wet out, meaning it flows into the microscopic peaks and valleys of the shroud, and holds. When surface energy is too low, the adhesive beads up on top instead of gripping.
The dyne level is the unit used to express surface energy. One dyne per centimeter (dyne/cm) is a small unit of force, but as a scale it works as a practical benchmark: the higher the number, the more wettable the surface. Untreated polypropylene shrouds often measure below 30 dyne/cm, which is why so many dirt bike graphics peel, lift, and curl at the edges.
The Actionable Target
For installers, the goal is a surface energy above roughly 38 dyne/cm before applying dirt bike graphics. Below that line, most pressure-sensitive adhesives cannot anchor reliably. Above it, the adhesive wets out fully and stays put.
What matters is that surface energy can be measured rather than guessed. A dyne test pen or test ink deposits a liquid of known dyne level on the plastic; you watch whether it holds a solid film or breaks into droplets. That test tells you whether to clean, abrade, or flame-treat the surface before fitting a new set of dirt bike graphics kits.
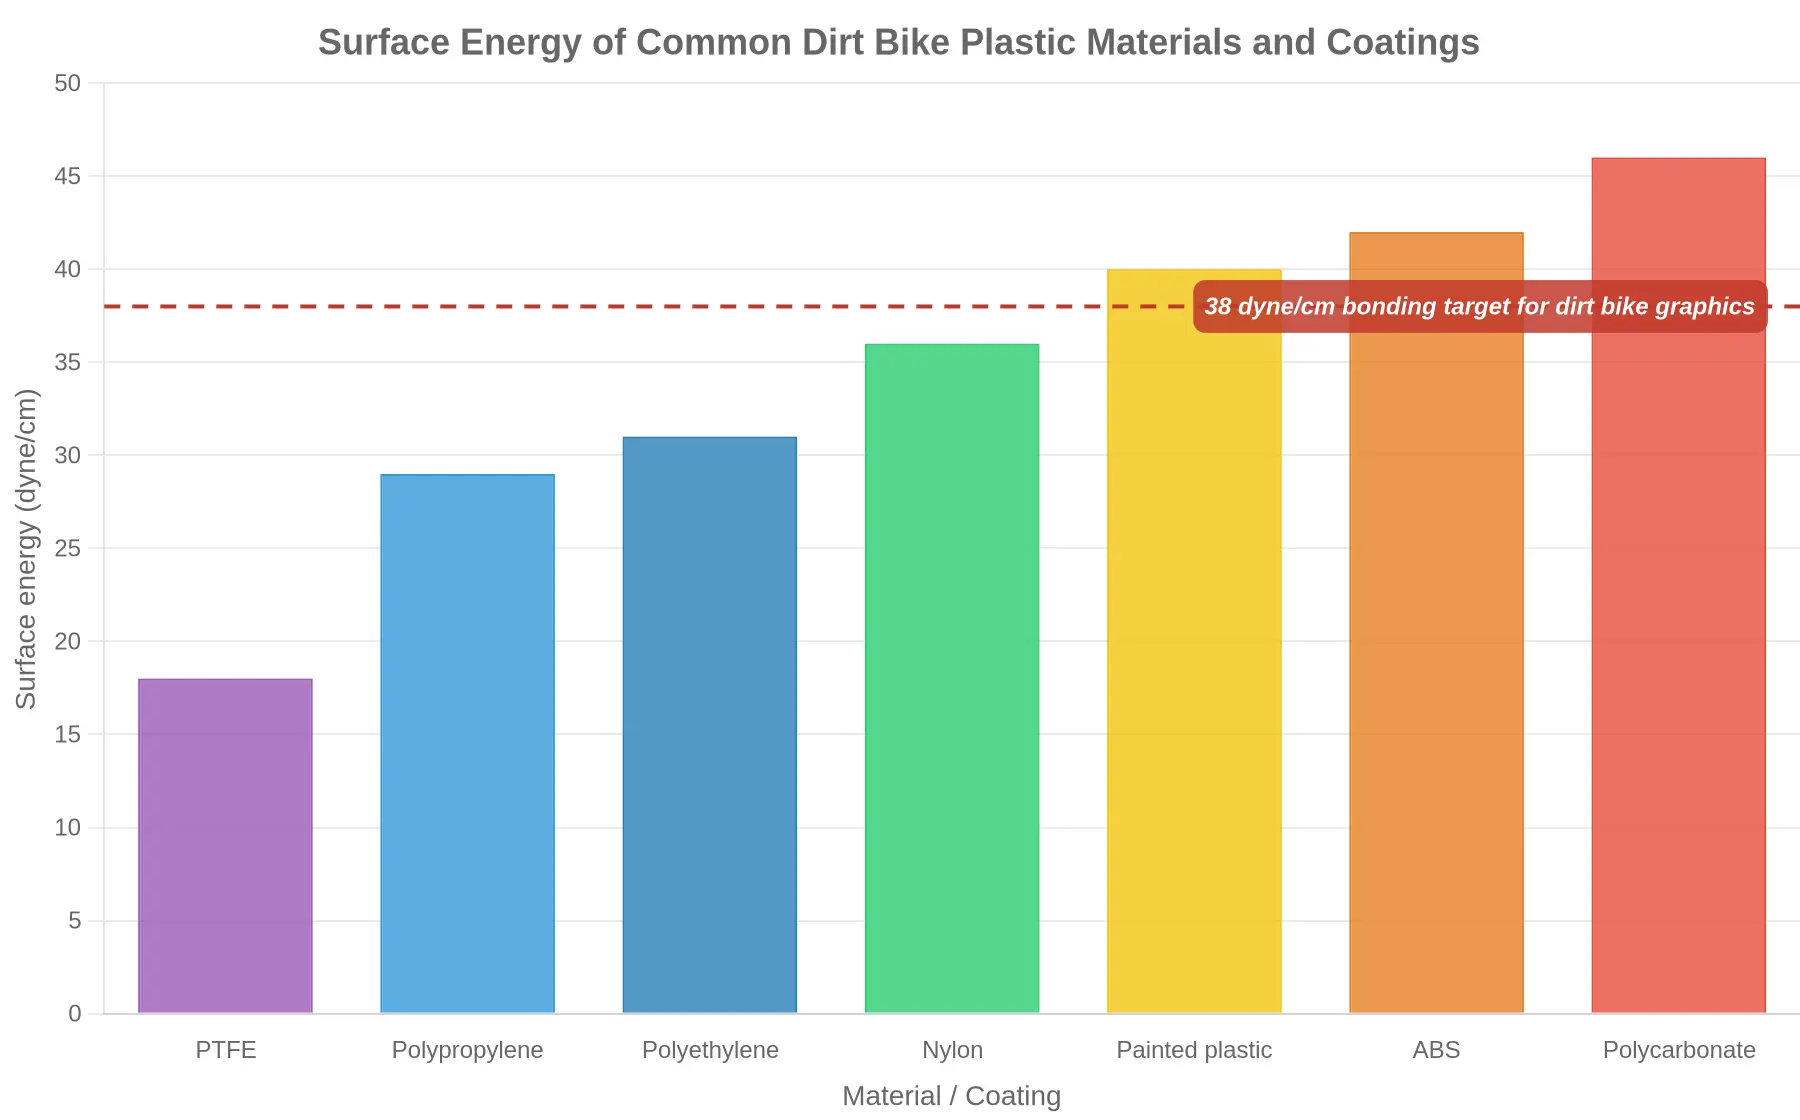
Testing surface energy before swapping adhesive is the step that decides the outcome.
Every plastic used for a shroud grips adhesive differently, and the measure of that is surface energy, in dyne/cm. A higher number means a decal wets out and locks on; a lower one means it beads up and peels. Match your material against the table below before you peel and re-stick anything, because polypropylene sits near the bottom of the scale and lets go first.
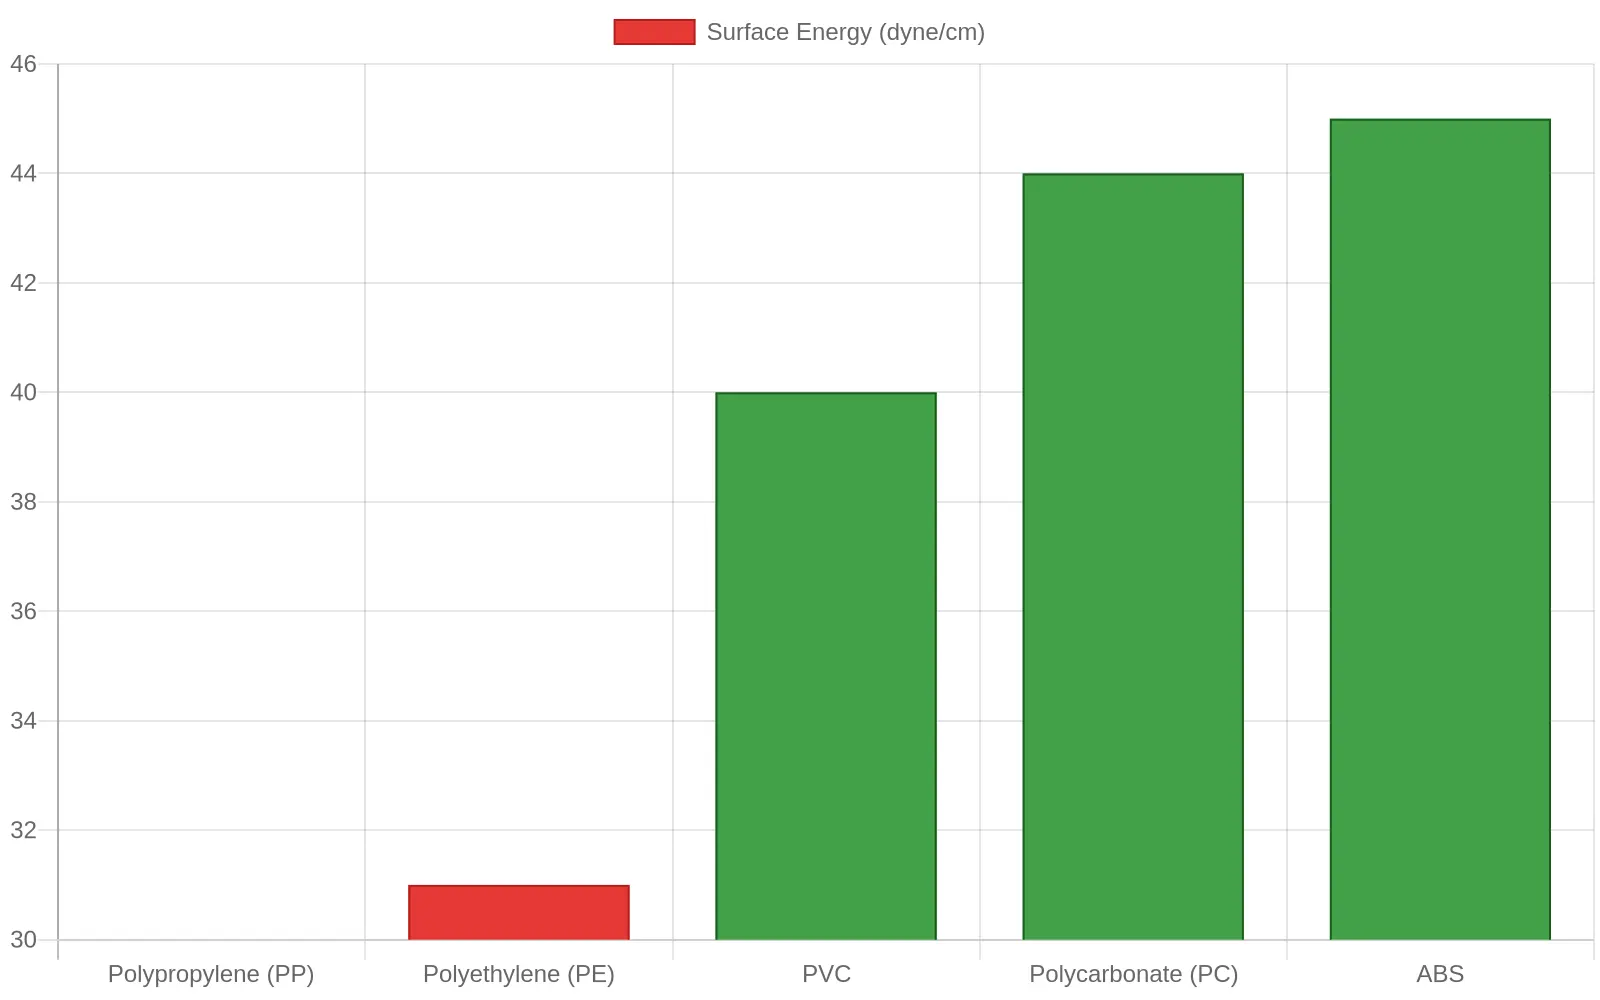
| Substrate | Typical Surface Energy (dyne/cm) | Riser/Untreated Bond Risk | Recommended Adhesive or Pre-Treatment Strategy |
|---|---|---|---|
| Polypropylene (PP) | 29-31 | Very high – untreated PP rejects standard pressure-sensitive adhesives and is the first to lift | Flame treatment, plasma treatment, or an adhesion promoter; otherwise spec a high-performance adhesive formulated for low-energy surfaces |
| Polyethylene (PE) | 30-31 | Very high – untreated PE is the classic low-energy “non-stick” plastic | Flame, plasma, or adhesion promoter; or a low-surface-energy high-performance adhesive |
| ABS | 42-45 | Low – bonds readily, but can dull or smear if over-wiped | Standard acrylic or rubber-based pressure-sensitive adhesive; light clean with isopropyl alcohol |
| PVC | 38-41 | Low to moderate – generally accepts standard graphics well | Standard pressure-sensitive decal adhesive; clean with isopropyl alcohol, and watch for plasticizer migration over time |
| Polycarbonate (PC) | 42-46 | Low – strong bond, but solvent-sensitive | Standard pressure-sensitive adhesive; clean with isopropyl alcohol and avoid harsh solvents that craze the plastic |
How to read this table: the higher the value, the more willing a surface is to accept an adhesive. PP and PE, both under the ~38 dyne/cm target, need mechanical or chemical help (flame, plasma, or an adhesion promoter) or an adhesive formulated for low-energy plastic. At 38 dyne/cm and above, a standard automotive-grade decal bonds comfortably, provided the surface is clean, dry, and free of mold release.
The bottom line: on a polypropylene shroud, peel-and-stick with a generic decal usually means lifted edges within a few rides. Treat the surface, apply an adhesion promoter, or spec an adhesive made for low-energy plastic. ABS, PVC, and PC are more forgiving, but even there a clean, oil-free surface is the difference between custom dirt bike graphics that last a full season and graphics that fail in a week.
Surface Energy and Adhesive Wet-Out
The diagram shows the one thing that decides whether graphics stick to a shroud. Both droplets land on plastic; surface energy decides what happens next.
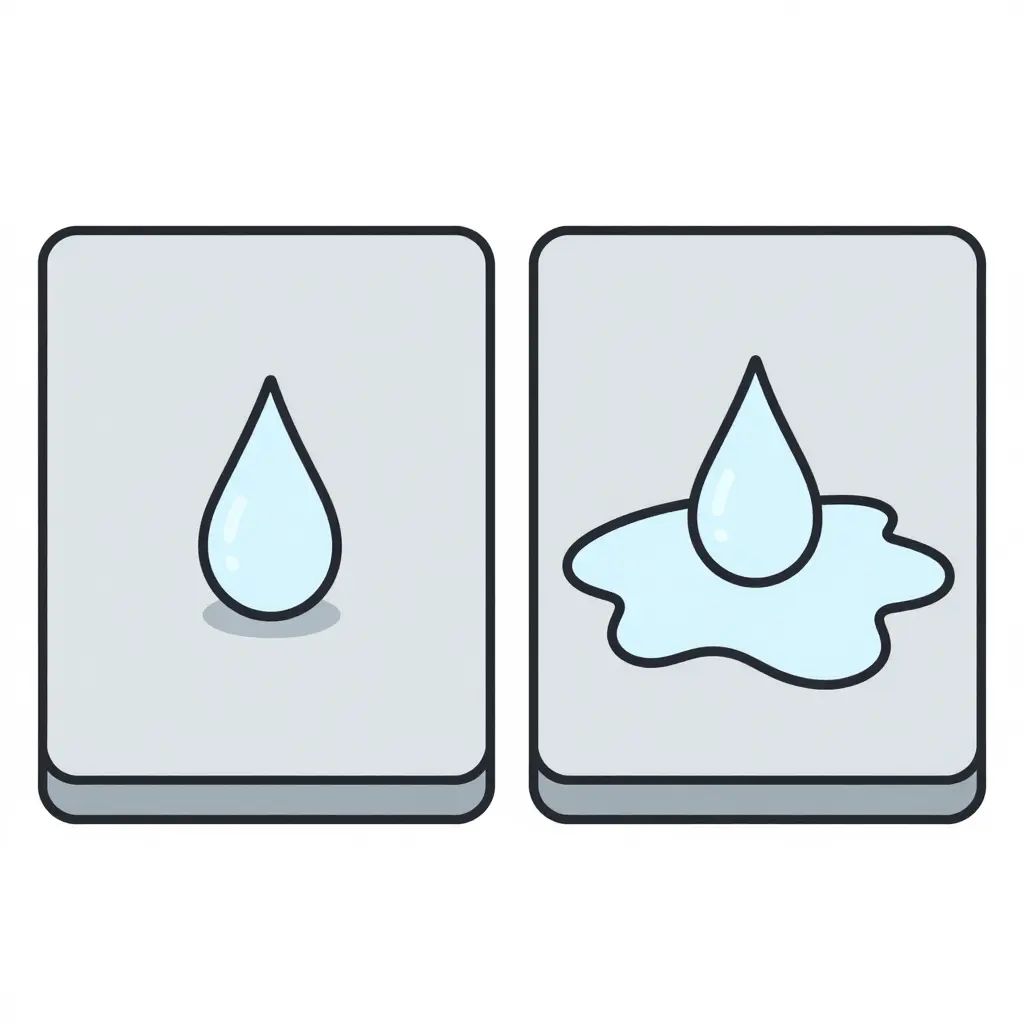
On the left, the droplet balls up into a near-sphere. That high contact angle is the signature of a low-energy surface such as raw polypropylene: the adhesive bridges over the plastic instead of flowing into it, and the edge lifts and peels. On the right, the same droplet spreads out wide and flat. That low contact angle means surface energy is high enough to pull the adhesive into full wet-out, which increases contact area and bond strength.
Wet-out simply means adhesive flowing into the microscopic peaks and valleys of the plastic. No wet-out, no hold. For a deeper walkthrough of how surface prep fits into a lasting install, it helps to understand the tricks that keep graphics locked down.
Surface Pre-Treatment Options for Polypropylene Shrouds
Polypropylene is behind most edge peeling on dirt bike graphics. The plastic’s natural surface energy, roughly 30 dyne/cm, sits below what a typical pressure-sensitive vinyl decal needs to grip reliably. When graphics let go, the instinct is to blame the glue and buy a stronger tape; in most cases that is the wrong fix. Raising the plastic’s surface energy through pre-treatment is what makes the bond hold. Before you swap anything, review the practical installation habits in these dirt bike graphics tricks to avoid rework.
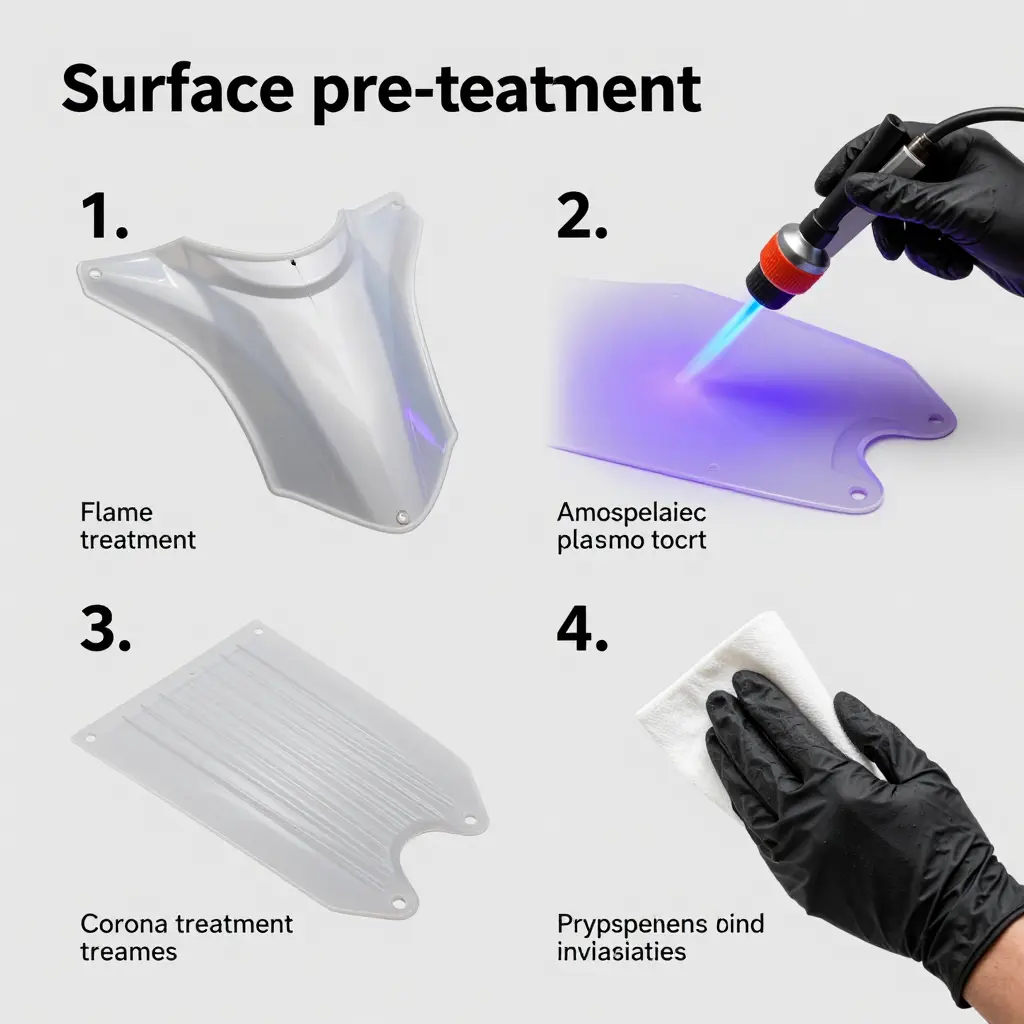
Flame Treatment
A controlled open flame passes over the plastic and briefly oxidizes the top layer, adding polar groups that adhesive can bond to.
- What it does: Lifts surface energy to roughly 45-50 dyne/cm without changing the plastic’s appearance.
- DIY vs. pro: Best left to professional shops. Controlling flame distance and dwell time takes practice.
- Cautions: Too much heat warps or glosses the shroud; too little does nothing. Keep the flame moving and test on scrap plastic first.
Atmospheric Plasma
A plasma jet activates the surface with ionized gas at low temperature.
- What it does: Pushes surface energy near 55-60 dyne/cm, the highest of the methods listed here.
- DIY vs. pro: Professional territory; the equipment is expensive and skill-dependent.
- Cautions: The effect fades over time, so apply dirt bike graphics within hours of treatment.
Corona Treatment
An electrical discharge bombards the surface with charged particles.
- What it does: Raises surface energy to about 40-45 dyne/cm uniformly across flat panels.
- DIY vs. pro: Industrial process, usually done inline during manufacturing rather than in a home garage.
- Cautions: Best for flat, simple shapes; sharp curves and deep recesses are harder to treat evenly.
Chemical Adhesion Promoters / Primers
The most accessible route for most riders is a wipe-on primer that chemically primes the plastic.
- What it does: Adds a bonding layer that lifts surface energy to around 50 dyne/cm and helps the adhesive anchor.
- DIY vs. pro: Ideal for DIY. A lint-free wipe and the right primer are all you need.
- Cautions: Clean off all dirt and old adhesive first; letting primer dry too long before applying vinyl decals weakens the bond.
| Method | Surface Energy Gain | Best For | Key Caution |
|---|---|---|---|
| Flame treatment | High | Pro shops | Overheating warps plastic |
| Atmospheric plasma | Highest | Pro shops | Effect fades fast |
| Corona treatment | Moderate-high | Flat panels, factory | Poor on tight curves |
| Primer / promoter | Moderate-high | DIY riders | Must let it cure correctly |
The chart below shows where each route puts a polypropylene shroud relative to the roughly 38 dyne/cm line where vinyl sticks reliably.
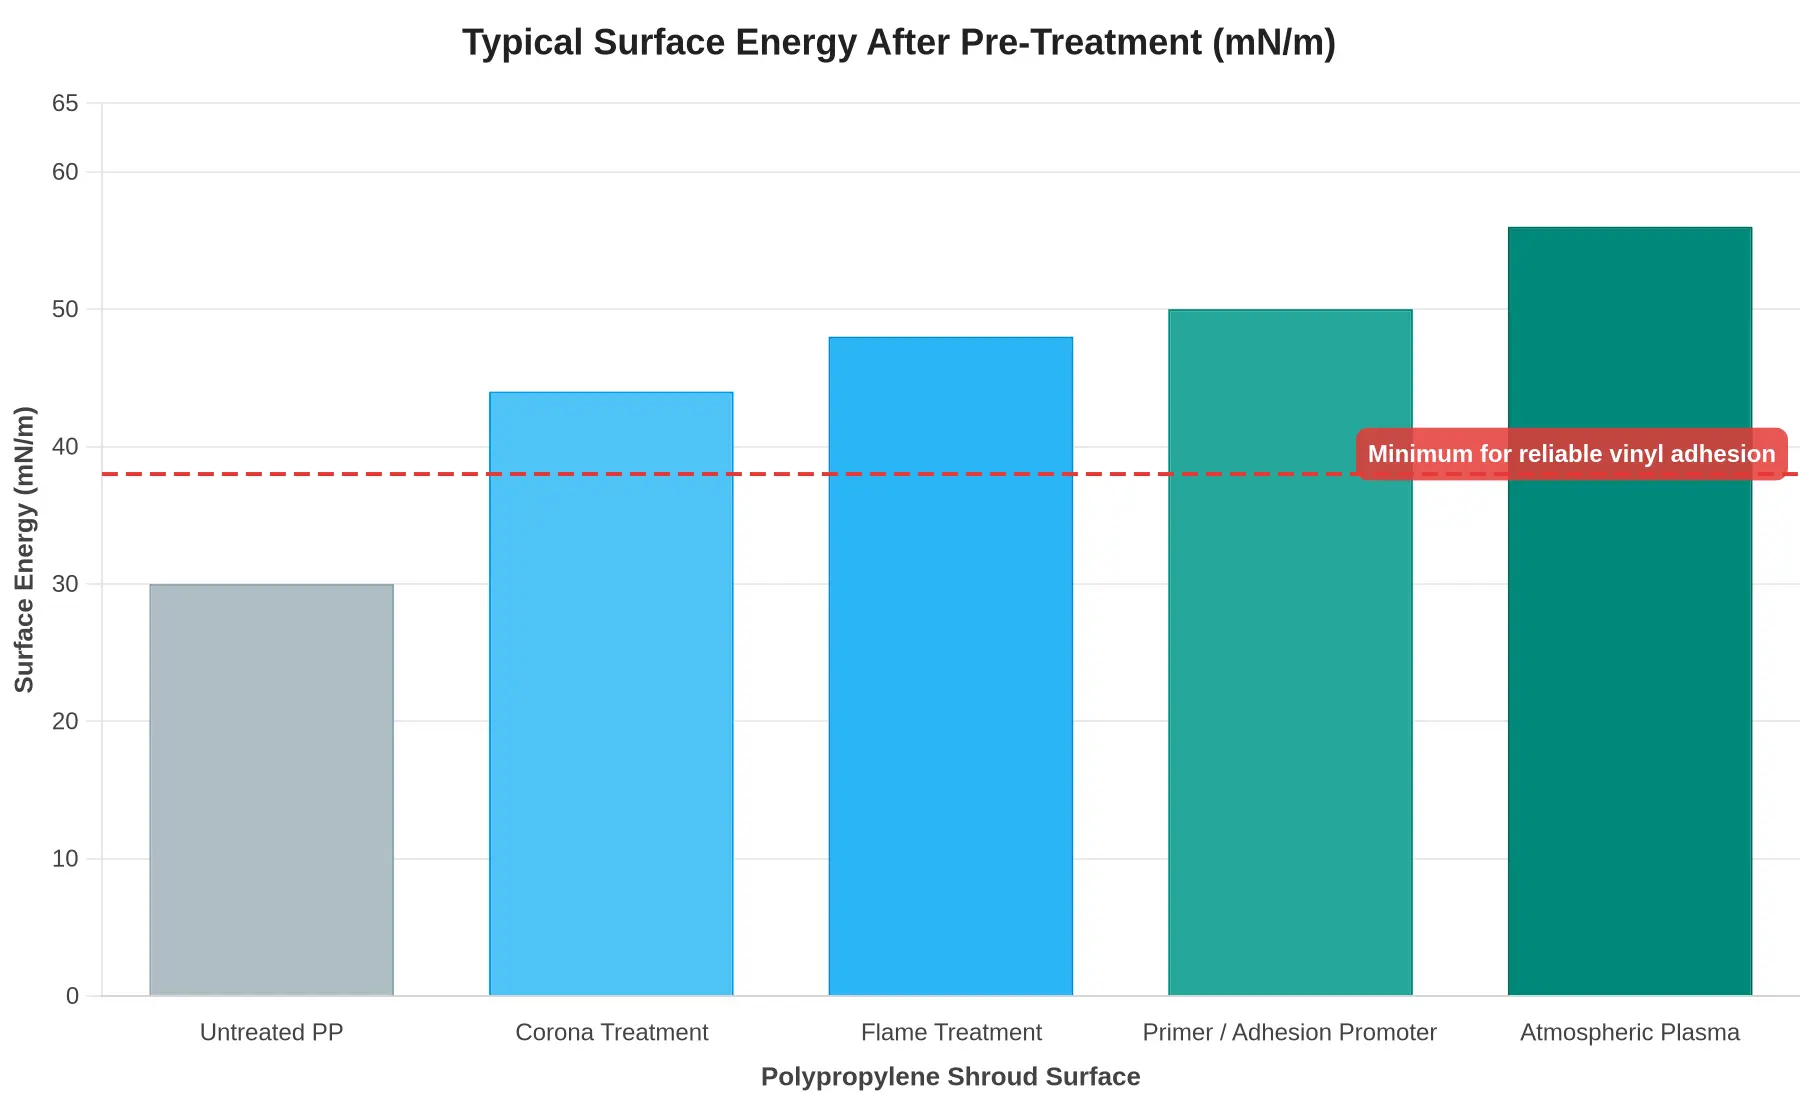
Treating the surface, not just switching adhesive, is usually the fix for graphics that keep lifting. Match the method to your tools and skill level and prep the shroud cleanly, and your dirt bike graphics will stay put through mud, pressure washing, and race weekends.
What Actually Makes Dirt Bike Graphics Let Go?
Ask ten riders why their graphics peeled off a polypropylene shroud and you will hear ten theories. The failure modes are more predictable than that. Sorted by root cause, one factor leads: the plastic never reached the surface energy a lasting bond requires. The chart below gives an approximate breakdown of what goes wrong.
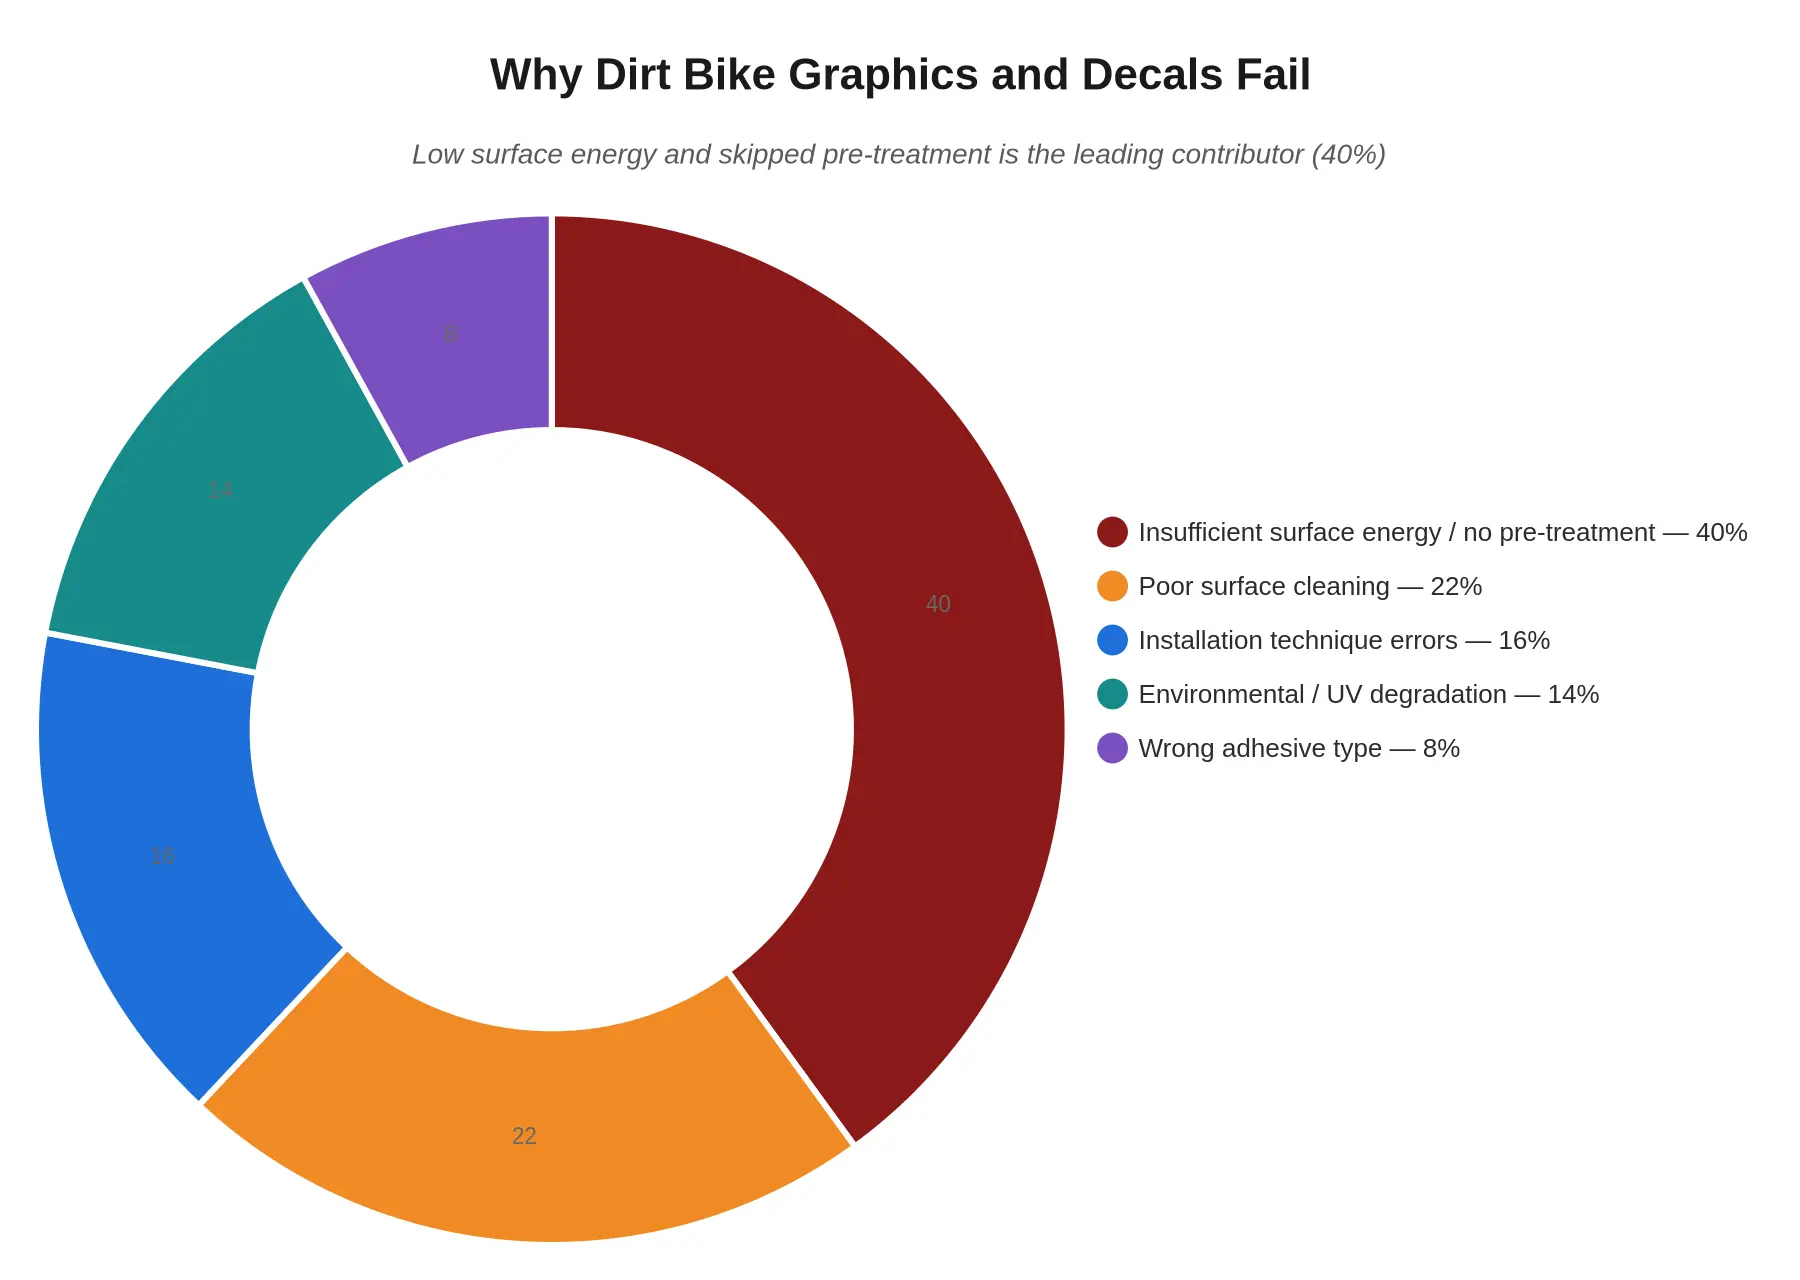
Figure 1: Approximate distribution of causes behind dirt bike graphics and decal failures. Insufficient surface energy and skipped pre-treatment together form the largest slice, at roughly 40 percent.
Reading the Data
In this breakdown, insufficient surface energy and skipped pre-treatment account for 40 percent, nearly double the next cause on its own. Poor surface cleaning follows at 22 percent, installation technique errors at 16 percent, environmental and UV degradation at 14 percent, and the wrong adhesive type trails last at 8 percent.
That last number is the one worth noticing. Riders tend to blame the adhesive, assuming a bad batch or the wrong brand, when wrong adhesive type is the smallest category here. In most of these failures the tape is doing what it was engineered to do; the surface underneath it simply does not have enough energy for a pressure-sensitive adhesive to grip. Polypropylene sits at the low end of the surface energy scale, which is why skipping abrasion, flame treatment, or a primer leaves graphics lifting at the edges, bubbling, or peeling within a few rides.
Before you spend money swapping adhesive or ordering a different kit, test the surface energy of the plastic first. A wet-out test or surface energy check takes minutes and tells you more than a new roll of tape will. For techniques that hold up in the field, review these installation tips that keep graphics stuck. Fix the surface and the adhesive you already own performs the way it was designed to.
Selecting and Pairing the Right Adhesive to Your Measured Surface Energy
A surface energy reading turns adhesive selection into a matching task. The number tells you how well a liquid will wet out the plastic, and that decides which adhesive will hold. Standard acrylic pressure-sensitive adhesives sit at one end of the scale; adhesives built for low-energy surfaces sit at the other.
Standard acrylic PSA versus low-energy adhesives
Standard acrylic pressure-sensitive adhesives are the workhorse chemistry behind most vinyl decals. They perform well on high-energy surfaces: painted metal, glass, and most painted plastics above roughly 38 dyne/cm.
Low-energy substrates such as the polypropylene shrouds on most modern dirt bikes sit closer to 30-31 dyne/cm. A standard acrylic struggles to wet out there, so it grabs weakly and creeps. Adhesives formulated for low-energy surfaces use modified acrylics, added tackifiers, or rubber-based systems to lower surface tension and bite into the plastic.
| Adhesive type | Best substrate | Surface energy range | What it does best |
|---|---|---|---|
| Standard acrylic PSA | Painted metal, glass, high-energy plastics | Above 38 dyne/cm | Long-term bond on easy surfaces |
| High-performance LSE adhesive | Polypropylene and polyethylene shrouds | Roughly 30-34 dyne/cm | Wet-out and initial grab on hard surfaces |
Thickness and tack
Adhesive thickness, or coat weight, controls compliance. A thicker layer flows into textured and curved shrouds and bridges small gaps that a thin coating cannot. Tack is the immediate grab you feel on contact; more of it helps anchor a decal on a slippery low-energy surface before full bonding develops. Thicker is not automatically better, though, because an over-thick adhesive can creep at the edges under heat and pressure washing.
Matching beats raw strength
It is tempting to chase the highest peel strength rating and call it done. That approach fails on low-energy plastic. Adhesion is an interface event: if the adhesive cannot wet out the substrate, the strongest formula on paper still lifts at the corner. Matching the adhesive to your measured surface energy outlasts any brute-force alternative.
This is why fade-resistant vinyl decals from Motograpics are designed to pair with proper surface prep rather than rely on aggressive chemistry alone. Clean the shroud, confirm the surface energy, then install. For a full refresh, review the available dirt bike graphics kits so the adhesive, artwork, and substrate all align before you peel the backing.
Frequently Asked Questions: Surface Energy and Adhesive Swaps
How do I know if a shroud has enough surface energy for graphics to stick?
The reliable test is a dyne pen or a calibrated surface-energy test fluid matched to your plastic. On polypropylene shrouds, you generally need a reading of 38 dyne/cm or higher for a graphics or adhesive bond to hold up, and most raw untreated PP plastics measure closer to 29-31 dyne/cm. If the test fluid beads up instead of wetting out into a continuous film, the surface energy is too low and the adhesive will eventually lift. Treating the shroud, through flame, plasma, or a primer, raises that reading into the range where an adhesive can anchor properly.
Does sanding improve adhesion on polypropylene?
Light sanding with 320-400 grit does help, but only as a mechanical key, not a chemical fix. Scuffing the polypropylene shrouds increases surface area and removes mold-release agents, which gives the adhesive more to grab onto, yet it does not raise surface energy on its own. Sanding is therefore a useful supporting step, but skip it or over-sand and you either lose the benefit or polish the surface back to a slick, low-energy state.
Can a primer replace pre-treatment entirely?
No. A primer is a pre-treatment, not a substitute for one, though it can replace other methods such as flame or plasma treatment. Adhesion promoters, including those covered in a quality dirt bike graphics installation guide, chemically modify the polypropylene surface to raise effective surface energy so the adhesive can bond. What a primer cannot fix is a dirty or greasy shroud, so always degrease and dry the plastic first, then apply the promoter.
How long will graphics last on a properly prepared shroud?
When surface energy is correctly raised and the adhesive is applied cleanly, graphics on polypropylene shrouds typically last three to five years of regular riding, and often longer on garage-kept bikes. Edges and high-flex areas tend to fail first, so clean masking and a firm post-installation press matter as much as the treatment. Poor surface prep can shorten that lifespan to a single season or less before peeling begins.
Can DIY installers test surface energy at home?
Yes. Low-cost dyne pens and surface-energy test kits are widely available, and they let any DIY installer verify a shroud before applying adhesive. Buy the pen range that brackets your expected value (for polypropylene, a 38 dyne/cm pen is the practical pass/fail line) and draw a short line across the cleaned plastic. If the ink holds a continuous film for a few seconds, you are good to install; if it breaks into droplets, treat the surface again.
The Takeaway: Test the Surface, Then Swap the Adhesive
When dirt bike graphics peel off polypropylene shrouds, the adhesive is rarely the culprit. The substrate is. Low-surface-energy plastics reject the bond long before a quality glue gets a fair chance, so swapping to a stickier product without changing the surface simply repeats the failure. Measure first, treat second, and let the surface dictate the adhesive you choose.
The workflow, in order:
- Clean the shroud thoroughly. Strip all dirt, oil, silicone, and old residue with isopropyl alcohol until the plastic is squeaky clean.
- Measure surface energy. Use a dyne test pen or contact-angle check to quantify how well the substrate will accept an adhesive.
- Pre-treat if below threshold. If readings fall short, flame, plasma, or primer-treat the polypropylene to raise its surface energy.
- Select a compatible adhesive. Match the adhesive to the treated surface and the rider’s demands, not to marketing claims.
- Apply the graphics. Lay down the decals on the prepared, tested surface and press firmly for full contact.
Adhesive performance is governed by the substrate surface. Our recommendation: never swap adhesive to fix lifting graphics. Test the surface energy on your polypropylene shrouds, pre-treat when the numbers say so, then invest in properly matched dirt bike graphics. For durable, ready-to-apply options built around that surface science, browse our custom dirt bike graphics and ride with decals that stay put.