
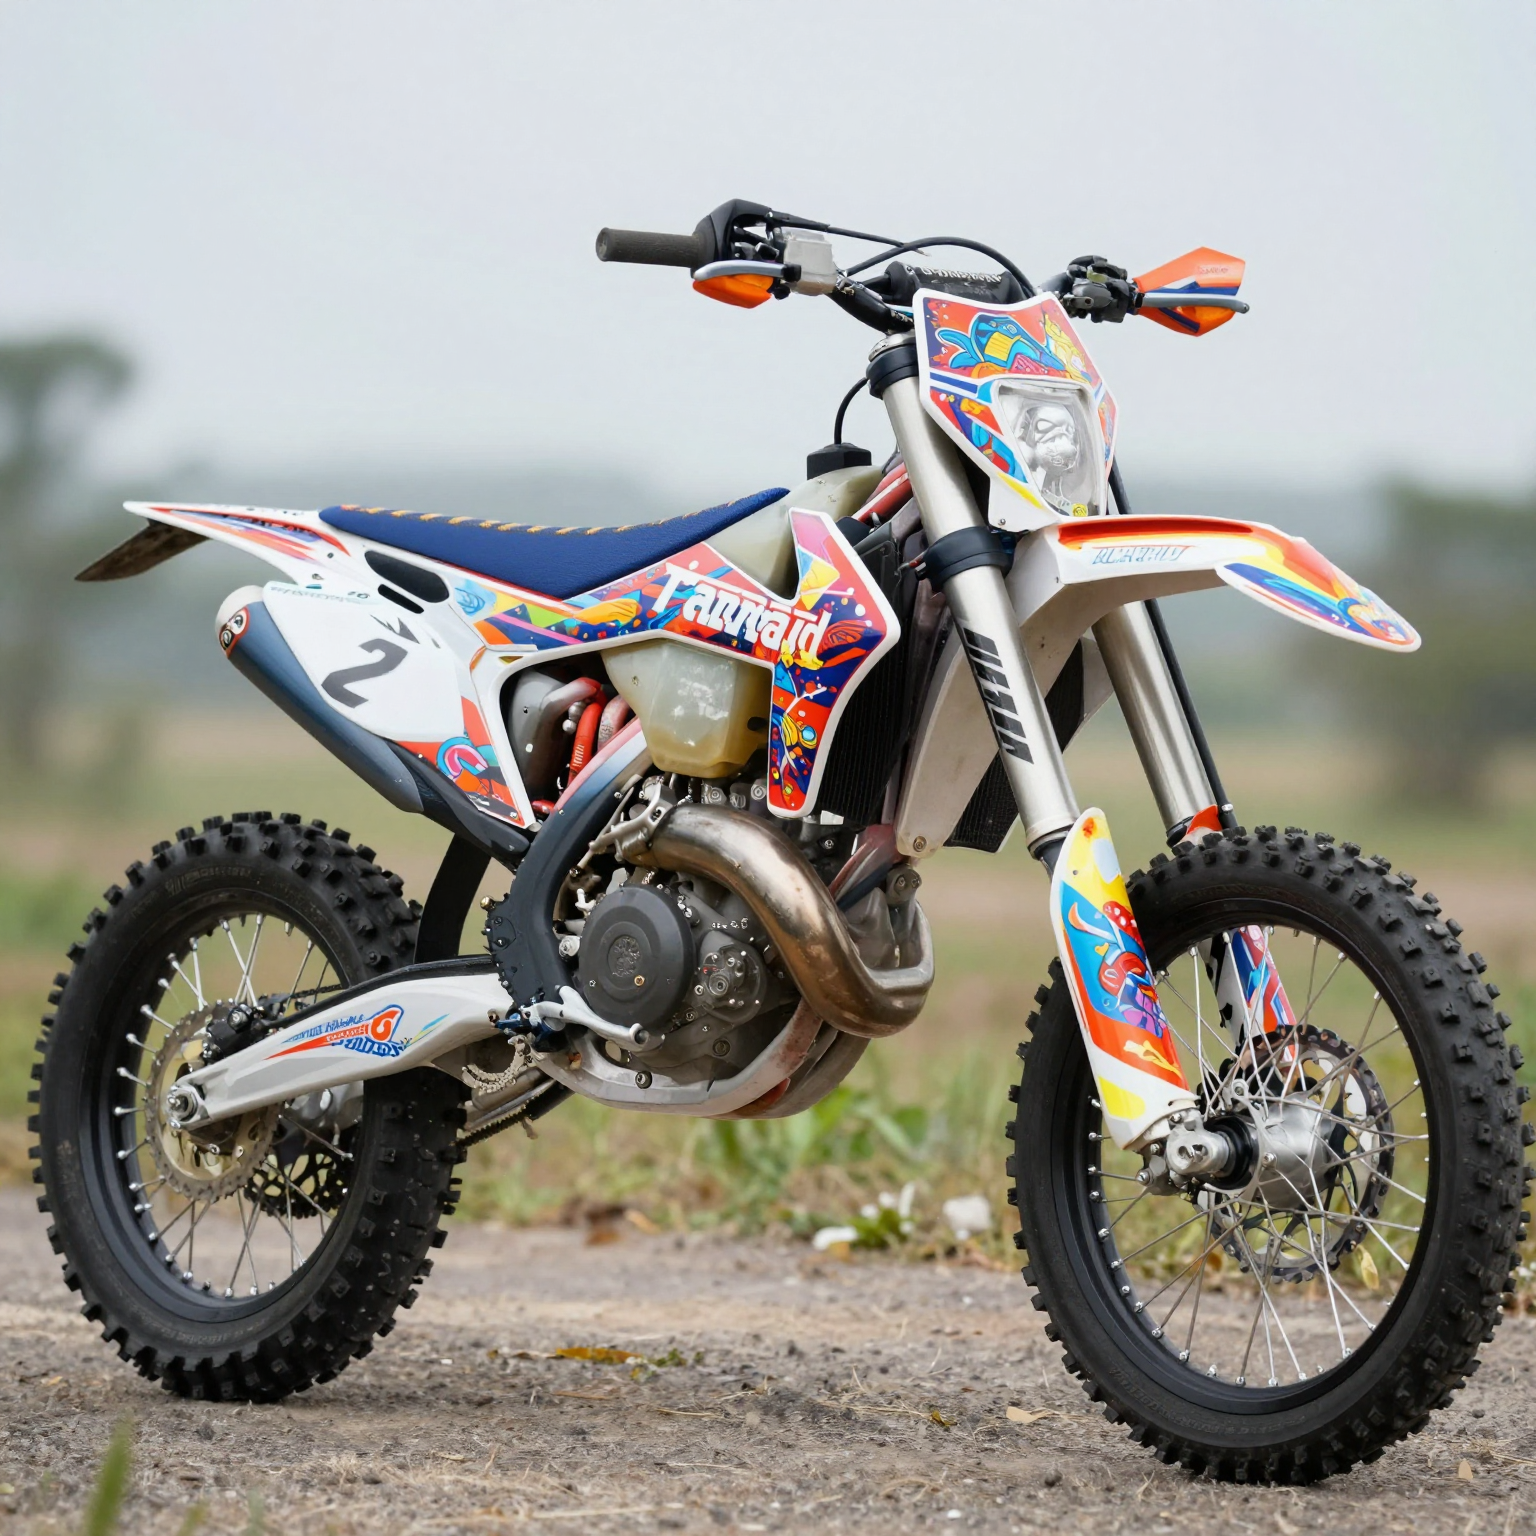
In the high-octane world of dirt biking, personalization is key not just for style, but for enhancing the overall riding experience. The best dirt bike graphics are more than just flashy designs; they are an extension of the rider’s personality and can significantly impact how a bike stands out on the track or trails. Customizing your dirt bike with unique graphics not only adds a personal touch but can also boost visibility, making it easier for fans and fellow riders to spot you during competitions. By investing in top-quality graphics, riders can boast their individuality and craft an image that resonates with their riding style. If you want to explore some phenomenal options, check out our guide on custom dirt bike graphics or discover the top 10 dirt bike wraps that can transform your bike into a one-of-a-kind machine.
Benefits of Custom Graphics for Dirt Bikes
Custom graphics on dirt bikes provide a multitude of advantages that go beyond mere decoration. Here are some of the top benefits:
-
Aesthetic Appeal: Custom graphics significantly enhance the visual appeal of dirt bikes. With various styles available-ranging from vibrant colors to intricate designs-these graphics allow riders to express their individuality and personal style. A unique appearance can also improve engagement and visibility at events or competitions. Studies indicate that bikes adorned with striking graphics tend to receive more attention on social media and at races.
-
Branding Opportunities for Repair Shops: For motorcycle repair shops, offering custom graphics can serve as a powerful marketing tool. By incorporating distinct logos or themed designs, shops can establish a strong brand identity, helping them stand out in a competitive market. Custom graphics can also foster customer loyalty, as personalized service usually leads to more repeat business. Learn more about branding through custom graphics.
-
Protection Against Wear and Tear: Many custom graphics are made from high-quality materials, offering durability and protection against the harsh elements dirt bikes often encounter. This includes resistance to mud, dust, and UV rays, significantly reducing fading and wear over time. Graphic wraps can also guard the paint job of the bike, maintaining its value and appearance for a longer time.
In conclusion, custom graphics are not just about looks; they provide protective benefits and enhance branding for repair shops, making them an excellent investment for any dirt bike enthusiast. Explore various graphic options here.
| Brand/Model | Features | Price Range | Customer Ratings |
|---|---|---|---|
| GPX Dirtbike Graphics Kit | Customizable, Durable, Unique Designs | $21 – $180 | 4.6/5 |
| KTM Racing Pro Series | UV Protection, Pre-Cut Templates, Scratch Resistant | $149 – $299 | 4.8/5 |
| Husqvarna FX-Elite Kit | Waterproof Adhesive, Heat-Resistant Film | $199 | 4.7/5 |
| Factory Pro ProSeries | Laser-Cut Precision, Anti-Scratch Coating | $169 | 4.9/5 |
| Motogadget V2 Kit | Aerospace-Grade Vinyl, Minimalist Design | $279 | 4.7/5 |
For more on the best dirt bike graphics or custom dirt bike graphics, check out these resources.
Exploring Graphic Materials for Dirt Bikes
When it comes to dirt bike graphics, the choice of material is essential not only for aesthetics but also for performance and longevity. Understanding the various materials used in dirt bike graphics can help motorcycle owners, repair shops, and technicians make informed decisions that affect the durability and visual appeal of their bikes.
Material Types
- Vinyl
- Cast Vinyl: This is the most durable option ideal for high-impact environments like motocross. It offers excellent flexibility, is resistant to UV degradation, and maintains color retention for several years. Cast vinyl is perfect for intricate designs and wraps due to its ability to conform to curves and textures.
- Calendered Vinyl: A more affordable choice, calendered vinyl lacks the durability of cast vinyl. It tends to crack under extreme temperature changes, making it less suitable for high-performance applications.
- Adhesive-Backed Polyester Film: This lightweight material has good abrasion resistance but requires careful application to ensure adherence.
- Adhesives
The adhesive quality significantly influences graphic performance. Standard pressure-sensitive adhesives (PSA) are commonly used, capable of maintaining bond strength against mud, vibration, and impacts. High-tack adhesives provide durability in harsh conditions, but low-quality adhesives may delaminate quickly.
- Solvent-Free Adhesives: These have shown to be more environmentally friendly and offer better performance in high-heat and vibrational contexts, maintaining adhesion while preventing discoloration.
Durability Factors
The longevity of dirt bike graphics is directly connected to the materials chosen:
- UV Resistance: Graphics with high-quality UV-resistant coatings can last up to 5-7 years in outdoor conditions, while lower-grade options may fade within months.
- Laminated Graphics: Adding a laminate layer can enhance protection against scratches and chemicals, extending the lifespan of the graphics significantly.
- Advanced Materials: Recently, materials like polyurethane films and ceramic-coated films are being adopted due to their superior flexibility and fading resistance. For instance, ceramic layers not only reflect UV rays, preserving ink integrity, but also enhance scratch resistance.
Performance Impact
The materials selected for dirt bike graphics directly affect how the bike performs:
- Graphics that conform well to the bike’s surface help reduce air bubble formation during installation, leading to a smoother finish and better performance in rugged conditions.
- Testing indicates that well-constructed PU graphics can last more than 6 years, while cheaper alternatives often fail within 12-18 months under similar conditions.
Conclusion
In summary, while selecting graphics for your dirt bike, consider the type of vinyl and adhesive used, as these characteristics play crucial roles in determining the performance, durability, and overall appearance of your bike. For more information on the best options available, check out our top 10 dirt bike wraps or explore our custom dirt bike graphics offerings.
Customer Insights on Dirt Bike Graphics
Customer testimonials provide valuable insights into how custom dirt bike graphics enhance the riding experience. Here are some quotes that highlight the positive impact of these designs:
“The custom graphics not only look incredible but also helped boost my confidence during races.”
- A satisfied motocross racer from CycleArt Co. Blog
“I went from having a generic-looking bike to a one-of-a-kind machine that reflects my personality. The pride I feel when riding is unmatched!”
- An enthusiastic rider featured in DirtBikeTrends Magazine
These personal stories exemplify how custom graphics contribute not only to the aesthetics of a dirt bike but also to the rider’s confidence and enjoyment. For more insights on the best options for your bike, check out our articles on the top 10 dirt bike graphic wraps and custom dirt bike graphics.
Installation Tips for Dirt Bike Graphics
Installing dirt bike graphics can greatly enhance the look of your bike and offer some protection to its surface. However, improper installation may lead to premature wear and tear. Here are comprehensive tips and step-by-step instructions for successful installation, common pitfalls to avoid, and maintenance advice.
Step-by-Step Instructions for Installation
-
Preparation: Start by cleaning your bike thoroughly. Use isopropyl alcohol to remove any grease, dirt, or residue from the area where the graphics will be applied. Ensure that the surface is completely dry before proceeding. This step is crucial because any contaminants can cause the graphics to peel off prematurely.
-
Align the Graphics: Carefully peel the graphics from their backing. Before applying them, position them on the bike without removing the adhesive backing. This will allow you to check the alignment and make any necessary adjustments. Take your time here to ensure everything looks perfect.
-
Applying the Graphics: Start from one end and slowly lay the graphic down onto the surface, using your fingers to smooth it as you go. If you encounter bubbles, you can use a squeegee or a credit card to push the air out towards the edges.
- Tip: If the graphic is particularly large, consider using a hairdryer on low heat to warm it slightly. This can help with better adhesion and make it easier to smooth around curves and edges. Avoid applying too much heat, as this can warp the vinyl.
-
Finalize the Application: Once applied, use the squeegee to seal the edges, ensuring that no air bubbles remain. Check the graphic for any lifting edges and firmly press them down.
-
Curing Time: Allow the graphics to cure for at least 24 to 48 hours without riding your bike. This waiting period ensures that the graphics adhere well to the surface.
Common Pitfalls to Avoid
- Dust and Debris: Installing graphics in a dusty environment can lead to particles getting stuck under the vinyl, damaging the appearance. Always choose a clean area for installation.
- Skipping Surface Prep: Failing to clean the surface thoroughly can lead to peeling and bubbling. Take the time to prepare your bike properly before applying the graphics.
- Forgetting to Check Temperature: Extreme cold or humidity can affect adhesion. Ensure the ambient temperature is optimal (typically between 70°F and 80°F) for installation.
- Rushing the Application: Take your time during the aligning phase. Rushing may lead to misalignment that could alter the appearance of your bike.
Maintenance Advice for Prolonging the Life of Your Graphics
Maintaining your dirt bike graphics is essential to preserve their look and effectiveness. Here are some tips:
- Regular Inspections: Examine your graphics regularly for any lifting corners, bubbling, or fading. Timely action can prevent larger issues down the road. If you notice a corner lifting, use a squeegee or a clean cloth to reapply pressure.
- Cleaning Method: When washing your bike, use mild soap and water along with a soft sponge. Avoid harsh chemicals like car wax or degreasers, as they can damage the vinyl. For stubborn dirt, a microfiber cloth with a small amount of soapy water works wonders.
- Avoid Direct Sunlight: Storing your bike in direct sunlight for prolonged periods can lead to fading. If possible, park your bike in a shaded area or consider using a bike cover when not in use.
- Protective Coatings: Apply a UV-protective spray specifically designed for vinyl graphics to extend their lifespan, especially for bikes frequently ridden in sunny conditions. This can help prevent fading and degradation of colors.
By following these installation tips and maintenance advice, you can ensure that your dirt bike graphics not only look great but also last longer, enhancing your overall riding experience.
To explore some of the best options for custom dirt bike graphics or for a deeper dive into installation techniques, check out these valuable resources on our website.
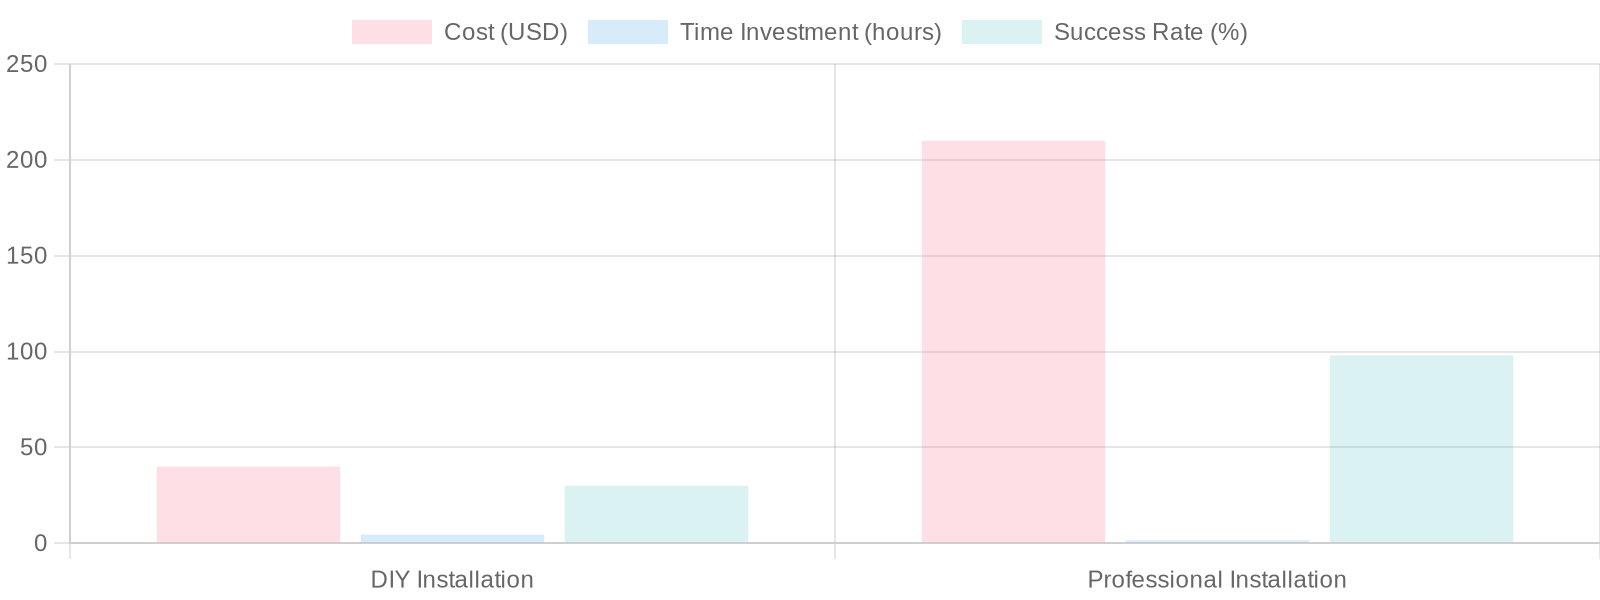
| Category | DIY Installation | Professional Installation |
|---|---|---|
| Cost | $20-$60 (materials only) | $120-$300 (labor and materials included) |
| Time Investment | 3-6 hours (including prep, application, and drying) | Under 2 hours (complete service) |
| Quality Outcome | 30% success rate for novices; prone to bubbles, wrinkles, and misalignment | 98% success rate; precise, smooth, professional finish |
| Durability | Variable; may degrade in 1-2 years without proper care | Guaranteed to last 3-5 years with proper installation |
| Pros | – Lower upfront cost – Full control over timing and process – Learning experience for enthusiasts – No need to transport bike |
– High-quality, flawless finish – Time-saving; immediate return to riding – Expertise ensures correct application – Warranty or guarantee on workmanship |
| Cons | – High risk of mistakes (bubbles, peeling, uneven edges) – Requires practice and patience – May need rework or replacement – Limited durability if not done correctly |
– Higher initial cost – Less personal involvement – Scheduling dependency – Limited customization during service |
*Sources:
- Cycle World – DIY vs Professional Dirt Bike Graphics Installation: A Complete Comparison
- Dirt Rider Magazine – How to Install Dirt Bike Vinyl Graphics: Tips for Success and Common Mistakes
In conclusion, choosing the best dirt bike graphics is not merely a cosmetic enhancement; it is a strategic decision that empowers motorcycle enthusiasts and professional repair shops alike. The right graphics not only add a unique personal touch to a motorcycle but also serve as a critical branding tool for repair shops. Custom graphics can act as mobile advertisements, greatly enhancing visibility and recognition in a competitive market. As highlighted by sources like Cycle World and RevZilla, high-quality graphics can effectively communicate a shop’s professionalism and craftsmanship, fostering trust and loyalty among customers.
Furthermore, personalized dirt bike graphics allow riders to express their individuality, creating an emotional connection with their machines. This connection not only enhances customer satisfaction but also increases the likelihood of repeat business and referrals. In a world where every detail counts, investing in custom graphics is essential for any repair shop aiming to stand out and attract more customers while providing a personalized experience. For more insights on selecting the right graphics, check out our guides on the top 10 dirt bike wraps and custom dirt bike graphics.
Explore the Best Dirt Bike Graphics Kits!
Are you ready to elevate your dirt biking experience? Dive into our carefully curated selection of top-notch graphic kits available at MOTOGraphics. Whether you’re looking for something bold and aggressive or sleek and stylish, there’s something for every rider’s taste.
Not only do these graphics enhance the aesthetics of your bike, but they also provide a layer of protection against the elements. Imagine riding with a customized look that turns heads in every race-what could be better?
We encourage you to share your own stories and showcase your personalized graphics on social media! Tag us in your posts and be a part of our growing community.
Visit our site to explore our custom dirt bike graphics and join the conversation. Your experience can inspire others to take the leap into personalization! Let’s ride in style together!