
Introduction
A set of dirt bike graphics looks perfectly centered in the digital proof, then sits noticeably off center once it is on the shroud. The design is rarely the problem. The mismatch is usually between the template version used to build the artwork and the plastic it is supposed to cover, or between bleed and cut values that were never confirmed before the vinyl went to the plotter. Build against an outdated template, or leave too little bleed, and the final cut pulls the printed image away from its intended position, leaving gaps, overlaps, or a lopsided panel. This guide is for riders, graphic designers, and print shop staff who want to avoid that. It covers how to confirm the template version, how to review bleed and cut lines, and how to verify both before any material is cut. If you want a reliable starting point, custom dirt bike graphics can be prepared with properly matched templates and generous bleed. After reading, you will be able to confirm template versions and bleed values before cutting, so the artwork lands exactly where it appeared on screen.
Why On-Screen Approval Differs From Physical Shroud Fit
The screen shows a flat, scaled drawing. The shroud it goes on is a curved, asymmetrical 3D panel. Whatever small template or production discrepancy the screen hides shows up after lamination, and the artwork ends up off center even though nothing looked wrong at approval. The gap is mechanical, not cosmetic.
The same handful of root causes turns up again and again in dirt bike graphics production:
- Template version mismatch. Plastics change subtly between model years. Put a 2019 template on 2021 bodywork and every anchor point shifts, moving the design before any cut is made.
- Left and right shroud asymmetry. The two sides mirror each other only approximately. Radiators, fuel tanks, and mounting tabs differ, so a single centered layout rarely maps correctly to both panels at once.
- Incorrect bleed allowance. Too little bleed removes the margin that absorbs slight misalignment and curvature. The visible edge drifts inward and pulls the layout off center.
- Cut-line offset. The contour path has to sit at a fixed distance outside the printed artwork. An inconsistent offset trims one side more than the other and exposes uneven borders.
- RIP and export scaling. Non-uniform scaling, missing crop marks, or fit-to-page settings distort proportions. A 1-2% scale error becomes roughly 0.2-0.36 inch over an 18-inch shroud.
Each cause can be measured and corrected. Verify the template revision, confirm the bleed and cut-line offset, and lock the export scale, and the drift is caught before production. For model-specific, production-ready files, see our custom dirt bike graphics kits.
Centered vs. Off-Center: Seeing the Misalignment at a Glance
Artwork signed off on a flat screen almost always looks right. The panel outline on the monitor feels generous, the graphic feels anchored, everything looks balanced. A screen gives you no physical reference point, though, so a graphic that sits slightly off center can still pass inspection. That is how a design that looks perfect in the proofing window ends up hugging one edge of the shroud after it is cut and applied.
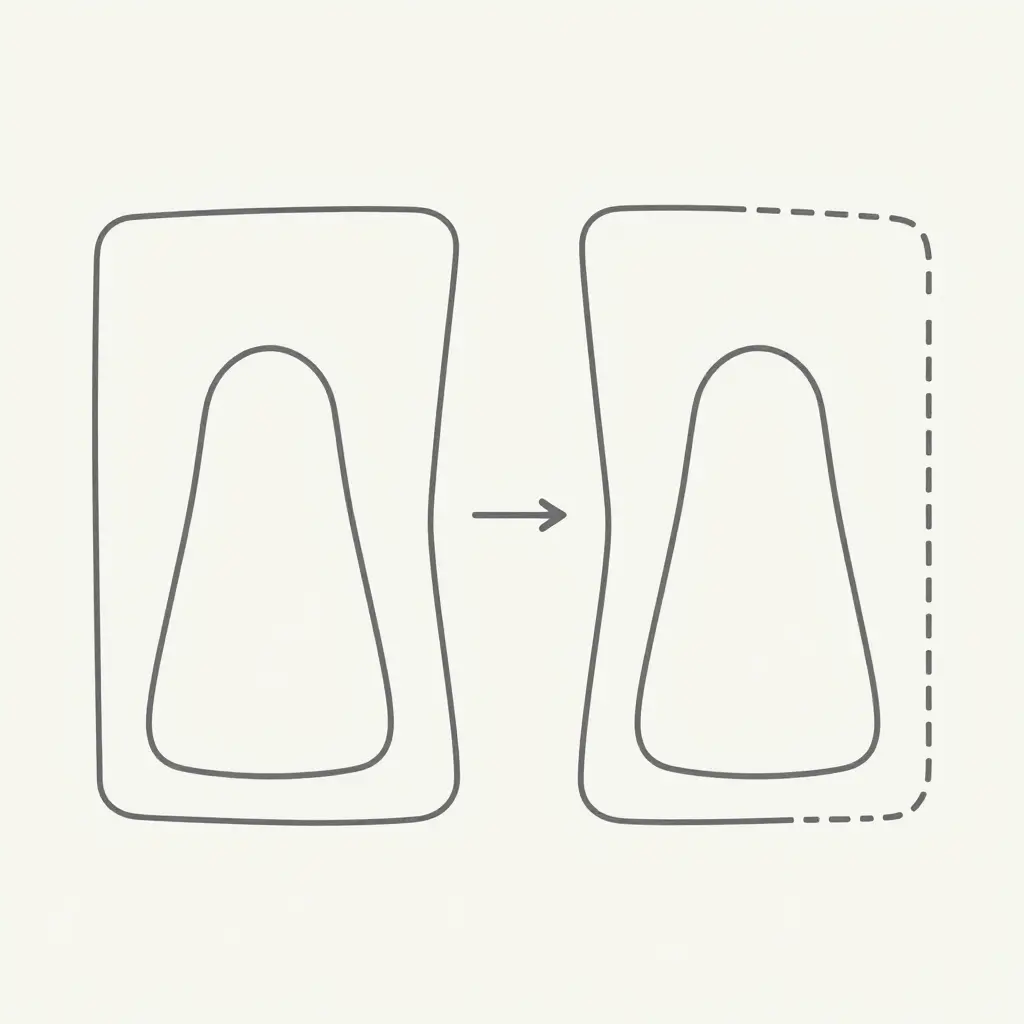
The diagram below shows only that one variable. Two identical shroud panel outlines sit side by side. On the left, the graphic is centered in the panel. On the right, the same graphic is shifted toward one edge. The dashed rectangle marks the template bounds, so you can see where the graphic drifts outside the intended placement area.
How to Read the Diagram
- Left panel (centered): The graphic is balanced inside the dashed template bounds, with even spacing on both sides. This is the target result.
- Right panel (off-center): The same graphic is pushed to one side, exposing the gap between where the artwork actually sits and the template. This is what bad alignment or a mismatched template looks like before cutting.
- The dashed rectangle: This is your template. If the graphic does not sit the way it does on the left, you have a placement problem, not a printing problem.
- The directional arrow: It marks the direction of the drift, so the eye can see how far the graphic travels from center.
Why This Matters Before Cutting
An offset this small is invisible on screen and obvious on the bike. Once the vinyl is cut, the misalignment is locked in. Confirm the template version and check the bleed area before the blade touches the material. If you are preparing a set, start by matching your source file to the current shroud dimensions with custom dirt bike graphics workflows that keep placement and bleed aligned from proof to cut.
Do not trust the screen alone. Compare your graphic against the template bounds the way this diagram does, and the offset will show itself before it becomes a wasted decal.
Before you cut, cross-check the template version against your bike’s exact model and year. Matching them is what keeps the shroud graphics centered instead of drifting off-axis.
| Bike Model and Year | Template Version | Shroud Side | Required Bleed (mm) | Cut Method | Notes |
|---|---|---|---|---|---|
| Honda CRF450R (2021-2024) | v4.2 | Left & Right | 12 | Panel plotter (kiss-cut) | Revised radiator shroud contour; right side is a true mirror of the left |
| Honda CRF250R (2018-2020) | v3.1 | Left & Right | 10 | Panel plotter (kiss-cut) | Pre-refresh shroud with a tighter winglet curve; do not reuse on 2021+ |
| Yamaha YZ450F (2019-2022) | v5.0 | Left | 15 | CNC knife plotter | Reversed engine layout; never mirror from the 2018 template version |
| Yamaha YZ250F (2014-2018) | v2.6 | Left & Right | 12 | Panel plotter (kiss-cut) | Legacy shroud; add 1 mm compensation when cutting stretch vinyl |
| KTM 450 SX-F (2020-2023) | v6.1 | Left & Right | 8 | Laser-guided contour cut | Narrow shroud edge; tight bleed critical for a clean wrap under the lip |
| Kawasaki KX450 (2019-2024) | v4.4 | Right | 14 | CNC knife plotter | Asymmetric shroud; left and right require different template versions |
| Husqvarna FC 450 (2021-2024) | v3.9 | Left & Right | 10 | Panel plotter (kiss-cut) | Shares geometry with KTM 450 SX-F; verify logo position before cutting |
Confirming the template version before every cut saves you the trial-and-error of reprinting an off-center kit. If you would rather begin with files already keyed to the correct model and year, browse our dirt bike graphics kits built for a centered fit.
What Actually Pushes Graphics Off Center?
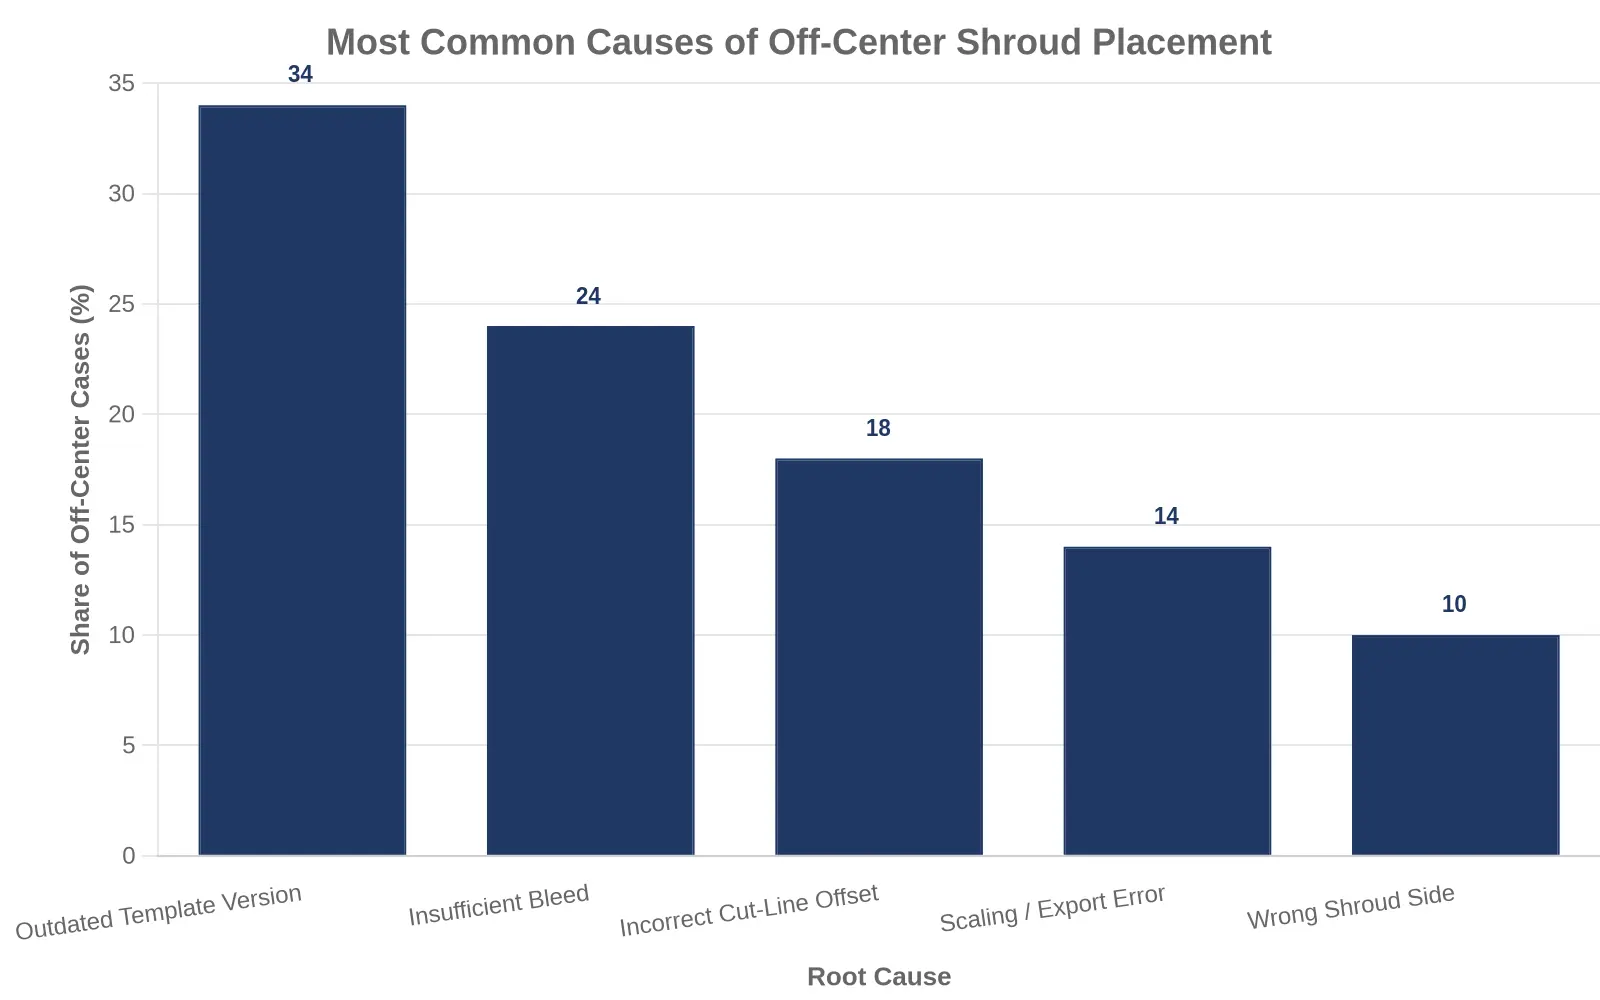
When a shroud decal looks centered on your monitor and lands crooked after installation, the cause is almost always in prep, not in the install. The table below ranks the causes shops report most often; read the percentages as a rough guide, not a measured survey.
| Rank | Root Cause | Share of Off-Center Cases |
|---|---|---|
| 1 | Outdated template version | 34% |
| 2 | Insufficient bleed | 24% |
| 3 | Incorrect cut-line offset | 18% |
| 4 | Scaling / export error | 14% |
| 5 | Wrong shroud side (left vs. right) | 10% |
Outdated template versions lead the list. OEM plastics get refreshed on a regular cycle, and a file one or two generations old carries a registration mark that no longer matches the actual panel shape. Insufficient bleed comes next: without enough overhang, the artwork cannot shift during application and still cover the edge cleanly. Cut-line offset and scaling errors usually trace back to a design program exporting at a different resolution or anchor point than the cutter expects. Working the wrong shroud side is a simple slip that happens more often than you would think.
If you suspect your kit was built from a stale file, compare your setup against a fresh, model-specific source before you cut. Browse a library of model-matched dirt bike graphics kits to confirm the current template revision for your machine.
Fix the file, not the sticker. Verify the template version, set the bleed, and confirm the cut-line offset before the blade touches vinyl.
Pre-Cut Verification Checklist for Dirt Bike Graphics
Run this sequence before any blade touches the vinyl. Each step protects your material, your time, and the final fit. Operators preparing dirt bike graphics kits treat it as a mandatory gate, not an optional review.
-
Confirm the bike model and year. Match the exact make, model, and production year on the order against the machine in front of you. Shroud shapes shift noticeably between model years.
-
Confirm the template version. Open the template file and check its version number against the latest release. An outdated template is the most common cause of off-center placement.
-
Check the bleed value. Verify that the artwork extends past the trim edge by the bleed your template specifies. The model table above lists 8 to 15 mm depending on the shroud; a shift during application should never expose a white gap.
-
Verify the cut line. Inspect the cut path as a closed vector on its own dedicated layer, with no strokes or stray nodes breaking the outline.
-
Check left/right shroud orientation. Confirm the left and right panels are mirrored correctly and not swapped. A reversed panel wastes an entire printed sheet.
-
Run a scaled proof before final cutting. Print a reduced or full-size proof on plain paper, lay it over the plastics, and compare alignment before the blade meets the material.
Troubleshooting: When Artwork Lands Off Center on the Shroud
When approved artwork transmits correctly but cuts off center, the fault almost always traces back to a mismatch between the design file and the production template. Diagnose one variable at a time before reprinting; fixing one factor while another is still wrong reproduces the same misalignment.
Cause 1: Outdated Template Version
An obsolete template shifts every registration point relative to the current shroud geometry. If the template predates the last body-panel revision, the artwork anchors to a contour that no longer exists. Pull the current template from the manufacturer’s library, confirm the version number, and re-import the design. The artwork then re-aligns to the actual panel boundaries.
Cause 2: Incorrect Bleed and Cut-Line Offsets
An undersized bleed or a mis-registered cut line lets the visible area drift from the intended position. Re-measure the bleed margin against the template’s specified tolerance, then confirm the cut line sits on the correct vector layer. Expand the bleed to spec and reapply the cut path; the printed image then extends past the trim edge and the drift disappears.
Cause 3: Scaling Errors During Export
Export settings that scale to fit the page distort the aspect ratio and displace the graphic. Export at 100% scale using the template’s native dimensions, and disable any “fit to media” option. The artwork then holds its true size and anchors correctly.
Cause 4: Misaligned Artwork Within the Template
If placement is still skewed, the artwork layer itself sits off the registration marks. Realign the design to the template’s centerline guides and lock the layer before cutting. For more production tactics that reduce placement errors, see these dirt bike graphics tricks.
How Bleed and Cut Lines Define Where Graphics Can Sit
Before you cut anything, it is worth knowing how a shroud panel is zoned. The schematic below breaks a panel into three regions: the outer bleed area (the excess trimmed away), the middle safe area (where logos and important artwork must live), and the inner cut line (the trimmed edge that follows the plastic’s shape).
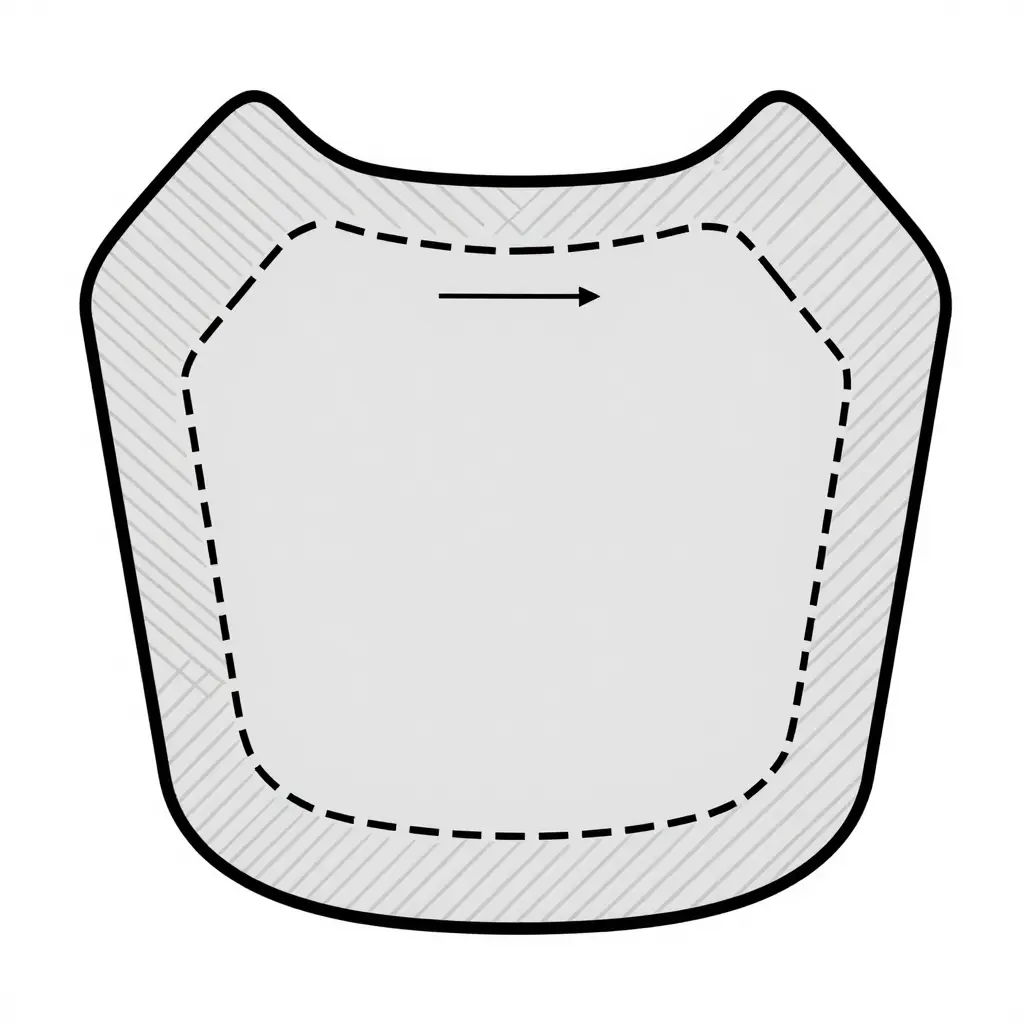
The small dimension arrow between the outer edge and the cut line is the bleed margin: a few millimeters of extra printed image beyond the final trim. This is why artwork that looks centered on screen can land off center once the kit is cut. Either the design was positioned relative to the bleed instead of the actual cut line, or the template did not match the panel. Confirm your bleed margin and trim line against the current template before cutting. If you are comparing how different kits handle this, this breakdown of dirt bike graphics kits can help you choose artwork that fits your panel.
Frequently Asked Questions About Dirt Bike Graphics Placement, Templates, and Bleed
Why does my graphic look centered on screen but off center on the shroud?
Design software shows a flat, idealized canvas. A real shroud is a curved, three-dimensional panel. When you center a graphic on the artboard, that center rarely matches the physical midpoint of the plastic; molded ridges, mounting bolts, and compound curves shift the perceived center. Position critical elements against the manufacturer’s measured template instead of the screen’s visual center, then check placement with a paper mockup before printing and cutting.
How do I find the correct template version for my bike?
Identify the bike by make, model, displacement, and exact model year. Manufacturers often redesign plastics within the same generation, so all four identifiers matter. Download the template that matches all four. If two templates look similar, compare bolt-hole locations and plastic contours against the actual shroud. Do not guess: the wrong template version is the most common cause of misaligned dirt bike graphics.
How much bleed should a dirt bike graphics file have?
Use the bleed your model calls for; the table above lists 8 to 15 mm depending on the shroud. As a floor, never let the artwork stop short of the finished cut line, or a small registration shift during printing or lamination will expose a white sliver at the panel edge.
Can I reuse a template from a different model year?
Only when the plastic part numbers are identical. A single-year change in shroud shape can move mounting points and alter contours, so reusing a mismatched template version produces gaps or overhangs.
What causes the cut line to shift after export?
Mismatched color profiles, unembedded fonts, scaling errors, and raster/vector conflicts all can. Export at 1:1 scale, embed every asset, keep the cut path on its own layer, and confirm the bleed survived. For more installation and design guidance, see our guide to custom dirt bike graphics before finalizing any dirt bike graphics kit.
A graphic that looks flawless on screen is only the starting point. The physical fit on the shroud depends on verification before the blade moves, and three checks decide the outcome: the template version matches the exact bike model and year, the bleed reaches far enough past the trim to absorb a small misalignment, and the cut lines match the real shroud contours rather than the proof.
On-screen proofing confirms color, layout, and composition. It cannot predict how an outdated template or a thin bleed will change placement on the plastic. For a dependable result, start from artwork prepared for accurate custom dirt bike graphics, then run the same pre-cut verification routine on every kit.