
Adhesive Residue vs. Plastic Staining: Two Different Removal Jobs
Pull a graphics kit off a bike that has done a full season and you end up with one of two things. Either glue is still stuck to the plastic, or the plastic itself has changed color. At arm’s length both look like a dirty panel. They are not the same problem, and they do not cost the same money.
Residue sits on the surface. Soften it, lift it, wipe it off: solvent, heat and a little patience usually get there. Stain has gone into the material. Wiping changes nothing, because pigment, dirt or UV exposure has already altered the panel itself.
That difference decides the invoice. Residue is a labor line, measured in careful hours. Staining is a material outcome, and after a season the honest answer is usually replacement panels rather than restoration.
| Outcome | Where it sits | Typical fix | Budget shape |
|---|---|---|---|
| Adhesive residue | On top of the plastic | Solvent, heat, controlled lifting | Labor hours |
| Plastic staining | Inside the plastic | Replacement or acceptance of discoloration | Parts cost |
What sets the price of a removal is not the kit you peel off. It is the plastic underneath: how porous it is, how much sun it saw, how well the last install was prepped. The kit is the layer coming off. The shroud beneath it decides the scope, the risk and the number on the estimate.
Which is why two bikes wearing identical kits can quote out very differently. One spent the summer in a shaded garage; the other sat outside on faded shrouds, and the technician finds out which at the first lifted corner, not at handover. Diagnosing early is what keeps a fixed-price job from turning into a loss, and when you are buying kits for next season it is worth comparing KTM graphics kit options by material and adhesive type rather than by price alone.
What Adhesive Residue Actually Is
Residue is the film a kit leaves behind. Not dirt, and not damage to the plastic: adhesive that stayed on the panel when the vinyl left.
The mechanism is mundane. A vinyl graphics kit is held on by pressure-sensitive adhesive, a bond that grips on contact and never fully cures. That is the whole point of it. Over a season, engine heat, direct sun, UV and repeated wash cycles soften the bond, and the softened layer works its way into the micro-scratches that every shroud plastic surface carries. Peel the kit and some of that adhesive stays lodged in the scratches. What is left feels tacky, looks hazy, and gathers everything that touches it.
What you see and feel:
- Dull patches exactly where the graphics sat, sitting against an otherwise even sheen.
- Lint, dust and chain grit stuck in the tacky zone, so that one panel reads dirtier than the rest of the bike.
- The outline of the old kit, visible at an angle under shop lighting.
- A fingertip that drags instead of slides.
Because the film is on the shroud rather than in it, the job is reversible with solvent, heat and patience. Owners replace plastics far more often than they need to; a fresh vinyl graphics kit and a proper cleanup would have done it.
For a shop, residue is a time problem. It is billable, it is predictable, and it does not touch the parts budget.
Where the Adhesive Actually Sits
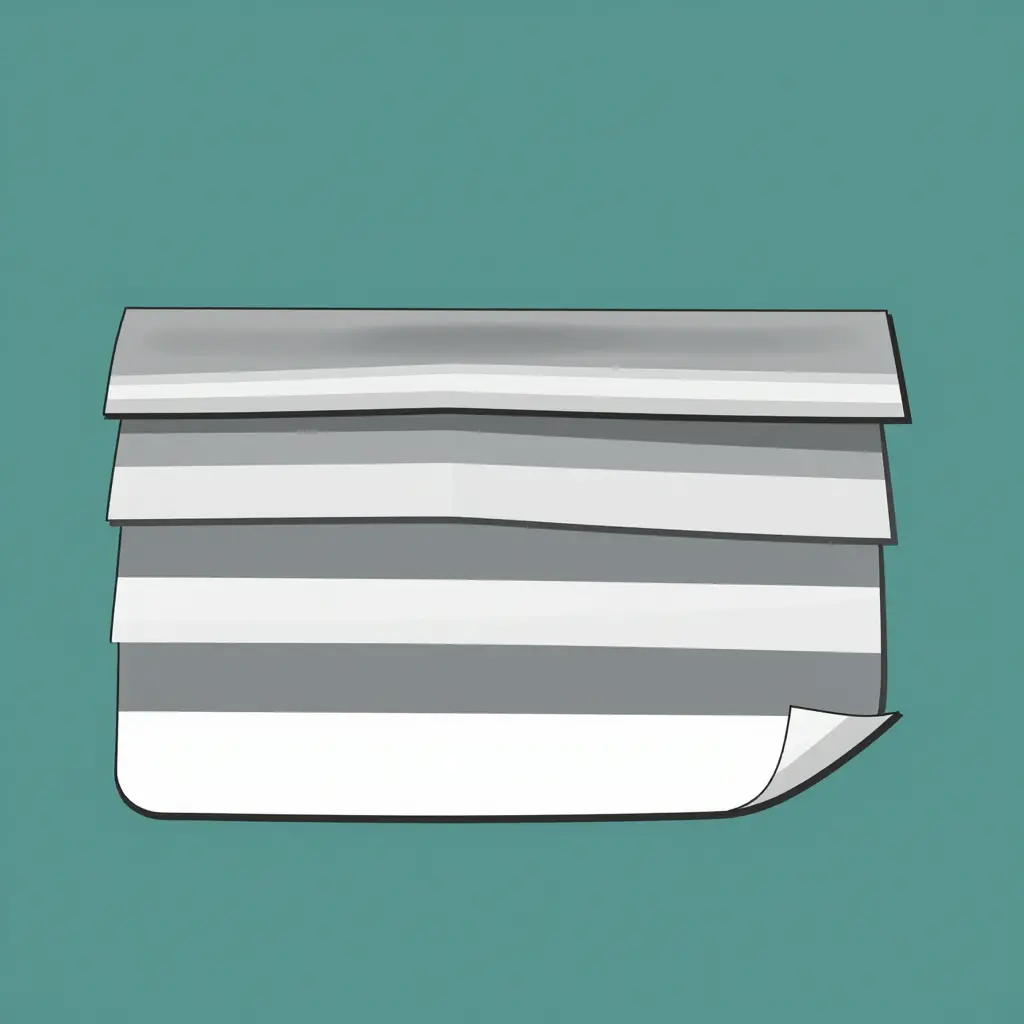
Seeing how the layers stack up settles the diagnosis faster than any test. A graphics kit is not one solid sticker. It is a bond between two very different materials, with a thin adhesive layer doing the work in between.
The cross-section above, from bottom to top:
- Plastic panel: the bodywork itself. It can absorb pigment and it can hold onto residue.
- Adhesive layer: the thin bonding film between vinyl and plastic. This is the layer that survives a season of heat cycles, pressure washing and sun.
- Vinyl film: the printed, colored layer you actually see, plus its clear top laminate.
- Lifted corner: where peeling starts, and where you find out whether the adhesive is coming away with the vinyl or staying on the panel.
That corner tells you more than the rest of the panel does. Vinyl lifts clean and takes the glue with it, and you have a straightforward job. Vinyl lifts and leaves a tacky film, and the adhesive bonded harder to the plastic than to the vinyl. That second scenario is the one that leads to residue scraping, solvent wiping and, on light-colored plastics, a cloudy patch that may not come out.
It also tells you where to aim. Work at the vinyl-adhesive interface, not against the plastic, and let heat or a gentle solvent do the separating instead of your wrist. If new panels are on the plan anyway, KTM graphics kits built with adhesives formulated for clean removal save you this whole section next year.
What Plastic Staining Actually Is
Staining is a change in the substrate. Something has got into the plastic: pigment carried by adhesives and inks, plasticizer migration drawing color and contaminants deeper into the polymer, UV oxidation breaking down the outer surface chemistry, or heat cycling that expands and contracts the panel until the affected zone spreads. Whichever driver is at work, the result is a panel whose color has genuinely shifted rather than one that is merely dirty.
It behaves nothing like residue. It does not feel tacky; it feels dry, often slightly chalky. Solvent will not move it, because there is nothing sitting on the surface to dissolve, and aggressive solvents tend to damage the plastic further. And it usually mirrors the exact silhouette of the kit, down to the edges of individual decals, because the film itself decided where the change could occur.
Two forms account for most of what you find after a season:
- The pale ghost outline. The covered zone stayed protected while the plastic around it faded, so the graphic reads as a bright silhouette against a duller panel. The film did its job, which is why a replacement dirt bike graphics kit with the same outline re-covers that zone cleanly.
- The dark or yellowed patch. Dirt, fuel, oil and fine grit sat under the film or along its edges and got driven into the plastic, leaving a warmer, darker area instead of a pale one. It rarely follows the decal edges neatly, and it is the harder of the two to fix.
| Indicator | Adhesive residue | Plastic staining |
|---|---|---|
| Surface feel | Tacky, gummy, grabs dust | Dry, sometimes chalky |
| Response to solvent | Softens and lifts | Little to no change |
| Shape | Patchy, follows peel direction | Mirrors the graphics kit silhouette |
| Depth | Sits on the surface | Inside the plastic |
Because the change is in the material, it shifts the cost of refurbishment from hours to parts.
Adhesive Residue vs. Plastic Staining: Diagnostic Comparison
In bad shop lighting these two look nearly identical, and the difference decides whether the bike is back in the lineup by noon or leaving with a parts order nobody budgeted for. Run this check before you quote labor or promise a delivery date.
| Indicator | Adhesive Residue | Plastic Staining | Business Impact | Recommended Action |
|---|---|---|---|---|
| Surface feel | Tacky or gummy | Smooth and dry | Sets removal cost early | Gloved finger test |
| Appearance after cleaning | Smears, dull haze | Faded ghost outline | Extra rework hours | Re-clean, then reassess |
| Response to solvent wipe | Softens and lifts fast | Barely responds | Cheap fix vs. new parts | Start with an IPA wipe |
| Visibility under direct light | Raised, textured film | Flat color shift | Shows in resale photos | Inspect at a low angle |
| Matches old kit outline | Patchy, edge-hugging | Follows the exact outline | Confirms cause fast | Compare with an old kit image |
| Typical removal labor | 20-45 min per bike | About 15 min to strip | Decides the labor quote | Quote after diagnosis |
| Replacement panels required | Rarely | Often, if deep | Parts cost decision | Order before scheduling |
How to Read the Table Fast
Tacky surface, solvent lifts it: residue. Keep wiping, keep the panels, keep your margin.
Smooth surface, stubborn color shift: staining. Solvent is only going to cost you an hour, so move straight to the panel decision.
The outline is the tiebreaker. Ghosting that traces the old kit exactly means the plastic absorbed pigment; it is not holding glue.
Time one panel before you quote the bike. One honest number from a single shroud beats an estimate extrapolated across six.
Photograph the panel before and after. When a customer asks why the estimate grew, a picture of what the plastic did, and not what the glue did, ends that conversation faster than any explanation.
Run this check on every bike coming off a season of riding and you stop guessing at quotes. When staining wins and the panels stay, a fresh set of graphics kits covers the ghost outline cleanly and gets the bike looking race-ready again.
A Repeatable Removal Workflow for Each Unit
Consistency beats brute force on a fleet. Run the same sequence on every unit and you spend less time fixing scratches than removing film. This is the order that keeps a heat gun honest and makes it obvious whether you are looking at leftover adhesive or permanent staining.
- Inspect every shroud, fender and number plate under bright light before you touch anything, and photograph existing cracks, scuffs and discoloration so nobody blames the removal later.
- Measure panel temperature with an infrared thermometer and confirm the surface is cool. Starting on a sun-baked panel softens the film before you are ready and turns a clean pull into a smear.
- Lift one corner with a plastic scraper or a thumbnail, sliding it flat under the edge. Never a metal blade: one careless pass gouges soft plastic.
- Sweep a heat gun 15-20 cm (6-8 in) from the panel, moving constantly and warming a small area at a time. Parking it in one spot is the classic way to warp a shroud and bake adhesive into the grain.
- Peel slowly at about 45 degrees or less, keeping the film low and folding it back on itself. A steep pull lifts paint, tears vinyl, or leaves a half-attached strip behind.
- Assess what is left the moment the film comes off: soft and gummy is residue, dull and ghosted is stain.
- Treat gummy patches with a plastic-safe solvent such as isopropyl alcohol or a citrus-based remover and give it 30-60 seconds to work. Move to a plastic razor blade or a soft eraser wheel only when the chemical route stalls.
- Rinse with clean water and a microfiber cloth to clear solvent film, then dry the panel fully so nothing stays trapped against the surface.
- Inspect again at a low angle in raking light. Contrast and texture should be even, and any mark left should be stain rather than adhesive you missed.
Log panel temperature, dwell times, products used and final condition on a per-bike sheet. The next removal, and the next replacement graphics install, then starts from a known baseline instead of a guess.
Where the Cost Actually Lands: Labor Hours or Parts
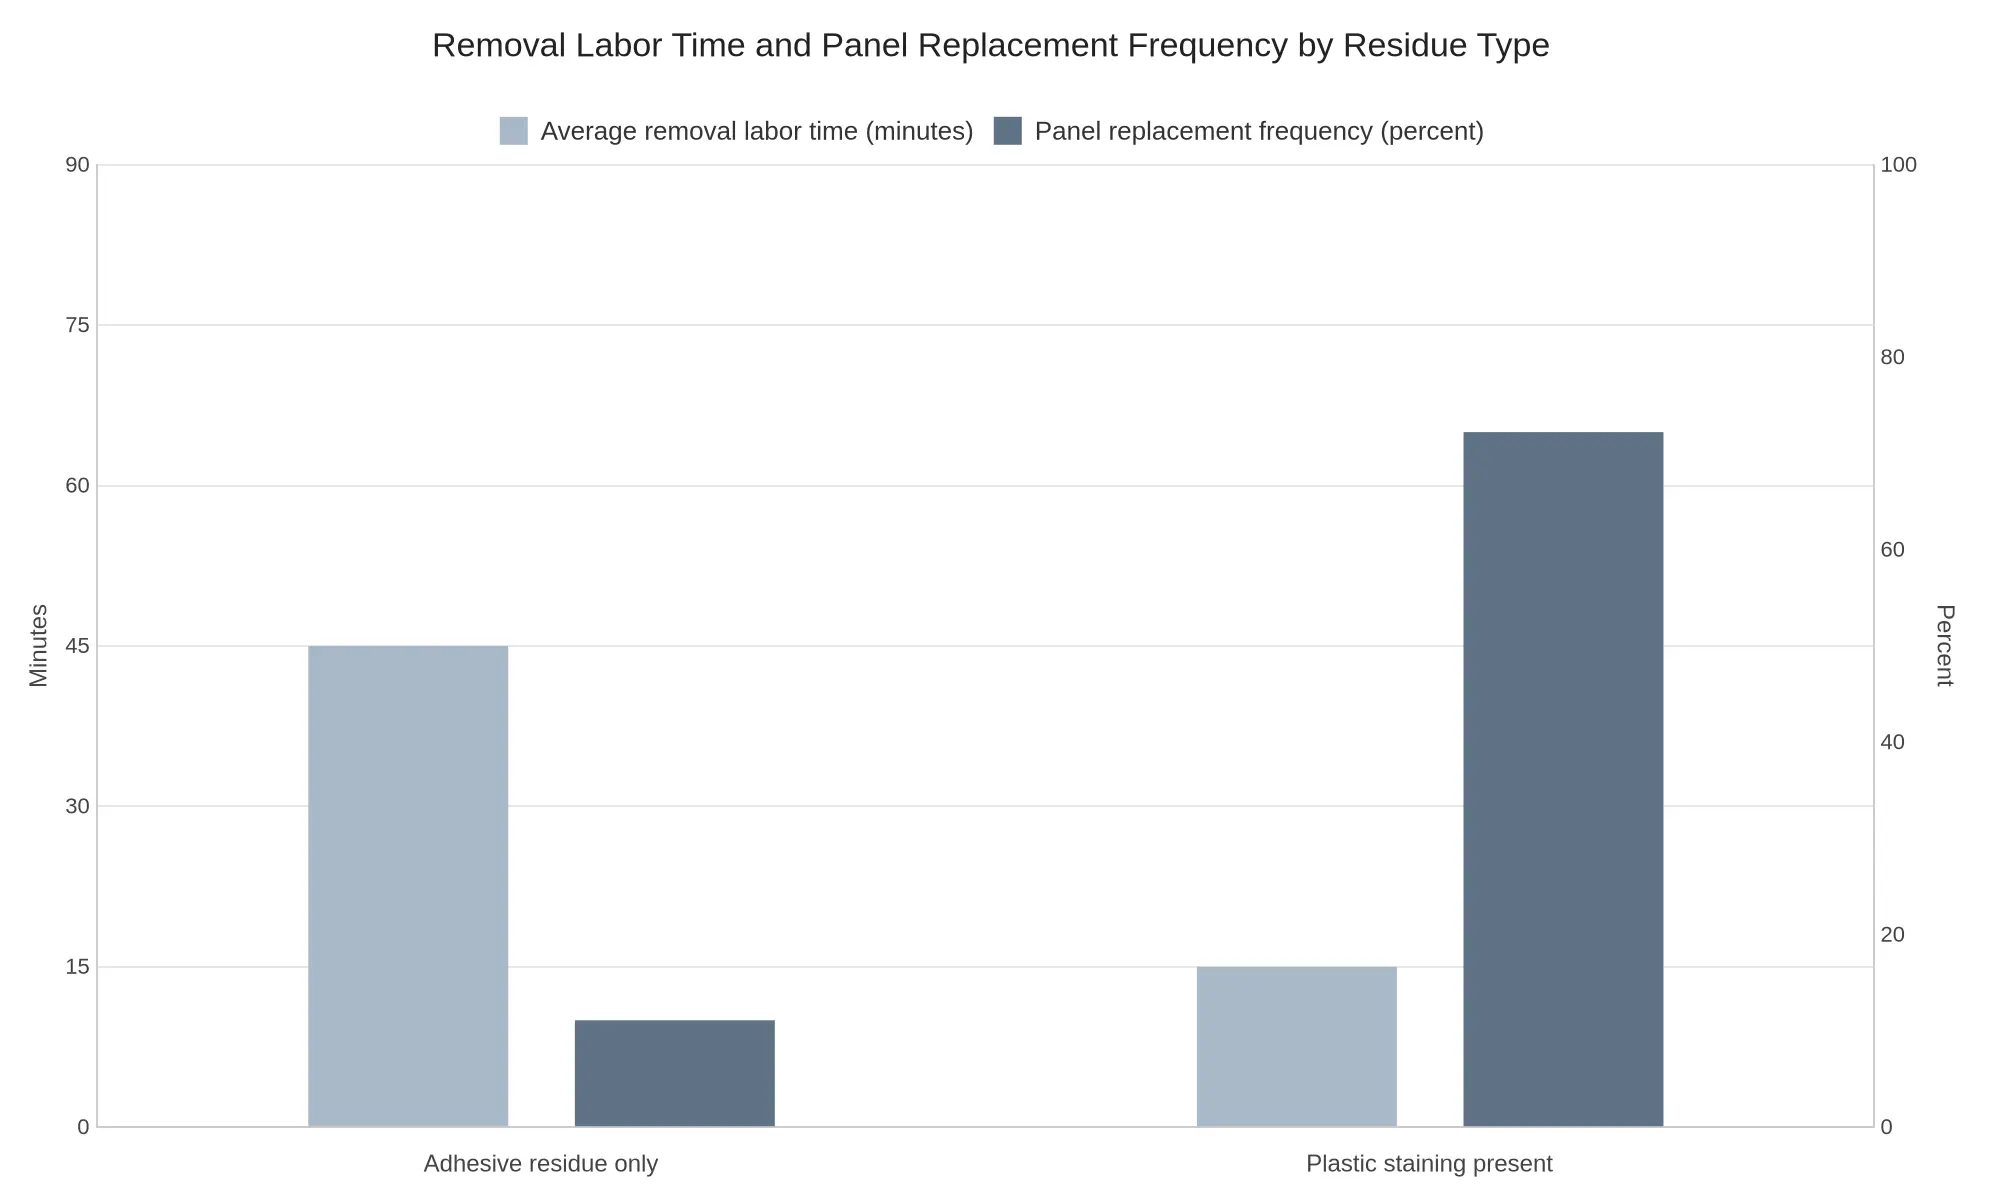
Strip a season-old kit and the money does not vanish. It changes address: either you pay a technician to stand there with a heat gun and a bottle of solvent, or you pay for new panels because the stain will not come out. The chart below models labor against replacement frequency for the two cases. (The doughnut further down is a different measure: it is what we actually saw on a mixed fleet, not a per-bike model.)
Reading the Two Bars
- Adhesive residue only: about 45 minutes of average removal labor per bike and roughly a 10% panel replacement rate. The glue is stubborn, but it comes off with heat, patience and the right solvent, so the cost is almost entirely your own or your tech’s time.
- Plastic staining present: labor drops to around 15 minutes, because there is nothing left to scrape. The damage is inside the plastic. Replacement frequency jumps to roughly 65%, so most of these bikes leave the shop with new shrouds, fenders or side panels on the invoice.
Why That Shift Matters to a Shop Owner
Labor is a variable cost you can schedule. Parts are a hard cost the customer reads on the estimate, and it is the line that turns a routine re-wrap into a conversation about whether the bike is worth keeping. Saving 30 minutes of labor sounds like a win until it arrives attached to a parts bill several times larger.
| Residue Condition | Avg. Removal Labor | Panel Replacement Rate | Dominant Cost Driver |
|---|---|---|---|
| Adhesive residue only | ~45 min | ~10% | Labor hours |
| Plastic staining present | ~15 min | ~65% | Replacement parts |
Which makes quoting a removal on time alone a trap. Look at the plastic before you commit to a number. If panels are already in the budget, price the KTM graphics kits on top of that before you talk to the customer, not after.
How to Tell Which Problem You Are Looking At
Run these three checks in order, before any polishing, heat work or chemical treatment, and put each result on the job sheet. A pass signal confirms removable adhesive residue. A fail signal confirms staining that cleaning will not shift.
Check 1 – Dry Wipe With a Microfiber Cloth
Fold a clean microfiber cloth into quarters and wipe a 10 cm patch with firm, even pressure for ten seconds.
- Pass signal: the cloth picks up a gray, tacky smear that re-forms a few minutes later, or loose fibers drag and stick to the surface. An adhesive film is still sitting on top of the plastic.
- Fail signal: the cloth comes away with dust only, and the surface feels dry and uniform. There is no transferable layer, so the discoloration is almost certainly in the plastic.
Check 2 – Controlled Solvent Test
Pick somewhere inconspicuous, such as the inner face of a rear fender, and put three or four drops of isopropyl alcohol on a white cloth. Rub a 3 cm patch for ten seconds, then let it dry completely before you judge the result.
- Pass signal: amber or brown transfer on the cloth, and the patch is brighter than the panel around it. That layer is residue and it will come off.
- Fail signal: the cloth stays white and the color is unchanged once dry. Pigment or oxidation has bonded into the polymer.
Stop if the plastic turns tacky or the gloss changes. At that point the solvent is attacking the substrate rather than the residue.
Check 3 – Raking-Light Surface Inspection
Work in shade and hold a flashlight at 5 to 10 degrees to the panel, sweeping slowly along each graphic edge. Relief shows up here that a straight-on view hides.
- Pass signal: a raised ridge, tide line or orange-peel texture lifts under the low angle. There is a film with measurable thickness on the panel.
- Fail signal: the patch reads flat, with color shift but no edge relief. The surface profile is intact and the defect is internal.
| Check | Pass signal (adhesive residue) | Fail signal (plastic staining) |
|---|---|---|
| Dry wipe | Gray tacky smear lifts, fibers stick | Cloth clean, surface dry |
| Solvent test | Amber transfer, patch brightens | No transfer, color persists |
| Raking light | Raised ridge or tide line | Flat surface, color only |
If the three results disagree, trust the solvent test over the dry wipe and repeat it on a second panel. Where the fail signal holds across all three, quote replacement graphics rather than billed cleaning hours. Attach the checks, products, timings and photographs to the job card: documenting the condition on arrival and the work actually authorized is what protects you at customer handover.
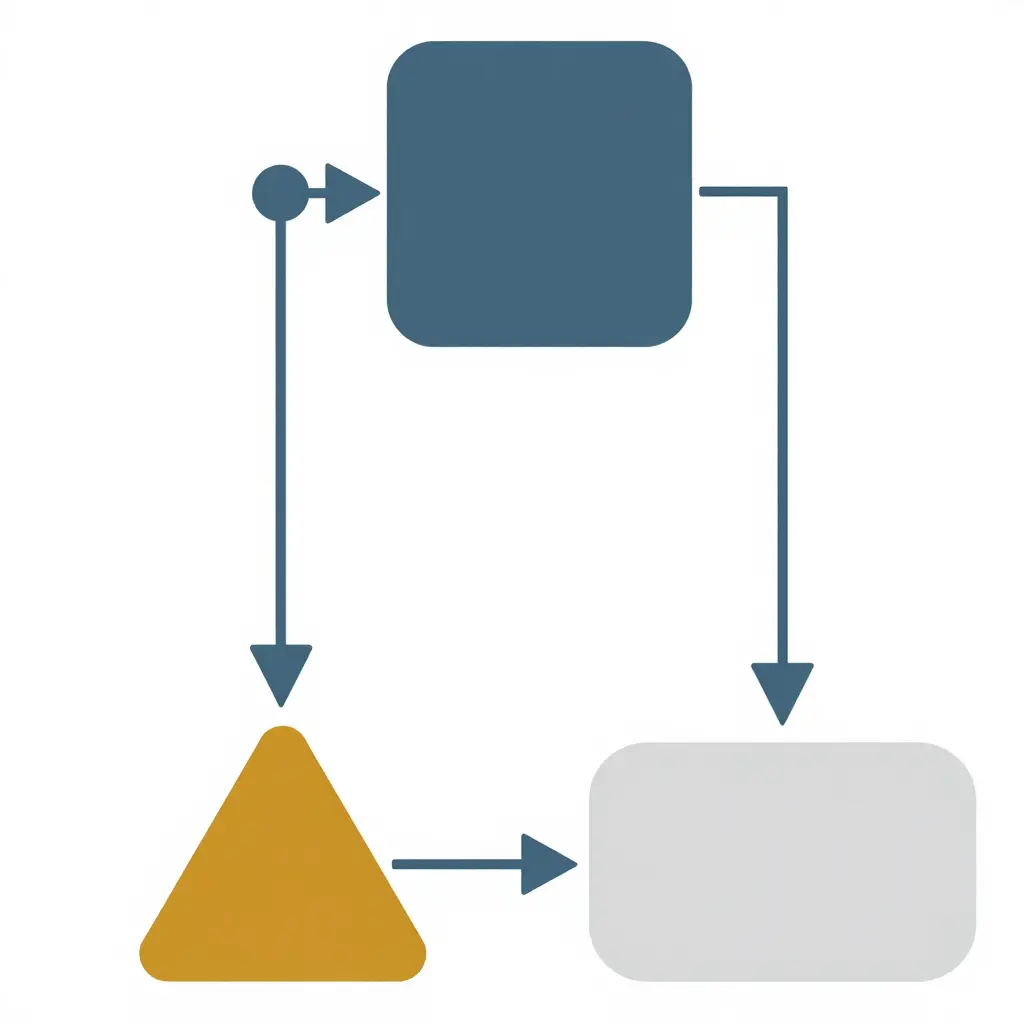
Figure: The fork in the road after a season of riding. One branch is residue treatment, the other is stain treatment – and both funnel toward the same end states: re-wrap or replace.
Keep the diagram where you can see it while you work on a stripped bike. Tacky and gummy, you are on the upper branch. Clean peel with a changed tone underneath, lower branch. The paths converge anyway, and the only real decision is whether the panels earn a fresh wrap or get retired.
Removing Adhesive Residue Without Damaging Plastic
Leftover glue is a chemistry problem, not a muscle problem. The aim is to soften the adhesive faster than you attack the panel, because every hard scrape is a chance to scar a shroud, a number plate or a glossy side panel. Three approved approaches cover almost every bike in a mixed fleet.
Controlled Heat Plus a Slow Peel
Warmth lowers the adhesive’s viscosity, so the bond releases under far less shear and the vinyl comes away in one piece instead of shredding. All the risk sits at the top of the heat gun’s range: too hot and thin plastics haze, warp or lift at the edges, and the damage only shows up days later.
- Keep the nozzle moving and aim for hand-warm, never hot.
- Pull at a low angle, slowly, and let the glue stretch rather than snap.
Citrus-Based or Isopropyl-Based Adhesive Removers
Solvents swell and soften the adhesive polymer so it wipes away instead of balling up. A citrus-based remover is slower but generally kinder to factory bodywork than a petroleum distillate, and it is not harmless: leave it on and it will soften clear coat, seep into seams, and on stressed polycarbonate it can haze the surface. Isopropyl alcohol flashes off quickly and behaves well on most unpainted plastics, though it can lift ink from printed decals and dull some clear-coated finishes.
- Test a hidden edge first, every time.
- Apply to the cloth, not the panel, and keep the area ventilated.
Mechanical Methods: Plastic Scraper and Eraser Wheel
Mechanical removal shears residue off the surface. A plastic scraper has an edge softer than the panel, so it lifts glue without cutting into plastic, while a rubber eraser wheel spins residue into small balls through friction. Pressure and speed are the risks here: a burred scraper gouges, and an eraser wheel held in one spot builds enough friction heat to burnish or dull a gloss finish.
- Keep scraper edges fresh and burr-free.
- Run eraser wheels at low speed in short, overlapping passes.
Technique Variables That Change the Outcome
Four variables do most of the work. Dwell time decides whether a solvent softens glue or starts eating plastic. Ambient temperature sets the pace, which is why a cold workshop needs more patience and gentler heat. Contact pressure and tool speed drive friction heat. Ventilation controls both your exposure to solvent vapor and how quickly residue flashes off before you can wipe it away.
- Log what worked per bike, so the next unit is faster.
- Once a panel is truly clean, fresh graphics kits bond far better than they do over a residue-marked surface.
Remover Compatibility by Bodywork Plastic Type
A dirt bike is a mix of polypropylene shrouds, polyethylene fenders and the occasional painted or clear-coated panel, and not every remover is happy on all of them. Match the chemistry to the surface before you reach for the bottle, use the grid below as a bench reference, and confirm on a hidden edge first.
| Adhesive Remover Family | Suitable Plastic Types | Risk Level | Typical Dwell Time | Notes |
|---|---|---|---|---|
| Citrus-based solvents (d-limonene) | PP and PE fenders and shrouds; painted panels with care | Medium | 2 to 5 minutes | Wipe off before it softens clear coat; keep off decal seams |
| Isopropyl alcohol (70 to 99%) | All rigid bodywork plastics; PP, PE, ABS | Low | 30 seconds to 2 minutes | Fast flash-off, ideal final wipe; do not soak printed graphics |
| Petroleum distillates (naphtha, kerosene, WD-40 type) | PE and PP fenders, bare metal; avoid polycarbonate | High | 30 seconds to 2 minutes | Can cloud clear plastics and lift paint; hidden-area test first |
| Heat-only methods (heat gun or hair dryer) | All bodywork plastics | Low | 20 to 45 seconds per 6 inch section | Hold 15-20 cm (6-8 in) away, keep the surface under about 70 C (160 F), warm then peel slowly |
| Plastic eraser wheels | Flat PP and PE panels; painted surfaces with caution | Medium | Continuous passes at 1,500 to 2,500 RPM | Keep the wheel moving, never dwell in one spot or you burn the finish |
| Mechanical scraping (plastic razor, old credit card) | All hard plastics; skip on soft or glossy decals | Medium | 1 to 2 minutes per panel | Work at a 30 to 45 degree angle and lubricate with soapy water |
| Commercial adhesive remover blends (aerosol) | Mixed; check the label for PP, PE and ABS approval | Medium | 1 to 5 minutes | Formulations vary widely, so test and re-test each new can |
Risk scale: Low means safe on most OEM bodywork at normal contact time. Medium means test a hidden area and keep dwell short. High means use sparingly, ventilate well, and never leave it pooling on plastic.
Addressing Plastic Staining When Residue Is Not the Problem
Once the adhesive is gone and the discoloration stays, you are past the surface. This is plastic staining: pigment, dye transfer or UV-driven oxidation that has moved into the material itself. No solvent lifts it, and more scrubbing only dulls the finish. What follows is an escalation ladder, and each rung has to be justified by the value of the bike and the price of the panel at stake.
Step 1: Deep Cleaning and Oxidation Removal
A dedicated plastic cleaner followed by an oxidation remover lifts surface oxidation, embedded dirt and light UV haze, and it often evens out the base tone across a panel. It will not bring back pigment, pull dye out of the plastic, or correct anything sitting below the surface layer. Cheap enough to try first, before you reach for abrasives.
Step 2: Plastic Polishing and Compound Work
A light cut with plastic polish or compound levels micro-scratches, strips a thin oxidized layer and evens the sheen. It will not remove stain that has penetrated the material, and heavy polishing thins the plastic, alters its texture, or leaves a glossy patch that no longer matches the rest of the bike.
Step 3: Dye or Trim Restorer Treatment
Dyes and trim restorers unify tone, darken faded plastic and cut the visible contrast between stained and clean zones. They remove nothing, the result is cosmetic and temporary, and it needs reapplying. Color matching gets especially awkward where graphics shielded part of the panel from UV.
Step 4: Full Panel Replacement
Replacement is the only option that guarantees a clean result and a predictable color match. It is not cost-justifiable on every panel, and new plastics will stain again if the root cause goes uncorrected, whether that is UV exposure, an unsuitable adhesive system, or coverage that leaves too much plastic exposed.
| Option | Can Fix | Cannot Fix |
|---|---|---|
| Deep cleaning and oxidation removal | Surface oxidation, embedded dirt, light UV haze | Pigment loss, deep dye penetration |
| Polishing and compound work | Micro-scratches, thin oxidized layer, uneven sheen | Staining below the surface, worn material |
| Dye or trim restorer | Tone uniformity, faded or dull appearance | The contamination itself, long-term color stability |
| Full panel replacement | Everything, with a guaranteed color match | Nothing technically, but cost and repeat risk remain |
Why the Next Graphics Kit Determines Future Staining
Three specification choices in the next kit decide how the panels age after this set comes off:
- Fade-resistant vinyl. Pigment stability under UV keeps the printed graphic from shifting color, so the protected zone does not drift away from the exposed plastic around it.
- Correct adhesive systems. A removable, residue-free adhesive allows clean seasonal removal without solvent damage, and solvent damage is itself a common cause of dulling and staining.
- Full-coverage designs. Panels covered edge to edge leave little exposed plastic to oxidize at a different rate, which limits the contrast between covered and uncovered zones.
The commercial logic follows from that. The more consistent the coverage and the more stable the vinyl, the less contrast there is to make existing staining visible in the first place. Sourcing Motograpics’ fade-resistant vinyl decals is one way to lock that consistency in, rather than repeating the same removal problem next season.
Removal Outcome Distribution Across a Mixed Fleet
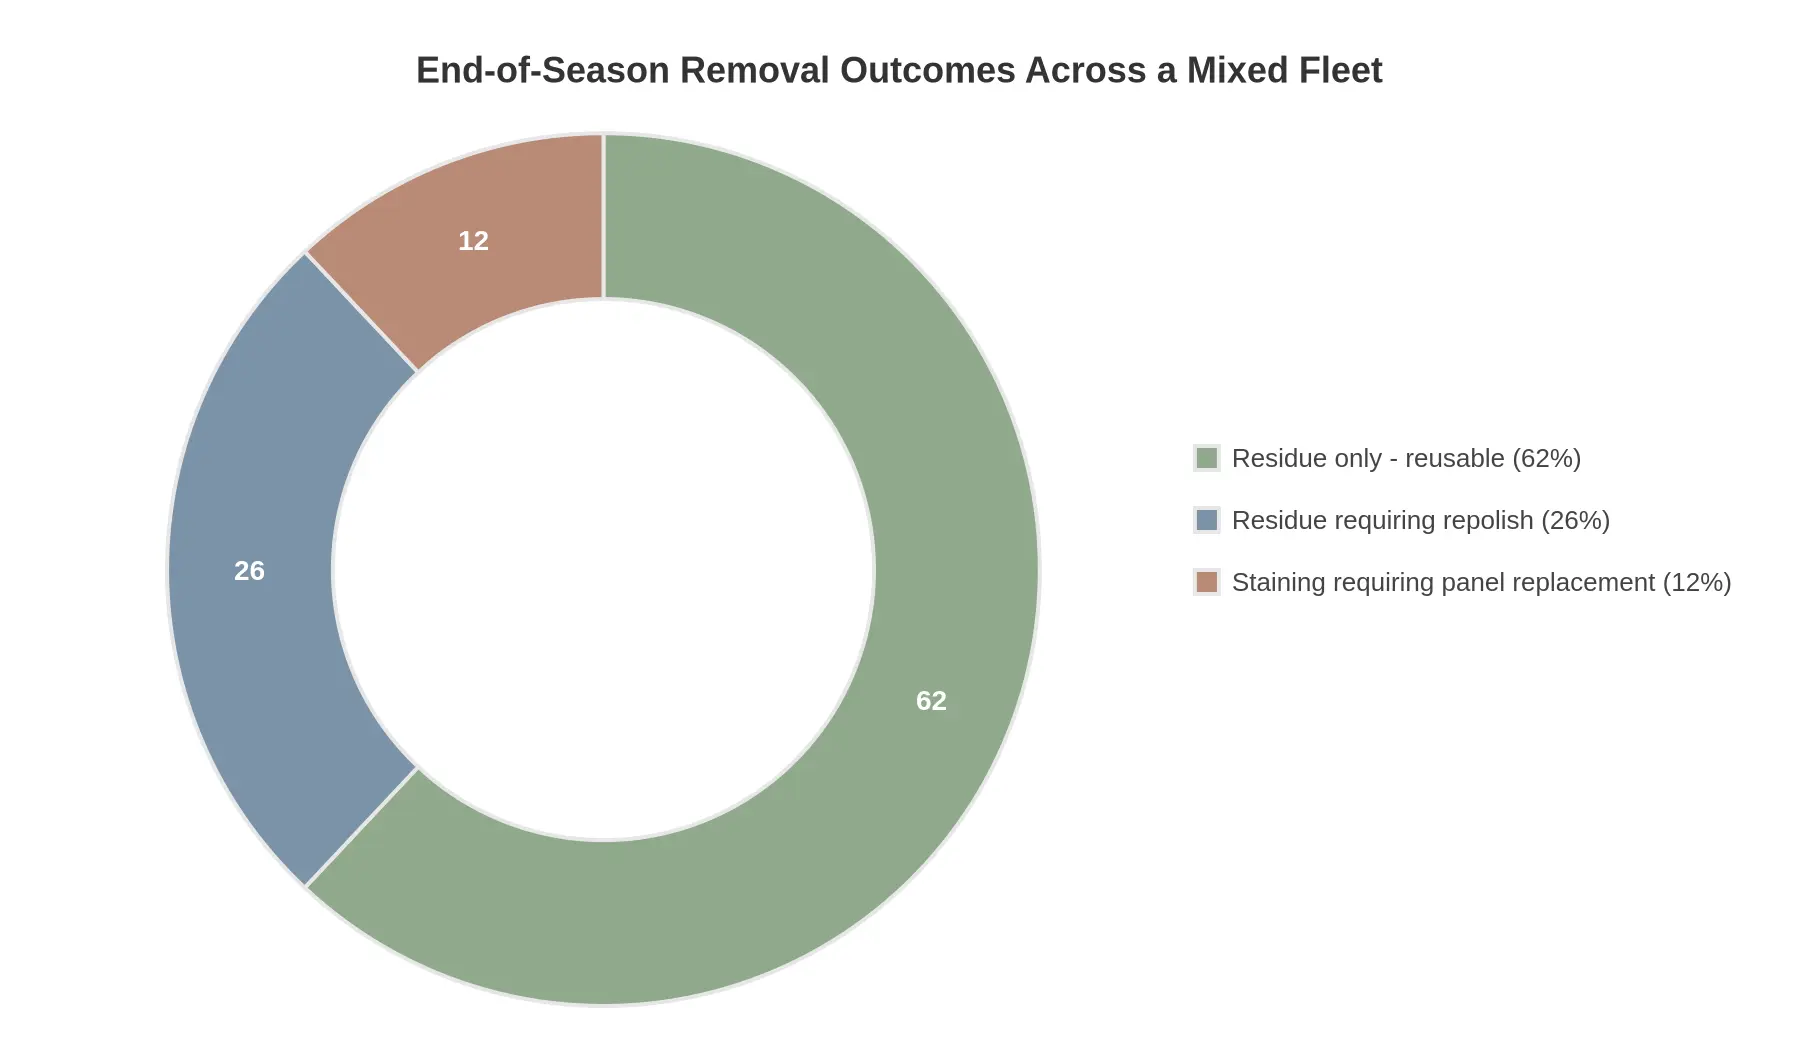
When we tore the graphics off a mixed fleet after a full riding season, two-strokes, electrics and a few trail bikes, the results fell into three groups. The doughnut below is what actually happened on those bikes, not a model.
How to Read the Three Segments
- Residue only, reusable (62%) was the majority outcome. Heat and a plastic scraper took the adhesive off, the plastic underneath stayed clean, and the panel went straight back into service.
- Residue requiring repolish (26%): glue had cured into the surface grain. These panels needed a light machine polish or a fine abrasive pass before anything new could be applied.
- Staining requiring panel replacement (12%) was the smallest slice, and in every case it tracked with long sun exposure rather than with the adhesive. The dye had migrated into the plastic itself, so no solvent was going to lift it.
What This Means for a Shop
Roughly two out of three removals cost you nothing but time. That is the number worth quoting to customers who worry a kit will ruin their plastics. Budget labor around that middle group, and treat replacement as the exception rather than a routine line item. If the next round of kits is for a mixed fleet, the KTM graphics range is a reasonable benchmark for how different material batches age under the same conditions.
Frequently Asked Questions
How long should a graphics kit stay on before removal?
Plan on a full season, roughly six to twelve months, before you pull a set. Most adhesive residue problems start with kits left on longer than a year, because UV exposure and engine heat keep hardening the glue into the plastic.
Can a heat gun cause plastic staining?
Yes, overheating is one of the most common causes of permanent staining. Once the panel surface gets too hot the plastic itself can scorch, and softened glue migrates into the grain. Keep the gun moving and work in short passes instead of parking it in one spot.
Can adhesive residue be prevented at install time?
Mostly, and it starts with a clean, dry, chemical-free panel. Wipe each shroud with isopropyl alcohol, let it flash off completely, then apply the graphics kit. Adhesive bonds to a stable surface, and there is far less residue to fight when the kit comes off.
How do washing routines affect residue buildup?
Frequent high-pressure washing accelerates it along the edges of a graphics kit. Water forced under lifted edges and leftover detergent both break the adhesive bond early, so a low-pressure rinse with a soft mitt will always outperform a pressure washer.
Can stained plastic be restored without replacement?
Light surface staining usually can be, with a fine finishing polish or a dedicated plastic restorer. Deep discoloration soaked into the grain generally cannot, and that is where new panels make more sense than another round of polishing.
How much lead time should a business plan for a full-fleet re-wrap?
Allow four to six weeks from artwork sign-off to the last bike finished, depending on fleet size and how many revision rounds you need. Book production slots early, and you can browse the graphics kit range by bike model while you plan, then stagger the dirt bike graphics kit removal a few bikes at a time so your riders stay on track.
What This Means for Your Removal and Re-Wrap Cycle
The lesson from a season’s wear is that diagnosis comes before treatment. Before you order a sheet of vinyl, find out whether you are looking at leftover glue or damaged plastic, because the two have nothing in common except how they look at a glance. Treat residue as staining and you sand a perfectly good fender for nothing. Treat staining as residue and you hand your crew a solvent that was never going to work.
The split also lands in two different budget lines. Residue is hours: heat, peeling, solvent and wiping that show up on a timesheet and leave no mark on the bike. Staining is parts. The sun has put pigment into the polymer, and the only real cure is replacement plastic. Knowing which one is in front of you tells you whether to budget man-hours or a box of new panels.
And next season’s removal cost is decided this season, at install. Kit material, adhesive quality and surface prep determine whether next year’s teardown takes twenty minutes or two hours. The cheapest kit on the invoice has a habit of becoming the most expensive job in the workshop.
Four things worth putting in your process:
- Book dirt bike graphics kit removal as scheduled labor, not as a surprise weekend job.
- Clear adhesive residue with controlled heat and patience before reaching for aggressive solvents.
- Check for plastic staining early. Pigment bleed is permanent, and replacement is the only cure.
- Specify kit quality and surface prep at install so next season’s teardown stays short.
Motograpics supplies pre-made kits for the platforms fleets actually run, including Talaria MX5 graphics and Surron Light Bee graphics, and takes on custom design work when you want one livery across the whole fleet. Gas bikes are covered too, with KTM graphics kits for the most common motocross models, so one supplier can keep every unit in the yard consistent.