
What a Graphics Kit for Dirt Bike Work Actually Contains
A graphics kit for dirt bike use is a set of pre-shaped vinyl decals covering the panels that take the most wear and impact: radiator shrouds, tank panels, front and rear fenders, number plate backgrounds, and the small pieces for swingarm and fork guards. Kits are printed on cast vinyl, laminated for abrasion resistance, and cut to the bodywork dimensions of one specific model, so every piece lands on a defined panel and nowhere else.
Shroud decals carry the brand, number and colour block, and shrouds are the most heavily curved panels on the bike. Tank and fender vinyl sits on flatter surfaces with gentler radii and conforms with far less effort. Plate backgrounds, swingarm pieces and fork guard decals are small, high-flex parts that go on in seconds and lift at the edges sooner than the larger panels.
How This Comparison Is Judged
Two supply routes are compared here: the pre-cut graphics kit, delivered already shaped to the model, and trim-on-bike graphics, where oversized sheets go onto the mounted plastics and are cut back along the panel edges. Five operational criteria do the work: conformity to curved shrouds, install labour per unit, rework risk, material waste, and scalability across a resale or workshop order book. For a business those five decide whether a kit is profitable to resell and predictable to fit inside a booked bay, which is why the curved shroud rather than the artwork becomes the deciding test panel.
Model-specific ranges, such as our KTM graphics kit selection, show how far pre-cut conformity already extends in production form.
From Vector File to Shroud: The Pre-Cut Production Path
A pre-cut graphics kit is not printed artwork that someone trims later with a blade. It is a manufactured part with fixed geometry, and five steps produce that geometry.
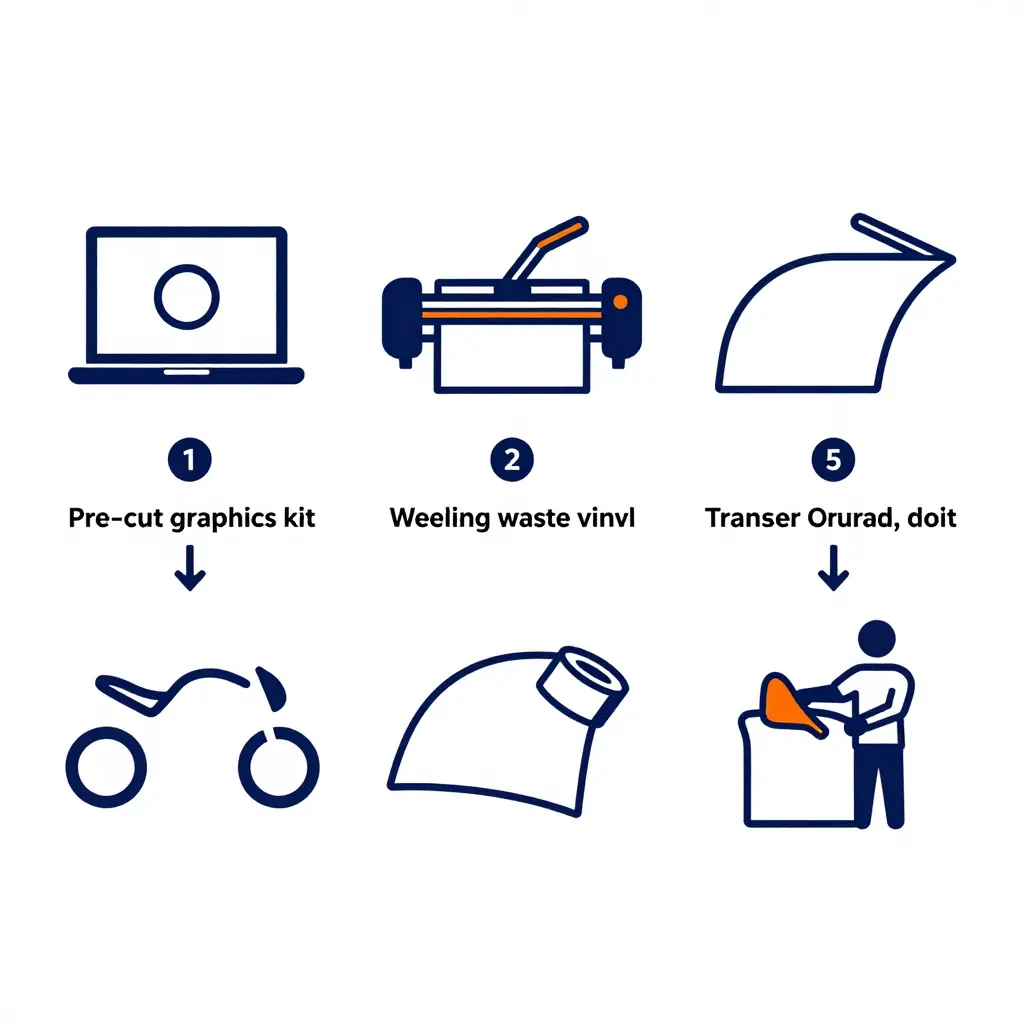
Digital design. Artwork is built in vector software with colours separated per panel, so each shroud, fender and side plate gets its own file. Sponsor logos, base colours and outline strokes stay as editable paths rather than flattened pixels, because the cutter only understands paths.
Template from the original shroud. This is the step that separates a kit from a roll of printed vinyl. The OEM plastic is scanned or photographed flat, its outer edge traced, and fastener holes, vent openings and moulded ridges marked as reference points. That trace becomes a cutting path saved per model and per model year, since a shroud that looks identical can shift several millimetres between generations. Artwork is then fitted into the path, not the other way round.
Plotter cutting. After printing and lamination, the plotter drags a blade along the saved paths. It cuts vinyl and laminate but leaves the backing paper intact, so the graphics stay arranged as a sheet of individual panels.
Weeding and transfer tape. Waste vinyl between the panels is lifted away by hand, then low-tack transfer tape is laid across the sheet. The tape holds every panel in its exact position and shape, which matters because complex dirt bike decals include thin strokes that would deform if handled loose.
Installation, panel by panel. The installer peels one panel off the tape at a time, aligns it to a shroud edge or a fastener hole, and works a squeegee from the centre outward to push air ahead of the adhesive. Each panel is set before the next is started, so the fit of one piece never depends on stretching a neighbouring one.
Panel-level accuracy is what curved shrouds demand. A curved shroud stretches vinyl in two directions at once. Small errors in the template are amplified as the film wraps, and a panel a couple of millimetres off at a mounting point pulls its edge into tension and lifts at the tightest radius. Because the cut is decided on a flat screen rather than on the bike, the template has to account for that wrap in advance. That is why model-specific catalogues, such as our KTM graphics range, are organised by model rather than by graphic style, and why comparable model-specific categories exist for other bike families.
Where the approach performs, and where it does not. On flat fenders, side plates and gently curved panels, a pre-cut graphics kit delivers consistent results: identical panels, repeatable alignment, no trimming marks. On strongly curved or heavily contoured shrouds the flat template has less to work with. Coverage near tight compound radii, where the film has to compress rather than simply wrap, is where the method shows its limits and trim-on-bike still has a role.
Pre-Cut vs Trim-On-Bike Graphics on Curved Shrouds
This comparison covers curved shrouds and business-facing criteria only.
| Criteria | Pre-Cut Graphics Kit | Trim-On-Bike Graphics | Business Impact |
|---|---|---|---|
| Conformity to compound curves | Relief cuts and panel splits built into the cut file | Trimmed in place under heat and stretch | Pre-cut edges hold their shape on tight shrouds |
| Installer skill required | Moderate – alignment and squeegee control | High – knife control and heat judgment | Trim-on-bike narrows the hiring pool |
| Installation time per bike | Short, predictable bay time | Longer, and varies with the fitter | Pre-cut raises daily bike throughput |
| Rework and peel-back risk | Low – no freehand blade contact | Higher – blade nicks and lifted edges | Fewer warranty claims and returns |
| Material waste | Low – nested layouts on the sheet | Higher – offcuts and miscuts | Trim-on-bike trims net margin |
| Per-kit cost structure | Higher unit cost, lower labour cost | Lower unit cost, higher labour cost | Pre-cut favours volume shops |
| Scalability across model ranges | Consistent repeat output per model | Quality drifts between fitters | Pre-cut supports multi-model catalogues |
| Suitability for branded retail packaging | Clean, shelf-ready sealed kits | Poor – shop-floor fabrication only | Pre-cut enables retail and dealer channels |
How those trade-offs land varies by model range, which is easier to see in a single catalogue such as our KTM graphics lineup.
How to install trim-on-bike graphics on curved shrouds
The oversized sheet is positioned directly on the bike because a shroud is a compound curve that cannot be measured or pre-cut accurately from a flat template. Keeping the vinyl oversize lets the material be stretched, relaxed and cut to the true edge instead of fighting a fixed shape. The sequence below applies to any trim-on-bike graphics set.
- Prepare and degrease the surface – wash the shroud with mild soap, rinse, then wipe with isopropyl alcohol until the plastic feels squeaky clean and fully dry.
- Decide between dry and wet positioning – apply dry on simple panels for maximum initial tack, or use a light slip solution on large sheets so the oversize film can be shifted into place before squeegeeing.
- Anchor the centre of the panel – tack the middle of the sheet down first and squeegee outward in short strokes to push air toward the open edges.
- Work the material outward across the curve – follow the shroud contour with overlapping squeegee passes, lifting and re-laying any area that folds on itself.
- Apply low heat to relax the vinyl – pass a heat gun on its lowest setting over stretched zones in short sweeps until the film softens and settles into the recesses without distortion.
- Trim the excess along the shroud edge – hold a fresh blade at a shallow angle, follow the plastic edge with light pressure, and add a relief cut into tight inside corners so the vinyl can lie flat.
- Seal the edges after installation – re-press every trimmed border by hand, apply edge sealer where the film meets the plastic, and check again after the first ride.
The trade-off is straightforward. Positioning and trimming on the bike gives noticeably higher contour accuracy on curved shrouds, because the film is cut to the shroud that actually exists rather than to a nominal shape. That accuracy costs time: slower positioning, controlled heat work and careful knife handling, which typically pushes a full kit install well beyond the time pre-cut panels need. For a shop the decision usually comes down to whether the extra hour of labour is worth an edge line that sits flush on a compound curve. To compare formats across models, browse our full graphics kit range before committing to a fitment approach.
Where the Walkthrough Lands
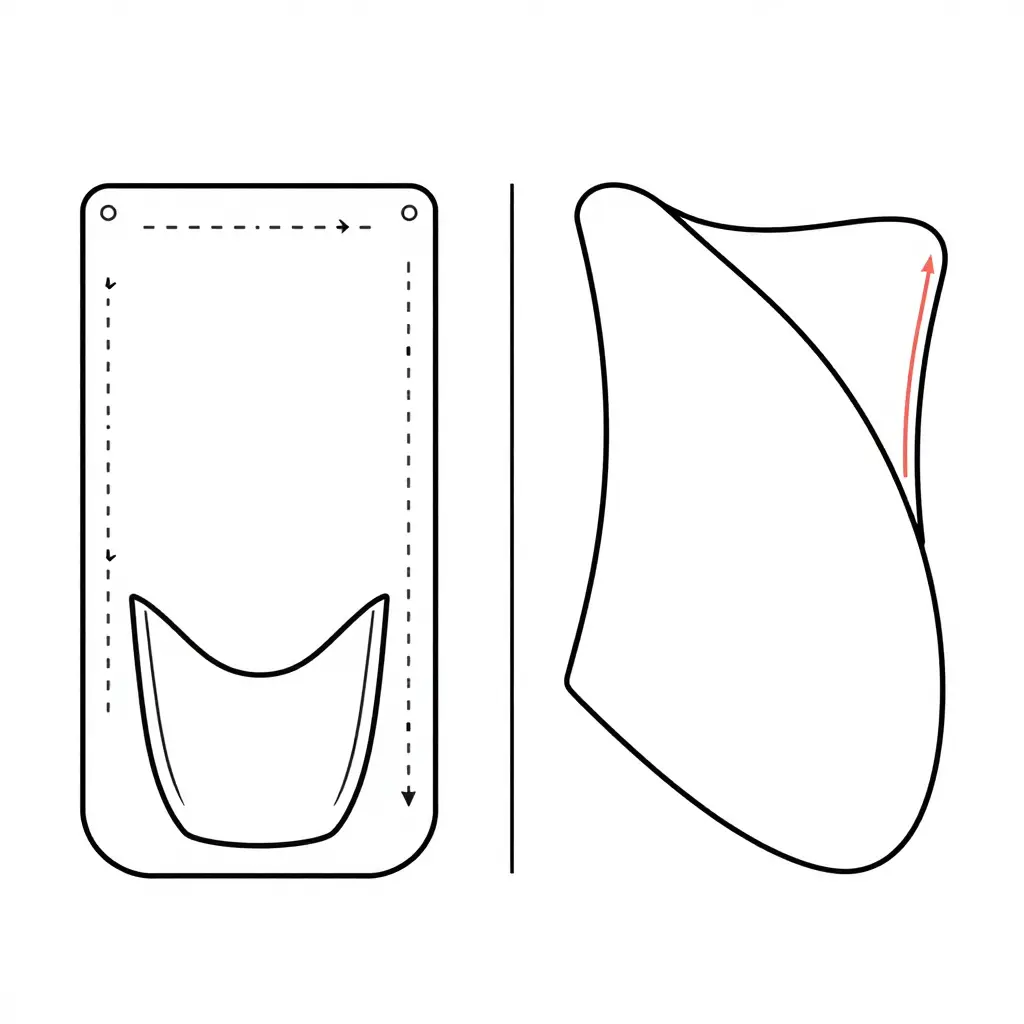
By the last bolt the method has made its point: the plastic, not the plotter, decided where the edge ended up. That is the promise of trim-on-bike, and the reason it rewards patience. You are not fighting the moulding, you are following it. The diagram below sets that moment beside the flat-panel alternative, so the trade-off is visible before you commit either way. If you are weighing this up on a familiar platform, start from a range like these pre-cut graphics kits for full-size motocross models and compare how the same shroud shape is handled in both styles.
Curved Shroud Geometry Analysis: Why Contours Decide the Winner
A shroud is rarely a single curve. It is a compound surface: a convex bulge near the radiator, a concave sweep toward the seat, and often a tight radius where the plastic folds back on itself. On the left of the diagram, the dashed lines represent a computer’s best guess at where that surface will end. Flattened onto a plane, every curve has to be compensated for, and every compensation is an approximation.
On the right, the trim line is drawn against the real edge, in three dimensions, with the film already stretched into position. That is why the oversized sheet wins on difficult contours: the excess material absorbs the stretch, and the cut follows the shape rather than predicting it.
| Factor | Pre-Cut Panel | Trim-On-Bike |
|---|---|---|
| Curve accuracy | Depends on the digital model | Follows the actual plastic edge |
| Stretch allowance | Fixed at cutting | Adjustable as you work |
| Install time | Fast, no trimming | Slower, needs a blade |
| Best for | Simple, repeatable shapes | Compound and tight-radius curves |
| Risk | Edge lift in deep recesses | Score marks if the blade slips |
Many workshops settle on a hybrid: pre-cut where the panel is generous and flat, hand-trimmed where the radius tightens. Whichever route you take, judge the kit by how well its edge allowance matches the plastic in front of you, not by how good the artwork looks on a screen.
Curved shrouds are the hardest surface in any kit, and film choice decides the outcome
A graphics kit for dirt bike programme succeeds or fails on the shroud. Everything else on the bike – number plates, fork guards, swingarm – is flat, single-curved, or small enough that the film never has to fight back. The shroud is compound-curved, reverses direction, and carries mounting holes with tight radii only millimetres from a deep draw. A panel that survives there will survive anywhere on the machine.
Two practical facts follow from that geometry. First, no adhesive can eliminate the strain; you can only decide where the strain lives. Second, the only vinyl property that reliably separates a fade-resistant graphics kit from a cheap decal is cast film rather than calendered film.

Compound curvature, not size, sets the difficulty
A shroud curves in two axes at once. Push film onto it and the material must gain surface area along one direction while losing it along another. Add the concave-to-convex transition that runs across most modern shrouds and the film is being pulled and pushed within a single panel, sometimes within the same centimetre.
Mounting holes make it worse. The film has to wrap a small-radius feature where stretch demand spikes, and any force concentrated there becomes an edge that lifts.
Where vinyl fails on a curved shroud
Failure is predictable once you map the zones. Over a convex ridge the film is in tension and thins, so it releases stress by pulling back toward the nearest free edge – the classic lift at a shroud tip. Inside a concave transition the film is in compression and has nowhere to go, so it folds, tents, or traps a bridge of air. Those folds are not only cosmetic; each one is a gap where dirt and pressure-washer water get in.
How pre-cut panels absorb stress
Pre-cut sets avoid the fight. Relief cuts and panel splits break one continuous surface into several smaller ones, so each piece spans a gentler portion of the curve. Tension no longer accumulates across the whole shroud, and compression folds end up in a designed seam instead of appearing wherever the film gives up. The trade-off is visual: seams interrupt graphics that cross the split line, and the print stops at an overlap rather than running on continuously.
How oversized trim-on-bike sheets spread tension
A full oversize sheet takes the opposite approach. It spreads load across one continuous piece, so no single edge carries the peak strain and the print stays unbroken. That only works if the installer keeps the stretch even. Pull too hard in one area and the film thins locally, the adhesive starves, and the panel fails there later. Oversize sheets reward skill and punish rushing, which is why they suit installers who do this every week.
| Behaviour | Pre-cut panels | Trim-on-bike sheet |
|---|---|---|
| Stress handling | Localised at relief cuts | Distributed across the sheet |
| Compound curves | Handled in smaller sections | Handled in one continuous pull |
| Graphic continuity | Interrupted at splits | Unbroken |
| Edge-lift risk | Concentrated at seams | Concentrated where stretch was uneven |
| Skill demand | Lower | Higher |
Heat, adhesive and overlap discipline
Heat-forming is a controlled process, not a rescue technique. Warm the film only into the working range the manufacturer specifies, press it into the curve while warm, and let it cool under pressure so the shape sets. Overheating relaxes the film and it springs back; under-heating forces a mechanical stretch that thins the material and loads the adhesive.
Adhesive activation matters just as much. Film needs firm, overlapping squeegee passes to wet out the glue fully. Air-release channels help here, giving trapped air a path out so you are not chasing bubbles under a stretched panel.
Overlap direction is a small detail with a large consequence. Always lay the downstream panel over the upstream one in the direction of travel and water flow, so edges are pushed down by the airflow rather than lifted by it. Skipping that, or trapping a fold at a mounting hole, is the most common cause of edge lift on an otherwise sound install.
The property that actually separates kits
Cast film is poured flat and takes the shape it is given; calendered film is pressed and carries a memory of being flat, which shows up as shrinkage and spring-back on a shroud. Paired with air-release adhesive and a UV-stable laminate, cast film of a thickness suited to the panel resists both, so the colour and the shape stay where you put them. That is the difference between fade-resistant vinyl decals and a decal that peels within a season. To see how that construction is applied per model, browse pre-cut KTM graphics kits and compare panel layouts across the range.
Side-by-Side: How Each Approach Actually Performs on Curved Shrouds
Geometry explains why a shroud is hard to cover. The scores below show which method pays for itself. Both approaches are rated on the four things that decide whether a graphics kit survives a season of riding and washing.
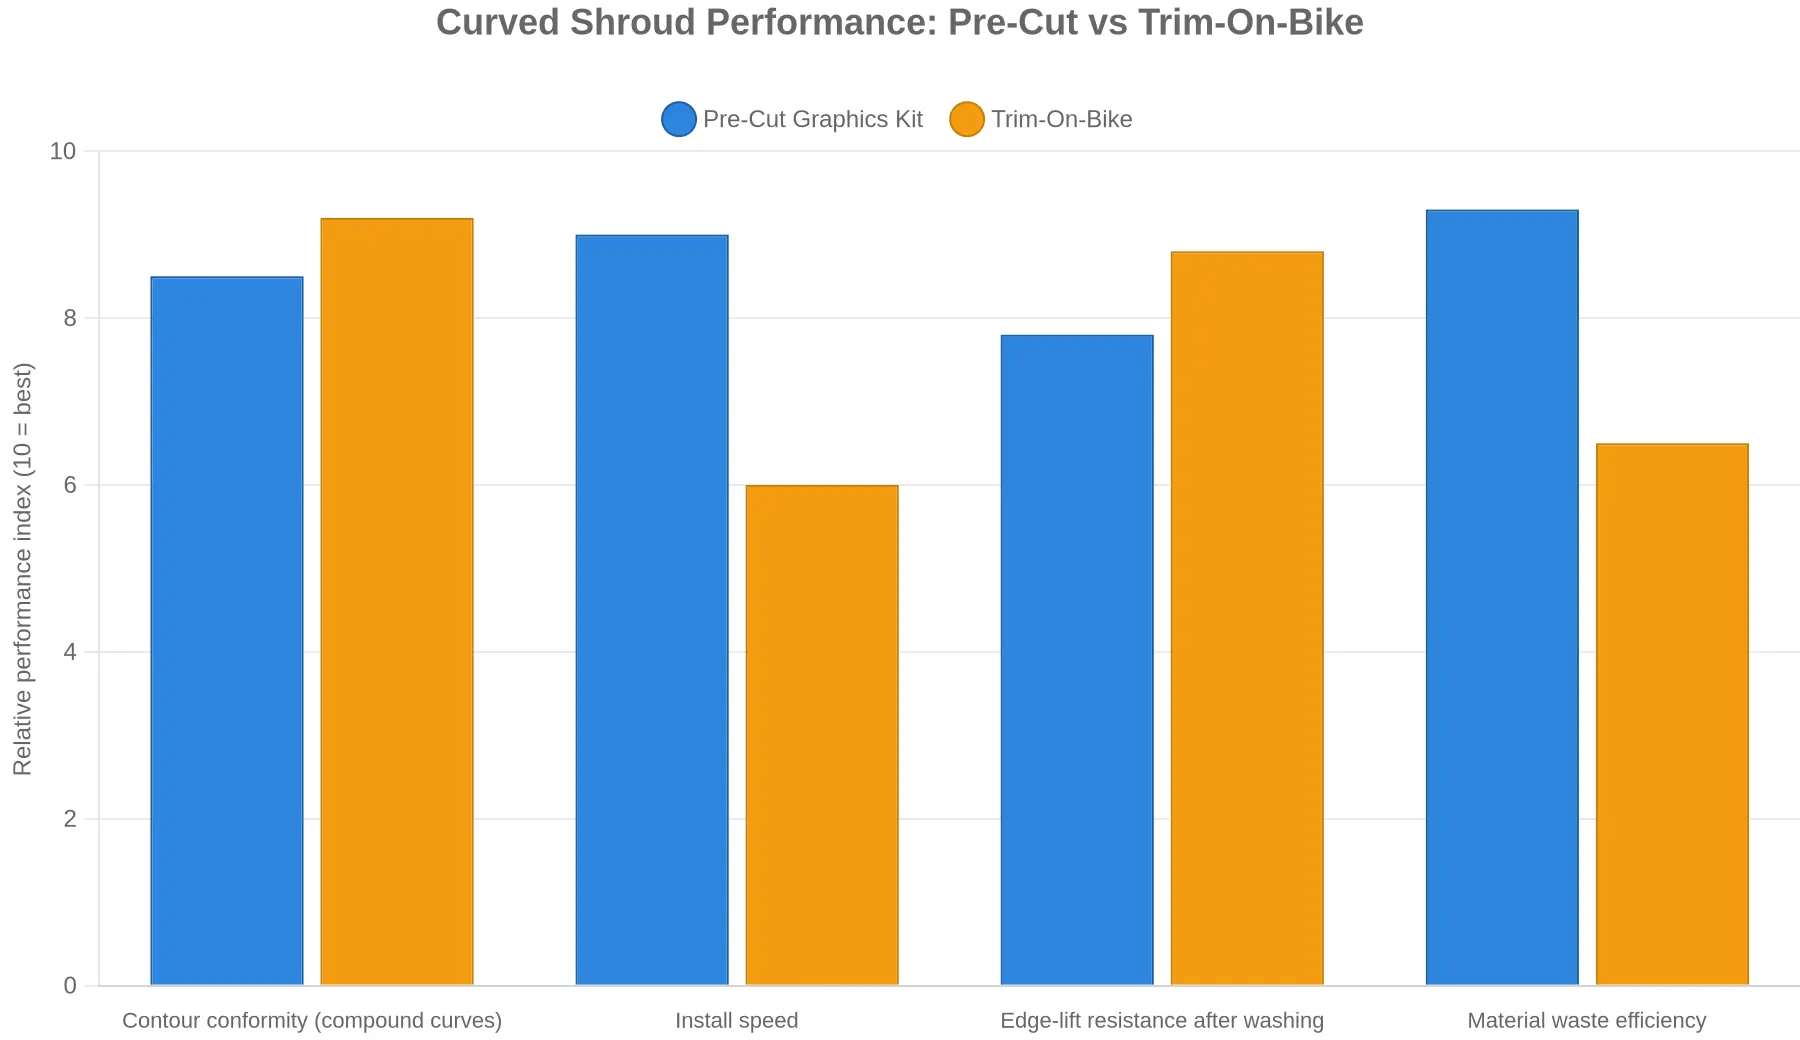
Illustrative benchmark values, not survey results. Scores reflect typical shop-floor performance comparisons on a 0-10 relative index, where 10 represents best-in-class performance.
Chart Generation Specification
| Element | Specification |
|---|---|
| Chart type | Grouped bar chart (two series, four categories) |
| Title | Curved Shroud Performance: Pre-Cut vs Trim-On-Bike |
| Series 1 | Pre-Cut Graphics Kit |
| Series 2 | Trim-On-Bike |
| Category 1 | Contour conformity on compound curves |
| Category 2 | Install speed |
| Category 3 | Edge-lift resistance after washing |
| Category 4 | Material waste efficiency |
| Y axis | Relative performance index (10 = best), 0-10 scale |
| X axis | Performance category |
| Performance category | Pre-Cut Graphics Kit | Trim-On-Bike |
|---|---|---|
| Contour conformity on compound curves | 8.5 | 9.2 |
| Install speed | 9.0 | 6.0 |
| Edge-lift resistance after washing | 7.8 | 8.8 |
| Material waste efficiency | 9.3 | 6.5 |
The Takeaway
Trim-on-bike leads on contour conformity, 9.2 against 8.5, because the vinyl is stretched and relaxed directly against the real shroud surface. Pre-cut kits take material waste efficiency 9.3 to 6.5, since there is no overcut to throw away. Trim-on-bike wins the curve; pre-cut wins the wallet.
If you are matching either method to a specific bike, browsable model ranges such as these KTM graphics kits show how much of the shroud a pre-cut pattern already covers before you reach for a knife.
A Screening Checklist for Shop Owners
Work through this before committing to a format. A graphics kit for dirt bike programme only pays back when your install volume, stock mix and staff match the format you choose.
- Annual install volume: pick pre-cut for steady high volume; trim-on-bike suits low, occasional jobs.
- Diversity of bike models in stock: wide model ranges favour trim-on-bike; narrow lineups justify pre-cut inventory.
- Installer skill level and training cost: budget training hours before adopting trim-on-bike on curved shrouds.
- Warranty and rework policy exposure: pre-cut lowers installer-error claims; trim-on-bike demands tighter final inspections.
- Retail packaging and shelf presentation: pre-cut dirt bike decals photograph cleaner for shelves; trim-on-bike favours custom builds.
- Turnaround promised to customers: quote pre-cut for same-day service; trim-on-bike needs longer bay time.
The margin math behind each of these choices is in the next section.
Model-specific catalogues, such as the KTM graphics range, also give you a sense of how wide your stock would have to be.
The Commercial Trade-Offs: Pre-Cut Kits versus Trim-On-Bike Sheets
Trim-on-bike installation consumes more labour hours per install, because each panel is measured, stretched, trimmed and re-trimmed while the adhesive is already exposed to dust. Pre-cut kits shift that work upstream into artwork and cutting files, so the bike-side task becomes locate-and-apply, which one technician can finish without a second pair of hands.
Rework is where the two formats diverge most sharply. A trim-on-bike panel cut short cannot be recovered: the piece is scrapped and the job restarts from a fresh sheet. Pre-cut graphics fail in more predictable ways, since a misaligned piece can often be lifted while the adhesive is still workable, and a reprint is limited to the affected panel rather than the whole set. Material waste per job follows the same logic: trim-on-bike sheets generate offcuts that rarely transfer to another model, while nested pre-cut layouts keep unusable material inside a known cut file.
At scale, pre-cut kits reward volume. Setup cost is front-loaded into design and cutting, then amortised across every unit sold, so margin per unit improves as order volume rises. Trim-on-bike sheets keep setup cheap but keep labour expensive on every job, which caps throughput at whatever installer hours you can afford. The sales model matters as much as the manufacturing model: selling a kit transfers execution risk to the buyer, while selling an installed result keeps that risk on your bench and has to be priced to absorb it. Kit sales scale without a workshop; installed jobs scale with bench space and skilled hands.
Hidden costs of the wrong format
Inventory decides more than most shops expect. A handful of trim-on-bike rolls cover the machines a mixed fleet brings in: a shop with Ultra Bee builds sharing floor space with other light electric platforms handles the Ultra Bee graphics work from the same roll it already stocks for unrelated repairs. Model-specific pre-cut kits invert that trade-off: more SKUs on the shelf and more capital tied up in slow movers, but faster installs and a cleaner customer experience. On high-volume platforms, a dedicated pre-cut line such as the Talaria MX3 and MX4 graphics kits turns that shelf space into predictable repeat revenue instead of dead stock. Three recurring costs are worth modelling before you commit:
- Labour hours consumed per install, including surface prep, alignment and clean-up.
- Rework and reprint burden, whether scrapped panels or a reprinted set.
- Material waste per job, measured as unusable offcut rather than sheet purchased.
Reorder behaviour follows the format. A customer who buys a kit reorders the same kit, in the same colourway, and expects it to be in stock; a customer who buys an installed result reorders the service and refers people who want the same outcome. Brand positioning lands in the same place: pre-cut kits position you as a product brand with a catalogue, installed work as a workshop with a waiting list. Choose deliberately rather than defaulting to whichever format is already on the rack, because the choice sets both the margin and the message.
Choosing Your Path at a Glance
The diagram reduces the decision to one starting point, one branch on how curved the shroud really is, and two exits: the fork most shops and riders hesitate over.

Image generation prompt (copy ready):
Minimalist flat 2D decision flow diagram on plain white background. Left side: one rounded rectangle start node. A thin arrow runs right into a diamond decision node, where a bracket splits the path into two separate thin arrows: an upper branch arrow to a square outcome node and a lower branch arrow to a second square outcome node. A short curved return arrow loops from the lower outcome node back to the diamond, marked only with a small hollow triangle. Clean geometric shapes, thin uniform outlines, generous white space, no gradients, no shadows. Palette: charcoal outlines, white fills, two accent colours only (teal and coral). Strictly no text, letters, numbers, symbols or realistic elements anywhere in the image.
Alt text (21 words):
Minimalist flow diagram comparing selection paths for a pre-cut graphics kit and trim-on-bike graphics, with a return arrow for format re-selection.
Placement note: Insert this image immediately after the business economics section and before the FAQ block, so the visual break lands between cost reasoning and reader questions. The unlabeled return arrow is explained by the surrounding prose: when a format fails the curve test, you circle back and re-select rather than force the fit.
Frequently Asked Questions: Pre-Cut vs Trim-On-Bike Graphics
Which format handles curved shrouds better?
Trim-on-bike graphics handle curved shrouds better, because the vinyl is applied oversized and trimmed after it has conformed to the shape. Use trim-on-bike for aggressive multi-radius shrouds; keep pre-cut kits for flatter panels, where the template does most of the work.
Do pre-cut graphics kits still need heat on tight curves?
Yes. A heat gun set to roughly 40-60 C on tight curves relaxes the vinyl enough to stretch slowly without lifting the edges. Work the whole compound curve rather than one spot, and keep the nozzle moving.
Can trim-on-bike installation damage the plastics?
It can, when blades cut too deep, so use a fresh blade and shallow, angled strokes. Tape a guide line and lift the trimmed edge before the final squeegee passes.
What vinyl specification should a business insist on for fade resistance?
Cast PVC vinyl from 3M or an equivalent film maker, with a UV-resistant gloss laminate rated for at least five years outdoors. Calendered vinyl shrinks and fades on curved shrouds inside a season.
How should a shop decide between stocking pre-cut kits and loose sheets?
Stock both, weighted by model turnover: high-volume bikes get pre-cut graphics kit inventory, while low-volume or heavy-curved models stay as loose sheets. Start with a small pre-cut range such as these Stark VARG graphics, then expand from sales data.
Pre-Cut or Trim-On-Bike: The Practical Verdict
Neither method wins outright. Pre-cut graphics kits win on consistency, install speed and scalability across model ranges: every panel arrives at the same dimensions, so one technician’s output does not swing from one bike to the next, and labour hours become something you can quote instead of guess. Trim-on-bike still earns its place where shrouds twist through extreme compound curvature, because a skilled hand cutting on the bike lays the film flatter than a flat-cut panel fighting a compound bend, at the cost of the extra material that oversize work throws away.
In plain terms: high-volume shops should standardise on pre-cut so throughput and finish stay predictable across shifts and staff turnover. Single-model specialists who keep one platform in the bay are best served by a dedicated pre-cut programme, such as 79Bike graphics kits, where one template covers the full range without re-measuring. Custom artwork projects are low-volume and often built around aggressive curvature, which justifies trim-on-bike material, provided the installer’s skill is genuinely high.
Whichever route you select, the result depends on the fade-resistant vinyl decals from Motograpics, whether the order is a universal sheet or a Talaria Komodo graphics kit cut to specific shroud geometry.