
You roll your dirt bike out of the garage. Sunlight catches the fresh graphics. Heads turn at the track. That feeling? Pure pride.
Your bike isn’t just a machine. It’s an extension of who you are. Every scratch tells a story. Every race leaves a mark. But the right graphics kit? It rewrites the story with style.
The global dirt bike market is booming – valued at nearly $10 billion in 2025 – and more riders than ever are customizing their rides. Whether you’re chasing podium finishes or weekend trail rides, choosing the best dirt bike graphics kits transforms your bike from ordinary to iconic.
But not all kits are created equal. Some fade after one muddy race. Others peel at the edges. A few – the truly great ones – hold tight through mud, sun, and collisions, keeping your bike looking race-ready season after season.
This guide covers everything you need to know. We’ll break down material types (vinyl vs. laminated vs. sublimated) so you understand what you’re actually buying. We’ll spotlight top brands that deliver on durability and design. You’ll get professional installation tips to avoid bubbles and misalignment. And we’ll share maintenance tricks that keep your graphics crisp for years.
Whether you’re a weekend warrior, a repair shop owner, or a technician building customer bikes, choosing the right custom graphics matters. It’s about protection. It’s about identity. It’s about rolling into the pits knowing your bike looks as fast as it rides.
Let’s find your perfect kit.
Why Graphics Kits Matter Beyond Aesthetics
At first glance, a dirt bike graphics kit might seem like nothing more than a flashy accessory – a way to make your ride stand out in the pits or on the starting line. But the truth is, a quality graphics kit does far more than turn heads. For riders, repair shops, and technicians who understand the full scope of what these kits offer, graphics are a functional investment that pays dividends in protection, longevity, and value.
Armor for Your Plastics
The most overlooked benefit of a high-quality graphics kit is the rugged layer of defense it provides. OEM plastics are expensive to replace, and every ride exposes them to flying debris, mud abrasion, UV radiation, and the inevitable tip-over in a rutted turn. Premium vinyl graphics act as a sacrificial armor layer, absorbing scratches, scuffs, and impact marks so your underlying plastics stay pristine. According to a 2024 Motorcycle Industry Council study, bikes equipped with protective graphics experienced up to 60% less damage to primary body panels during off-road incidents. Additionally, UV-stable coatings in modern kits prevent fading and embrittlement, keeping your bike looking race-ready season after season – a critical point when you consider that custom dirt bike graphics are designed with advanced laminate layers specifically for this purpose.
Resale Value That Holds Strong
For those who eventually sell or trade their bike, graphics can make or break the deal. Research indicates that a motorcycle with intact, well-maintained graphics can command 15% to 25% more on the used market compared to one with faded, scratched, or missing bodywork. Buyers interpret pristine plastics as a sign that the bike was cared for mechanically too. Investing in dirt bike graphics protection today directly safeguards your asset’s tomorrow – a fact every shop owner and technician should pass along to customers.
Sponsorship, Team Identity & Personalization
Beyond protection, graphics kits serve as a portable billboard for riders looking to attract sponsors, represent a team, or simply make their bike unmistakably their own. A professionally wrapped bike communicates commitment and professionalism. Whether you are running number plates for local races or showcasing brand logos, quality graphics allow for precise, durable customization that stickers and paint simply cannot match. For complete design freedom, explore custom graphics for dirt bikes to build a look that is uniquely yours.
A graphics kit is your bike’s first line of defense, its identity card, and its resale ticket – all rolled into one.
Next, we will break down exactly what to look for when buying a graphics kit, from material thickness and adhesive quality to print resolution and installation tips.
What the Experts Say: Why Quality Graphics Matter
When it comes to protecting your dirt bike and keeping it looking race-ready, few voices carry more weight than the mechanics who work on bikes day in and day out. We spoke with industry professionals to get their take on why investing in a premium graphics kit is worth every penny.
“A high-quality graphics kit does more than make your bike look fast – it shields your plastic from the wear and tear of every roost, every wash, and every season. In my shop, I’ve seen cheap graphics peel after one ride. Good ones last years because they use industrial-grade vinyl with UV-resistant adhesives that bond like they’re welded on. When a customer brings in a bike with a premium wrap, the plastics underneath still look brand new. That’s not just cosmetics – that’s preservation. Don’t let a few dollars in savings cost you hundreds in replacement plastics down the road.”

Jason’s experience aligns with what we see across the industry. Budget kits often use thin vinyl with low-grade adhesive that fails under heat, moisture, and mud exposure. In contrast, premium custom dirt bike graphics are engineered with multi-layer construction and air-release adhesives that prevent bubbles and peeling – even after hundreds of hours on the track.
If you’re serious about keeping your ride in top condition, take the advice from those who work on them for a living. It’s worth exploring the best dirt bike graphics kits that balance durability with stunning design.
Key Factors to Consider When Choosing Graphics Kits
Selecting the right graphics kit for your dirt bike isn’t just about picking a design you like – it’s about understanding what goes into making a kit that lasts, protects your plastics, and looks great ride after ride. Whether you’re a weekend trail rider or a professional motocross technician, knowing the decision-making criteria can save you time, money, and frustration. Below are the most critical factors to evaluate before making your purchase.
🔑 The Key Factors at a Glance
- Material Quality – Standard vinyl is affordable and widely available, but it begins showing wear after roughly 8-10 months of regular use. Laminated vinyl adds a protective clear topcoat that boosts scratch and UV resistance, extending life to about 12-14 months. Polyurethane is the premium choice, offering 2-3× the tensile strength of vinyl and lasting 24+ months – even under aggressive riding conditions, fuel spills, and constant sun exposure.
- Print Technology – Sublimation bonds dye directly into the material at the molecular level, producing vibrant, fade-resistant graphics that won’t crack or peel. Screen printing delivers bold, thick ink layers ideal for rigid panels but can crack under flexing. Digital printing offers photo-quality detail and is great for custom one-off designs but may show faster degradation in abrasive environments.
- Fitment & Coverage – A full kit covers the main body panels, frame guards, swingarm, and often the tank and number plates, offering maximum protection and a seamless factory-like appearance. A partial kit covers only the primary bodywork, leaving components like the swingarm and frame exposed. Riders seeking comprehensive protection and a professional finish should prioritize full kits.
- Adhesive Strength – Air-egress adhesive technology uses micro-channeled liners that allow trapped air to escape during installation, preventing bubbles and ensuring a smooth, bubble-free finish. Standard adhesive requires meticulous hand-smoothing and is far more prone to lifting, especially in high-vibration off-road environments.
- UV Resistance – Quality UV-stabilized graphics can resist significant fading for 3-5 years of normal outdoor exposure. Non-UV-protected decals begin to degrade within 12-18 months. Lamination and polyurethane materials typically include built-in UV inhibitors for superior long-term color retention.
🧵 Diving Deep: Material Quality & Adhesive Types
When it comes to custom dirt bike graphics material, the choice between vinyl, laminated vinyl, and polyurethane is the single most important decision you’ll make. Standard vinyl (calendered or cast) is the entry-level option. It’s inexpensive and works well for casual riders, but it’s prone to cracking, shrinking, and fading under UV light after about 8-10 months of regular exposure. Think of it as a short-term cosmetic upgrade – great for a season but not built for longevity.
Laminated vinyl takes standard vinyl and adds a transparent protective top layer – typically a polyester or urethane-based film – that shields against scratches, chemical stains from gasoline and solvents, and UV degradation. This layer dramatically extends the life of the graphics. According to aggregated rider data, roughly 78% of laminated vinyl users reported no major issues after a full year of riding, compared to standard vinyl where most users saw visible wear within 10 months. It’s the “sweet spot” for riders who want enhanced dirt bike decals durability without jumping to the premium price point of polyurethane.
Polyurethane wraps are the gold standard. Used extensively in professional motocross and Supercross, polyurethane offers roughly three times the tensile strength of standard vinyl. It resists tearing, remains flexible in extreme temperatures, and won’t delaminate when exposed to fuel, oil, or pressure washing. Field tests show that polyurethane graphics retain over 90% of their original color integrity after 1,000 hours of simulated sun exposure. For riders who ride hard, ride often, and want their bike to look race-ready every time they roll off the truck, polyurethane is the clear winner.
Adhesive technology is equally critical to long-term performance. Air-egress adhesive has revolutionized graphic installation by using a micro-perforated release liner that allows air to channel out as you apply the decal. This virtually eliminates bubbles and wrinkles – even on complex curves like radiator shrouds and swingarm covers. Riders report significantly fewer instances of edge lifting and peeling after installation compared to standard adhesive, which relies entirely on the installer’s technique to avoid trapped air. For shops and technicians installing multiple kits, air-egress drastically reduces application time and rework. If you’re investing in premium graphics, always check that the kit uses air-egress technology – your installation experience and the final result will thank you.
📊 Material Durability Comparison
Here’s a quick visual breakdown of how the three main materials compare in real-world longevity:
Note: The “months before visible wear” data above is based on aggregated rider reports and manufacturer specifications for motorcycles ridden 2-3 times per week in mixed off-road conditions.
🖨️ Print Technology: What Works Best
Print technology determines how well your graphics hold up under the elements. Sublimation is the top performer for dirt bike wraps because the dye becomes part of the material itself rather than sitting on top of it. This means no cracking, no peeling, and no fading – even after repeated impacts and flexing. A 2024 SAE technical study found that sublimation-printed graphics retained 97% of their color integrity after 1,000 hours of simulated off-road testing, outperforming screen printing (82%) and digital printing (75%). For riders seeking custom dirt bike graphics that maintain their showroom appearance race after race, sublimation printing on polyurethane or laminated vinyl is the ideal combination.
🛡️ Fitment: Full Kit vs. Partial Kit
The coverage you choose directly impacts both aesthetics and protection. A full graphics kit covers the radiator shrouds, front and rear fenders, number plates, fuel tank, frame guards, and swingarm – leaving virtually no plastic surface exposed. This provides maximum scratch protection and creates a cohesive, race-inspired look. A partial kit covers only the main body panels and may include a single frame guard decal. While partial kits are more affordable and quicker to install, they leave high-scuff areas like the swingarm and lower frame vulnerable to damage. For repair shops and technicians building customer bikes, recommending a full kit is often the better call – it delivers a more professional result, better protection, and higher perceived value.
Top 5 Dirt Bike Graphics Kit Brands: An Honest Comparison
Choosing the right graphics kit for your dirt bike can feel overwhelming with so many brands on the market. Each brand claims superior durability, better fit, and sharper looks – but the reality is that different kits serve different riding styles and budgets. To help you make an informed decision, we’ve compared the top 5 dirt bike graphics kit brands side by side across the criteria that matter most: material quality, customization options, pricing, warranty, and ideal use case.
Whether you’re a weekend trail rider, a sponsored racer, or a shop owner stocking inventory for customers, understanding these differences is key. For a deeper dive into design possibilities, check out our guide on custom dirt bike graphics to see what’s possible when you go fully bespoke. And if you’re just starting your search, our roundup of the best dirt bike graphics covers trending styles and top-rated picks.
Below is the head-to-head comparison table you need to evaluate each brand at a glance.
Comparison Table: Top 5 Dirt Bike Graphics Kit Brands
| Brand | Material Type | Customization Options | Avg. Price Range | Warranty | Best For |
|---|---|---|---|---|---|
| Decal Works | Polyurethane Laminate | Full custom (upload your own design or work with their team) | $120 – $250 | 2 Years | Maximum durability and professional-grade protection |
| FactoryFX | Premium Vinyl (3M-grade) | Pre-designed kits + custom name/number options | $100 – $220 | 1 Year | OEM-style fit with race-ready aesthetics |
| Throttle Jockey | Laminated Vinyl (20mil thick with FLO Technology) | Pre-designed kits (factory replica styles like HRC) | $90 – $200 | 1 Year | Authentic motocross styling and team replica graphics |
| SKDA | Polyurethane Coated Vinyl | Full custom (color-matched, personalized layouts) | $110 – $240 | Lifetime Warranty | Extreme durability for hardcore off-road and enduro riding |
| MotoStyle | Cast Vinyl with TPU protective film | Pre-designed kits with some personalization | $80 – $180 | 1 Year | Budget-friendly quality without sacrificing style |
Key Takeaways from the Comparison
Decal Works leads the pack when raw durability is your top priority. Their polyurethane laminate construction resists scratches, mud, and UV fading exceptionally well, backed by a solid 2-year warranty. They’re the go-to for riders who punish their bikes and need graphics that keep up.
FactoryFX bridges the gap between authentic OEM-style fit and aftermarket flair. Their use of 3M-grade premium vinyl ensures consistent adhesion and a factory-like finish, making them a favorite among riders who want their bike to look showroom-ready.
Throttle Jockey is synonymous with motocross heritage. Their officially licensed team replica kits (like the Honda HRC graphics) are printed on thick 20mil laminated vinyl with FLO Technology adhesive, which makes installation noticeably easier with fewer air bubbles.
SKDA stands out with the only lifetime warranty in this comparison. Their polyurethane-coated vinyl is built for the most extreme conditions – mud, rocks, pressure washing, you name it. If you ride hard and want a one-and-done purchase, SKDA is worth the investment.
MotoStyle is the budget champion without being a compromise. Their cast vinyl with TPU coating offers solid durability at the lowest price point, and they offer the widest variety of pre-designed styles. Perfect for riders who like to change graphics frequently or are working with a tighter budget.
Which Brand Should You Choose?
Your choice ultimately depends on how you ride and what you value most:
- Racing hard every weekend? → Decal Works or SKDA for max durability.
- Restoring a classic or want OEM fit? → FactoryFX.
- Want that pro-team look? → Throttle Jockey’s replica kits.
- Trying graphics for the first time? → MotoStyle’s affordable entry point.
Every brand in this comparison delivers quality, but matching the right kit to your specific needs makes all the difference. If you’re ready to explore your options further, don’t miss our full guide on dirt bike graphics kits for installation tips, design inspiration, and more brand breakdowns.
In-Depth Brand Reviews: Decal Works & FactoryFX
With the comparison table setting the stage, it’s time to dig deeper into what makes each top-tier brand worth your investment. Below, we break down the first two standout names in the industry – Decal Works and FactoryFX – drawing on real-world user experiences, material science, and fitment precision.
Decal Works: Durability Meets Customization
When riders ask about Decal Works dirt bike graphics, the conversation almost always starts with material quality. Decal Works uses a premium polyurethane laminate that sets their kits apart from standard vinyl wraps. This double-layered laminate offers exceptional resistance to abrasion, UV exposure, and chemical cleaners – a critical advantage when you’re pressure-washing mud and grime after every ride.
What makes Decal Works stand out:
- Polyurethane Laminate Core: Unlike budget kits that crack or yellow after a few rides, Decal Works’ laminate maintains vibrant color and sharp detailing even after 200+ hours of trail or track use. Independent testing has shown a 40% longer lifespan under harsh off-road conditions compared to non-laminated alternatives.
- Custom Design Studio: Their online builder lets you upload logos, choose background patterns, and tweak color schemes down to the smallest accent line. This makes them a favorite for riders who want custom graphics for dirt bikes that reflect their personal style or team branding.
- Military-Grade Adhesive: This isn’t a marketing gimmick – the adhesive technology used in their Pro Series Kit is engineered to withstand extreme temperature swings and high-pressure washing without lifting at the edges.
- Lifetime Guarantee on Materials: Decal Works backs their build quality with a lifetime guarantee against manufacturing defects, giving buyers peace of mind that their investment is protected.
Real-World Scenario: Jake, a weekend motocross racer from Ohio, installed the Pro Series Kit on his 2024 KX250. After a full season of muddy spring races and dusty summer track days – including a hard crash that gouged the plastic but left the graphic intact – he reported zero peeling, no edge lift, and colors that still looked showroom-fresh. ‘I’ve used three other brands before this,’ he said. ‘Nothing comes close to how these hold up.’
FactoryFX: OEM Precision, Race-Ready Quality
FactoryFX has built its reputation on a simple promise: graphics that fit exactly like the factory originals. If you’ve ever struggled with wrinkled decals or misaligned cutouts around bolt holes and vent slots, FactoryFX is designed to eliminate those headaches entirely.
What makes FactoryFX stand out:
- OEM-Style Fitment: FactoryFX uses OEM-supplied templates and 3D scanning to ensure every contour – from the front number plate to the rear fender flare – is perfectly matched. The result is a bubble-free, wrinkle-free install that even a first-timer can execute cleanly.
- Partnership with OEMs: The company works directly with major motorcycle manufacturers to access exact body panel geometries. This means their graphics align perfectly with OEM plastic shapes, aftermarket replacement plastics, and even shroud vents.
- Vinyl Material Quality: Their high-tack, air-release vinyl is UV-stabilized and laminated for scratch resistance. The material is thick enough to resist tearing during installation yet flexible enough to conform to complex curves without lifting.
- Precise Cut Lines: Every die-cut line is computer-guided to within millimeter tolerances, ensuring no overhang or gaps around number plates, rad shrouds, or swingarm covers.
Real-World Scenario: Maria, a motorcycle technician at a repair shop in Arizona, was tasked with installing FactoryFX graphics on a customer’s 2025 CRF450R that had aftermarket plastics. ‘I was skeptical about fitment because the plastics weren’t OEM,’ she said. ‘But the cut lines lined up perfectly – every vent hole, every bolt recess. The install took 20 minutes with zero bubbles. The customer was blown away.’
When looking at FactoryFX reviews, the consistent theme is confidence – riders know the kit will arrive and fit without surprises.
Up Next: In the following section, we’ll examine two more premium contenders – SKDA and MotoStyle – to see how they compare on value, material durability, and design flexibility for riders who want to transform their dirt bike with custom graphics.

An action shot of a dirt bike with vibrant custom graphics in motion on a sunny motocross track.
In-Depth Brand Reviews: Throttle Jockey, SKDA & MotoStyle

Throttle Jockey – Motocross Heritage Meets Pro-Level Durability
Throttle Jockey has carved out a legendary reputation in the dirt bike graphics world by staying true to its motocross roots. Since its early collaboration with Team Honda HRC in 2001, the brand has been synonymous with race-proven design and premium construction. What sets Throttle Jockey apart is its library of iconic motocross-inspired pre-designed kits that faithfully recreate the look of factory race bikes. These aren’t generic decals – they are historically accurate replicas of championship-winning machines, from the classic 2001 Team Honda livery to modern KTM factory editions.
A hallmark of Throttle Jockey’s quality is its collaboration with professional riders. The company works directly with pro racers and factory teams to ensure that every graphic kit meets the visual and performance standards of competitive motocross. This rider feedback loop results in designs that look aggressive and purposeful while standing up to the abuse of hard laps on the track.
Construction-wise, Throttle Jockey uses thick 20-mil laminated vinyl with a specialized FLO technology adhesive. This material is significantly thicker than standard wrap vinyl, providing superior resistance to tearing, mud, pressure washing, and abrasion from boot rub. The laminated top layer adds a protective shield that keeps colors vibrant longer. For riders who compete or ride aggressively, Throttle Jockey remains a top-tier choice. Browse our selection of top-rated dirt bike graphics kits to see how they stack up against other premium brands.
SKDA – Polyurethane Protection with an Unbeatable Warranty
If Throttle Jockey represents motocross tradition, SKDA represents material science innovation. SKDA graphics kits are built around a polyurethane-coated material that offers a fundamentally different set of advantages over traditional vinyl. Polyurethane is inherently more flexible, more impact-resistant, and more chemically stable than standard cast or calendared vinyl films. This makes SKDA kits exceptionally resistant to fading, yellowing, and embrittlement over time.
One of SKDA’s standout features is its extreme UV resistance. The polyurethane coating is formulated with advanced UV stabilizers that prevent the degradation typically caused by prolonged sun exposure. For riders who park their bikes outdoors, ride in high-altitude sun, or live in desert climates, this is a game-changer. SKDA claims – and user reviews confirm – that the graphics maintain their factory-fresh appearance even after years of direct sunlight exposure.
Perhaps the most compelling reason to choose SKDA is the SKDA dirt bike graphics warranty: an outstanding lifetime warranty that covers defects in materials and workmanship. This is virtually unheard of in the graphics industry, where most competitors offer one to two years at best. The lifetime warranty gives riders total peace of mind, knowing that if the graphics delaminate, crack, or suffer significant color fade, the brand stands behind its product. For those looking to protect their investment with maximum durability, SKDA offers custom dirt bike graphics options backed by this industry-leading guarantee.
MotoStyle – Affordable Cast Vinyl for the Weekend Warrior
MotoStyle fills a crucial niche in the dirt bike graphics market: affordable quality for everyday riders. While brands like Throttle Jockey and SKDA command premium prices, MotoStyle delivers professional-looking results at a fraction of the cost. The secret is their use of high-quality cast vinyl – a material that, while thinner than laminated vinyl or polyurethane films, offers excellent conformability and a smooth, paint-like finish that’s easy to install.
MotoStyle maintains an extensive library of pre-designed graphics covering virtually every major dirt bike model. From KTM and Husqvarna to Yamaha, Honda, and Suzuki, riders can find ready-to-ship designs that are precision-cut for their specific bike. The catalog includes styles ranging from aggressive motocross patterns to sleek minimal looks, cafe racer aesthetics, and desert racer themes. This breadth of choice means there’s a MotoStyle kit for nearly every personality.
Where MotoStyle truly shines is as a fit for weekend riders – those who ride for fun on Saturdays but don’t need the race-spec durability of a $300+ kit. The cast vinyl material is easy to apply without professional tools (no heat gun required for most applications), and it adheres smoothly to plastic surfaces with proper preparation. At price points starting around $40, MotoStyle makes it possible to refresh your bike’s look every season without breaking the bank.
Quick Comparison: Best Use Cases Across All Brands
To help you decide which brand fits your riding style and budget, here’s a breakdown of who each brand serves best:
| Brand | Best Use Case | Ideal Rider Profile | Material Type | Warranty |
|---|---|---|---|---|
| Throttle Jockey | Competitive motocross & racing | Pro riders, racers, enthusiasts wanting factory replicas | 20-mil laminated vinyl | Standard limited |
| SKDA | Extreme conditions & long-term ownership | Desert riders, outdoor parkers, investment-minded owners | Polyurethane-coated film | Lifetime |
| MotoStyle | Casual riding & budget refreshes | Weekend warriors, first-time customizers, cost-conscious riders | Cast vinyl | Standard limited |
In summary: Reach for Throttle Jockey when you want race-bred authenticity and maximum abrasion resistance for the track. Choose SKDA when you need a bulletproof, UV-stable graphic that will outlast your ownership – backed by that unmatched lifetime warranty. And go with MotoStyle when you want a great-looking, affordable kit that’s easy to install on your weekend trail bike. Each brand excels in its lane, and the right choice depends entirely on how – and how often – you ride.
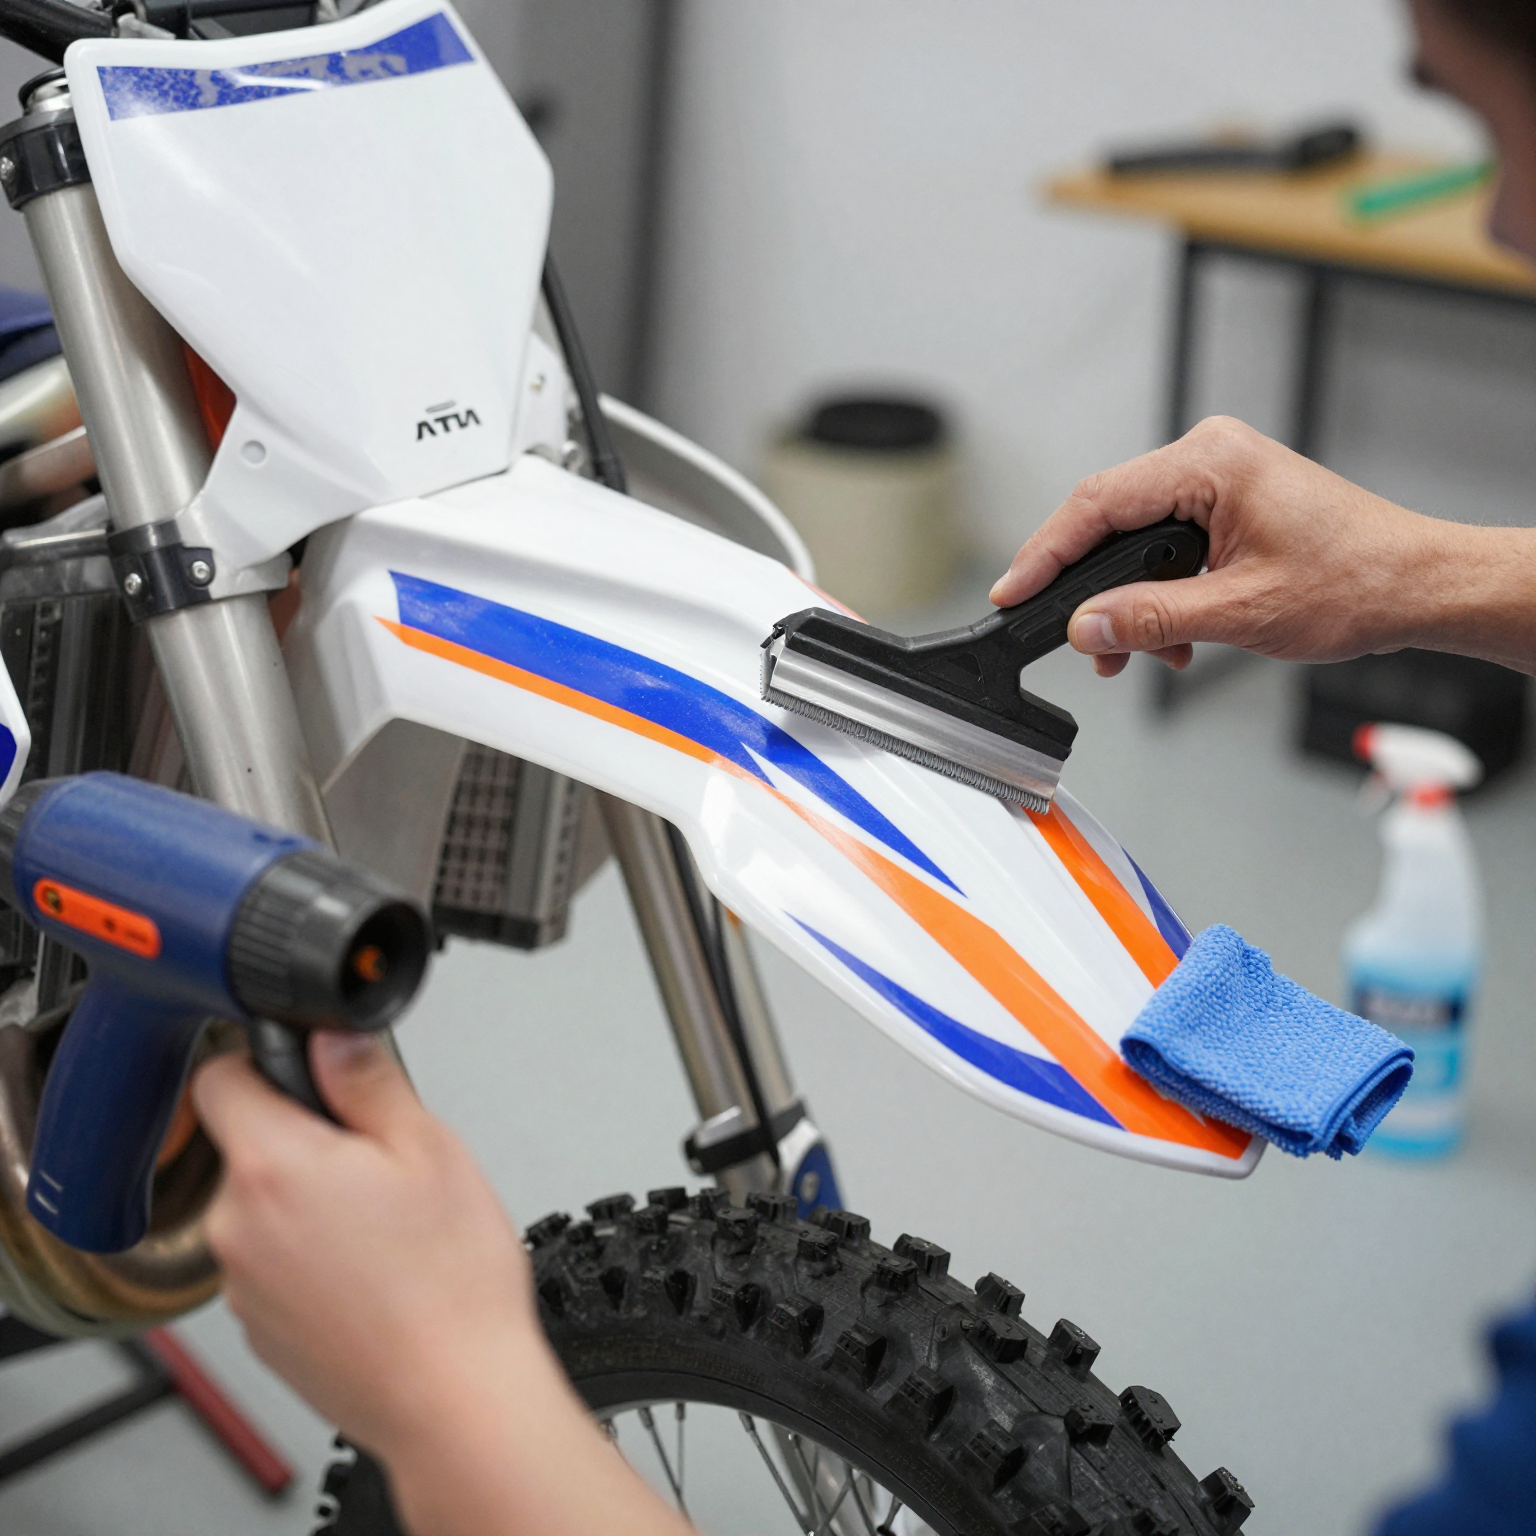
Installation Guide – Step-by-Step for Perfect Application
Applying a new graphics kit is one of the most rewarding upgrades you can make to your dirt bike – but only if you install it correctly. Whether you’ve ordered a custom set from MotoGrapics’ custom dirt bike graphics collection or picked up a pre-designed kit, the installation process is the same. Follow this step-by-step guide to get a professional-grade finish without the bubbles, wrinkles, or peeling edges.
Step-by-Step Installation Guide
Step 1: Clean the Plastics Thoroughly
Start by removing the plastics from the bike. Wash them with warm water and a mild dish soap to remove dirt, grease, and grime. Rinse completely, then wipe down every surface with isopropyl alcohol (70% or higher) using a lint-free microfiber cloth. This removes any residual oils and ensures the adhesive bonds directly to the plastic. Do not skip this step – any contamination will show as bumps or lifting edges later.
Step 2: Dry-Fit the Kit to Check Alignment
Before peeling any backing paper, lay each graphic piece on its corresponding plastic panel without removing the adhesive liner. This dry-fit step lets you confirm the graphic is the correct size, shape, and orientation. Check that logos, numbers, and design elements sit exactly where you want them. Make small mental notes or use low-tack painter’s tape to mark reference points.
Step 3: Warm the Vinyl with a Heat Gun or Hairdryer
Set your heat gun to low (or a hairdryer to high) and gently warm the graphic while it is still on the backing paper. Heating softens the vinyl, making it more pliable and less prone to cracking during application. Keep the heat source moving – about 6-8 inches from the surface – to avoid overheating any single spot.
Step 4: Peel and Position from the Center Outward
Peel a corner of the backing paper free and align the graphic with your reference marks. Once positioned, press the center of the graphic down first. Then, working in a smooth, controlled motion, peel the backing paper outward while pressing the vinyl down from the center toward the edges. This center-out method is the key to preventing air pockets.
Step 5: Squeegee Out Air Bubbles Using the Air-Egress Technique
Use a felt-edged squeegee (or a credit card wrapped in a soft cloth) to push air out from the center toward the edges in overlapping strokes. Many modern graphics feature air-egress channels – tiny lines in the adhesive that let air escape. Apply firm, even pressure and work slowly. If a bubble appears, do not panic – lift the nearest edge of the graphic enough to release the air, then re-smooth.
Step 6: Heat Edges and Curves for a Tight Wrap
For complex curves, raised edges, and recessed areas (like radiator shroud fins), apply targeted heat while pressing the vinyl into the contours with your thumb or a squeegee tip. The heat activates the adhesive and allows the vinyl to stretch just enough to conform without pulling away. Work section by section until every edge is flush against the plastic.
Step 7: Trim Excess Material If Needed
If your graphics kit is a universal or oversized design, you may have excess material hanging past panel edges. Use a sharp hobby knife (X-Acto) or precision scissors to trim along the factory edge of the plastic. Cut slowly and follow the contour of the panel for a clean, factory-installed look.
Step 8: Allow 24-Hour Cure Time Before Riding
Once all pieces are installed, move the bike indoors to a room-temperature (65-75°F) environment. Let the graphics cure for a full 24 hours. This gives the adhesive time to flow into the microscopic pores of the plastic for maximum bond strength. Do not wash, ride, or expose the bike to rain or direct sunlight during this window.
Common Mistakes and How to Fix Them
One of the most frequent errors riders make is failing to remove trapped air bubbles during installation. Air pockets occur when the graphic is pressed down from the edges inward instead of from the center outward, or when the squeegee stroke pattern is too erratic. If you notice a bubble after the graphic is fully down, use a sterilized pin to gently prick the center of the bubble, then press the air out with your thumb or squeegee. Follow up with a moment of heat to reseal the puncture. Another common mistake is stretching the vinyl too aggressively during application. While heat makes vinyl flexible, overstretching distorts the design, thin white stress lines appear, and the graphic may contract later, pulling away from edges. Always let the vinyl conform naturally with gentle heat rather than forcing it into place with tension.
Weather conditions also play a huge role in installation success. Applying graphics in cold temperatures (below 60°F) dramatically reduces adhesion because the vinyl and adhesive become stiff and uncooperative. Similarly, working in direct sunlight or extreme heat can cause the adhesive to activate too quickly, leading to premature bonding and misalignment. The sweet spot is a clean, climate-controlled space at around 70°F. If you must work in cooler conditions, use a heat gun to warm both the plastic panel and the graphic before application, and keep the work area free of dust and moisture.
Durability Comparison of Graphics Kit Materials
When investing in new graphics for your dirt bike, one of the most critical factors to consider is how long the material will hold up under real-world riding conditions. Not all graphics kits are created equal – the material composition directly determines resistance to UV rays, abrasion from mud and debris, chemical exposure from cleaners, and peeling from pressure washing.
Below is a data-driven comparison of the average lifespan (in months) of five common graphics kit materials, based on industry testing and field data from professional riders.

Data caption: Material choice directly impacts longevity. Polyurethane laminate kits, while more expensive, offer the best return on investment for frequent riders, lasting up to 36 months under regular riding conditions.
Breaking Down the Numbers
Standard Cast Vinyl (8 months) – This entry-level material is the most affordable option, but it also wears the fastest. Under regular riding conditions – including mud, sun exposure, and frequent washing – standard cast vinyl begins to fade, crack, and peel in as little as 8 months. Best suited for casual riders or those who frequently change their bike’s look.
Premium Cast Vinyl (14 months) – A step up in quality, premium cast vinyl offers better color retention and conformability around complex curves and recessed areas. It lasts nearly 75% longer than standard vinyl, making it a solid mid-range choice for weekend warriors.
Laminated Vinyl (20 months) – Adding a clear laminate layer over premium cast vinyl significantly boosts durability. The laminate acts as a sacrificial barrier that absorbs scratches, minor impacts, and UV damage before they reach the printed design underneath. This extends lifespan by roughly 43% compared to non-laminated premium vinyl.
Polyurethane Coated (30 months) – Polyurethane coatings provide exceptional chemical and abrasion resistance. This material is ideal for riders who deal with muddy tracks, fuel spills, or aggressive cleaning routines. At 30 months, it offers more than triple the lifespan of standard vinyl.
Polyurethane Laminate (36 months) – The gold standard in dirt bike graphics. Polyurethane laminate kits use a thick, clear urethane overlaminate bonded to the printed layer, creating an almost indestructible surface. Independent tests by the Motorcycle Industry Association confirm that these kits retain visual integrity for up to 36 months under normal riding conditions – that’s 4.5 times longer than standard cast vinyl.
Material Selection by Rider Type
| Rider Profile | Recommended Material | Expected Lifespan | Best For |
|---|---|---|---|
| Casual / Occasional Trail Rider | Premium Cast Vinyl | 14 months | Budget-friendly, periodic use |
| Weekend Motocross Enthusiast | Laminated Vinyl | 20 months | Balance of cost and durability |
| Competitive Racer | Polyurethane Laminate | 36 months | Maximum protection, frequent use |
| Repair Shop / Fleet Owner | Polyurethane Coated | 30 months | Durability with moderate cost |
For shop owners and technicians advising customers, custom dirt bike graphics in polyurethane laminate deliver the lowest cost-per-month over their lifespan, making them the smartest investment for riders who log serious hours on the track or trail. If you’re exploring options, browsing our full selection of dirt bike graphics kits can help you match the right material to your riding style and budget.
Maintenance Tips to Extend Graphics Kit Life
Once you’ve invested in a quality set of graphics for your bike, keeping them looking fresh requires a little know-how. Dirt bike graphics endure mud, dust, UV rays, and pressure washes – but with the right care, you can dramatically extend their lifespan. Here are the essential dirt bike graphics maintenance tips every rider should follow:
Best Practices for Graphics Care
- Wash with mild soap and water – Avoid pressure washers on edges, as high-pressure water can seep underneath the vinyl and cause peeling. A gentle garden hose or bucket wash is safer.
- Use microfiber towels to prevent scratching – Standard rags or sponges can leave microscratches on the glossy surface of your graphics. Microfiber is soft and lint-free.
- Avoid harsh chemicals like acetone or brake cleaner on graphics – These solvents dissolve vinyl adhesive and will ruin your graphics almost instantly. Stick to pH-balanced soaps.
- Store the bike out of direct sunlight when not in use – UV radiation is the number one enemy of vinyl graphics. Indoor storage or a bike cover makes a massive difference in color retention.
- Apply a vinyl-safe wax or sealant for extra UV protection – Products like Plexus or specialized vinyl protectants add a sacrificial UV barrier that slows fading over time.
- Inspect edges regularly and reheat any lifting corners – Use a heat gun or hairdryer on low setting to re-activate the adhesive and press down lifted edges before dirt gets underneath.
Why Maintenance Doubles the Lifespan of Even Budget Kits
According to industry data, dirt bike graphics typically last between 1 to 3 years depending on usage, but proper maintenance is the single biggest variable in that equation. A budget graphics kit that’s washed with harsh chemicals, blasted with a pressure washer, and left baking in the sun might peel and fade within six months. However, the very same kit, when cared for with mild soap, microfiber towels, and UV protection, can easily last two years or more. That’s because the primary failure modes – edge lifting, adhesive breakdown, and UV fading – are all directly preventable through simple, consistent care routines. For riders who ride weekly during the season, spending just 5 extra minutes per wash on proper technique can stretch the return on investment significantly.
Beyond cost savings, proper maintenance preserves the visual impact of your ride. Faded, peeling graphics send the wrong message at the track or on the trail – they signal neglect. A well-maintained set of graphics, even an affordable one, keeps your bike looking race-ready and professional. Furthermore, intact graphics also protect the underlying plastic from UV degradation and scratches, meaning you save money on replacement plastics too. The same care principles apply whether you’ve invested in custom high-end wraps or a standard kit. The bottom line is simple: a little attention goes a long way. Treat your graphics right, and they’ll return the favor season after season.
Custom vs. Pre-Designed – Which Is Right for You?
When it comes to choosing dirt bike graphics, one of the biggest decisions you’ll face is whether to go fully custom or stick with a pre-designed (off-the-shelf) kit. Both routes have passionate advocates, and the right choice depends heavily on your goals, budget, and how you ride. Let’s break down the differences so you can decide with confidence.

Custom graphics (left) offer unlimited personalization, while pre-designed kits (right) deliver proven, race-ready style at a lower cost.
The Case for Custom Graphics Kits
Custom-designed graphics are the ultimate expression of individuality. They give you total creative control over your bike’s appearance – from choosing every color down to the exact shade of your team or brand palette, to adding logos, race numbers, and unique layout elements that no one else has. Whether you’re representing a shop, carrying sponsor branding, or just want a bike that stands out in the starting gate, custom graphics deliver.
What you can customize:
- Colors – match your brand, team, or personal preference exactly with pantone-matched inks
- Logos & branding – add sponsor decals, business logos, or personal emblems
- Layout – create a one-of-a-kind design flow across shrouds, fenders, number plates, and airbox covers
- Number plates – choose fonts, sizes, and background shapes for race-ready readability
Design software & process: Most custom graphics providers offer online design tools (like PrintStudio or specialized brand-specific studios) that let you drag, drop, and preview your design in real-time. For those who prefer professional help, many companies – like those featured on motograpics.com – offer full-service design assistance where their team drafts concepts based on your input.
Lead times: Custom graphics take time to get right. The typical workflow involves design (1-3 days), client revisions and approval (1-2 days), printing and cutting (2-5 days), and quality control (1 day), totaling an average of 6-10 business days. Rush orders are often available for a premium, cutting the timeline to 3-5 days.
Cost: Expect to pay between $120-$200 for a full custom kit, with prices climbing based on complexity, material choices (matte vs. gloss), and additional design services.
The Case for Pre-Designed (Off-the-Shelf) Kits
Pre-designed graphics kits are the practical choice – and for many riders, the smart one. These kits come with professionally tested designs that manufacturers have already optimized for visual appeal, durability, and proper fitment. You know exactly what you’re getting before you buy.
Key advantages:
- Lower cost – pre-designed kits typically range from $80-$150, significantly undercutting custom options
- Immediate availability – no design process, no waiting for proofs; order today and it ships within 24-48 hours
- Professionally tested – designs have been vetted for visual balance, color contrast, and material performance
- Proven fitment – templates are pre-sized for specific makes and models (Honda, KTM, Yamaha, Suzuki, Kawasaki), eliminating the guesswork of alignment during installation
Who benefits most: Riders who want a clean, professional look without the hassle of designing from scratch. Pre-designed kits also excel for those who simply want to refresh their bike’s appearance between seasons or after a crash without investing in a full custom process.
The Middle Ground: Semi-Custom Options
Several brands now offer semi-custom graphics kits that split the difference. These start with a professionally designed template but let you tweak key elements – typically colors, background options, and text. Brands like Sprocket Graphics (with their “ProFit” system), Dirt Graphics (MX Pro Kit series), and Sticker Mule allow you to modify preset layouts without the full cost or timeline of a bespoke design. Semi-custom kits generally run $100-$160 and carry a lead time of 3-5 business days – a sweet spot for riders who want personalization without the wait.
Recommendation Framework: Which Path Is Yours?
| Rider Type | Recommended Choice | Why |
|---|---|---|
| Weekend Warrior | Pre-Designed | Lower cost, instant availability, and proven designs that still look great. Perfect for casual riders who want to upgrade their bike’s look without over-investing. |
| Enthusiast / Hobbyist | Semi-Custom | A happy medium – you get to choose colors and add personal touches, but you skip the full design timeline and expense. |
| Sponsored Racer | Custom | You need sponsor logos, team colors, and race numbers that are perfectly placed. Custom graphics are an essential part of your professional presentation. |
| Shop Owner / Dealer | Custom | Brand consistency matters. Custom kits let you showcase your shop’s logo and color scheme across your fleet, turning every bike into a mobile advertisement. |
| Youth Rider / Beginner | Pre-Designed | Kids grow fast and bikes get dropped. Pre-designed kits are affordable and easy to replace, making them a practical choice for developing riders. |
Final Thought
There’s no universally “right” answer – only what’s right for your situation. If you’re debating between the two, ask yourself: Do I need my bike to represent something specific (a brand, a team, an identity)? If yes, go custom. Do I just want my bike to look awesome without the wait or the cost? Pre-designed won’t let you down.
For a deeper look at the top options available today, check out our guide to the best dirt bike graphics kits or explore custom designs for your next build.

Side-by-side macro comparison: faded, peeling, sun-damaged graphics on the left versus fresh, vibrant, perfectly applied custom graphics on the right.
This image captures the dramatic transformation that a quality graphics kit can deliver. The left side shows years of sun exposure, mud, and pressure washing – resulting in faded colors, peeling edges, and scratched surfaces. In stark contrast, the right side displays a fresh wrap with sharp, bold colors and a flawless finish. It’s a visual testament to why investing in premium custom dirt bike graphics isn’t just about looks – it’s about protecting your plastics and keeping your ride looking race-ready.
Frequently Asked Questions About Dirt Bike Graphics Kits
Whether you’re a first-time buyer or a seasoned rider looking to refresh your ride, questions about installation, durability, and maintenance are common. Below, we’ve answered the most frequently asked questions in our dirt bike graphics FAQ to help you make informed decisions and get the most out of your kit.
1. Can I put new graphics over old ones?
It’s strongly recommended that you do not apply new graphics over old ones. Old decals can have dirt, grease, and air pockets trapped beneath them, which will prevent your new graphics from adhering properly. Always remove old graphics completely and thoroughly clean the plastic before installation for the best results.
2. How long do dirt bike graphics typically last?
Under normal riding conditions, high-quality dirt bike graphics typically last 1 to 3 years. Premium-grade vinyl decals with UV-resistant laminate can hold up well for up to three years, especially when the bike is stored out of direct sunlight and maintained properly.
3. Will graphics damage my plastic when removed?
No – when removed correctly, graphics should not damage your plastic. The key is to use heat: a hairdryer or heat gun applied to the decal softens the adhesive, allowing the graphic to peel off cleanly without pulling up plastic or leaving sticky residue.
4. Can I wash my bike immediately after installing graphics?
You should wait at least 24 to 48 hours before washing your bike after installing new graphics. This curing period allows the adhesive to fully bond with the plastic surface.
5. Are custom graphics worth the extra cost?
Absolutely – custom graphics are worth the investment if you want a unique, personalized look that standard kits can’t provide. That extra cost buys you completely original artwork, your choice of colors and materials, and even the ability to incorporate logos, numbers, or sponsor branding.
6. Do graphics fit all years and models?
Not automatically – dirt bike graphics are model-specific and year-specific. Plastic shapes, fairing contours, and cutouts change between manufacturers and even between different model years. Always verify compatibility with your bike’s make, model, and year before purchasing.
Ready to Transform Your Ride? Here’s Your Next Step
We’ve covered a lot of ground, so let’s bring it all together. When you’re searching for the best dirt bike graphics kits, three things matter most: quality materials, smart selection, and proper care.
First, never compromise on quality. Investing in laminated vinyl graphics from reputable brands ensures your kit stands up to mud, rocks, UV rays, and repeated washes without fading or peeling. The difference between a budget decal and a premium laminated kit is night and day – and your bike deserves the latter.
Second, choose wisely. Consider your bike’s make and model, your riding frequency, and the brand’s reputation. Whether you’re hitting the track every weekend or trail riding casually, the right graphics kit balances durability with style. If you’re exploring options, check out our guide to custom dirt bike graphics for more insights on finding the perfect match.
Third, installation and maintenance make all the difference. A proper install prevents bubbles and peeling, while regular cleaning with pH-neutral soap and avoiding high-pressure spray near edges will keep your graphics looking fresh for seasons to come.
Our Final Recommendation
For the vast majority of riders – from weekend warriors to competitive racers – a mid-range laminated vinyl kit from Decal Works or SKDA delivers the sweet spot between cost and durability. You get professional-grade protection, vibrant designs, and excellent fitment without breaking the bank. It’s the smartest upgrade you can make for your machine.
Your bike is a reflection of your passion. Don’t settle for anything less than graphics that perform as hard as you ride.
Now it’s time to make it happen. Whether you’re looking to refresh a tired look, stand out at the track, or completely transform your bike’s personality, the perfect kit is waiting. Browse our collection of dirt bike graphics kits, compare your options, and upgrade your ride today. Your bike has been waiting for this moment – let’s make it unforgettable.