
When Chain Lube and Degreaser Meet Your Dirt Bike Graphics
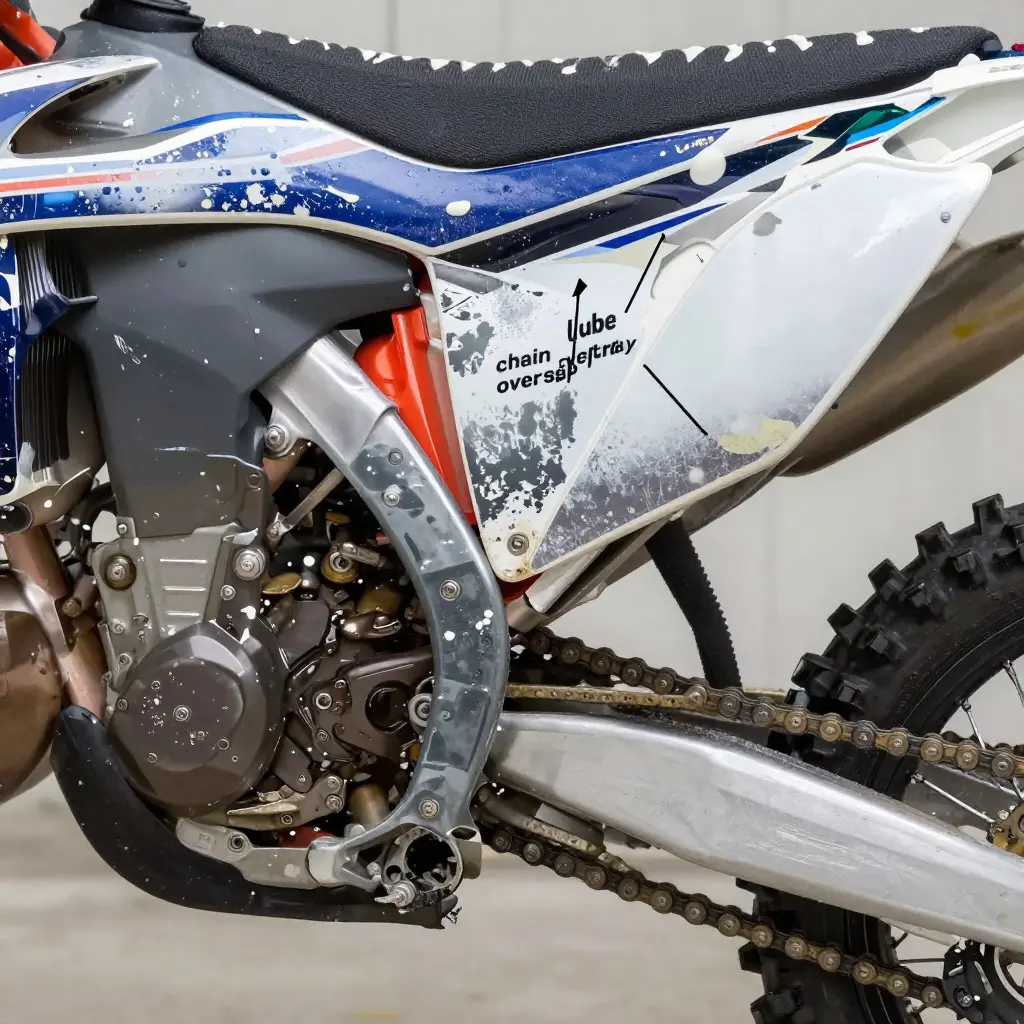
Chain lube and degreaser show up in nearly every dirt bike maintenance routine, and both work against the vinyl decals on your swingarm. Chain lube flings fine overspray backward across the rear of the bike. Degreaser, applied to strip grime from the chain and sprocket, routinely lands well beyond the chain. Over time the two reach the swingarm decals and break down the adhesive, the printed ink, and the clear top laminate. Riders often notice nothing until edges lift, colors fade, or the decal turns tacky and smears.
For riders, graphics installers, and print shops that reprint decals, the same point applies: not every vinyl film tolerates repeated solvent exposure. Verify solvent resistance before committing to a reprint, and match the film to the chemicals it will actually meet rather than to the artwork alone. This guide covers how chain lube and degreaser act on decal films, how to test and read solvent resistance, which laminate and adhesive combinations hold up on the swingarm, and how to reprint custom dirt bike graphics that last a full season of cleaning and lubrication.
Why Dirt Bike Graphics Fail First at the Swingarm
The swingarm takes more abuse than any other surface on a dirt bike. It sits low and nearly horizontal, directly in the path of everything the drivetrain throws. Graphics there start failing first, often months before the shrouds or number plates show similar damage.
The Chemical Assault: Chain Lube and Degreaser
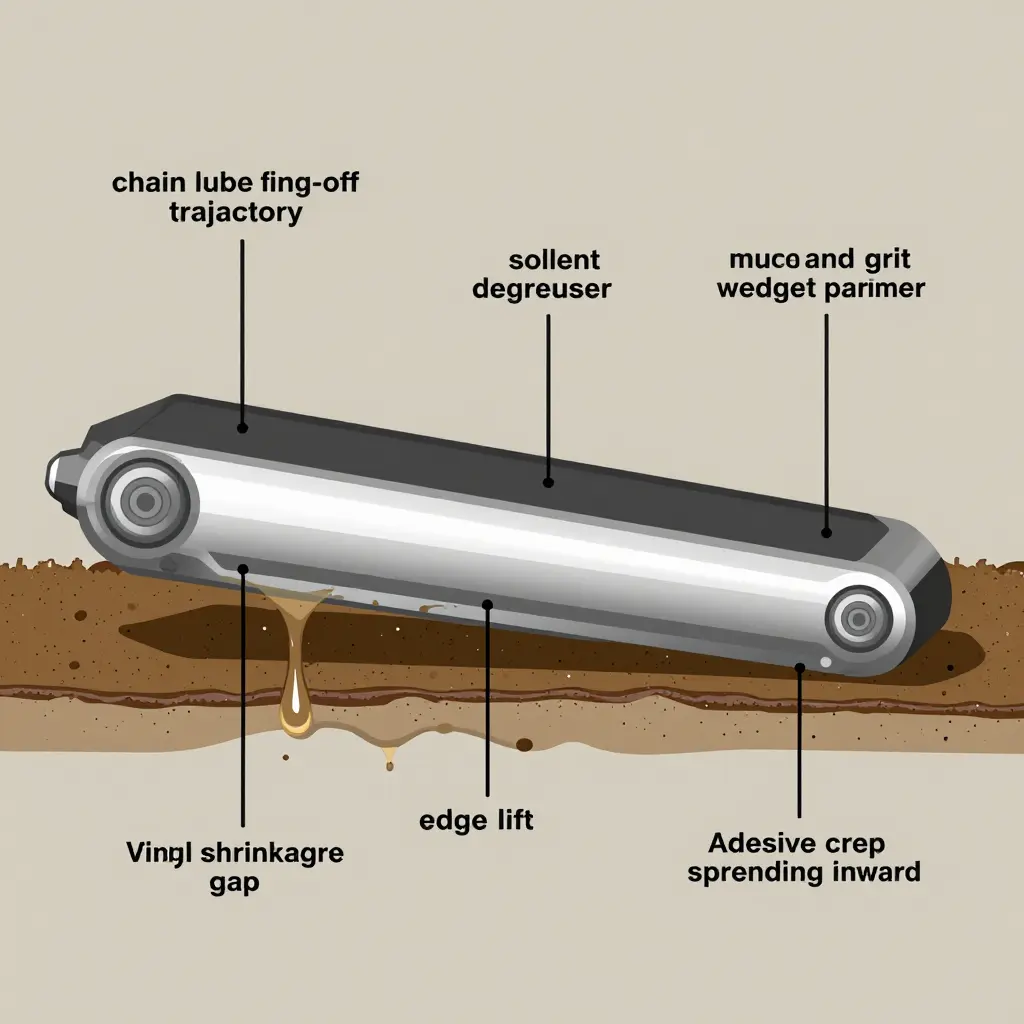
Chain lube delivers a steady chemical dose. As the chain spins, centrifugal force throws an aerosol of base oils, solvent carriers, and tackifier resins onto the swingarm. Each deposit softens the adhesive and plasticizes the vinyl, weakening the bond from below.
Cleaning the chain adds to the problem. Solvent-heavy degreasers are brushed on and rinsed off, sending concentrated petroleum distillates and surfactants down the swingarm. Those solvents attack the pressure-sensitive adhesive harder than the lube does.
Mud, Grit, and Pooling Liquids
The swingarm also collects what the rear wheel throws. Mud, sand, and grit gather at the decal edge and act as an abrasive wedge under the film. Because the surface is horizontal, liquids do not drain. They pool against the edges and can sit there for hours.
How Failure Progresses: Edge Lift, Shrinkage, and Adhesive Creep
Failure follows a sequence. Pooled solvent works into the exposed adhesive at the edge and the bond starts to release; edge lift is the first sign. At the same time, plasticizers migrate out of the vinyl, which shrinks and pulls away from what had been a flush edge.
Adhesive creep finishes it. Heat and sustained load make the pressure-sensitive adhesive flow, and the lifted edge moves farther inward. Grit works under the flap and levers the decal off. Once creep starts, cleaning or re-pressing will not restore the original bond.
Riders and installers comparing replacement films can explore swingarm-area graphic options made from vinyl with higher solvent resistance.
What Film Solvent Resistance Actually Means
Film solvent resistance measures how long a printed graphic lasts against petroleum distillates, ketones, aromatic hydrocarbons, and the caustic degreasers riders aim at the swingarm after a muddy weekend. No single material determines it. A dirt bike decal is a stack of bonded layers – a clear laminate or topcoat, the printed ink, the vinyl substrate, and the pressure-sensitive adhesive – and each layer fails on its own timeline once solvent chemistry gets the upper hand.
Layer by layer, the chemistry differs
The cross-linked laminate topcoat is the first barrier. Cross-linking ties the clear film’s polymer chains into a dense three-dimensional network with fewer gaps for solvent molecules. That network resists swelling, so petroleum distillates bead up and evaporate rather than soak in. Bare printed ink has no such protection. Its resins sit exposed, and strong degreasers can dissolve the binder almost on contact, lifting pigment before you can wipe it off.
Under the print, the vinyl film is softened with plasticizers, liquid esters blended into the PVC to keep it flexible. Solvents attack those additives directly. A strong degreaser pulls plasticizer out of the film, and without it the vinyl shrinks, curls, and turns chalky or discolored.
Why dwell time decides the outcome
Solvent damage depends on contact time as much as on chemistry. A quick splash may do nothing. Leave degreaser pooling on a swingarm decal while you scrub elsewhere, though, and the solvent gets the minutes it needs to swell the laminate, move through the ink, and reach the adhesive. The longer the wet contact, the faster the bond fails. A product that seems harmless in a five-second spray can damage a graphic left wet for a minute.
- Edge lift – solvent creeps under the film edge and softens the adhesive until the corner curls and traps grit.
- Plasticizer leaching – the vinyl loses its flex agents and shrinks, discolors, and embrittles.
- Ink bleed – unprotected or under-laminated ink dissolves and smears, blurring fine detail.
A film with a verified cross-linked laminate keeps custom dirt bike graphics crisp for a season; without it, expect a reprint within a month. Solvent-ready options are listed in the dirt bike graphics kits lineup.
Film and Laminate Solvent Resistance at a Glance
Not every film survives the chemicals flung across a swingarm. Before committing to a reprint, compare how common materials hold up against chain lube and degreaser: weak solvent resistance means the whole panel fails early. Choosing the best dirt bike graphics starts with the film underneath.
| Material Type | Laminate Present | Chain Lube Resistance | Degreaser Resistance | Reprint Recommendation |
|---|---|---|---|---|
| Standard calendared vinyl | No | Poor | Poor | Avoid for swingarm use |
| Premium cast vinyl | No | Moderate | Fair | Reprint only with added protection |
| Cast vinyl with protective laminate topcoat | Yes | Good | Good | Recommended for most riders |
| Specialty solvent-resistant film | Yes | Excellent | Excellent | Ideal for heavy chemical exposure |
Summary: For graphics that see constant lube fling and degreaser washdown, a laminate topcoat or a specialty solvent-resistant film means the difference between lasting a season and smearing after one ride.
Chemicals That Attack Vinyl Graphics
The swingarm is the dirtiest and most chemically hostile spot on a dirt bike, and your custom dirt bike graphics sit in the splash zone. Every chain clean, degrease, and wash throws solvents at the film, the ink, and the adhesive. Vinyl tolerates a lot, up to a point. These are the chemicals that do the damage long before you notice:
- Chain lube with high petroleum distillate content – the solvent carrier in the propellant softens the vinyl’s clear topcoat and lets edges start lifting.
- Citrus-based degreasers – the d-limonene terpenes act as a slow solvent that swells the film and dulls printed color over repeated use.
- Brake cleaner – aggressive ketones and chlorinated solvents attack ink and adhesive almost instantly, causing bleeds and peeled corners.
- Carb cleaner – harsh aromatic solvents etch the laminate, leaving a hazy, cracked surface that never fully recovers.
- Strong alkaline foaming cleaners – a high pH breaks down the adhesive bond and etches the film, so graphics curl and lift after washing.
- Acetone and lacquer thinner – fast-evaporating ketones dissolve the topcoat outright and can weld ink to your rag instead of the panel.
Read the product labels on your chain lube and cleaners, and choose solvent-resistant film before you reprint.
Solvent Resistance Ratings by Film Type
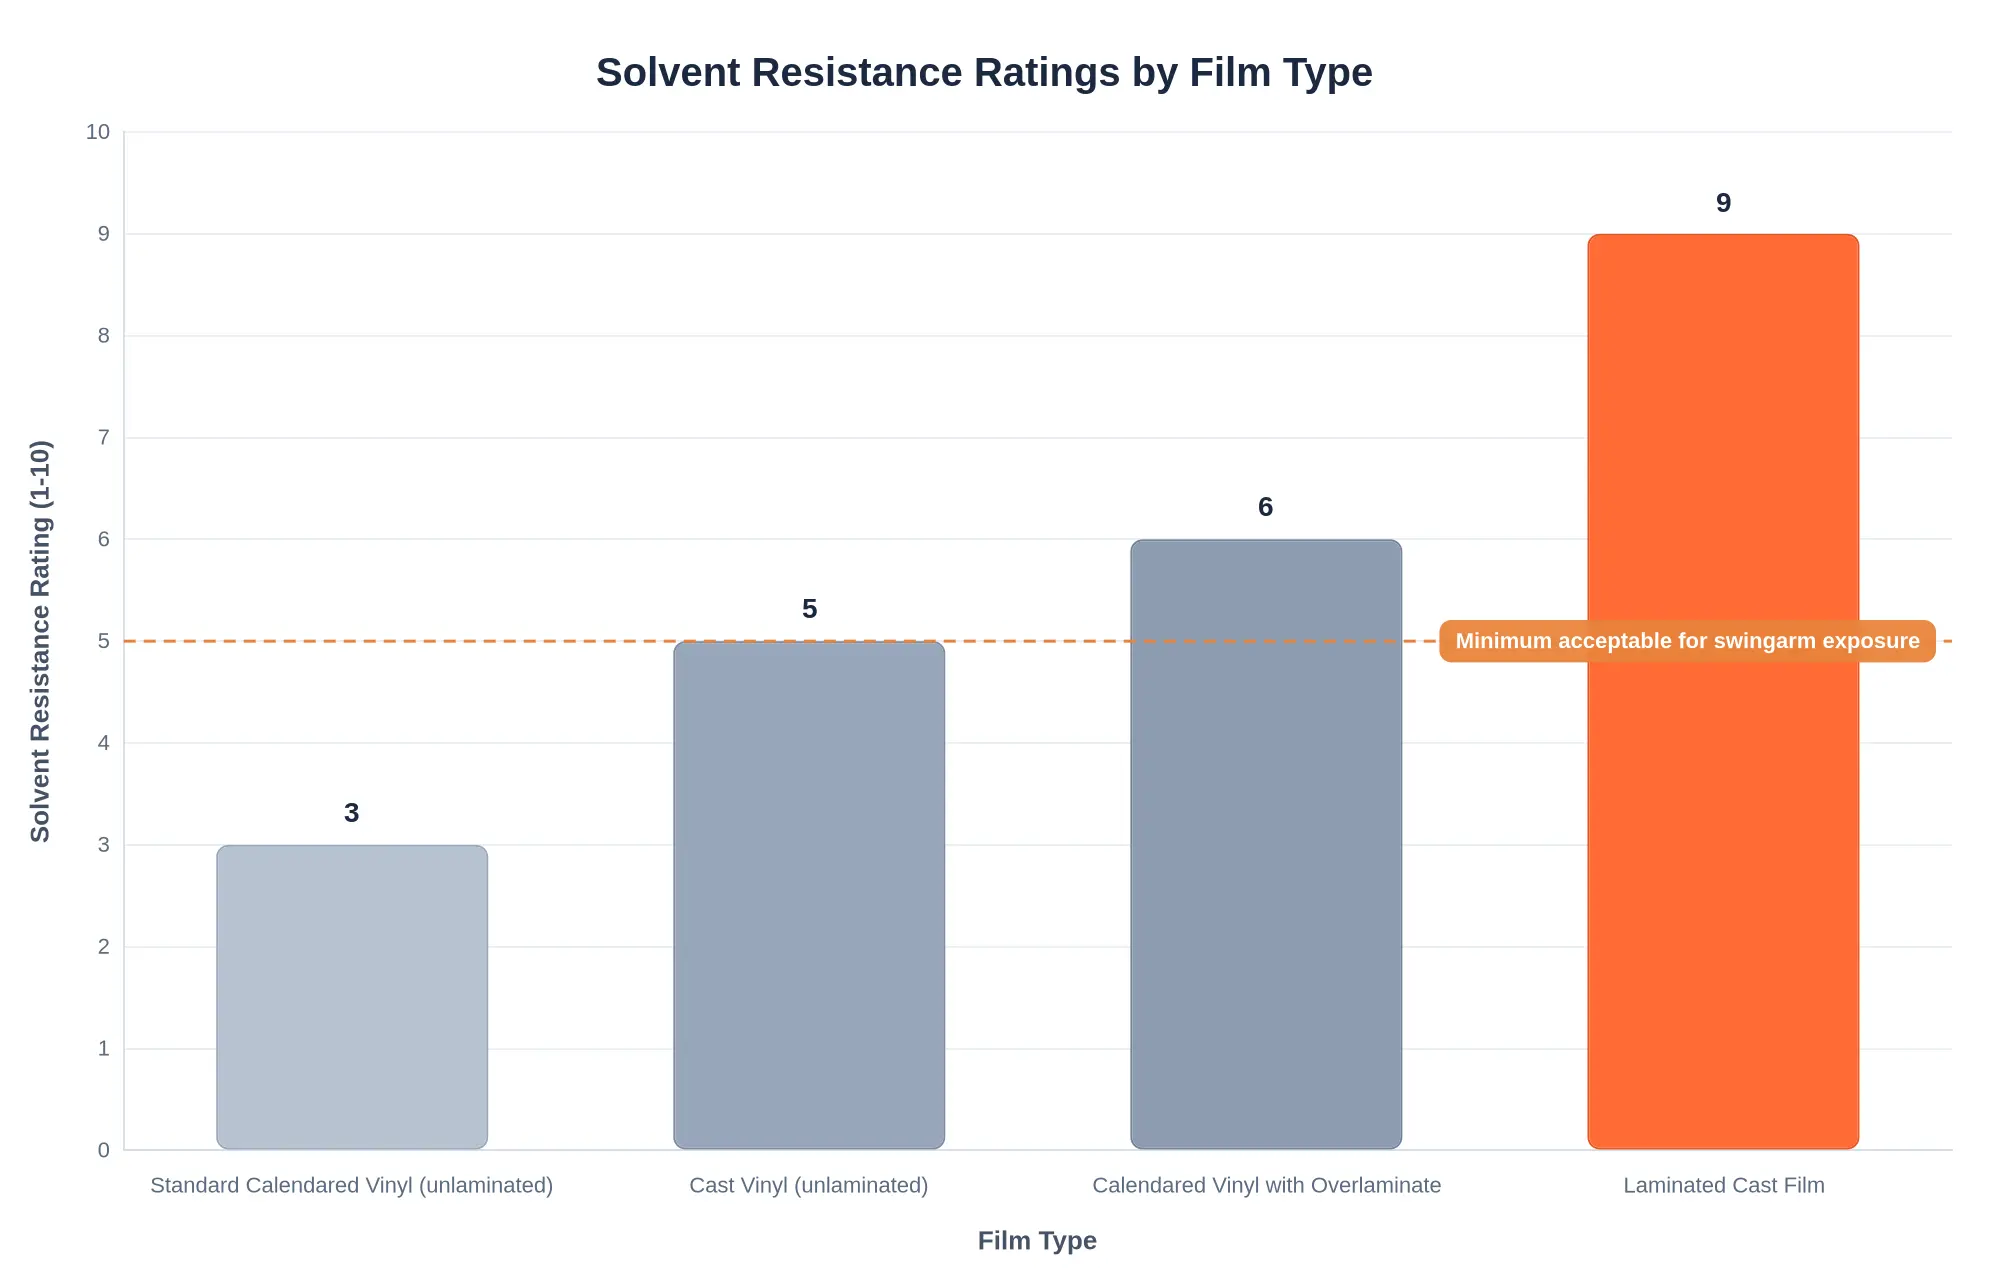
Caption: Solvent resistance tracks film construction. Laminated cast film rates 9, well above standard calendared vinyl at 3 and clear of the minimum acceptable threshold for swingarm exposure. When chain lube and degreaser are in the mix, the film and overlaminate you choose matter more than print quality. A cast film without a laminate only reaches mid-pack, so spec a laminated cast construction before you commit to a full run.
How to Test Film Solvent Resistance Before You Reprint
Before sending a full run to the printer, confirm film solvent resistance with a quick coupon test. Ten minutes up front can save a costly reprint.
-
Cut a representative test coupon. Use a spare piece of the exact film and laminate combination you intend to run, ideally from the same roll or batch as your production stock. Trim it to roughly 3 x 3 inches and apply it to the same substrate the finished decal will cover (swingarm guard, shroud, or side panel).
-
Apply the actual chemicals you ride with. Dispense one or two small drops of the exact chain lube and the exact degreaser you use on the bike, never a generic substitute. Keep the amount realistic; a flooded coupon exaggerates real-world exposure at the swingarm.
-
Control your dwell time. Start a timer and let the solvent sit for a defined interval, such as five minutes for a light spray and up to thirty minutes for a heavy soak. Note the dwell time carefully, since film solvent resistance changes with contact duration.
-
Wipe with the recommended method. Once the timer ends, wipe the surface using the cloth and technique your care guide specifies, working in one direction with light pressure. Avoid aggressive scrubbing, which can hide or create defects unrelated to the solvent.
-
Inspect for edge lift, gloss change, and color shift. Examine the coupon under bright, angled light for lifted edges, a dulled or cloudy finish, and any hue drift in the ink. Photograph anything you find so the evidence survives a busy reprint day.
-
Document the results for the reprint spec. Record the film batch, chemical brand, dwell time, and observed pass-or-fail result in your reprint file. Use that record to approve the run or switch to a more resistant laminate before you print dirt bike graphics.
For more field-tested tips on keeping your kit looking sharp season after season, see these dirt bike graphics tricks.
Linear pre-reprint solvent resistance test sequence: obtain coupon, apply solvent, wait, wipe, inspect, decide reprint.
Getting the Reprint Right and Keeping Swingarm Graphics Alive
Confirming film solvent resistance in the lab is only half the battle. The real payoff comes when that data flows into the reprint spec and into a rider’s weekly cleaning routine. Here is how both sides of the equation should operate.
For print and film shops: lock it into the spec
Treat solvent resistance as a required line item, not an afterthought.
- Name the film and laminate by SKU on every work order so a reprint six months down the line uses the exact same solvent-tested stack.
- Record the test method (solvent type, dwell time, wipe cycles) alongside the job ticket. If a batch fails, you have a baseline to compare against.
- Set a minimum resistance threshold for any graphic destined for the swingarm, where chain lube and degreaser overspray land hardest.
- Archive the digital file with the substrate spec so solvent resistance travels with the artwork. When you produce custom dirt bike graphics at volume, this discipline prevents mismatched replacements.
For riders: upgrade the laminate and clean smarter
The printed ink is rarely the weak point; the protective laminate is. A solvent-resistant overlaminate is what buys you seasons instead of weeks.
- Switch to a solvent-resistant gloss or matte laminate on any graphic near the drivetrain, and re-laminate worn swingarm panels rather than running bare ink.
- Never spray degreaser directly onto decals. Aim the stream at the chain, not the plastic, and avoid overspray drifting onto the swingarm.
- Rinse within 60 seconds. Solvent left to dwell softens adhesive and lifts edges faster than any ride will.
- Use a pH-neutral cleaner for routine washes and keep aggressive solvents to metal-only surfaces.
If you are ordering fresh panels, look at how personalized dirt bike graphics can be specced with a tougher top layer from the start.
| Habit | High Risk | Solvent-Safe Alternative |
|---|---|---|
| Degreaser application | Direct overspray on decals | Spray chain only, shield swingarm |
| Rinse timing | Left to dry on film | Rinse within 60 seconds |
| Cleaning product | Harsh solvent wipe | pH-neutral bike wash |
| Protection | Bare printed ink | Solvent-resistant laminate |
Swingarm graphics fail from chemistry, not crashes. Verify film solvent resistance before every reprint, spec a resistant laminate, and clean with care. Do that and your custom dirt bike graphics will outlast the lube and degreaser that ruin most decals.
Frequently Asked Questions
How quickly can chain lube damage swingarm graphics?
Damage can begin within minutes. Chain lube often contains petroleum distillates and light solvents that soften the adhesive and the print layer, so a single overspray or flung deposit left to sit can start lifting edges or clouding the ink. On a hot swingarm, where surface temperatures spike, the attack accelerates and you may see gloss loss or edge curl within a few hours. Wiping fresh fling-off promptly is the cheapest protection you have.
Do all degreasers attack vinyl decals?
No, but many do. Water-based, pH-neutral degreasers are usually gentle on a properly laminated film, while aggressive solvent-based or caustic (high-alkaline) cleaners strip the clear coat, dull the print, and weaken the bond. The variable that matters is film solvent resistance – not every vinyl and laminate stack is built to shrug off strong chemicals. Always test an inconspicuous corner before spraying a strong degreaser across your dirt bike graphics.
Can I reprint over an existing kit?
Do not print directly over an old kit. Old adhesive, embedded dirt, and residue from chain lube or degreaser leave an uneven, contaminated surface that prevents proper ink and adhesive bonding, so the new layer fails fast. Remove the old graphics completely, clean and degrease the bare panel, then apply fresh film you have already verified for film solvent resistance. For a durable reprint, start with clean bare plastic and a kit built for it: browse quality dirt bike graphic kits designed for long-term chemical exposure.
What is the best laminate for solvent resistance?
Cast PVC overlaminates with a urethane (polyurethane) top layer outperform standard calendared laminates for chemical resistance and conformability. A cast film with a 1.5 to 2 mil urethane laminate resists fuel, petroleum distillates, and mild solvents far better than thin economy films. The laminate, not the print itself, is your primary barrier, so choosing the right top coat matters more than the ink.
How do I know if my film has passed a solvent test?
Run a controlled spot test: apply a sample swatch to a clean offcut, cure it 24 hours, then wipe it with the exact degreaser or lube you use, letting it dwell for several minutes. A passing film shows no gloss change, no ink bleed, and no edge lift, and the adhesive stays firm. For shop-level confidence, document the cleaner, dwell time, and result so you can compare films objectively before committing to a full dirt bike graphics production run.