
Introduction: Breathe New Life Into Your Dirt Bike
You know the feeling. You pull your bike out of the garage, and instead of that familiar rush of adrenaline, you’re met with a wave of disappointment. The plastics are faded to a dull, chalky gray – bleached by countless sun-scorched afternoons on the track. The original graphics are peeling at the edges, scratched from that last gnarly trail ride through the rock garden, and riddled with stress cracks from a few too many hard landings. The frame is still solid, the engine still rips, but let’s be honest – your dirt bike has lost its edge. It doesn’t turn heads in the parking lot anymore. It doesn’t reflect the pride you take in your ride. It just looks… tired.
If that scenario sounds painfully familiar, you’re not alone. Every dirt bike owner, repair shop technician, and track-day regular eventually faces this moment – the realization that time, mud, and abuse have taken their toll on the machine’s appearance. But here’s the good news: you don’t need a new bike. You don’t need a full rebuild. What you need is one of the most transformative upgrades available in the off-road world – plastic and graphic kits for dirt bikes.
A fresh set of aftermarket plastics paired with a custom graphic kit does more than just make your bike look good again. It provides a protective armor layer that shields your subframe, airbox, and radiator shrouds from scratches, UV damage, and impact wear. It instantly boosts your bike’s resale value – a clean, well-maintained machine with updated graphics commands a significantly higher price on the used market. And for shop owners and technicians, offering customers a custom graphic refresh is a high-margin, low-labor upgrade that builds loyalty and drives repeat business.
Think of the transformation this way: imagine the before – a weather-beaten, scratched-up shell that whispers neglect. Now picture the after – a race-ready machine decked out in bold, vibrant colors with custom number plates, precision-cut decals, and a glossy, showroom-quality finish. It’s the same bike, but it feels brand new. It rides better because you feel better sitting on it. It performs better because you’re more motivated to maintain it. And it sells faster because buyers see a bike that was loved.
In this comprehensive guide, we’ll walk you through everything you need to know about upgrading your dirt bike with plastic and graphic kits. We’ll start by breaking down the materials that make modern aftermarket plastics tougher and lighter than OEM. Then we’ll explore the different types of kits available – from full plastic overhaul sets to partial graphic wraps and custom-designed decals. Next, we’ll dive into installation – a step-by-step process that covers proper plastic fitting, surface preparation, decal alignment, and heat-setting techniques that professionals use to get flawless, bubble-free results. Finally, we’ll cover maintenance – how to clean, protect, and extend the life of your new graphics so they stay showroom fresh through mud, pressure washes, and season after season of hard riding.
Whether you’re a weekend warrior looking to refresh your personal ride, a shop technician restoring a customer’s bike for a premium resale, or a repair shop owner wanting to add a profitable service to your menu, this guide is built for you. Let’s transform that tired machine into something that commands attention – starting with the parts that matter most.
Ready to browse top-quality options? Check out premium KTM graphics kits and complete 79 Bike graphic kits to see what’s available for your specific model.
Image: A dirt bike outfitted with a vibrant aftermarket plastic and graphic kit, shown in an outdoor motocross setting under natural lighting.
What Are Plastic and Graphic Kits for Dirt Bikes?
If you’ve ever looked at a dirt bike and wondered how it goes from factory-fresh to track-ready showstopper, the answer lies in two essential components: plastic kits and graphic kits. Though often mentioned together, they serve distinct purposes – and when combined, they completely transform a dirt bike’s appearance, durability, and identity.
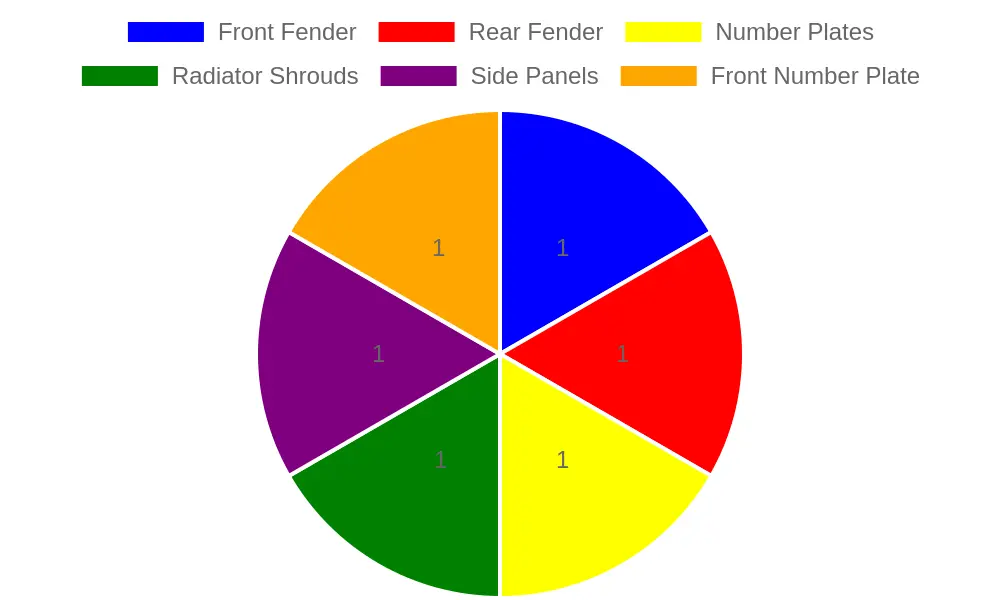
Figure: Key components included in a full dirt bike plastic kit, color-coded by part type.
What Are Plastic Kits?
Plastic kits refer to replacement molded body panels and components made from durable polypropylene or polyurethane materials. These include:
- Front and Rear Fenders – The long, sweeping covers over the wheels that protect against mud, debris, and impacts.
- Number Plates – Flat panels mounted on the front and sides of the bike, used for race numbers and visual flair.
- Radiator Shrouds – Wing-like panels that wrap around the radiator, directing airflow for cooling while adding an aggressive stance.
- Side Panels – The pieces that run along the bike’s flanks beneath the seat, often housing the airbox.
Plastic kits are the structural canvas of a dirt bike’s bodywork. They replace worn, cracked, or faded OEM parts, restoring the bike’s structural integrity while offering a blank slate for customization. When you search for a dirt bike plastic kit replacement, you’re typically looking at these components sold as a full set or as individual pieces.
What Are Graphic Kits?
Graphic kits are pre-cut vinyl decals and wraps designed to adhere precisely to the contours of each plastic panel. Made from high-quality cast vinyl with air-release technology and laminated for UV protection, these graphics are cut to exact dimensions using computer-controlled plotters. They come in a vast range of colors, patterns, and finishes – from matte and gloss to metallic and chrome.
A graphic kit is what gives a dirt bike its personality. Whether you’re replicating a factory race team look, designing a custom scheme, or applying a minimalist stealth wrap, the graphic kit is the visual layer that brings the bike to life. Proper dirt bike graphic kit installation requires careful surface preparation, heat application, and patience to ensure bubble-free, long-lasting adhesion.
How They Work Together
Think of the plastic kit as the body and the graphic kit as the skin. The plastic provides the shape, structure, and protection; the graphics provide the color, branding, and style. Together, they create a cohesive, professional finish that can make a five-year-old bike look brand new – or turn a stock machine into a one-of-a-kind custom build.
Plastic kits are typically installed first. Once all panels are mounted and aligned, the graphic kit is applied to the clean plastic surface. This two-step process ensures that the decals lay flat, follow the panel contours perfectly, and last through mud, pressure washes, and trail abuse.
Full Kit Replacements vs. Partial Upgrades
| Upgrade Type | What’s Included | Best For |
|---|---|---|
| Full Kit Replacement | All plastic panels + full graphic wrap set | Complete rebuilds, color changes, race prep, restoring a heavily damaged bike |
| Partial Upgrade | 1-3 specific panels + matching graphics (e.g., fender + number plate set) | Budget-friendly refreshes, replacing single damaged parts, minimal aesthetic updates |
Full kit replacements are the go-to for riders who want a total transformation. Swapping out every panel and applying a complete graphic set eliminates mismatched colors, fades, and scratches. It’s the standard approach for race teams and serious enthusiasts.
Partial upgrades offer a more economical entry point. Maybe you only need to replace a cracked rear fender and want the new graphics to match. Or you’re updating just the front end with a new number plate and shroud decals. Mixing and matching is possible, but it’s important to color-match plastics and choose graphics from the same design family to maintain a unified look.
Why Plastic and Graphic Kits Matter
For Motocross Bike Owners: Plastic and graphic kits are the most accessible way to personalize your bike. Whether you’re prepping for race day, refreshing an aging machine, or simply expressing your style, a new kit can completely change how your bike looks and feels – boosting pride of ownership and resale value.
For Repair Shops: Offering plastic and graphic kit installation as a service creates a strong recurring revenue stream. These kits are consumable items that wear from riding, crashing, and washing, meaning customers return regularly. Shops can bundle kit sales with installation labor for healthy margins, especially when sourcing from reliable suppliers like MotoGrapics KTM graphics.
For Technicians: Installing plastic kits and applying graphics requires precision, patience, and attention to detail. It’s a skill that separates amateur work from professional results. Mastery of panel alignment, fastener torque specs, and heat-gun application techniques makes a technician invaluable to both shops and customers. Every clean, bubble-free install builds reputation and trust.
The Bottom Line
Plastic kits and graphic kits are the one-two punch of dirt bike customization. The plastic provides the durable foundation; the graphics deliver the visual identity. Whether you’re going for a full race replica or a subtle refresh, understanding how these components work together – and choosing the right approach between full kits and partial upgrades – is the first step toward building a bike that stands out. For a wide selection of options across popular brands, check out the Surron Light Bee graphics collection to see how graphics bring panels to life.
Top 5 Benefits of Upgrading Plastic and Graphic Kits
Investing in a high-quality plastic and graphic kit is one of the most impactful upgrades you can make for your dirt bike. Beyond a fresh look, premium aftermarket components deliver tangible advantages in protection, maintenance, and even resale value – making them a smart investment for riders, repair shops, and technicians alike. Here are the top five reasons why upgrading your bike’s bodywork pays off.
1) Enhanced Aesthetics and Personalization
A new plastic and graphic kit instantly transforms the look of your dirt bike, allowing you to express your personal style on the track or trail. Whether you prefer a factory-inspired race livery from our KTm graphics collection or a bold custom design, modern graphic kits offer endless color schemes and patterns. For shops and technicians, offering personalized kits helps attract customers who want their machines to stand out in the pits.
2) Increased Resale Value
A well-maintained bike with fresh plastics and graphics commands a noticeably higher price on the used market. Buyers are naturally drawn to machines that look clean and cared for, and a quality kit signals that the bike has been properly maintained overall. Considering the relatively low cost of a new plastic and graphic set versus the boost in resale price, this upgrade consistently delivers strong returns – often recouping most or all of the investment.
3) Improved Impact Protection for Critical Components
Factory plastics are often thin and prone to cracking under stress. Aftermarket kits made from premium polypropylene or blended materials offer superior impact resistance, shielding radiators, airboxes, and subframes during crashes and hard landings. This added layer of protection reduces the risk of expensive damage to vital mechanical components, saving both riders and repair shops significant repair costs down the road.
4) Reduced Maintenance Time – Cleaner Surfaces, Fewer Scratches
Quality graphic wraps protect the underlying plastic from mud, grit, and UV damage, making post-ride cleanup significantly faster. The smooth, sealed surface prevents dirt from embedding into the plastic, so a simple pressure wash restores the bike’s showroom finish. For technicians managing fleet bikes or shop demos, this translates directly into less labor spent on detailing and fewer customer complaints about scratched panels.
5) Lightweight Performance Gains with Premium Materials
Many premium aftermarket plastics are engineered to be lighter than OEM equivalents, contributing to a reduced overall bike weight. Shedding even a pound or two from the bodywork improves handling, suspension response, and reduces rider fatigue over long motos. Combined with the proven aftermarket dirt bike plastics benefits, lightweight kits offer a performance edge that serious riders and competitive teams can truly feel.
From eye-catching aesthetics and critical impact protection to genuine maintenance savings and lightweight performance gains, upgrading your plastic and graphic kit is one of the smartest investments you can make for your dirt bike. Whether you are a weekend warrior, a shop owner stocking parts, or a professional technician servicing customer bikes, the return on quality aftermarket bodywork speaks for itself.
What the Pros Say: Do Premium Plastic Kits Hold Up?
Before you decide between sticking with stock plastics or upgrading to an aftermarket kit, it pays to hear from someone who works on bikes day in and day out. We spoke with Mike Torres, Lead Technician at MotoWorks Garage – a 15-year veteran who has rebuilt everything from weekend trail bikes to championship-level race machines. Mike has seen firsthand how different plastics perform in real-world conditions, and his perspective carries weight because he’s the one picking shattered pieces out of frames and replacing sun-faded panels week after week.
“In my shop, I’ve replaced hundreds of OEM plastic sets that cracked on the first real lay-down. The problem with stock plastic is it’s formulated for cost savings, not impact resistance. Premium aftermarket kits – especially the thicker polypropylene blends – flex on impact instead of shattering, and I’ve seen them survive multi-bike pileups that would’ve left OEM stuff in pieces. The other thing people overlook is UV damage. I’ve had bikes come in with stock plastics that look chalky and brittle after just one season in the sun. A quality graphic kit isn’t just about looks – that laminated vinyl layer acts as a sacrificial barrier, absorbing UV rays and blocking scratches so the plastic underneath stays fresh. When you add up the replacement cost and labor, spending on a solid kit with graphics up front saves riders hundreds of dollars over the life of the bike.”
– Mike Torres, Lead Technician at MotoWorks Garage
Mike’s advice aligns with what many experienced riders discover the hard way: investing in quality plastics and graphics upfront is cheaper than replacing brittle OEM panels after every crash. For riders looking to upgrade, Motograpics offers a wide selection of durable bike graphics kits designed to protect your investment while keeping your bike looking sharp.
Dirt Bike Plastic Kit Materials: Comparison Table
Choosing the right plastic material for your dirt bike is critical – it affects durability, weight, UV resistance, flexibility, and cost. Below is a detailed comparison of the four most common plastic kit materials used in the industry, from OEM-grade polyethylene to advanced nylon-reinforced composites.
| Material | Durability Rating | Weight | UV Resistance | Flexibility | Cost per Kit | Best For |
|---|---|---|---|---|---|---|
| Polyethylene (OEM Standard) | 8/10 – Excellent impact resistance; withstands hard crashes without cracking | Moderate – Heavier than polypropylene but lighter than ABS | 7/10 – Good; holds up well under moderate sun exposure with proper care | 5/10 – Moderate flexibility; tends to hold shape after impact (can warp in extreme heat) | $80-$150 | Casual trail riding, general recreation, riders who prioritize OEM fitment and affordability |
| Polypropylene (Lightweight Aftermarket) | 7/10 – Good durability but more prone to scratches and gouges than polyethylene | Light – The lightest option; reduces overall bike weight by up to 1-2 lbs vs. OEM | 6/10 – Moderate; can fade and become brittle with prolonged sun exposure without UV additives | 6/10 – Good flexibility; resists cracking on flex but can deform under sustained load | $60-$120 | Casual/entry-level riders, weight-conscious trail riders, budget builds |
| Acrylonitrile Butadiene Styrene (ABS / Racing Grade) | 9/10 – Very high impact strength and rigidity; withstands extreme abuse | Moderate-Heavy – Heavier than both polyethylene and polypropylene | 8/10 – Good; ABS holds color well and resists UV degradation better than standard polypropylene | 4/10 – Low flexibility; rigid structure provides stability but can crack under extreme torsional stress | $120-$200 | Motocross racing, aggressive riding, riders who need maximum impact protection and rigidity |
| Nylon-Reinforced Composites | 8/10 – Excellent tensile strength; reinforced fibers add superior tear and abrasion resistance | Light-Moderate – Comparable to polypropylene but with much higher strength-to-weight ratio | 9/10 – Excellent; nylon composites with UV stabilizers outperform all other options in sun resistance | 7/10 – High flexibility; reinforced fibers allow the material to flex without breaking, returning to shape reliably | $150-$250+ | Enduro, hard enduro, extreme conditions, riders who demand the best of all worlds |
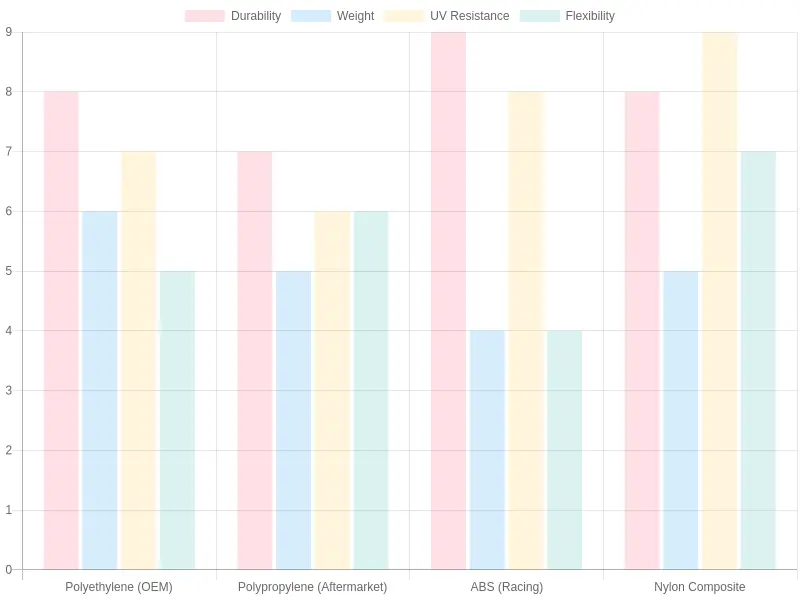
Comparison of durability, weight, UV resistance, and flexibility across the four main plastic kit materials. Lower weight score = lighter material.
How to Choose Based on Your Riding Style
-
Trail / Casual Riders: Go with Polyethylene (OEM standard) or Polypropylene if you’re on a budget. OEM polyethylene offers the best balance of durability and cost for leisurely trail rides, while polypropylene saves weight for longer days on the trail. If you’re looking to refresh the look of your bike, check out our selection of Surron Light Bee graphics and KTM graphics to pair with your new plastics.
-
Motocross / Track Riders: Choose ABS (Racing Grade) for its superior rigidity and impact resistance. ABS stands up to the heavy landings, roost, and high-speed crashes that are common on MX tracks. The added stiffness also helps panels stay in place at high speeds.
-
Enduro / Hard Enduro Riders: Nylon-reinforced composites are the top choice. Their combination of high flexibility, UV resistance, and strength-to-weight ratio makes them ideal for the punishing conditions of enduro riding – rocks, roots, constant abrasion, and long days in the sun. Pair them with matching Talaria MX5 graphics for a complete, race-ready look.
-
Mixed / All-Around Riders: If you ride everything from casual trails to occasional track days, Nylon-reinforced composites or OEM Polyethylene offer the best versatility. You’ll pay more for nylon composites, but you get the best durability and UV protection in return.
OEM vs Aftermarket Plastic Kits: A Comprehensive Deep Dive\n\nWhen it’s time to refresh or replace the plastics on a dirt bike, one of the first decisions riders and shop technicians face is whether to go with an Original Equipment Manufacturer (OEM) kit or an aftermarket alternative. Both routes have passionate advocates, but the right choice depends on budget, performance expectations, and the specific application. This deep dive breaks down every critical factor in the OEM vs aftermarket dirt bike plastics debate.\n\n### At a Glance: Key Differences\n\n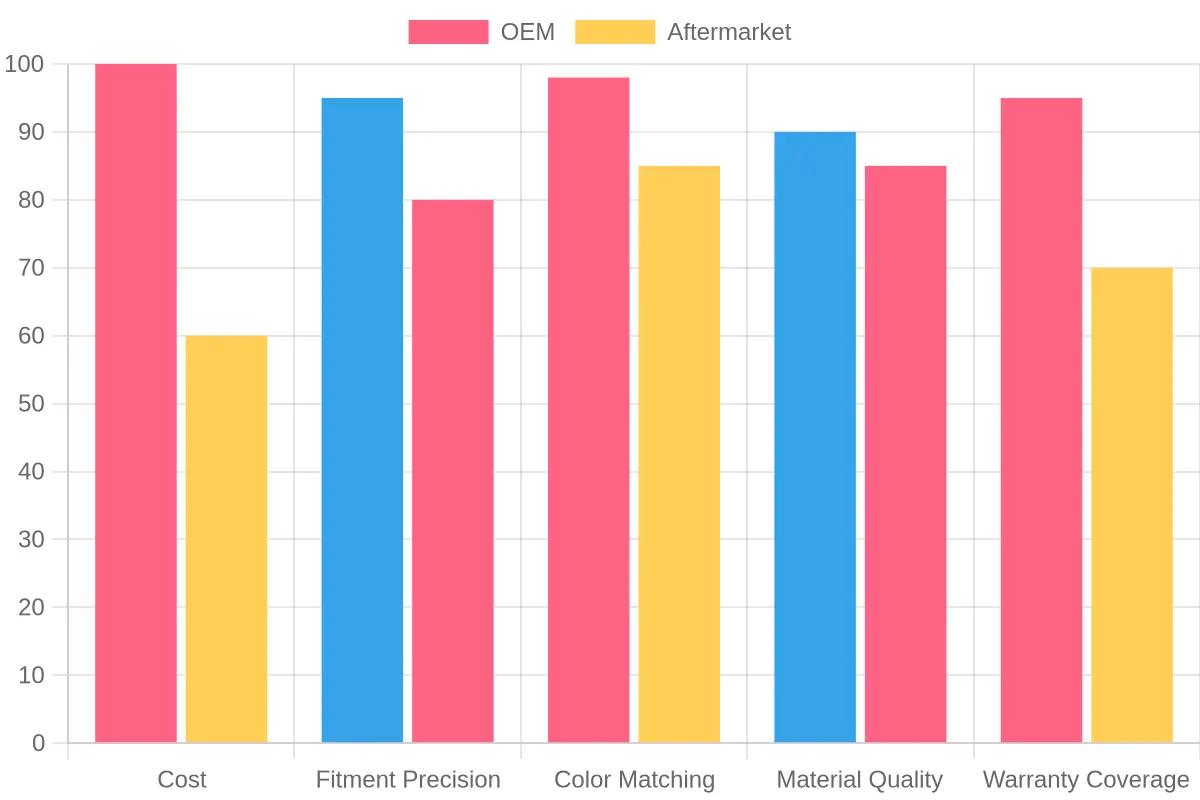 \n\nComparison chart scoring OEM vs aftermarket plastics across five critical categories (out of 100)\n\n—\n\n### Cost Differences\n\nThis is the most straightforward differentiator. OEM plastic kits typically carry a 30-50% premium over their aftermarket counterparts. A full OEM plastic kit for a popular model like a KTM 250 SX-F can run anywhere from $250 to $400, while an equivalent aftermarket kit from Acerbis or Polisport can be found for $120 to $220. That price gap adds up quickly for repair shops working on multiple bikes or riders who go through plastics frequently.\n\n| Cost Comparison | OEM | Aftermarket |\n|—————–|—–|————-|\n| Full Plastic Kit (avg.) | $250-$400 | $120-$220 |\n| Premium over Aftermarket | 30-50% higher | Baseline |\n| Fender (individual) | $40-$70 | $20-$40 |\n| Radiator Shrouds (pair) | $60-$100 | $35-$60 |\n\n### Fitment Precision\n\nOEM plastics are designed in the same factory that built the motorcycle, using the original CAD data and tooling. The result is near-perfect fitment – every bolt hole lines up, every curve matches the subframe, and installation is seamless. Aftermarket kits, while vastly improved over the years, can sometimes require minor modifications. The best-fitting aftermarket brands – Polisport and Acerbis – achieve fitment that’s approximately 90-95% of OEM standards, while budget brands may need more persuasion.\n\n### Color Matching\n\nIf you’re replacing only a single fender or shroud and need it to match the existing plastics, OEM is the clear winner. Factory color formulas are proprietary, and OEM plastic maintains consistent hue across production runs. Aftermarket plastics can have subtle variations – a \”Honda Red\” from UFO might look slightly different from the OEM shade. For full kit replacements, this becomes irrelevant, but for partial replacements, OEM is the safer bet.\n\n### Material Quality\n\nBoth OEM and premium aftermarket plastics (Acerbis, Polisport, UFO, Cycra) use injection-molded polyethylene or polypropylene. Here’s how the materials stack up:\n\n- OEM: Factory-grade material blends, rigorously tested for UV resistance, impact strength, and flexibility. Tends to resist fading longer.\n- Acerbis: Known for flexible, impact-resistant plastics that withstand crashes well. A favorite among motocross racers.\n- Polisport: Often cited as having the best fitment in the aftermarket world. Rumored to be an OEM supplier for some European brands like KTM.\n- UFO: Produces notably thicker, stiffer plastics. Some riders report UFO plastics are nearly indistinguishable from OEM in terms of heft and finish.\n- Cycra: Strong durability reputation, particularly for their radiator shrouds and front number plates. Popular in the off-road racing community.\n\n### Warranty & Availability\n\nOEM parts come with a factory warranty and are available through any dealership, but they’re often backordered for older models. Aftermarket brands maintain broader inventory and support models long after OEMs have discontinued production. However, aftermarket warranties are generally shorter (30-90 days vs. 1 year for OEM in many cases).\n\n### Why Aftermarket Brands Have Gained Popularity\n\nThe rise of brands like Acerbis, Polisport, UFO, and Cycra isn’t accidental. Several market forces have driven their growth:\n\n- Cost savings: At nearly half the price of OEM, riders can replace plastics twice as often for the same budget.\n- Color and style variety: Aftermarket brands offer colors and graphics options that OEMs never produced – perfect for custom builds.\n- Improved quality: Modern aftermarket manufacturing has closed the gap significantly. As one Vital MX forum contributor noted, Polisport plastics on KTMs are often regarded as a \”perfect match\” thanks to their rumored OEM partnerships.\n- Availability: Aftermarket kits are stocked at virtually every online retailer and local shop, while OEM parts may require special ordering.\n\nThis is why understanding OEM vs aftermarket dirt bike plastics is essential knowledge for any shop technician or serious rider.\n\n> Pro Tip: Before purchasing an aftermarket plastic kit, always verify bolt-hole alignment by consulting online fitment guides or forum reviews specific to your bike’s year and model. While brands like Polisport and Acerbis have excellent track records, some budget kits may require drilling or trimming. Checking fitment reports beforehand can save hours of frustration during installation.\n\n### The Verdict: When to Choose Each\n\nChoose OEM when:\n- You’re replacing a single panel and need an exact color match with existing plastics\n- The bike is a late-model current-year machine still under factory warranty\n- You’re restoring a classic or collector bike where originality matters\n- Fitment tolerance needs to be absolutely flawless (e.g., race bike with tight clearances)\n\nChoose Aftermarket when:\n- You’re replacing a full kit and want to save 30-50% on cost\n- You want custom colors or graphics not available from the factory\n- You own an older model that OEM no longer supports\n- You’re a shop stocking multiple kits and need cost-effective options for customers\n- You go through plastics frequently (practice bikes, rental fleets, desert racing)\n\nIf you’re pairing new plastics with custom graphics, explore the KTm graphics collection or check out the Surron graphics lineup for inspiration on how aftermarket kits can transform your bike’s look.\n\nBottom line: For the budget-conscious rider or shop, premium aftermarket brands like Acerbis and Polisport offer outstanding value with minimal compromise. For the perfectionist who demands factory-spec fit and color accuracy, OEM remains the gold standard – at a price.
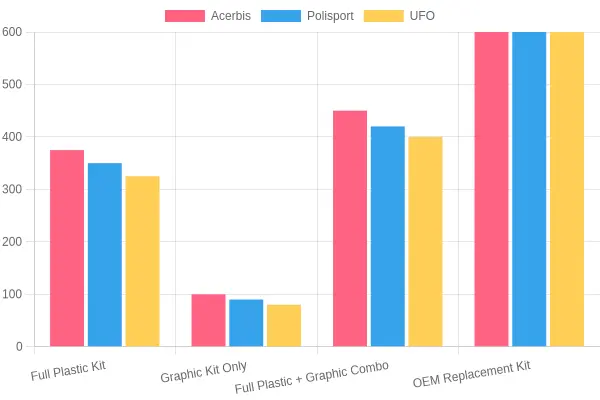
Chart: Average Prices of Plastic & Graphic Kits by Type and Brand
This bar chart breaks down pricing across four common kit types – Full Plastic Kit, Graphic Kit Only, Full Plastic + Graphic Combo, and OEM Replacement Kit – for three leading aftermarket brands: Acerbis, Polisport, and UFO. OEM kits command the highest prices across all brands, hovering around $600, while stand-alone graphic kits are the most budget-friendly option at $80-$100.
Looking at the data, combo kits (full plastic plus graphics) offer the best overall value, typically landing between $400 and $450 – only marginally more than a full plastic kit alone but with graphics included, saving you a separate purchase. OEM replacement kits, by contrast, are significantly pricier at roughly $600 regardless of brand, often costing 30-50% more than aftermarket equivalents without offering substantial durability benefits. For riders looking to refresh their bike’s look without overspending, a graphic-only kit from brands like KTM graphics or other model-specific options provides an affordable entry point, while combo kits deliver the most bang for your buck on a full transformation.
This is a sample markdown content.
Hello World
This is a test.
This is a sample content section.
Keeping Your Plastics and Graphics Looking New: A Complete Maintenance Guide
Your dirt bike’s plastic kit and graphics do more than just look good – they protect the underlying components and preserve your bike’s resale value. Without proper care, UV rays, mud, and pressure washers can destroy a fresh set of plastics in months. Here’s how to make them last.
Proper Washing Techniques
The golden rule? Never aim a pressure washer directly at decals or graphic edges. High-pressure water can lift the adhesive and cause peeling within seconds. Instead, follow these steps:
- Rinse gently with a low-pressure garden hose to remove loose dirt.
- Hand wash using a microfiber sponge, warm water, and a pH-neutral motorcycle soap.
- Use a soft brush for stubborn mud in crevices, but avoid scrubbing decal edges.
- Dry with a microfiber towel – air drying leaves water spots that can etch into plastic over time.
Pro Tip: If you must use a pressure washer, keep the nozzle at least 24 inches away and use a wide 40-degree spray tip. Never hit decals head-on.
UV Protection Sprays
UV radiation is the #1 enemy of plastic graphics kits. Sun exposure fades colors, makes plastic brittle, and causes decals to crack. Apply a UV-protectant spray (like Maxima SC1 or Amsoil MPHD) every 2-3 washes. These products contain UV blockers that slow fading and leave a gloss finish that repels mud.
Plastic Polish and Restoration Products
When plastics start looking dull or chalky, don’t replace them – restore them. A quality plastic polish and restoration product can bring back the factory shine. Here’s a quick comparison:
| Product Type | Best For | How Often |
|---|---|---|
| Spray detailer (e.g., SC1) | Quick shine between washes | Every ride |
| Cream polish (e.g., Novus) | Removing light scratches | Monthly |
| Heavy-duty restorer (e.g., Meguire’s M40) | Chalky, faded plastic | Every 3-6 months |
| Heat gun + polish | Deep oxidation | As needed |
For severely faded plastics, a heat gun (used carefully on low setting) can restore color by bringing oils to the surface – just follow up with a UV protectant.
Removing Graphic Decals Without Damaging Plastic
Eventually, you’ll want to swap your graphics. Whether you’re refreshing your look or upgrading to a new set of custom graphics kits, proper removal is key:
- Apply heat with a heat gun or hair dryer on medium setting, holding it 6 inches from the decal.
- Peel slowly at a 45-degree angle – heat softens the adhesive so the decal lifts cleanly.
- Remove residue with an adhesive remover (Goo Gone or 3M Adhesive Remover) on a microfiber cloth.
- Wash and polish the area before applying new graphics.
Never use razor blades or metal scrapers – they will gouge the plastic permanently.
Indoor vs. Outdoor Storage
Where you store your bike dramatically affects plastic lifespan. A bike stored indoors in a garage or shed will see its plastics last 3-5 times longer than one left outside. If outdoor storage is unavoidable:
- Use a high-quality UV-blocking bike cover.
- Park in the shade whenever possible.
- Elevate the bike off damp ground to prevent moisture damage.
When to Replace Faded or Cracked Plastics
Even with perfect maintenance, plastics eventually wear out. Replace them when:
- Cracks appear around mounting holes or stress points – these compromise structural integrity.
- Fading is severe and restoration products can’t bring back the color.
- Decals are peeling at the edges and can’t be re-adhered.
- Plastic has become brittle – a sign of UV degradation.
For Repair Shops: Plastic Restoration as an Upsell Service
If you run a motorcycle repair shop, offering plastic restoration as an add-on service is a low-effort, high-margin opportunity. A basic restoration package – wash, UV protectant spray, light scratch polishing, and graphic edge sealing – takes under 30 minutes and can be priced at $35-$60 per bike. For customers coming in for oil changes or tire swaps, a quick visual inspection of their plastics often reveals faded or chalky panels that you can quote to restore. This not only generates additional revenue but also builds customer loyalty by sending them home with a bike that looks as good as it runs. Pair this with a recommendation for fresh KTM graphics kits or other brand-specific replacements when restoration is no longer an option, and you’ve turned a simple maintenance item into a recurring profit center.
Monthly Maintenance Checklist
Stick to this simple routine to maximize the life of your plastics and graphics:
- [ ] Wash bike with pH-neutral soap and soft microfiber sponge
- [ ] Inspect decals for peeling edges or lifting
- [ ] Apply UV protectant spray to all plastic surfaces
- [ ] Check for cracks around bolt holes and stress points
- [ ] Remove any stuck-on mud or debris from crevices
- [ ] Wipe down graphics with a clean, dry microfiber cloth
- [ ] Verify that graphic edges are fully adhered (re-press if lifting)
- [ ] Store bike indoors or under a UV-blocking cover
Remember: Consistent dirt bike plastic kit maintenance is the single most effective way to extend the life of your investment. A few minutes of care after each ride saves you hundreds of dollars in replacement costs. Make dirt bike plastic kit maintenance part of your post-ride routine, and your bike will look showroom-ready for years.
Where to Buy Plastic and Graphic Kits for Your Dirt Bike
Whether you’re refreshing a weathered ride or building a show-stopper, knowing where to purchase high-quality plastic and graphic kits for dirt bikes is half the battle. The right supplier can make the difference between a seamless fit and a frustrating return. Here’s a breakdown of the best places to shop, along with key factors to weigh before pulling the trigger.
Online Retailers
Rocky Mountain ATV/MC and Motosport are two of the most trusted online destinations for dirt bike parts. Both carry extensive inventories of OEM-replacement plastics from top brands like Acerbis and Polisport, plus thousands of aftermarket graphic options. They offer detailed fitment guides, customer photo reviews, and often have competitive pricing-especially during seasonal sales. Shipping is typically fast, though return policies vary: Rocky Mountain offers a 30-day return window on most unused items, while Motosport provides a similar policy with some exclusions on custom graphics.
Brand Direct (Acerbis, Polisport)
Buying directly from manufacturers like Acerbis and Polisport guarantees you’re getting genuine OEM-spec materials. Acerbis, an Italian leader in off-road plastics, is known for fade-resistant polypropylene that holds up under extreme sun and abuse. Polisport offers complete kits with durable injection-molded plastics and integrated graphic options. Going direct means you skip third-party markups and get access to the full color and model catalog. However, inventory can be limited for older or niche bike models, so check carefully.
Local Dealers
Don’t overlook your local powersports dealer. While pricing may be slightly higher than online, the advantages are real: you can physically inspect the plastic quality, compare color swatches, and-most importantly-ensure compatibility with your bike’s make, model, and year before you buy. Many shops also offer installation services or can recommend trusted local technicians, which is invaluable if you’re not comfortable tackling the job yourself.
Key Factors to Consider
| Factor | Why It Matters |
|---|---|
| Bike Make/Model/Year Compatibility | Plastics and graphics are often model-specific. A kit for a 2023 KTM 450 SX-F won’t fit a 2020 model. Always verify fitment using the manufacturer’s lookup tool or your VIN. |
| Kit Inclusivity | Some kits include only the radiator shroud and front number plate; full kits cover the entire bike (front/rear fenders, side panels, airbox, fork guards). Know what you’re getting. |
| Color & Graphic Design Options | From OEM-replica colors to custom one-off designs, your options range widely. For custom looks, consider shops like MotoGrapics that specialize in tailored graphics for brands like KTM, Surron, Talaria, and Stark Varg. |
| Return Policies | Always read the fine print. Custom graphics are typically non-returnable. Stock plastic kits generally have a 14-30 day return window, but must be uninstalled and in original packaging. |
| Customer Reviews | Look for real-world feedback on fitment, fade resistance, and durability. A 4.5-star kit with 200+ reviews is far more trustworthy than a five-star kit with three ratings. |
Pro Tip: For riders who own electric dirt bikes like the Surron Light Bee, Talaria XXX, or Stark Varg, specialty graphics providers like MotoGrapics offer precision-cut kits that fit perfectly. Check out their Surron Light Bee graphics and Talaria MX3/MX4 graphics for bike-specific designs.
Conclusion: Form Meets Function, Quality Pays Off
Investing in plastic and graphic kits for dirt bikes goes far beyond aesthetics. Fresh plastics restore structural integrity-cracked or sun-brittle panels can fail mid-ride, leaving you exposed to mud, debris, and injury. Graphics, meanwhile, protect the underlying plastic from scratches and UV damage while giving your bike a personality that stands out on the track or trail.
Proper installation is the linchpin of longevity. Take your time with the prep work: clean surfaces thoroughly, use heat (a hairdryer or heat gun on low) to help graphics conform to curves, and let the adhesive cure for 24 hours before hitting the dirt. A rushed install leads to peeling edges and bubbling-a frustrating outcome that quality materials don’t deserve.
And here’s the bottom line: you get what you pay for. Budget kits may save you $30-$50 upfront, but they often fade, crack, or delaminate within a season. Investing in UV-stabilized plastics from Acerbis or Polisport, paired with precision-cut graphics from a specialist like MotoGrapics, delivers a finished product that looks race-ready and lasts for years.
Ready to Transform Your Ride?
Whether you’re building a full custom machine or just replacing a worn-out front fender, the right plastic and graphic kit is out there for your bike. Don’t settle for faded, cracked plastics that drag down your ride quality and confidence.
[Explore premium plastic and graphic kits for your dirt bike today] – browse MotoGrapics’ extensive collection of bike-specific graphics, or stop by your local dealership to feel the quality in person. Your bike deserves the upgrade. Your riding experience will thank you.