
Introduction: Why Pink Is the New Bold in Motocross
The world of motocross has always been defined by speed, grit, and a rugged aesthetic-but a new wave of personalization is turning heads on the track. Riders are increasingly moving beyond the traditional blues, reds, and blacks that have dominated the sport for decades, embracing pink graphic kits for dirt bikes as a powerful statement of individuality and style. Whether you’re tearing through muddy trails or lining up at the starting gate, your bike’s appearance says as much about you as your riding technique does. The rise of custom dirt bike graphics has opened the door to limitless creativity, and pink has emerged as one of the most sought-after colors in the motocross customization scene.
What was once considered a niche choice is now a full-blown trend. From pink motorcycle decals that add subtle accents to full-coverage kits that command attention, riders are discovering that pink isn’t just a color-it’s a declaration. It challenges outdated stereotypes, stands out in a sea of conventional designs, and gives bike owners the freedom to ride something that truly reflects their personality. For repair shops and technicians, this shift also means understanding a growing demand for unique, high-quality graphics that can withstand the rigors of off-road riding while looking incredible.
This article will explore the rising popularity of pink graphic kits, break down the customization options available for popular bike models-including custom graphics for electric bikes and KTM-specific kits-and offer practical advice on selection, installation, and maintenance. Whether you’re a rider looking to make a statement or a shop owner aiming to meet client demand, this guide covers everything you need to know about making your bike stand out with the perfect pink setup.

What Are Pink Graphic Kits for Dirt Bikes?
If you’ve ever wondered what gives those head-turning dirt bikes their personality, you’re looking at graphic kits. A pink graphic kit is a set of high-performance vinyl wraps or decals designed specifically to fit dirt bike body panels. Think of it as a custom paint job – minus the spray booth, drying time, and permanent commitment. These kits allow you to transform the look of your bike in an afternoon, and when you’re ready for something new, they peel off cleanly without damaging the underlying plastic.
What’s Included in a Kit?
A standard pink graphic kit covers the main visual real estate of your dirt bike. Most kits include:
- Radiator shrouds – The large side panels that make the biggest visual impact
- Front and rear fenders – Matching decals to tie the whole look together
- Number plates – Both front and rear plates, often with pre-applied number backgrounds
- Air box covers – The smaller panels around the air intake system
Some premium kits also include fork guard decals, swingarm wraps, and even tank decals for a fully coordinated appearance.
The Spectrum of Pink
Not all pink is created equal. The beauty of modern custom dirt bike graphics is the sheer variety of pink shades available to match your style:
| Shade | Vibe | Best For |
|---|---|---|
| Hot Pink | Bold, vibrant, unapologetic | Racers who want to stand out on the track |
| Bubblegum Pink | Soft, sweet, playful | Retro-inspired builds and casual riders |
| Rose Pink | Elegant, muted, sophisticated | Custom builds with a premium aesthetic |
| Neon Pink | Eye-catching, luminescent | Night riding and maximum visibility |
| Pastel Pink | Light, airy, understated | Minimalist designs and vintage looks |
Full-Wrap vs. Partial Kits
Understanding the difference between kit types is essential before you buy:
-
Full-wrap kits cover the entire surface of each panel, edge to edge. They offer the most dramatic transformation and the best protection for your plastics against scratches and UV damage. These are the go-to choice for show bikes, racers, and anyone going for a complete color change.
-
Partial kits cover only a portion of each panel, leaving some factory plastic exposed. These are often more affordable and work well as accent graphics over existing colored plastics. They’re popular for riders who want to add flair without fully committing to a new color scheme.
Pre-Cut vs. Custom-Cut Options
Most dirt bike vinyl wraps come in two fitment styles:
-
Pre-cut kits are die-cut to match specific bike makes and models (e.g., KTM, Honda, Yamaha, Sur-Ron, Talaria). They’re ready to apply right out of the package with no trimming needed – perfect for DIY installers and repair shops looking for quick turnaround.
-
Custom-cut kits are designed from scratch based on your bike’s exact panel measurements. These are ideal for modified bikes with aftermarket plastics, custom bodywork, or unique builds where standard templates won’t fit.
Whether you’re a shop technician refreshing a customer’s ride or a weekend warrior giving your own bike a makeover, pink graphic kits offer an accessible, high-impact way to make a statement. They’re durable, weather-resistant, and designed to handle everything from muddy trails to motocross tracks.
Top Benefits of Choosing Pink Graphic Kits
A vibrant pink graphic kit transforms your dirt bike from ordinary to extraordinary while adding real functional value.
Thinking about upgrading your ride? Pink graphic kits for dirt bikes deliver more than just a fresh coat of color. They provide genuine functional benefits that protect your investment, boost your visibility, and let you stand out in a sea of standard-issue machines. Here are the top seven reasons to make the switch.
1. UV Protection for Factory Plastics
The sun is relentless. Constant exposure to UV rays causes factory plastics to fade, yellow, and become brittle over time. Quality vinyl graphics act as a sacrificial barrier, absorbing harmful ultraviolet radiation before it reaches the plastic beneath. Premium pink graphic kits for dirt bikes are engineered with UV-stable inks and laminate layers that block fading.
Payoff: Your plastics stay vibrant and crack-free season after season.
2. Scratch and Scuff Resistance
Trail riding and motocross racing are tough on equipment. Branches, rocks, boots, and even pressure washers leave their mark. A high-quality graphic kit provides a tough outer layer that takes the abuse instead of your plastic. This is graphic kit durability at its finest-the vinyl absorbs scratches, scuffs, and minor impacts that would otherwise gouge the plastic permanently.
Payoff: Your bike looks newer longer, even after hard rides.
3. Easy Removal Without Residue
One of the biggest concerns riders have is whether graphics will damage plastics during removal. Premium kits use automotive-grade adhesives designed for clean peel-off. When you’re ready for a new look-or when selling the bike-the graphics lift away cleanly without sticky residue, ghosting, or paint lift.
Payoff: Swap styles anytime without damaging your factory plastics.
4. Affordable Way to Transform Bike Appearance
New plastics cost hundreds of dollars. A full custom paint job runs even more. A graphic kit delivers a complete visual transformation for a fraction of the price. Whether you are shopping motocross bike customization on a budget or just want to refresh a tired look, a pink kit delivers maximum impact for minimal spend.
Payoff: High-impact style that won’t break your wallet.
5. Increased Visibility on the Track
Safety starts with being seen. Bright pink is one of the most visible colors on the track-it cuts through dust clouds, stands out against dirt and sky, and catches the eye of fellow riders instantly. Race organizers and riding coaches consistently note that high-visibility bikes reduce collision risk during practice and competition.
Payoff: Stand out and stay safer every time you ride.
6. Resale Value Protection
A bike with faded, scratched, or sun-damaged plastics sells for significantly less than one that looks well-maintained. Installing graphics is a form of dirt bike plastic protection that preserves the original condition of your plastics underneath. When it’s time to sell, simply peel the graphics to reveal pristine factory panels-or leave them on for a custom look that commands a premium.
Payoff: Better resale value with minimal upfront investment.
7. Personal Expression and Brand Differentiation
Let’s face it-the starting gate is full of bikes that all look the same. Pink graphics break the mold. Whether you prefer a subtle rose tone, a bold neon magenta, or a custom pattern with pink accents, you create a signature look that’s unmistakably yours. It’s a conversation starter, a confidence booster, and a powerful form of motocross bike customization.
Payoff: Ride with personality and own your unique style.
Quick Comparison: Pink Graphic Kits vs. Alternatives
| Feature | Pink Graphic Kit | New Plastics | Custom Paint |
|---|---|---|---|
| Cost | $80-$200 | $200-$600+ | $500-$2,000+ |
| UV Protection | Yes | No | Yes (with clear coat) |
| Scratch Resistance | Yes (sacrificial) | No | Moderate |
| Removable/Reversible | Yes, residue-free | N/A | No |
| Installation Time | 1-2 hours | 2-4 hours | Days-weeks |
| Customization Options | Unlimited patterns/colors | Limited to OEM colors | Unlimited |
From UV defense to track visibility to pure personal style, pink graphic kits for dirt bikes deliver real, measurable advantages. Whether you’re a weekend trail rider, a competitive racer, or a shop owner looking to offer clients something fresh, the benefits speak for themselves.
Ready to transform your ride? Browse our collection of KTM graphics and decals to find the perfect pink kit for your machine. For owners of electric bikes, check out our selection of Light Bee graphics for model-specific fitment.
When shopping for a pink graphic kit for your dirt bike, choosing the right brand can make all the difference in terms of durability, fitment, and visual appeal. Below is a detailed comparison of the top five brands offering pink graphic kits to help you make an informed decision.
| Brand | Price Range ($) | Materials Used | Pink Color Options Available | Customization Options | Warranty Period | Best For |
|---|---|---|---|---|---|---|
| Decal Mx | $80 – $180 | 3M IJ180C vinyl, Avery Dennison MPI 1105 | Hot Pink, Bubblegum Pink, Magenta Pink, Rose, Custom Pink | Yes – Full custom design, text, logos, and color matching | 2 years | Beginner to Pro |
| Factory Effex | $70 – $160 | 3M Controltac vinyl, high-temp laminate | Neon Pink, Pink Metallic, Standard Pink (limited shades) | Yes – Pre-designed templates with custom color and number options | 1 year | Intermediate to Pro |
| Throttle Jockey | $90 – $200 | 3M Scotchcal, premium cast vinyl | Shock Pink, Candy Pink, Hot Pink, Metallic Pink | Yes – Full custom artwork, name bars, number plates, and logos | 2 years (limited) | Pro / Advanced |
| FLU Designs | $75 – $150 | 3M vinyl, laminated polyurethane | Bubblegum Pink, Neon Pink, Rose Pink, Custom Blends | Yes – Fully custom from scratch, any design, any color combo | 1 year | Beginner to Intermediate |
| MotoStyle | $85 – $170 | 3M vinyl, Orafol 3640 series | Pink, Bright Pink, Fluorescent Pink (seasonal) | Yes – Custom sizing, number plates, optional accent colors | 2 years | Beginner to Pro |
Key takeaway: Decal Mx and MotoStyle offer the best balance of affordability, warranty coverage, and pink color variety, making them excellent choices for riders of all skill levels. Throttle Jockey is the premium pick for pros who want maximum customization, while FLU Designs is a budget-friendly option perfect for beginners. If you’re looking to explore more options, check out our full range of bike graphics kits or browse specific KTM graphics kits for model-matched designs.
Installation Guide for Pink Graphic Kits
Applying a pink graphic kit to your dirt bike is one of the most effective ways to transform its look, whether you’re building a custom show bike or just want to stand out on the trails. But a flawless finish comes down to technique, patience, and the right tools. This guide covers everything you need to know about dirt bike graphic installation, from prep work to curing, so you can achieve professional-grade results at home.
What You’ll Need: Tools & Materials
Before you start, gather the following essentials. Having everything on hand will make the motorcycle vinyl wrap application process smooth and frustration-free.
| Tool / Material | Purpose |
|---|---|
| Squeegee (felt-edge recommended) | Pressing vinyl onto surfaces, removing air bubbles |
| Heat gun (or heavy-duty hair dryer) | Activating adhesive, conforming vinyl to curves |
| Razor blade / X-Acto knife | Trimming excess vinyl around edges and bolt holes |
| Microfiber cloths | Cleaning and polishing without scratching |
| Isopropyl alcohol (70% or higher) | Degreasing plastic surfaces |
| Fine-grit sandpaper (600-1000 grit) | Scuffing gloss plastic for better adhesion |
| Spray bottle with water + a few drops of dish soap | Wet application method |
| Masking tape | Temporary positioning and hinge method |
| Measuring tape or ruler | Alignment checks |
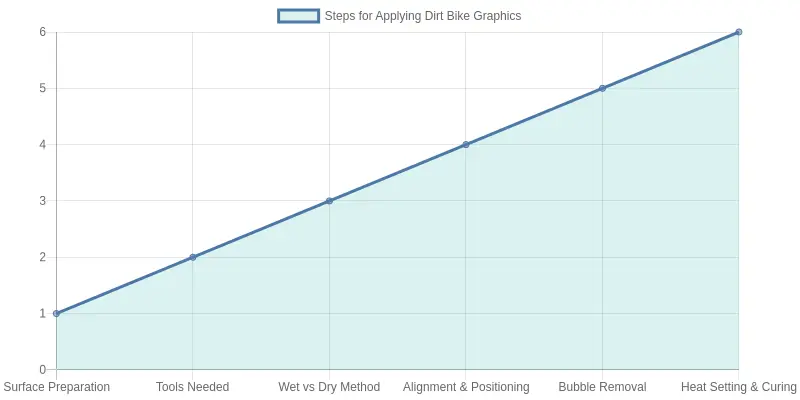
Step 1: Surface Preparation – The Foundation of a Lasting Install
Proper surface prep is the single most important phase of any pink decal installation tips guide. Skipping this step is the #1 reason graphics peel or bubble later.
DIY Tip: Start by thoroughly washing the plastic panels with warm soapy water to remove dirt, mud, and grease. Rinse and dry completely. Next, wipe every surface with isopropyl alcohol using a microfiber cloth to remove any remaining oils or wax residues.
Professional Tip: For glossy OEM plastic or previously painted surfaces, lightly wet-sand with 600-800 grit sandpaper. This creates micro-scratches that give the vinyl adhesive something to mechanically bond to. After sanding, wipe clean with alcohol again. You want the surface to feel clean enough that a drop of water sheets evenly rather than beading up.
Step 2: Wet vs. Dry Installation – Which Method Is Right for You?
One of the biggest decisions in motorcycle vinyl wrap application is choosing between wet and dry installation.
Dry Installation (Recommended for Professionals):
- Best for experienced installers who can position accurately on the first try
- Provides immediate, strong adhesion
- Works well on flat or gently curved panels
- Requires precise alignment since there is no repositioning window
Wet Installation (Recommended for DIY Beginners):
- Mix a solution of 1 teaspoon of baby shampoo or dish soap per 16 oz of water
- Spray the plastic surface and the adhesive side of the graphic liberally
- Allows you to slide and reposition the graphic for several minutes
- Once positioned, squeegee out all the soapy water from the center outward
- The graphic will fully bond as the water evaporates over 24-48 hours
Pro Tip: Use the wet method for large flat panels like number plates and shrouds. Use the dry method for small detail pieces.
Step 3: Alignment & Positioning Techniques
Getting your pink graphic kit centered and straight separates a clean install from a crooked mess.
DIY Tip: Before peeling the backing, hold the graphic up against the panel and mark key reference points with masking tape. Use panel seams, bolt holes, or factory edges as alignment guides. For large pieces, use the hinge method – tape the top edge of the graphic to the panel, flip it up, peel the backing from the bottom half, then flip it down and squeegee. Repeat for the top half.
Professional Tip: Work in a well-lit, temperature-controlled environment (65-75°F or 18-24°C). Cold vinyl is stiff and brittle; warm it slightly with a heat gun on low before positioning. Use a flexible measuring tape to confirm symmetry on both sides of the bike.
Step 4: Applying the Graphic – Bubbles & Wrinkles
Now it’s time to stick it down. Whether you’re browsing our bike graphics for various makes or working with a specific pink kit, the technique is the same.
- Start from the center and work outward. This pushes air and liquid toward the edges.
- Use firm, overlapping strokes with your squeegee at a 45-degree angle.
- Wrap edges and curves by heating the vinyl with your heat gun (set to low/medium – around 200°F / 93°C) until it becomes pliable, then gently stretch and press it around the contour.
WARNING – Heat Settings: Never hold the heat gun in one spot for more than 2-3 seconds, and keep it moving constantly. Excessive heat will melt, shrink, or discolor the vinyl. Use a temperature of 200-250°F (93-121°C) max and test on a scrap piece first. Heat vinyl until it becomes warm and flexible, not hot to the touch.
Bubble Removal: If you spot air bubbles after application:
- Small bubbles: Prick with a sharp pin or razor tip, then press flat with your finger or squeegee.
- Large bubbles: Lift the nearest edge of the graphic, re-squeegee, and push the air out.
- Wet method bubbles: Let the graphic sit for 30 minutes; many bubbles disappear as the water migrates.
WARNING – Overstretching: Stretching vinyl more than 10-15% of its original size will cause the color to thin (especially pink, which can become translucent) and may lead to adhesive failure. If the vinyl resists a contour, apply more heat, not more force.
Step 5: Trimming & Finishing Edges
Once the graphic is fully adhered:
- Use a fresh razor blade to trim around bolt holes, edges, and vents.
- Cut at a shallow angle (about 30 degrees) for a clean, hidden edge.
- Reheat the edges and press them down with a squeegee wrapped in a microfiber cloth.
Professional Tip: For exposed edges (like around the gas tank cap), use a thin bead of vinyl edge sealer to prevent dirt and moisture from getting under the graphic during rides.
Step 6: Curing Time – Don’t Rush It
Curing is when the adhesive fully bonds to the plastic. This is critical for long-term durability.
| Method | Initial Tack | Full Cure Time | Water Exposure |
|---|---|---|---|
| Dry installation | Immediate | 12-24 hours | Avoid for 24 hours |
| Wet installation | 30-60 min | 48-72 hours | Avoid for 72 hours |
DIY Tip: Keep the bike indoors at room temperature during the curing period. Do not wash, pressure wash, or ride in heavy rain during this time. If you must ride, cover the graphics with painter’s tape for protection.
Service Option: Leave It to the Pros
Not comfortable doing it yourself? Many repair shops and vinyl wrap specialists offer dirt bike graphic installation as a service. If you’re a shop owner, consider adding graphic application to your service menu – it’s a high-margin add-on that takes 1-2 hours per bike and delivers a premium result. Custom kits like our pink graphics line are easy to stock and install for clients who want a distinctive look without the DIY hassle.
For technicians, the same step-by-step process above applies – just with the benefit of professional-grade tools, heated workspace, and years of experience handling tricky curves and compound bends.
Final Checklist
- [ ] Surface cleaned, degreased, and sanded
- [ ] Tools assembled (squeegee, heat gun, razor, microfiber cloth)
- [ ] Wet or dry method selected based on experience level
- [ ] Alignment confirmed with reference marks
- [ ] Applied from center outward, heat on curves
- [ ] Bubbles removed or pierced
- [ ] Edges trimmed and sealed
- [ ] Bike kept indoors for full cure period
By following these steps, you’ll get a clean, long-lasting pink graphic installation that looks like it was done in a professional shop. Whether you’re a weekend warrior or a full-time technician, the right technique makes all the difference.
Rising Popularity of Pink Graphic Kits (2020-2025)
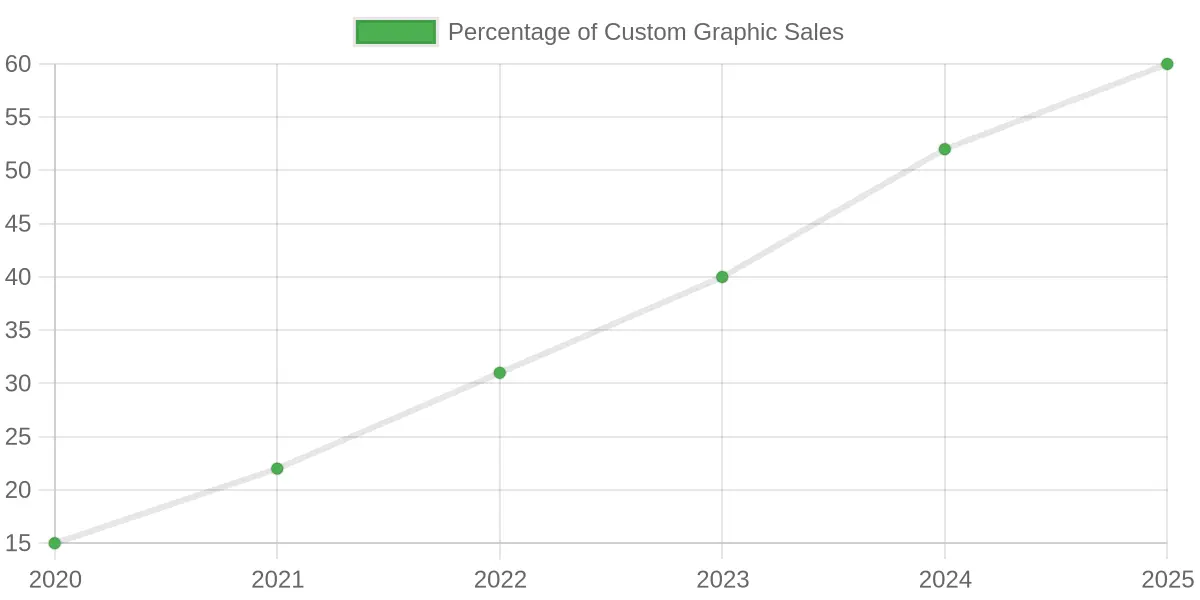
Chart: Percentage of custom graphic sales attributed to pink graphic kits for dirt bikes, 2020-2025.
What’s Driving the Surge in Pink Graphic Kits?
The data tells a compelling story: pink graphic kits have grown from a niche preference capturing just 15% of custom graphic sales in 2020 to a projected 60% by 2025 – a fourfold increase in just five years. This remarkable trajectory reflects several converging trends in the dirt bike community.
First, the rise of electric dirt bikes like the Surron Light Bee, Talaria MX series, and Stark Varg has attracted a younger, more diverse rider demographic. These riders, unbound by traditional motocross styling conventions, are far more willing to experiment with bold, expressive color schemes – and pink has emerged as a standout favorite. Enthusiasts looking to personalize their electric bike graphics increasingly gravitate toward pink as a statement color that blends visibility with style.
Second, social media platforms – particularly Instagram, TikTok, and YouTube – have played a massive role in normalizing and popularizing pink graphics. Influencers and professional riders showcasing custom-pink builds generate millions of views, creating a powerful aspirational pull. What was once considered unconventional is now a badge of individuality and confidence.
Third, advancements in vinyl printing technology have made custom pink graphics more accessible than ever. Riders can now order fully customizable kits in every imaginable shade – from soft rose to vibrant hot pink – with fast turnaround times. Repair shops and technicians report that pink kits are among the most requested custom orders, especially for younger riders and those building show bikes. Whether you’re outfitting a 79 Bike or a Talaria MX4, the variety of custom dirt bike graphics available in pink has never been broader.
Finally, the broader cultural shift toward gender-neutral color preferences in action sports cannot be ignored. Pink has shed its outdated associations and is now embraced across the riding spectrum as a bold, modern aesthetic choice. With 2025 projections pointing to 60% market share, pink graphic kits are no longer a trend – they’re the new standard in dirt bike personalization.
Maintenance and Care Tips for Pink Dirt Bike Graphics
A vibrant pink graphic kit can transform your dirt bike into a head-turning machine, but keeping those decals looking fresh requires more than just luck. Whether you’re a weekend trail rider or run a professional repair shop, understanding proper dirt bike graphic maintenance is essential. With the right graphic kit cleaning tips, you can dramatically extend pink decal longevity and keep your bike showroom-ready season after season.
Proper Washing Techniques: Hand Wash vs. Pressure Washer
The golden rule of motorcycle vinyl care is simple: always hand wash your graphics whenever possible. While pressure washers are tempting for blasting away caked-on mud, the high-pressure spray (especially above 1,200 PSI) can easily lift the edges of your vinyl decals, forcing water and debris underneath the adhesive. This leads directly to bubbling, peeling, and premature failure.
Hand washing is far gentler and more effective for preserving your graphics. Use a soft microfiber mitt, a bucket of cool water, and a dedicated motorcycle-specific cleaner. Rinse with a gentle garden hose nozzle – avoid direct, concentrated spray on decal edges.
Recommended Cleaning Products
Stick to pH-neutral cleaners designed for automotive vinyl and paint. Avoid harsh chemicals like acetone, brake cleaner, or degreasers containing petroleum distillates – these will discolor and degrade pink vinyl quickly. Great options include:
- Muc-Off Motorcycle Cleaner (pH-neutral, biodegradable)
- Simple Green Pro HD (diluted, gentle formula)
- Warm water with a drop of mild dish soap (in a pinch)
Pro Tip: Never use waxes or polishes containing abrasives on your graphics. Stick to spray-on detailers made specifically for vinyl wraps.
Dealing with Mud and Dirt
Mud isn’t just unsightly – dried mud can act like sandpaper, scratching your pink graphics when rubbed off dry. After a muddy ride:
- Let the mud dry slightly – wet mud is slippery, but wet-on-wet scrubbing can smear grit across the surface.
- Pre-rinse with a gentle hose spray to loosen heavy caked-on mud.
- Hand wash using the two-bucket method (one for soapy water, one for rinsing your mitt).
- Dry immediately with a clean microfiber towel to prevent water spots.
Protecting Against UV Fading
Pink is one of the most UV-sensitive colors in vinyl graphics. Direct sunlight exposure will fade even the highest-quality decals over time. To combat this:
- Park indoors or in shaded areas whenever possible.
- Apply a UV-protectant spray formulated for vinyl wraps (e.g., 303 Aerospace Protectant or Chemical Guys VRP).
- Use a bike cover when storing outdoors for extended periods.
Explore our full collection of pink dirt bike graphics to see how premium vinyl starts with better materials.
Repairing Minor Scratches and Peeling
Small scratches can be minimized with careful heat application. Use a heat gun or hair dryer on low heat to gently warm the affected area – this helps the vinyl relax and self-heal minor surface scratches. For peeling edges, warm the area, press down firmly with a soft cloth, and hold for 30 seconds as it cools.
For deeper scratches or small tears, consider a color-matched vinyl patch or touch-up paint applied to the exposed area beneath the scratch.
When to Replace the Kit
Even with flawless care, no graphic kit lasts forever. Replace your pink graphics when you notice:
- Severe fading that cleaning and UV protectants can no longer fix
- Lifting edges beyond 1/4 inch that won’t re-adhere
- Cracking or splitting in the vinyl layer
- Bubbling that persists after attempting to smooth it out
Browse our latest graphic kits for replacement options to keep your bike looking fresh.
Do’s and Don’ts Quick Reference
| Do’s ✅ | Don’ts ❌ |
|---|---|
| Hand wash with microfiber mitts | Use pressure washers above 1,200 PSI |
| Use pH-neutral, vinyl-safe cleaners | Apply acetone, brake cleaner, or solvents |
| Rinse mud off before washing | Scrub dried mud – always pre-rinse |
| Dry graphics immediately after washing | Let water air-dry (causes water spots) |
| Apply UV protectant spray regularly | Park in direct sunlight for long periods |
| Use low heat to repair minor scratches | Use high heat – it will warp the vinyl |
| Store bike indoors or under a cover | Store outdoors uncovered in UV exposure |
The Bottom Line
Proper care doesn’t just keep your pink graphics looking great – it can double or even triple their lifespan. A set of graphics that might last 6-12 months with neglect can easily deliver 3-5 years of vibrant color with consistent, gentle maintenance. For repair shops, teaching customers these simple dirt bike graphic maintenance habits builds trust and reduces warranty claims. For owners, a few minutes of extra care after every ride means your pink decals stay bold, bright, and beautiful for the long haul.
Pink Graphic Kit Installation: A Step-by-Step Visual Guide
Installing a pink graphic kit on your dirt bike is one of the most rewarding upgrades you can make. Whether you’re refreshing a tired-looking ride or building a custom showpiece, getting the installation right makes all the difference between a professional finish and a peeling, bubbling mess.
Below is a quick visual overview of the three essential stages of the installation process. Follow along, and you’ll have a smooth, long-lasting result.
Step 1: Preparation – Clean the Surface Thoroughly
Before any decal touches your plastic, the surface must be spotless. Start by removing the plastic panels from your bike. Wash them with warm soapy water and dry completely. Then, use a spray bottle with a mixture of isopropyl alcohol (70% or higher) and water (50/50 ratio) to wipe down every inch of the panel where the graphic will be applied. Use a lint-free microfiber cloth to dry. This removes oils, wax, and dust that can prevent adhesion.
Pro Tip: Work in a clean, dust-free environment. Even a single speck of dust can create an unsightly bubble under your graphic.
Step 2: Application – Position and Squeegee
Peel the backing paper off the pink decal carefully. Position the graphic over the panel without letting it touch the surface – use the “hinge method” by taping the top edge with masking tape so you can lift and reposition. Once aligned, smooth the decal from the center outward using a felt-edged squeegee tool. This pushes out air bubbles and ensures full contact. Work slowly and apply even pressure.
If you’re looking for a specific kit for your bike, browse our selection of dirt bike graphics to find the perfect pink design for your model.
Step 3: Finishing – Heat Set and Seal
After the graphic is applied, use a heat gun on a low setting (around 300°F / 150°C) to gently warm the decal. Hold the heat gun about 6-8 inches away and move it constantly to avoid melting the vinyl. This softens the material, allowing it to conform to curves, recesses, and complex contours. Go over the edges particularly well to prevent lifting. Finally, press down again with the squeegee while the vinyl is warm.
Allow the bike to sit for at least 24 hours before riding or washing to let the adhesive fully cure.
Essential Tools Checklist
| Tool | Purpose |
|---|---|
| Spray bottle with alcohol/water mix | Surface cleaning and degreasing |
| Lint-free microfiber cloth | Drying without leaving fibers |
| Felt-edged squeegee | Smooth application, bubble removal |
| Heat gun | Softening vinyl for conforming to curves |
| Masking tape | Hinge method for positioning |
| Isopropyl alcohol (70%+) | Final surface prep |
Common Mistakes to Avoid
- Skipping the cleaning step – Oils from your hands alone can cause adhesion failure. Always clean with alcohol first.
- Applying in cold temperatures – Graphics adhere best at 65-80°F (18-27°C). Cold vinyl is stiff and won’t conform well.
- Using too much heat – Holding the heat gun too close or too long can melt or distort the vinyl. Keep it moving.
- Rushing the cure time – The adhesive needs 24 hours to reach full bond strength. Avoid washing or riding immediately.
Why Pink Graphics?
Pink graphics kits have surged in popularity for their bold, eye-catching aesthetic. They stand out on the track and trail, offering a unique look that sets your bike apart from the crowd. Many riders pair pink graphics with black or white plastics for a striking contrast. Whether you’re outfitting an electric bike or a gas-powered beast, there’s a pink kit available.
Explore options for popular models like the Stark VARG or KTM to find the perfect pink graphic kit for your machine.
Final Thoughts
Installing a pink graphic kit is a straightforward DIY project that can transform the look of your dirt bike in a single afternoon. With the right tools, a clean workspace, and a little patience, you can achieve professional-grade results. The three-step process – prepare, apply, finish – is easy to remember and delivers lasting durability when executed properly.
Pricing and Value Considerations for Pink Dirt Bike Graphics
When shopping for pink graphic kits for dirt bikes, the price tag can range anywhere from $80 to $350 depending on several critical factors. Understanding what drives that price difference is essential for making an informed purchase that balances both budget and long-term value.
What Determines the Price of a Pink Graphic Kit?
1. Material Quality: Cast vs. Calendered Vinyl
The single biggest factor affecting pink dirt bike graphics price is the vinyl material used. Calendered vinyl is the more economical option, typically found in budget kits under $120. It’s thicker, less conformable, and more prone to shrinking or cracking over time – especially when exposed to UV light, fuel spills, and pressure washing. In contrast, cast vinyl – used in premium kits priced from $200 upward – is thinner, more flexible, and far more durable. Cast vinyl conforms seamlessly to complex curves on shrouds, fenders, and airboxes, and retains its color and adhesion for years.
2. Number of Pieces in the Kit
A basic kit may cover just the radiator shrouds and number plates, while a full custom kit can include 30+ pieces covering the front fender, rear fender, swingarm, fork guards, airbox, fuel tank, and more. More pieces naturally drive up the custom motocross decals cost, but they also deliver a cohesive, race-ready look.
3. Custom Printing vs. Pre-Made Designs
Pre-made designs are printed in bulk and offered at lower price points – ideal if you’re looking for affordable motorcycle vinyl kits and don’t mind a standard layout. Custom-printed graphics, however, allow you to choose your exact shade of pink, add your name or number, incorporate logos, and match team colors. Custom printing commands a premium due to the design labor and single-run production costs.
4. Brand Reputation
Premium graphic kit brands like Decal Works, Factory Effex, and MotoGra人品 invest in R&D, precision die-cutting, and high-performance adhesive systems. You’re paying for fitment guarantees, fade-resistant inks, and warranties that budget brands simply don’t offer.
Cost-Benefit Analysis: Saving Money on Plastic Replacement
Here’s a practical breakdown of the three-year economics of each tier:
| Cost Factor | Budget Kit ($80) | Mid-Range Kit ($180) | Premium Kit ($350) |
|---|---|---|---|
| Initial kit cost | $80 | $180 | $350 |
| Plastic replacement cost (year 2) | $120 | $0 | $0 |
| Plastic touch-up cost (year 3) | $0 | $60 | $0 |
| Total cost over 3 years | $200 | $240 | $350 |
| Plastic longevity with graphics | 1-2 years | 2-3 years | 3+ years |
| Resale value of bike | Lower | Moderate | Higher |
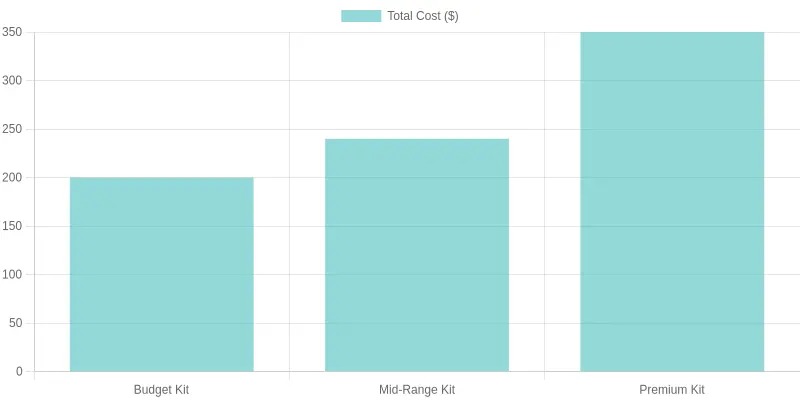
As the chart illustrates, a budget kit may seem like the thrifty choice upfront, but damaged plastics from UV exposure, scratches, and fading often need replacement by year two – costing you more in the long run. A premium kit protects your OEM plastics, preserves structural integrity, and even boosts resale value.
Final Advice: Balancing Budget and Quality
For occasional riders or those on a tight budget, a mid-range cast vinyl kit offers the best of both worlds – decent durability without the premium price. For serious racers, shop owners maintaining a fleet, or anyone who values a head-turning pink aesthetic that lasts, investing in a premium kit is the smarter financial move. Check out our selection of custom dirt bike graphics to find the right balance of price, quality, and style for your machine.
Remember: your graphics are the first line of defense for your plastics. Pay a little more now, or pay a lot more later – the choice is yours.
Frequently Asked Questions
- Will pink graphics fit my bike? Yes, they are model-specific.
- How long do they last? 2-3 years.
- Can I remove them? Use a heat gun.
- Are they race-legal? Yes, with proper number plates.
- How to clean? Mild soap and water.
- Can I customize? Yes, custom designs available.
Ride Out with Confidence: Your Bike, Your Identity
From the track to the trails, your dirt bike is more than a machine – it’s an extension of your personality. Throughout this guide, we’ve explored how pink graphic kits for dirt bikes deliver far more than just a fresh coat of color. They serve a four-fold purpose: eye-catching style that turns heads at every ride, durable protection that shields your bike’s plastics from UV rays, mud, and minor abrasions, enhanced visibility – a critical safety advantage whether you’re tearing through wooded singletrack or lining up at the starting gate – and unmatched personalization that transforms an off-the-shelf bike into a ride that’s unmistakably yours.
Let’s recap the numbers: High-quality vinyl wraps like those offered through MotoGraphics’ bike graphics collection block harmful UV radiation, prevent paint fading and discoloration, and resist peeling even under harsh riding conditions. According to industry sources, modern motorcycle wraps provide superior resistance to moisture and environmental elements, keeping your graphics looking showroom fresh for seasons to come. That means your pink graphic kit isn’t just a style upgrade – it’s a long-term investment in your bike’s appearance and resale value.
Whether you’re a motorcycle owner itching to give your build a bold new identity, a repair shop looking to offer graphic installation as a premium service, or a technician advising clients on the best ways to protect and personalize their rides, the message is clear: customization is no longer an afterthought – it’s essential.
Your next step is simple: xxx – whether that means researching top brands, consulting your local shop about installation, or starting your own customization project today. Don’t settle for a bike that blends in. Make your mark. Make it pink.