
New dirt bike plastics leave the factory with mold release still on the surface. The film is too thin to see, but it sits on the shrouds and side panels, and it is a common reason a fresh set of graphics starts peeling. Apply a precut decal over that film and the adhesive grabs the release agent instead of the plastic; a few days later the edges are up.
You can avoid that with one extra step. This guide covers what mold release agent is, why it causes edge lift on shrouds and side panels, and how to wipe those panels down before you lay anything on them. Get it right and your motocross graphics stay where you put them.
What Is Mold Release and Why Is It on New Plastics
A mold release agent is a silicone- or wax-based compound sprayed or wiped onto the inside of an injection mold before the plastic is injected. Its job is simple: keep the finished part from sticking to the tooling so it drops out cleanly, with sharp edges and no tearing. What it does not do is disappear. It stays on the surface, and on brand-new dirt bike plastics that leftover film becomes the main obstacle to a clean install.
New shrouds and side panels arrive with a layer of it that you cannot always see. Run a clean finger across the plastic: if it feels slick or waxy, like a table just wiped with furniture polish, the release agent is still there. That slickness is what makes fresh plastics so annoying to wrap.
The problem is at the adhesive. The adhesive layer on vinyl decals is made to bond to bare, clean plastic. Mold release sits between them like a film of oil on glass. The glue cannot get a grip, so it slides, and the decal never truly anchors to the panel underneath.
Three Telltale Signs of Leftover Mold Release
- A greasy or waxy slickness when you drag a finger across the panel.
- Water, isopropyl alcohol, or soap solution that beads up instead of sheeting evenly across the surface.
- Decal edges that lift, curl, or peel back within days of installation.
The result is predictable. A graphic can look sharp and perfectly aligned on day one, then start lifting at the edges within a week. Dust and pressure-washer spray work their way under the lifted lip, and the peel speeds up from there. Nothing is wrong with the decal or your technique; the surface was contaminated at the factory.
The fix does not change: strip the mold release before you apply anything. No adhesive holds on a dirty surface.
Once your panels are clean, our pre-cut dirt bike graphics kits are ready for them.
Cleaning Methods for Removing Mold Release from Dirt Bike Plastics
Mold release beats adhesive every time, so which cleaner you pick matters. Use the table to choose one, then follow it with a final prep wipe right before you lay down a new graphics kits.
Table: Cleaning Methods for Removing Mold Release from Dirt Bike Plastics.
| Cleaning Method | What It Removes | Drying Time | Solvent Risk to Plastic | Best Use Case |
|---|---|---|---|---|
| Dish soap and warm water | Light oils, dust, surface mold release | 10-20 min | None (water-based) | First wash to knock down mold release; follow with IPA before graphics |
| Isopropyl alcohol (IPA, 90%+) | Oils, fingerprints, thin mold release film | 1-3 min | Low; overuse can dry out plastic | Quick final wipe right before applying graphics |
| Wax-and-grease remover | Silicone, wax, heavy mold release film | 5-15 min | Medium; test a hidden spot first | Stripping stubborn mold release from full plastic sets |
| Dedicated plastic prep spray | Mold release, oils, static dust | 2-5 min | Low to medium; formulated for plastics | Best all-around prep for shrouds and side panels |
| Dry microfiber wipe-only | Dust and loose debris only | Instant | None | Quick dusting between steps; does NOT strip mold release alone |
Bottom line: dish soap, wax-and-grease remover, and a dedicated plastic prep spray all strip mold release from shrouds and side panels before you apply graphics. A dry microfiber wipe removes dust but leaves the release agent in place, so do not rely on it alone.
Why Graphics Lift at the Edges
A decal holds only as well as the surface under it, and fresh plastic is a poor host. When shrouds and side panels come out of the injection mold, the release agent leaves a low-energy surface behind. Polypropylene is already low-energy on its own, around 30 dynes/cm untreated, and mold release, oils, and silicone push it lower. Pressure-sensitive adhesives need a clean, higher-energy surface to “wet out” and grip. When contamination stops the glue from flowing into the microscopic peaks and valleys of the plastic, contact is partial, and a partial bond is a weak bond.
The Four Forces That Work the Edges Loose
Once adhesion is compromised, four forces pull it apart over time:
- Residual contamination and low surface energy. Mold release, oils, and silicones stop the adhesive from wetting the plastic, so the bond starts out weak.
- Thermal cycling. Plastic, adhesive, and vinyl expand and contract at different rates as the bike bakes in the sun and cools overnight, flexing the film and creeping the edges upward.
- Mud and pressure-washing. Grit packs under any lifted lip, and a pressure washer drives water into that gap and pries the edge open.
- Vibration and chassis flex. Engine buzz and suspension movement load the film constantly, and wherever it has room to move, it migrates.
Why Lift Always Starts at Curves and Edges
Lift starts on curves because that is where the stress collects. A flat panel lets the film relax; a tight radius forces the vinyl to fight its own memory, and the tension pulls straight back toward the edge. Edges also leave a bare line of adhesive exposed to air, water, and grit, which makes them the entry point for every other force above. That is why the edge and the curvature line go first, long before the flat centers move. To keep a decal down, start from a clean, de-greased surface and use a quality pre-cut graphics kits set.
Why Brand-New Dirt Bike Plastics Reject Graphics
Freshly molded shrouds and side panels look clean, but the surface is not. To release the part from the mold, the factory sprays a mold release agent into the tooling, and that chemical leaves a microscopically thin film on the plastic long after it ships.
Here is the layered problem, shown as a simple cross-section:
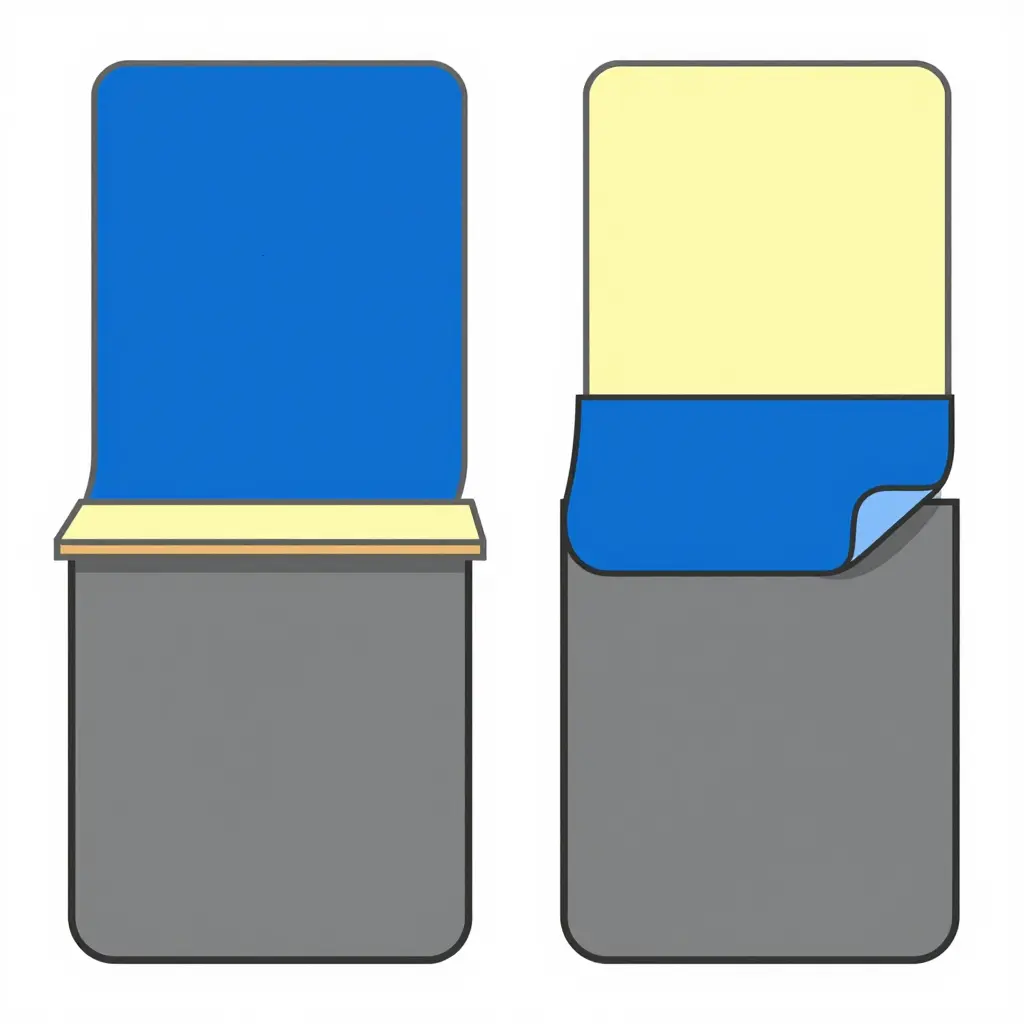
Reading the Diagram
- Left state, the failure: the vinyl adhesive can only touch the release film, not the plastic. Bonding stops at the residue, so the graphic never truly grips.
- Right state, the fix: once the film is wiped away, the adhesive contacts bare plastic directly and locks down flat.
The Practical Takeaway
That invisible layer is why a decal can feel stuck one day and curl at the edges a week later. Wipe every shroud and side panel with a proper prep routine before you lay down graphics. If you want a kit that holds its edges through mud, pressure washing, and heat cycles, look at our dirt bike graphics kits built for clean-bond installation.
Skip the wipe and the residue wins. Do the wipe and the adhesive does its job.
What You Need Before You Wipe Down Shrouds and Side Panels
Gather your supplies in one spot first, so you never stop mid-clean with bare plastic sitting exposed. Installers who do this every day will tell you the same thing: a spotless, contaminant-free surface is the biggest factor in whether a decal grabs tight or lifts at the edge. Here is the kit to have on hand.
- Lint-free microfiber cloths – Keep at least three: one for washing, one for the alcohol wipe, and one for a final dry pass.
- Isopropyl alcohol in a spray bottle – Use 70% to 91% IPA to strip oily residue; never use a lower concentration that leaves water behind.
- Mild dish soap – A few drops in a bucket lifts dirt without leaving a slick film that blocks adhesion.
- Warm water – Warm, not hot, water breaks down grime faster and rinses away soap cleanly.
- Soft bristle brush – Work it into textured seams and vents where grit likes to hide after a ride.
- Wax-and-grease remover – Apply it to stubborn silicone and polish residue that alcohol alone won’t touch.
- Nitrile gloves – Gloves stop your skin oils from re-contaminating the plastic the moment you finish cleaning.
- Plastic squeegee – A soft-edged squeegee helps you chase out trapped liquid when applying the graphics.
- Heat gun or hairdryer – Gently warming the panel keeps the adhesive pliable so it conforms to curves and corners.
Supplies are the cheap half of the job. A well-cut kit matters just as much, so browse our KTM graphics range to see how quality vinyl behaves on a surface that is actually ready.
How to Remove Mold Release from New Dirt Bike Plastics Before Installing Graphics
Freshly molded dirt bike plastics arrive coated in a slick layer of mold release, a silicone-based residue that keeps the part from sticking to the tooling. Leave it on and your graphics will trap air, refuse to bond, and peel at the edges. Follow this sequence exactly, and the decals stay down.
-
Remove the Panels First. Unbolt every shroud, side panel, and fender so you are working on a flat, manageable surface. Off-bike cleaning lets you reach edges, seams, and the backside that a spray bottle never touches. If a panel has to stay mounted, tape off the surrounding areas to avoid solvent streaks.
-
Wash with Mild Dish Soap and Warm Water. Fill a bucket with warm water and a few drops of mild dish soap, then scrub each panel with a soft sponge. The surfactant cuts through the mold release film without dulling the plastic. Work the surface for a full minute per panel, then repeat once more.
-
Rinse and Dry with Microfiber. Flood the panels with clean water to carry away loosened residue, then dry them immediately with a plush microfiber towel. Skip paper towels and shop rags, which shed lint and scratch the surface you just cleaned.
-
Wipe Down with Isopropyl Alcohol or Wax-and-Grease Remover. Saturate a clean microfiber pad with 70 percent isopropyl alcohol or a dedicated wax-and-grease remover. Wipe in overlapping passes across the whole panel, flipping the cloth as it picks up soil. This step breaks any mold release the soap missed.
-
Let the Surface Fully Dry. Give the panel five to ten minutes in a dust-free area until it is bone dry. Solvent left behind will weaken the adhesive once you press the graphics down.
-
Run the Squeak or Water-Bead Test. Drag a clean, bare finger across the plastic. A clean panel squeaks and offers light resistance; a contaminated one feels slippery and silent. Or mist on water: it should flatten and spread on clean plastic instead of beading up. If it beads, wipe again.
-
Handle the Panel by Its Edges Only. From this point on, grab the panel only by its borders. Your fingertips carry natural oils that reintroduce the exact contamination you just removed.
-
Apply Graphics Immediately. Position and squeegee your decals right after cleaning, before dust or grease can settle. Get pre-cut, model-specific sets from our graphics kits for KTM models and press them on while the surface is pristine.
Treat prep as the most important stage of the install, and edge lift becomes a problem you do not see again.
What Actually Makes Fresh Graphics Peel at the Edges?
Before you put a new kit on a set of shiny shrouds or side panels, it helps to know what you are up against. Edge lift is rarely one mistake; it is a stack of small surface and handling errors. The chart below shows the five most common causes we see in the shop, sized by how often each turns out to be the root cause.
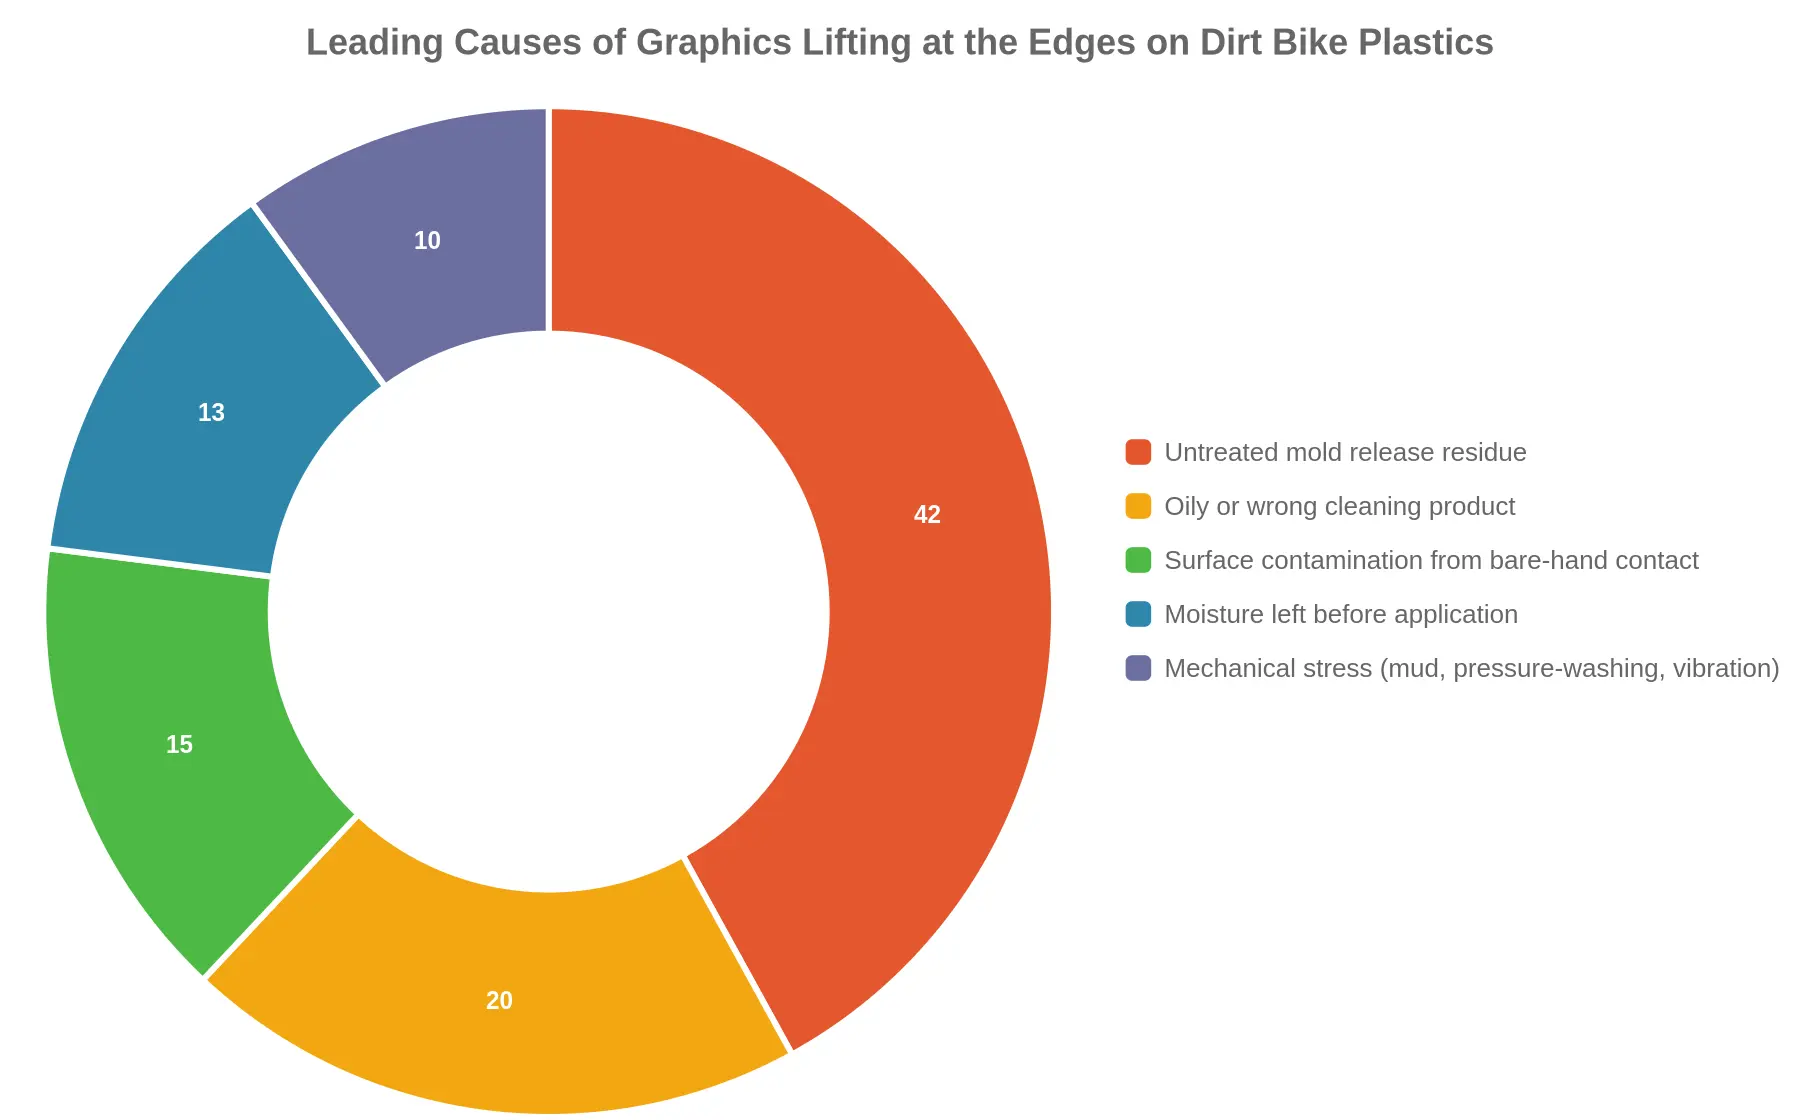
Untreated mold release is the dominant cause by a wide margin. That invisible silicone or wax film left over from molding is what kills adhesion, so a wipedown with a dedicated prep solution before you apply anything is non-negotiable. The other slices – oily or wrong cleaning products, bare-hand contamination, trapped moisture, and mechanical stress from mud, pressure-washing, and vibration – matter less often, but each one can lift an edge on its own.
If you are kitting out fresh plastics, wipe the shrouds and side panels first and let the surface flash off completely before you lay the vinyl down. Making prep the priority, not an afterthought, is what keeps the edges stuck.
Matching Your Prep to Your Bike
The mold-release wipe-down does not change with the bike. Gas or electric, full-size or mini, the shrouds and side panels carry the same factory residue, and if you skip the alcohol wipe before your decals, the kit will lift at the edges. Clean the plastic first, then worry about the artwork.
What does change is panel material and finish, and that is what you tune your prep to. Full-size motocross and enduro plastics – the glossy polypropylene shrouds you find under KTM graphics or a Stark Varge MXEX graphics kit – release easily and take a decal with minimal fuss, but the sharp radiator fins need extra attention because release agent hides in the creases. Smaller electric platforms, from a 79Bike graphics set to an E-Ride graphics kit, use thinner, more flexible panels that flex as you squeegee, so wipe twice to be sure no film remains in the tooled recesses.
The Surron family deserves its own routine. Surron Light Bee graphics sit on notoriously slick, glossy side panels, while Surron Ultra Bee graphics and Surron Hyper Bee graphics cover larger, flatter surfaces where fingerprints and mold release spread further than you expect, so wipe a wider margin than the decal itself. A ReRode R1 graphics kit and Arctic Leopard graphics panels follow the same logic: matte finishes grip well, but any oil or release agent left on them will show up later as a dull, lifted halo.
For Talaria owners, the workflow is identical in spirit but tighter in space. Talaria XXX graphics, Talaria MX3 MX4 graphics, Talaria MX5 graphics, and Talaria Komodo graphics all wrap around narrow, curved shrouds with tight corners, which is exactly where edge lift begins. Wipe those corners until they are bone dry, then apply.
Whatever you ride, the rule holds: removing mold release from shrouds and side panels is the step that prevents edge lift. Prep it correctly once and the graphics stay put.
Frequently Asked Questions
Do all new dirt bike plastics have mold release on them?
In almost every case, yes. A new set of dirt bike plastics leaves the factory with a slick layer of mold release still on the surface, which is why brand-new shrouds and side panels feel oddly smooth. That invisible film is what causes graphics to lift at the edges, so do not assume new plastic is ready to stick.
Can I skip the alcohol wipe if I wash the panels with soap?
No. Soap and water remove visible dirt but leave behind mold release that soap alone cannot break down. Finish with a clean isopropyl alcohol wipe to strip that last film before you apply graphics.
How do I know the mold release is fully gone?
Use the water test. Spray the panel and watch what the water does; on a clean, release-free surface it sheets out evenly instead of beading up. If it beads, the mold release is still there, so wipe again with fresh alcohol.
Will isopropyl alcohol damage my graphics after they are applied?
No. Once your graphics are properly adhered, a light wipe with isopropyl alcohol is safe. The alcohol attacks the mold release sitting on bare plastic, not cured adhesive-backed vinyl, so it is fine for post-install cleanup.
Can I re-stick graphics that have already started to lift at the edges?
Yes, if you catch it early. Gently peel the lifted edge back, clean both surfaces with isopropyl alcohol to remove trapped mold release and dirt, then press it down firmly with a squeegee or a little heat. For a permanent fix, order a fresh set of dirt bike graphics built for your model rather than fighting an edge that keeps popping up.
Wipe First, Stick Second
Brand-new dirt bike plastics leave the factory coated in mold release, an invisible slick film that sabotages even a well-made graphic. Before a single decal touches your bike, wipe each shroud and side panel with isopropyl alcohol or a dedicated prep spray, let the surface flash-dry until it is completely clear, then apply the graphic with steady, even pressure from the center outward.
That two-minute step is the difference between edges that lift within a week and edges that stay locked down for seasons. A clean, properly prepped surface gives the adhesive something to bite, so the graphic holds through mud, pressure washes, and UV while the edges stay sharp.
Do not skip it. Grab your prep spray, work panel by panel, and browse high-quality fade-resistant graphics at motograpics.com to finish the job right.