
Why Graphics Curl at the Fuel Filler Neck
The fuel filler neck is one of the few places on a dirt bike where a decal edge sits directly in the path of a fluid that dissolves its bond. The sequence runs the same way every time.
Step 1: Fuel splash contacts the exposed edge
Every refuel throws off a small splash. The graphic’s edge is the only part of the decal with no surface protecting it, so spilled fuel reaches the cut line first and most often.
Step 2: The adhesive softens
Fuel acts as a solvent on pressure-sensitive adhesive. Gasoline and ethanol blends soak into the adhesive layer and drop its tack, so the glue loses grip on the plastic shroud.
Step 3: Capillary action wicks fuel under the lip
Once the adhesive softens, capillary action pulls fuel into the hairline gap between the graphic and the surface. Fuel creeps inward along the edge, and every refuel pushes the wet zone a little further under the decal.
Step 4: Graphics curl away from the rim
As fuel keeps wicking under the lip, the lifted section grows. The graphic curls up and away from the rim, which exposes fresh adhesive to the next splash and speeds the process up.
Why the rim shape and tight radius curves matter
Filler necks rarely sit on flat ground. They usually sit inside a tight radius curve, and a curved edge resists flat pressure far less evenly than a straight one. The tighter the curve, the more peeling stress lands on that edge.
Incomplete edge sealing after install
A decal only blocks fuel if its perimeter is fully sealed. Sealing the edge means pressing and warming it until the adhesive flows out and closes the border. Skip that step and a microscopic channel stays open, giving fuel a direct entry point.
Heat cycles accelerate the failure
Engine heat and direct sun expand the plastic, the vinyl, and the adhesive at different rates. Each heat cycle flexes the bond and pumps the softened adhesive, so graphics curl faster on a hot-running bike than on one that stays cool.
What this means in practice
Because the mechanism is cumulative, the fix is to interrupt it early: wipe the rim dry after every refuel and reseal the edge before the curl travels. If the lift has already passed the adhesive, graphics cut to fit the fuel cap opening reduce the exposed edge in the first place, such as these KTM graphic kits built for the filler neck.
Early-Warning Diagnosis: Catch Graphics Curl Before It Spreads
Inspecting the edge after each ride takes a minute and can save a whole decal kit. Run through this whenever you suspect a curl is starting around the fuel filler neck.
- Look for a whitened or chalky band along the edge. That pale, frosted halo is the first visible sign of a lift.
- Feather a fingertip around the filler opening. A raised lip near the opening means the adhesive bond is already breaking down.
- Wipe the rim after every fuel splash, then check the cloth. Brown or orange fuel staining under the vinyl tells you fuel is wicking beneath the edge.
- Press the adhesive just inside the lifted line. If it feels soft or tacky, repeated fuel contact has softened the glue.
- Check for trapped debris along the rim. Grit, dust, and dried mud caught under the lifted edge will hold it open no matter how hard you press.
- Refuel, then re-measure the gap at the edge. A gap that widens after a single tank-up means fuel is actively pushing the decal away from the plastic.
One rule decides repair versus replacement. If the edge is still tacky, free of debris, and the gap stays under a couple of millimeters after you reseal it, clean the surface thoroughly and reseal now – it will hold. But if the vinyl has gone chalky and stiff, the gap widens every time you refuel, or fuel staining has crept well under the graphic, the adhesive is spent. Stop chasing a losing battle and swap in fresh dirt bike graphics so the new decal seals cleanly from day one.
Once the rim is clean, the real question is what to seal it with. Here is how the common options compare for resealing an edge at the fuel filler neck.
| Product Type | Best Use Case | Fuel Resistance | Cure Time | Ease of Application | Notes |
|---|---|---|---|---|---|
| Automotive clear edge sealant | Sealing graphic edges against light fuel splash | Moderate | 12-24 hrs | Easy – brush or pen tip | Dries clear and flexible, budget-friendly |
| Flexible silicone sealant | Wide gaps and irregular curves near the neck | Low to moderate | 12-24 hrs | Easy – squeeze tube | Stays rubbery but can peel under heavy fuel contact |
| Fuel-resistant epoxy | High-exposure filler necks with frequent splash | High | 1-4 hrs | Moderate – mix two parts | Toughest bond, but rigid and hard to remove later |
| Primer-and-adhesive edge pen | Quick touch-ups on small lifted corners | Moderate | 30-60 min | Very easy – pen applicator | Precise and portable, ideal for spot repairs |
| Clear vinyl edge tape | Fast, removable protection before a race | Low to moderate | Instant | Very easy – press and smooth | No cure time, swap it out once fuel-soaked |
For most riders who want fuel resistance without much fuss, a flexible silicone sealant or an automotive clear edge sealant is the simplest option that still holds up. If your filler neck takes constant splash, step up to fuel-resistant epoxy to reseal the edge and keep your dirt bike graphics stuck through the season.
How to Wipe the Rim and Reseal the Edge
Every time you top off, a little gas creeps under the edge of the decal at the fuel filler neck, softens the glue, and peels it back until the corner curls. You can fix that without buying new dirt bike graphics; you just need to clean the surface and glue the edge back down.
Before you start: Work on a completely cool, dry bike in a well-ventilated space. Fuel vapor plus a hot tank plus solvent fumes is a bad combination, so let the machine sit, open a garage door or roll it outside, and keep any spark or flame source well away. Have your alcohol, primer, sealant, and a clean lint-free cloth within reach before you begin.
Step-by-Step
- Wash and degrease the area. Use mild soapy water and a soft brush to remove caked-on mud, dust, and fuel residue around the filler opening. Rinse, then inspect the whole area.
- Dry fully. Blot the surface with a clean microfiber cloth and let it air-dry completely. Any trapped moisture will ruin the new bond, so don’t rush this step.
- Lift the curled edge slightly. Gently warm the lifted corner with a hair dryer on low, then peel it back just enough to expose the old adhesive and the bare surface underneath. Don’t yank it – a small flap is all you need.
- Wipe the rim and the hidden surface with isopropyl alcohol. Dampen a lint-free cloth with 90%+ isopropyl alcohol and wipe the rim and the freshly exposed panel surface to strip away old glue, oils, and fuel film. Let it flash off completely.
- Treat the bare surface with primer if the manufacturer calls for it. If your decal kit or tank material needs an adhesion promoter, apply a thin, even coat to the clean bare area and let it dry per the label.
- Apply the sealant or adhesive. Spread a thin bead of the recommended sealant or edge adhesive along the underside of the lifted edge and onto the panel. Keep it even and avoid lumps.
- Press the edge down firmly and roll it. Starting from the center of the flap, press outward with your thumb, then run a felt-edged roller or plastic squeegee over the edge to push out air and lock the bond.
- Let it cure before refueling. Follow the product’s cure time, often 24 hours, and avoid fueling, washing, or hard riding until it’s fully set. This is the step that decides whether the repair holds.
Confirm the Seal Is Holding
After the cure window, press the repaired edge with a clean fingertip and look for lifting, bubbling, or tacky residue. Run a slow fuel fill and watch the fuel filler neck for a few seconds; if the edge stays flat and dry, the bond is good. Check it again after your next ride, and if it lifts, repeat the alcohol wipe and reseal before the curl spreads across the rest of your dirt bike graphics.
A minimalist flat 2D schematic showing a fuel filler neck rim in cross-section, with the vinyl graphic edge lifting away and fuel creeping underneath the exposed lip.
Choosing Fuel-Resistant Dirt Bike Graphics That Survive the Filler Neck
Fuel splashes every time you refuel, and those drips wear down cheap stickers fast. Two things separate dirt bike graphics that last a full season from ones that peel within weeks: the material they are made of, and how carefully the edge was installed. At motograpics.com, every set of fuel-resistant vinyl decals is built to handle repeated fuel contact instead of curling at the pump.
What makes vinyl and laminate fuel resistant?
Fuel resistance takes two layers. The base film has to be a cast, solvent-tolerant vinyl that will not soften, swell, or lift when gasoline touches it. Over it sits a thick, UV-cured laminate that acts as a chemical barrier, keeping the printed ink away from fuel and sunlight. When the laminate is too thin, fuel eats straight through it and the color fades quickly – the usual sign of bargain decals left near a filler neck.
Why a fully sealed edge resists curl
Fuel attacks an edge first. If the cut line is exposed, gasoline wicks under the vinyl and lifts it a little more with every splash. A fully sealed, wrapped edge leaves nothing underneath to trap fuel, so the graphic stays flat and refuses to curl. That is why you should always reseal the edge after trimming or wrapping around the neck.
Install at the filler neck to stop splash damage
Cutting the graphic just short of the filler neck leaves a raw boundary where fuel pools. Instead, install so the vinyl tucks cleanly around the opening, then press and reseal the edge. A precise, precut fit leaves no gap for fuel to creep into.
Look for graphics with these traits:
- Thick UV-cured laminate for a real fuel barrier
- High-tack adhesive rated for solvent exposure
- Precut fit that wraps neatly around the filler neck
- Confirmed UV and fuel resistance from the supplier
- Clean, fully sealed edge that will not lift
Whether you ride a KTM or an electric machine, the same rules apply. Compare the KTM graphics, the Surron Light Bee graphics, the Surron Ultra Bee sets, and the Talaria MX3 and MX4 graphics – each uses fade-resistant vinyl that holds its edge long after the first tank.
What Actually Kills the Graphic Edge at the Fuel Filler Neck?
Before you buy a fresh set of decals, it helps to know why the edge failed. The doughnut chart below is a rough breakdown of what causes graphic edge failure around the fuel filler neck, based on the failure modes riders and shops report most often.
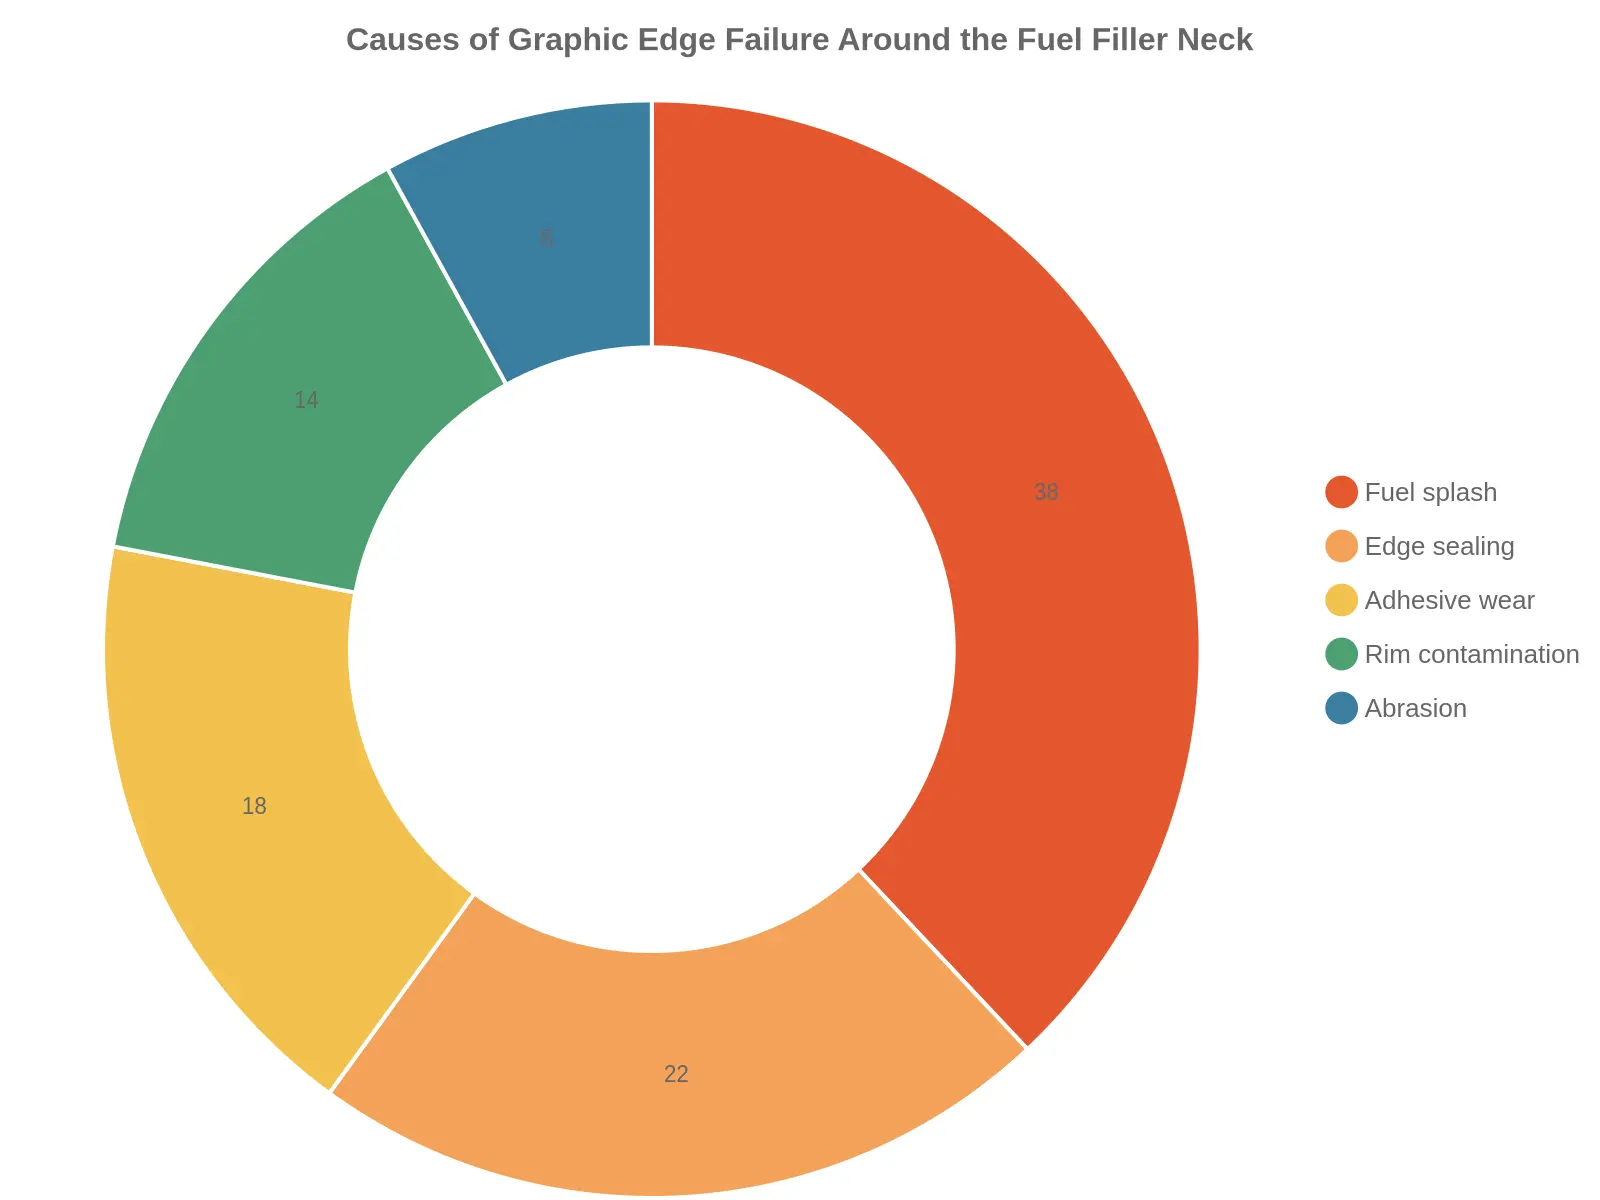
Chart title: Causes of Graphic Edge Failure Around the Fuel Filler Neck
Legend (share of failures)
| Segment | Share |
|---|---|
| Repeated fuel splash | 38% |
| Incomplete edge sealing at install | 22% |
| Worn or degraded adhesive | 18% |
| Rim contamination | 14% |
| Mechanical abrasion | 8% |
Interpretation: Repeated fuel splash and weak edge sealing together account for roughly 60% of all cases, so that is where the fix belongs – wipe the rim dry and reseal the edge rather than immediately swapping graphics. Nail those two steps and you neutralize the most common causes before worn adhesive, contamination, or abrasion ever get a chance to lift the edge.
Preventing Future Fuel-Splash Curl
Every refuel sends a fine mist of gasoline toward the filler neck. Where that mist seeps beneath the edge of your decal, it softens the adhesive and slowly lifts the corner. A bigger sticker will not fix it; a few habits will stop the damage before it starts.
- Wipe the rim when you finish fueling. A microfiber cloth run around the filler neck takes five seconds and removes the fuel film that would otherwise soak into the adhesive.
- Use a funnel or a splash guard. Directing the nozzle with a funnel keeps the fuel stream centered and stops the overflow that causes most splash. If your tank has an awkward shape, a simple splash guard pays for itself in a single season.
- Never top off past the neck. Overfilling pushes liquid fuel into the rim and vents, so stop at the recommended level and let the tank breathe safely.
- Inspect the edge monthly. Run a fingertip along the perimeter of your dirt bike graphics to catch a lifted corner while it is still a tiny bubble.
- Reseal the edge seasonally. Clean the lifted lip with isopropyl alcohol, let it dry, then reseal with a quality edge sealant to lock out moisture and vapor.
- Store the bike away from fuel vapor. A hot, closed garage traps fumes against your plastic, so park where air can move and keep the tank sealed and the cap tight.
- Recheck after pressure washing. High-pressure water along a loose edge does the same damage as fuel, so add an edge inspection to your post-wash routine.
Keep to those habits and the graphics hold their shape. Every wipe, seal, and careful refuel adds weeks of life to the decal, and fewer replacements mean a bike that still looks race-day ready.
Frequently Asked Questions
Fuel splash and a lifted edge at the fuel filler neck are the two complaints we hear most from riders. Here are direct answers to the questions that come up again and again.
Can curled graphics be saved without replacing them?
Yes, in most cases. If the vinyl is still pliable and only the outer edge has lifted, you can flatten it back down with heat and a fresh bead of adhesive instead of buying a new set. Replace the panel only if the print itself has cracked, torn, or shrunk beyond recovery. For a look at what fresh sets are like, browse our KTM graphics selection.
Which sealant works best against fuel splash?
A dedicated fuel-resistant edge sealer or a fuel-resistant epoxy beats generic superglue every time. Superglue dries brittle and cracks the moment the panel flexes, which lets fuel creep back under the dirt bike graphics. Silicone is useful for filling wide gaps on irregular curves, but check the label, because many silicone sealants have only limited fuel resistance. However you seal the edge, apply it in a thin, even line.
How long should you wait before refueling after resealing?
Give the sealant a full 24 hours to cure before you touch a fuel pump, and 48 hours if the weather is cold or damp. Filling up too early traps vapor under the fresh bead and softens the bond right where the fuel filler neck sits. If you must ride sooner, fill slowly and wipe up any drips immediately.
Does a heat gun help re-adhere the edge?
Yes, gentle heat makes the vinyl soft and tacky so it grips the plastic again. Keep the gun moving, hold it several inches away, and press the edge down with a squeegee or gloved thumb while it is warm. Too much heat will stretch or gloss the print, so work in short passes rather than blasting one spot.
Does fuel damage the vinyl print itself?
Occasional drips are harmless, but repeated fuel splash will eventually dull the ink, stain light colors, and break down the adhesive layer. That is why the failure shows up first as a curled edge rather than a ruined graphic. Keeping the area wiped clean is the cheapest way to protect the print.
How often should the edge be resealed?
Check the rim every few washes and reseal the edge whenever you see it lifting, which for most riders means about every one to three months. Riders who spill fuel often should inspect after every fill-up. A five-minute touch-up costs far less than replacing a full panel.
Conclusion: Wipe the Rim, Reseal the Edge, Keep It Stuck
Graphics that curl around the fuel filler neck come down to one predictable cause: repeated fuel splash. Gasoline drips onto the exposed decal edge every time you refuel, softening the adhesive and lifting the vinyl near the cap. Left unchecked, that small lift grows into a full peel.
The routine is simple. After each refuel, wipe the filler rim dry, then reseal the edge with a thin bead of clear edge sealer or a fresh strip of clear edge tape. Press the graphic back down firmly and let it cure before your next ride.
Prevention keeps the fix permanent. Keep a rag within reach, avoid overfilling the tank, angle the nozzle away from the decal, and inspect the edge every few rides. For riders replacing worn graphics, sourcing fuel-resistant vinyl decals from motograpics.com gives the adhesive a stronger starting point.
Consistent edge maintenance protects both adhesion and appearance. A dry rim and a sealed edge take seconds, and they keep your graphics flat and your bike looking sharp.