
There’s nothing more frustrating than stepping back after hours of work to admire your bike, only to spot a peeling edge, an unsightly bubble, or-worst of all-a graphic that’s sitting crooked. If you’ve been there, you’re not alone. Improper surface prep, hasty application, and the wrong tools are the top culprits behind failed installations, turning what should be a thrilling upgrade into a disappointing headache. But here’s the good news: mastering the best way to install dirt bike graphics is completely within your reach, and it doesn’t require a professional shop or years of experience.
The difference between a shoddy job and a showroom-quality finish comes down to three things: the right preparation, the right technique, and the right patience. Whether you’re a weekend warrior refreshing your ride, a shop technician looking to deliver flawless results for customers, or a rider adding a personal touch with a set of custom dirt bike graphics, this guide will walk you through every step. From the essential tools you’ll need to surface cleaning, application methods, and post-install care-we’ve got it all covered.
In the sections ahead, you’ll learn exactly how to prep your plastics, the proper wet-vs-dry installation methods, proven tricks to eliminate bubbles for good, and how to seal those edges so they stay put through mud, heat, and hard riding. Ready to transform your bike with graphics that look professional and last season after season? Let’s dive in.
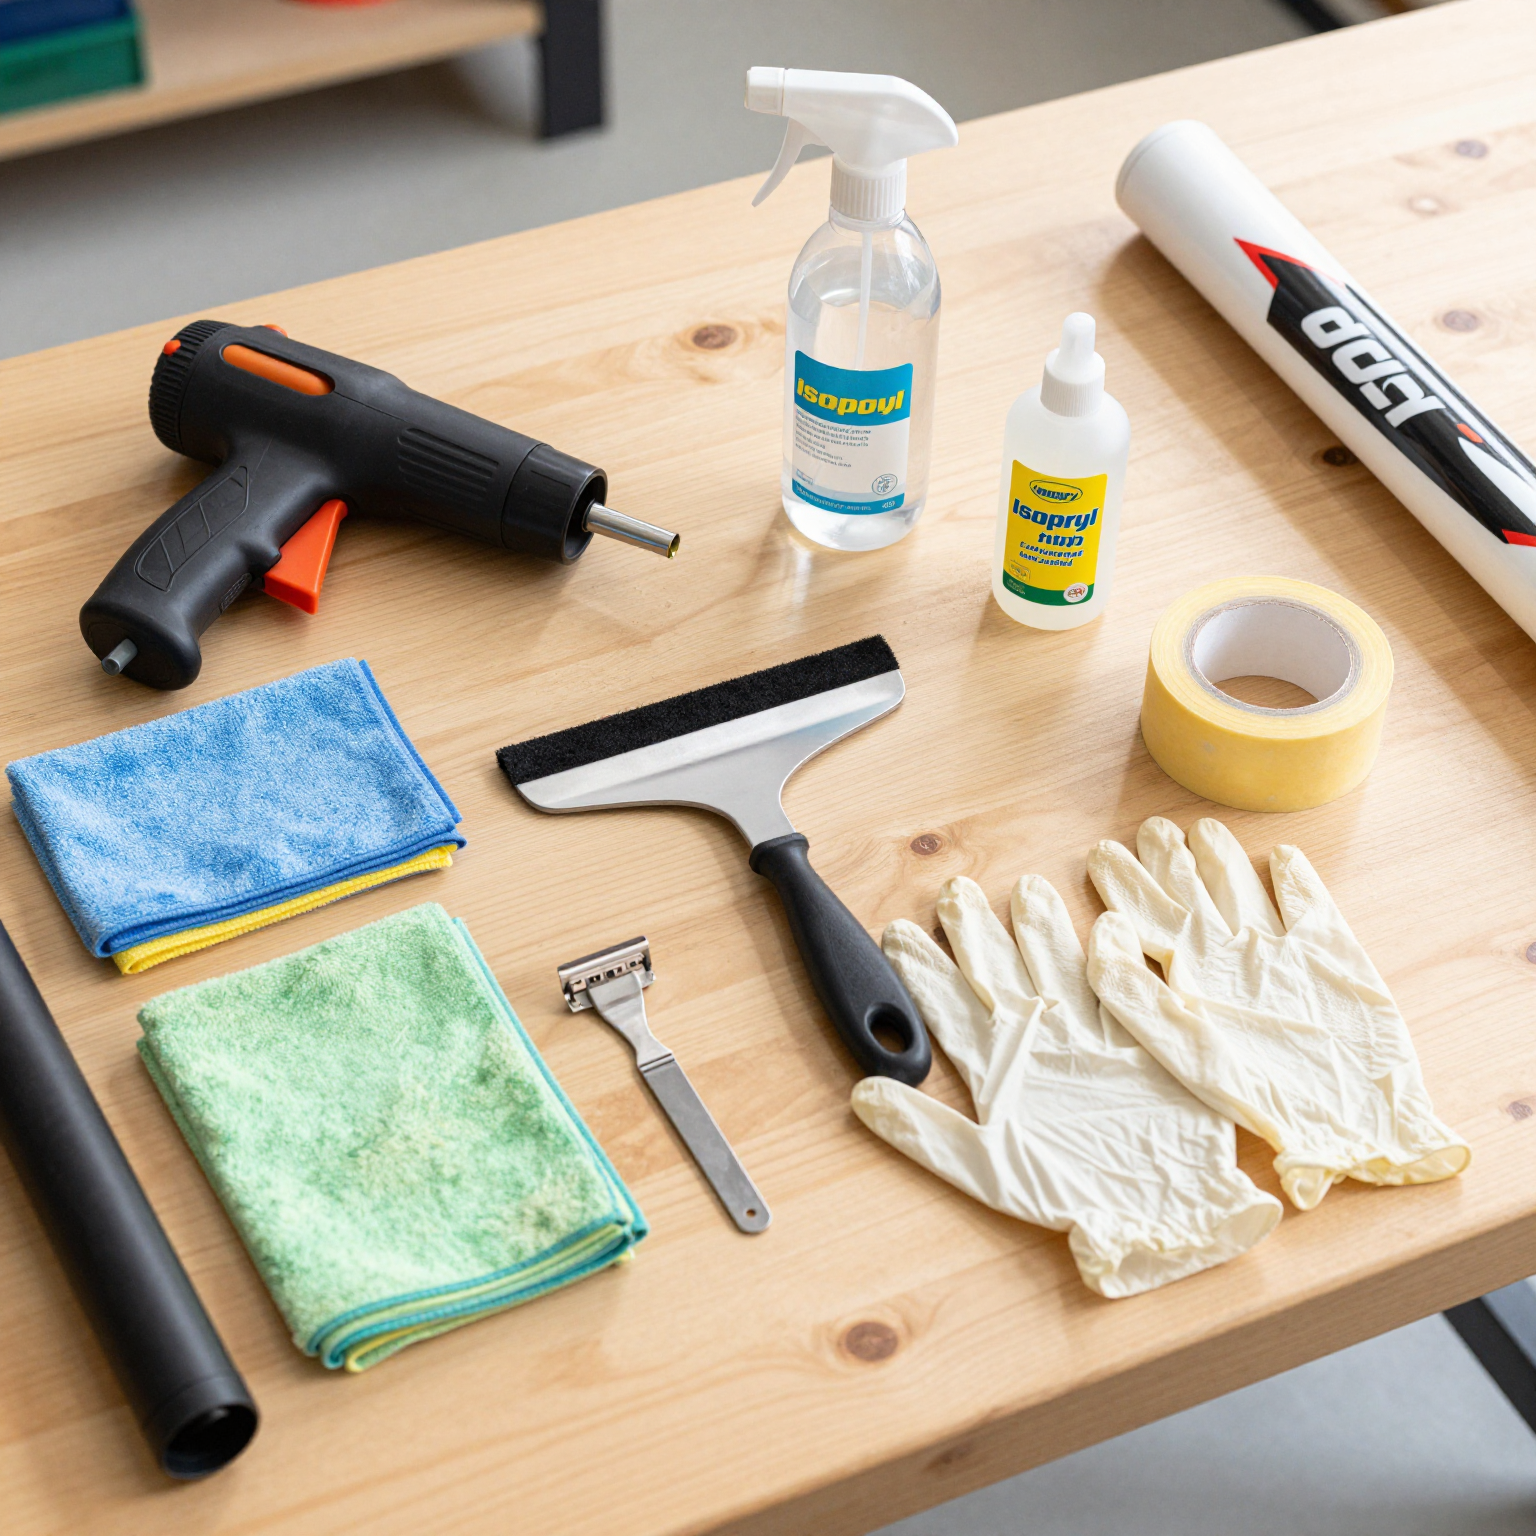
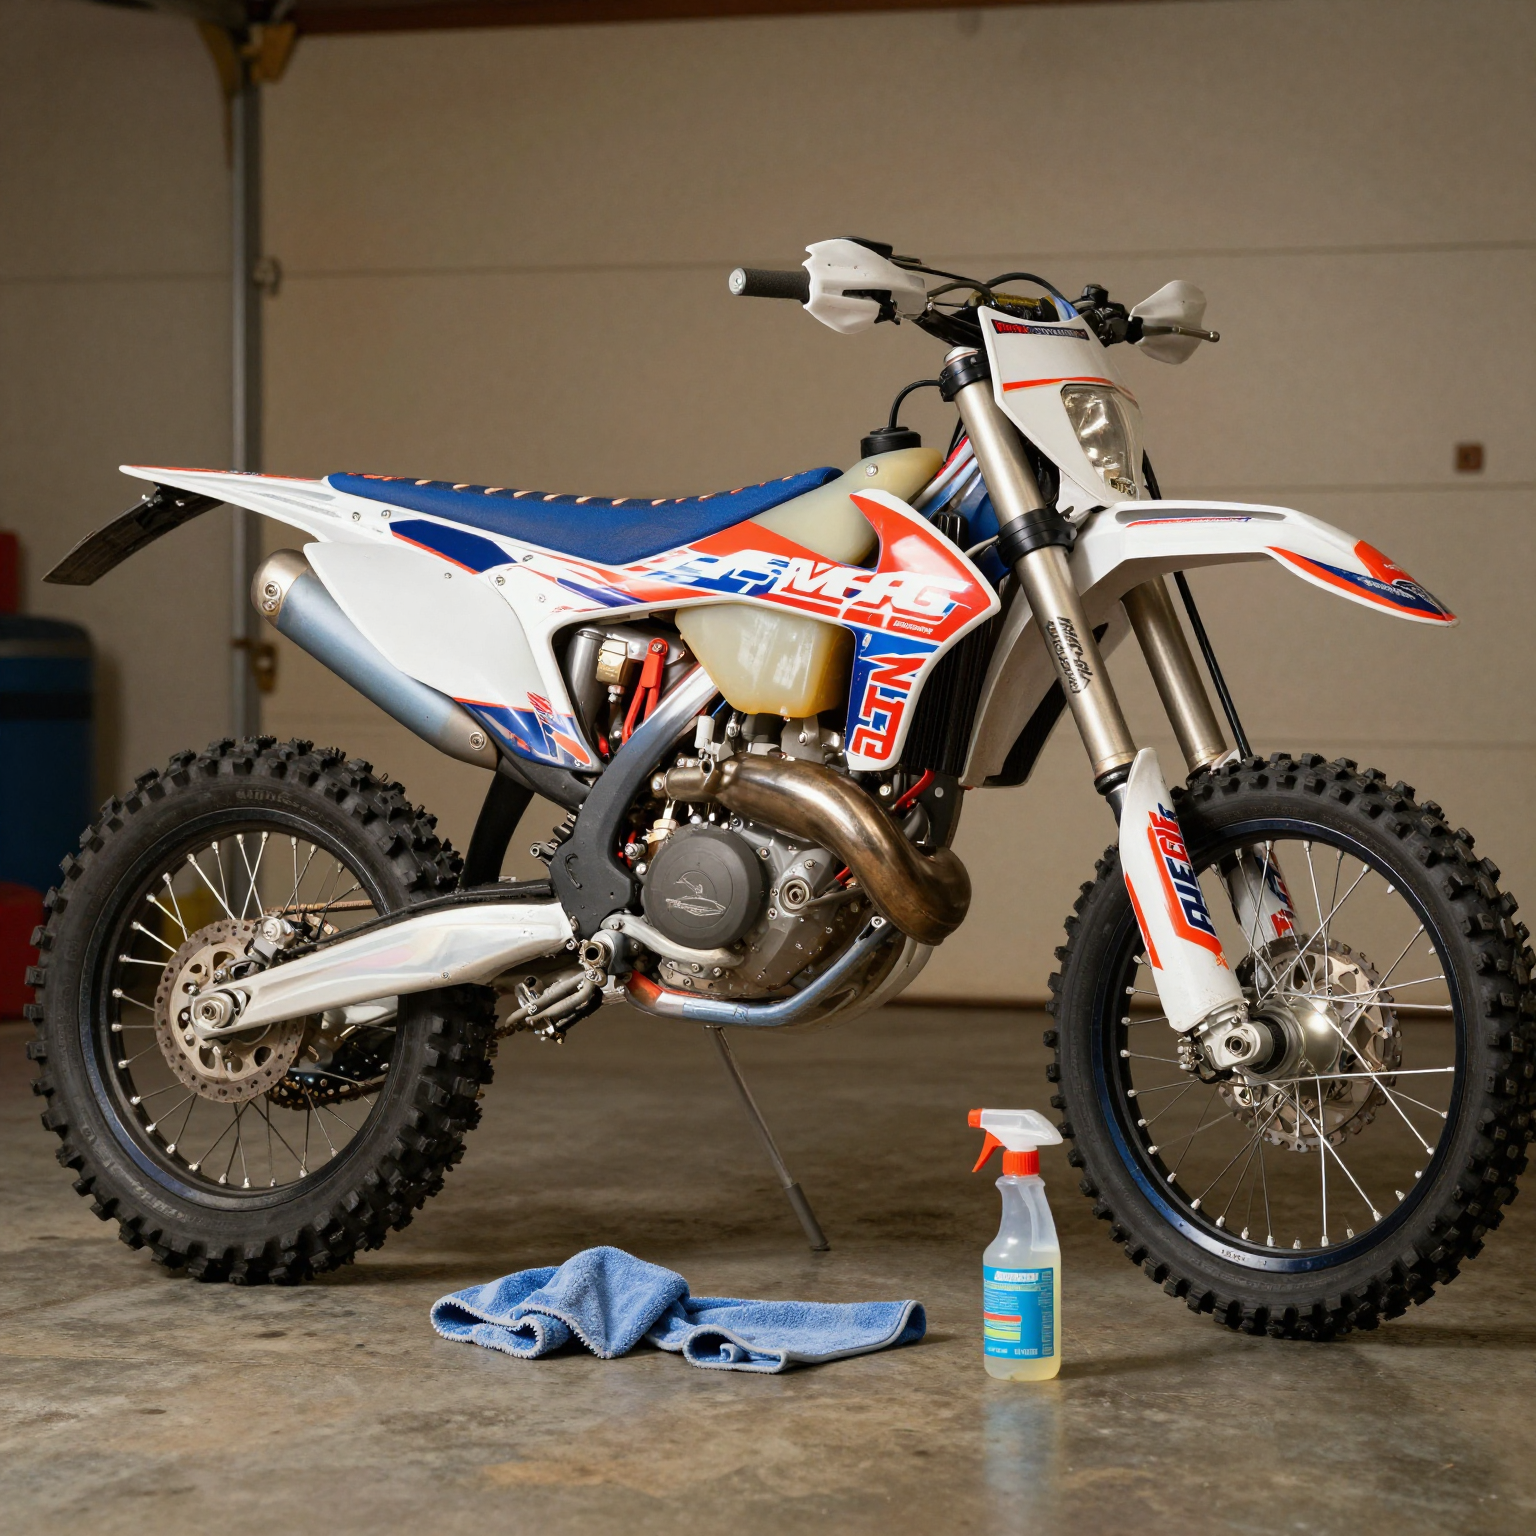
Before you begin applying your custom dirt bike graphics, gathering the right equipment is half the battle. Having the proper dirt bike graphics installation tools on hand ensures a smooth, bubble-free application that will last for seasons of hard riding. Below is every essential tool and material you’ll need, along with why each one matters.
-
Isopropyl Alcohol (70% or higher) – Removes all oils, waxes, and grime from the plastic surface so the adhesive bonds directly to clean material rather than contaminants that cause peeling.
-
Microfiber Cloths – Lint-free and ultra-absorbent, these prevent fibers from sticking to wet adhesive while ensuring you don’t scratch the plastic during cleaning.
-
Spray Bottle with Soapy Water (Baby Shampoo Mix) – Creates a thin lubricating layer that lets you slide the graphic into the perfect position before the adhesive locks down, saving you from crooked installations.
-
Heat Gun or Industrial Hair Dryer – Softens the vinyl and adhesive so the graphic stretches smoothly around complex curves, compound bends, and recessed areas without creasing.
-
Squeegee with Felt Edge – The felt side glides without scratching; pressing firmly with it forces air and moisture outward to eliminate bubbles under the decal.
-
Razor Blades or X-Acto Knife – Essential for trimming overhanging vinyl precisely along panel edges, around bolt holes, and inside recessed graphics without tearing the material.
-
Painter’s Tape – Lightly tacking a graphic in position before full application lets you step back and check alignment; it also protects edges while you work adjacent panels.
-
Nitrile or Latex Gloves – Skin oils and fingerprints transfer easily onto adhesive and vinyl; wearing gloves keeps the graphic and backing clean during handling.
-
Clean, Dust-Free Workspace – A well-lit, clean area prevents airborne dust and pet hair from landing on wet adhesive, which causes bumps and premature edge lifting.
-
Measuring Tape or Ruler – Ensures symmetrical placement on paired panels (both sides of the shrouds, for example) so your dirt bike graphics kits look professionally aligned from every angle.
Having these items ready before you start will drastically reduce frustration and dramatically improve the final look of your graphics package. Take the time to prep your tools – your bike will thank you.
🛠️ Dirt Bike Graphic Tools & Materials Comparison Table
Before you begin your installation, choosing the right tools and materials can mean the difference between a flawless professional-grade finish and a peeling, bubbled mess. Below is an at-a-glance dirt bike graphic tools comparison to help you decide what to buy-and what to skip-for your next graphics job.

| Tool Category | Recommended Option | Budget Option | Pro Tip |
|---|---|---|---|
| Squeegee | Felt-edge squeegee (e.g., 3M or Rhino brand) – gently removes air bubbles without scratching premium vinyl | Plastic squeegee with rounded edge – cheap but effective if wrapped in microfiber cloth | Always wrap your squeegee in a felt sleeve or soft cloth; rubber squeegees are too aggressive for glossy dirt bike graphics and can leave permanent scuff marks |
| Heat Source | Variable-temp heat gun (300-500°F) – provides focused, consistent heat for post-heating and contouring around plastics | Household hair dryer (100-200°F) – works for small decals but lacks heat consistency for complex curves | Post-heat every edge and recessed area for 10-15 seconds at 300°F; this activates the adhesive and prevents lifting during your first muddy ride |
| Cleaning Solution | Dedicated prep spray (e.g., Motocross Pro Prep or 3M™ General Purpose Adhesive Cleaner) – removes 98% of contaminants without damaging vinyl | 70% isopropyl alcohol (diluted) and a drop of mild dish soap – effective for basic degreasing but can weaken adhesives over time | Never use WD-40, acetone, or citrus-based cleaners on plastics; they eat through factory coatings and cause graphics to fail within weeks |
| Protective Film | 3M™ Paint Protection Film (PPF) with self-healing top coat – best-in-class durability for high-impact off-road conditions | Generic clear laminated vinyl from aftermarket brands – lower initial cost but prone to yellowing and peeling within 3-6 months | Apply PPF over your finished graphics on high-wear areas like frame rails, swingarm, and fork lowers; this single step more than doubles the lifespan of your graphics |
Why These Choices Matter
Using the wrong squeegee, heat source, or cleaning solution is the number one cause of premature graphic failure-especially on dirt bikes exposed to mud, vibration, and pressure washing. A felt-edge squeegee paired with a quality heat gun and dedicated prep spray will give you the cleanest, longest-lasting results. For riders looking to personalize their build with unique designs, check out our selection of custom dirt bike graphics for inspiration.
A Note on Protective Films
While budget options exist, the data is clear: 3M’s PPF (paint protection film) outperforms generic films by a significant margin, maintaining clarity and adhesion even after hundreds of off-road miles. Generic films typically start yellowing or peeling within 3-6 months, especially on high-impact zones. If you want your graphics to look fresh all season, investing in quality protection is non-negotiable.
For more advanced techniques on working with different plastic contours, read our dirt bike graphic kits guide covering step-by-step installation methods.
⚠️ Don’t Let Poor Prep Ruin Your Graphics Install
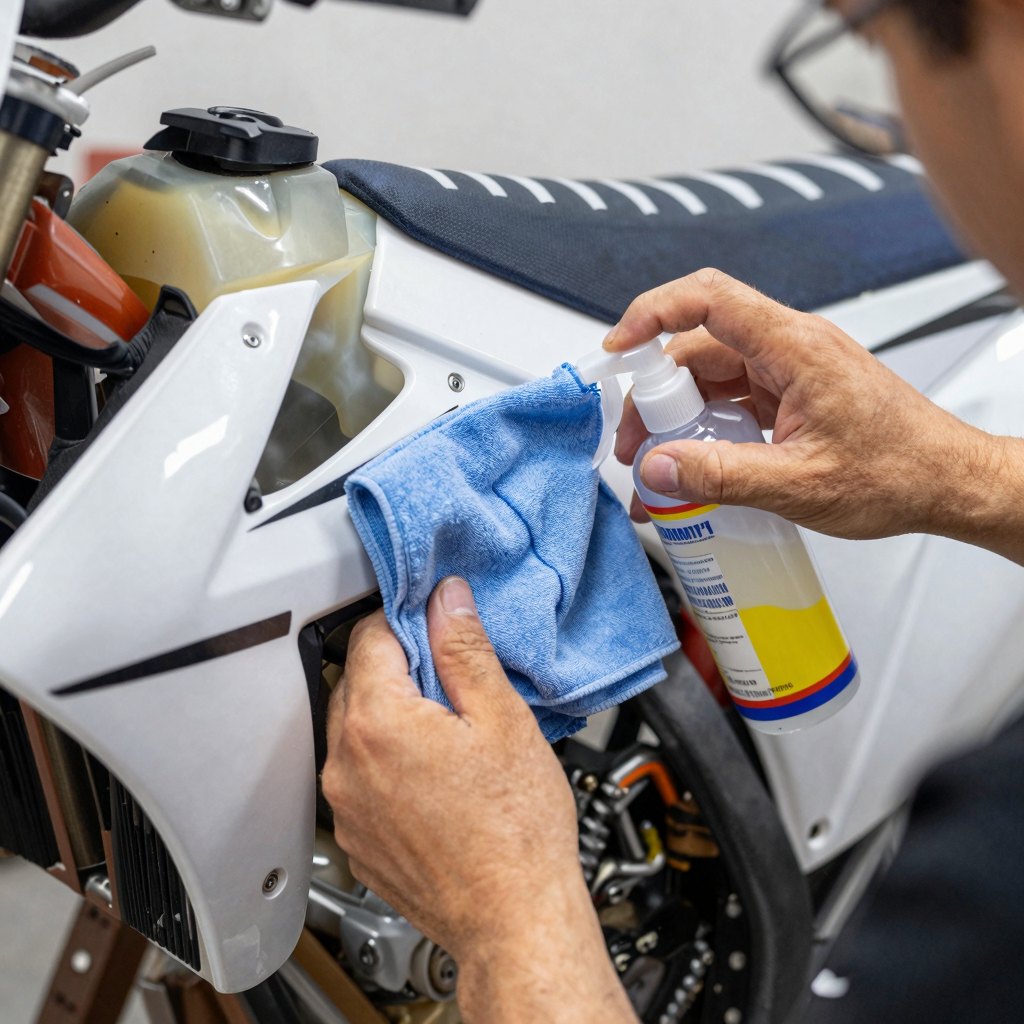
Even after you’ve picked out the perfect set of custom dirt bike graphics, a rushed installation can turn your fresh look into a peeling, frustrating mess in no time. The single biggest culprit? Poor surface preparation.
Skipping the alcohol wipe-down is the #1 reason graphics fail. Even microscopic residue from soap or oils will prevent adhesive from bonding, leading to edge lift within the first ride. Take the extra 60 seconds – it makes the difference between a weekend redo and a season-long install.
– Jake Morrison, 15-year MX Graphic Wrap Specialist
Before you even think about laying down that first decal, ensure your plastics are thoroughly cleaned with isopropyl alcohol (at least 70% concentration) and a lint-free cloth. This step is non-negotiable. If you’re installing a complete dirt bike graphics kit, take the time to prep each panel individually – rushing through prep work is the fastest path to disappointment when your graphics start curling up after the first muddy ride.
The Wet Installation Method: The Best Way to Install Dirt Bike Graphics
If you’ve ever struggled with misaligned decals, trapped air bubbles, or wrinkles that ruin the look of fresh graphics, the wet installation method is the solution you’ve been searching for. Widely regarded as the best way to install dirt bike graphics by both weekend warriors and professional shop technicians, this technique replaces frustrating guesswork with a controlled, forgiving process. By introducing a thin layer of liquid between the graphic and the plastic, you gain valuable “slip time” to position your decals with surgical precision before the adhesive locks into place. Here’s exactly how to execute this method for flawless results every time.
Step 1: Mix Your Application Fluid
The magic starts with a simple, shop-safe solution. Fill a clean spray bottle with distilled or filtered water and add one small drop of baby shampoo for every 16 ounces of water. Baby shampoo is preferred over dish soap because it’s mild, leaves no chemical residue, and won’t weaken the adhesive’s long-term bond. Shake gently to combine-you’re looking for a solution that reduces surface tension just enough to allow the graphic to float, not slide uncontrollably.
Step 2: Spray Both Surfaces Thoroughly
Liberally spray your application fluid onto the dirt bike plastic where the graphic will sit and onto the adhesive side of the graphic itself (after peeling it from the backing paper). Both surfaces need to be uniformly wet. This double-spray approach is the secret behind the wet install method dirt bike graphics professionals swear by-it creates a temporary lubrication layer on both contact surfaces, preventing premature bonding.
Step 3: Position with Slip Time
Lay the wet graphic against the wet plastic. Thanks to the fluid barrier, the decal will glide freely across the surface. Take your time to align edges, match curves around shrouds and number plates, and check symmetry from multiple angles. If something looks off, simply slide the graphic into a better position-you have several minutes of working time before the fluid evaporates and the adhesive begins to grab.
Step 4: Squeegee from Center Outward
Once positioning is perfect, grab a felt-edged squeegee (or a soft credit card wrapped in a microfiber cloth) and begin pushing the trapped fluid and air outward. Start at the center of the graphic and work toward the edges using firm, overlapping strokes. Each pass should overlap the previous one by about 50% to ensure no liquid or air pockets are left behind. Maintain consistent pressure-too light and you’ll leave fluid behind; too aggressive and you risk stretching the vinyl.
Step 5: Deal with Bubbles Like a Pro
Even with the wet method, small bubbles may appear-especially around sharp curves and compound contours. Don’t panic. Use the squeegee to push each bubble diagonally toward the nearest edge of the graphic. If a bubble refuses to move, let the graphic sit for 5-10 minutes and try again as the fluid continues to wick out. For stubborn trapped air, a tiny pinprick on the bubble’s leading edge followed by gentle squeegee pressure will release it invisibly.
The wet installation method isn’t just beginner-friendly-it’s the preferred approach for applying premium custom dirt bike graphics on complex plastic panels. Whether you’re refreshing a single fender or wrapping an entire bike with a graphics kit for dirt bike, taking the wet route eliminates the most common application mistakes and delivers a showroom-quality finish that lasts through mud, pressure washes, and race-day abuse. Master this technique, and you’ll never install a dry graphic again.
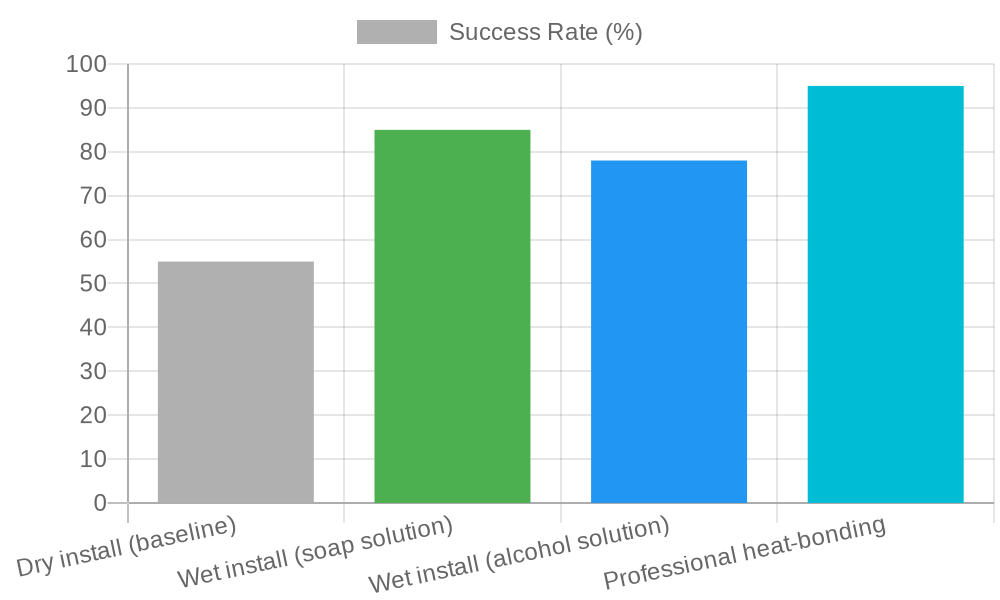
Chart: Installation Success Rate by Method – The data above compares four common approaches to applying dirt bike graphics, with professional heat-bonding leading at 95% success, followed by wet install with soap solution at 85%, wet install with alcohol solution at 78%, and dry install trailing at just 55%.
Why Wet Install with Soap Solution is the Sweet Spot
While professional heat-bonding delivers the highest success rate, it requires specialized equipment and training that most DIYers don’t have access to. The wet install method using a soap solution strikes the perfect balance between accessibility and reliability. When exploring dirt bike graphics installation methods, the soap-based wet approach stands out because the soapy water acts as a temporary lubricant, allowing you to slide and position the graphic precisely before it bonds. As you squeegee out the solution, the graphic adheres evenly with minimal risk of bubbles or misalignment – delivering an 85% success rate that’s achievable in any home garage. For more expert tips on getting perfect results, check out our guide on top dirt bike graphics installation tricks. And if you’re planning a full makeover, explore how to transform your ride with custom graphics and plastics to complete the look.
Heat Application & Edge Finishing: The Make-or-Break Final Step
Applying heat is the critical final phase of any graphics installation – and it’s the step that most clearly separates a professional-grade finish from an amateur job that peels within weeks. When done correctly, heat setting dirt bike graphics ensures your decals bond permanently to the plastic, conform to every curve, and resist peeling from mud, pressure washing, and trail abuse. Here’s exactly how to do it right.
When to Apply Heat
Heat should only be applied after every last bit of application fluid has been squeegeed out from beneath the graphic. If you heat while fluid is still trapped, you’ll create steam bubbles that permanently blister the vinyl. Run your squeegee from the center outward in overlapping passes until no liquid movement is visible beneath the film. Once the surface is dry to the touch and the graphic appears fully adhered, you’re ready for heat.
Proper Heat Gun Technique
Set your heat gun to a medium heat setting – ideally between 300°F and 375°F (149°C to 190°C) for standard cast vinyl graphics. Maintain a steady 6 to 8-inch distance from the surface and keep the gun moving constantly. Never linger on any single spot for more than a second or two. Concentrated heat can warp the vinyl, damage the adhesive, or even distort the underlying plastic. Use a sweeping, side-to-side motion, covering each section for about 3 to 5 seconds before moving on.
| Vinyl Type | Recommended Heat Gun Temp | Technique Notes |
|---|---|---|
| Standard Cast Vinyl | 325°F (163°C) | Medium speed sweeping motion |
| High-Performance Vinyl | 375°F (190°C) | Slower passes, extra tack activation |
| Heat-Sensitive (Thin) Vinyl | 275°F (135°C) | Faster passes, greater distance |
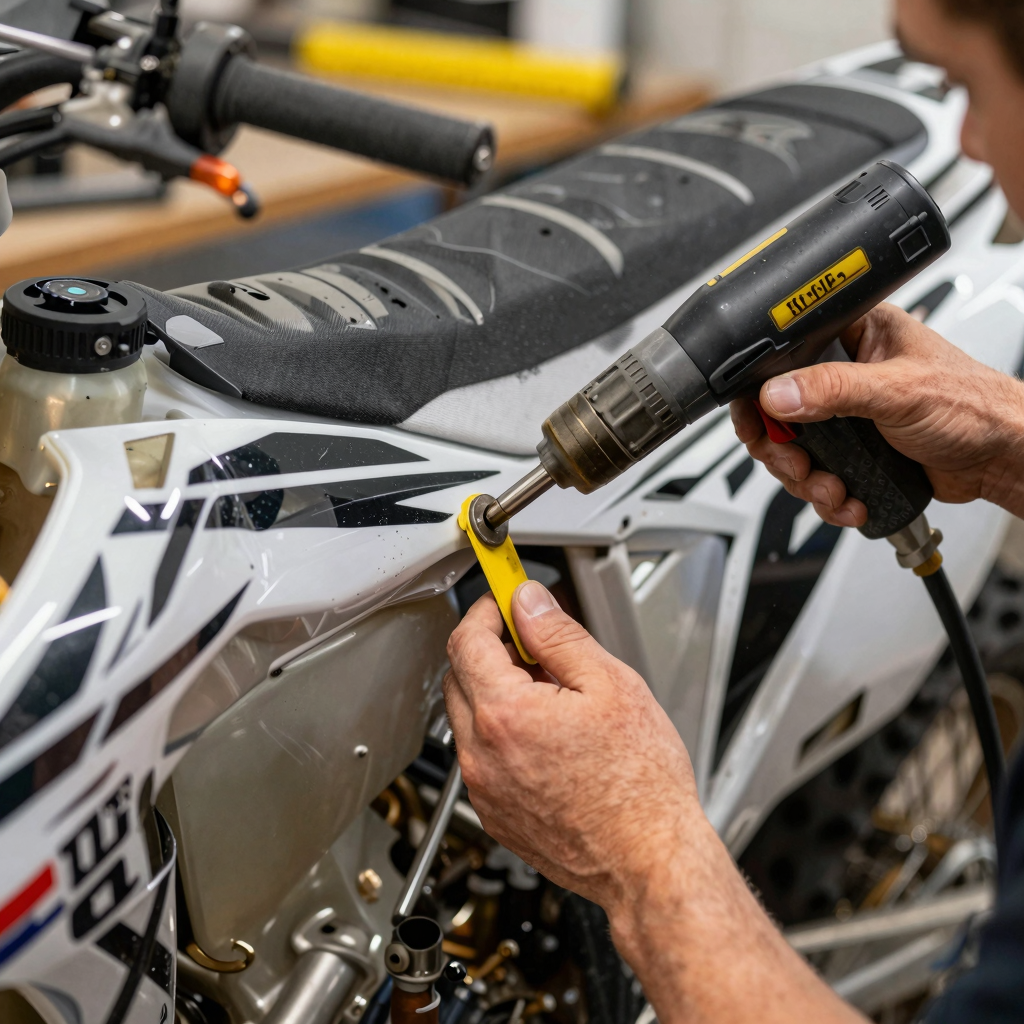
Pressing Edges with a Felt Squeegee
While the graphic is still warm and pliable, take a felt-edged squeegee and firmly press along all edges – especially around curves, recesses, and indented contours like radiator shroud channels and number plate grooves. The felt material prevents scratching while the residual heat lets the vinyl stretch slightly and tuck into these tight areas. Work each edge section immediately after heating; don’t wait for the vinyl to cool, or the adhesive will lose its tack.
Razor Trimming Overhang on Complex Contours
Some graphics kits extend slightly past the edge of the plastic to allow for positioning adjustments. On complex curves – like the leading edge of front fenders or the molded grips on shrouds – any overhanging material should be carefully trimmeed with a sharp X-Acto or vinyl razor blade. Score along the plastic’s natural edge using light, consistent pressure. Cut while the vinyl is still warm for a cleaner, smoother edge that won’t lift later. For more pro installation tips, check out our guide on dirt bike graphic kits for model-specific fitment advice.
Post-Heat Inspection
Once the entire graphic has been heated and edge-finished, perform a thorough walk-around inspection. Look for:
- Bubbles – small air pockets that need to be punctured and pressed flat
- Edge lift – areas where the vinyl hasn’t bonded to the plastic
- Wrinkles – creases that may require reheating and stretching
- Scratches or scuffs – from squeegee or tool contact
Run your fingertip along every edge. Any spot that catches or feels raised should be reheated and pressed again. This final quality check is what turns a good install into a great one.
Pro Tip: A properly heat-set graphic should feel like it’s part of the plastic itself. If you can feel a raised edge or see light reflecting under the film, you’re not done yet.
Mastering heat application and edge finishing transforms your dirt bike from a bike with stickers into a bike with true custom graphics. Take your time on this step, and your graphics will outlast the season. For more pro-level techniques, explore our top 10 dirt bike graphics tricks to elevate your installation game even further.
Troubleshooting Common Dirt Bike Graphic Installation Problems
Even with careful preparation, installing graphics on your bike’s plastics can present challenges. Below is a numbered checklist of the six most common issues riders face and how to resolve them quickly and effectively.
1. Air Bubbles Stuck
If you notice air pockets trapped beneath the vinyl after application, don’t panic. Use a fine pin to gently puncture the center of each bubble, then press the air out toward the nearest edge using a plastic squeegee or a credit card wrapped in a soft cloth. This technique, often called fixing dirt bike graphic bubbles, works best when done immediately before the adhesive fully sets. For a broader look at pro-level application tips, check out our guide on the top 10 dirt bike graphics tricks.
2. Edge Lifting
The edges of your graphic are peeling up or refusing to lay flat. Reheat the affected area with a heat gun set to low (about 150°F) or a hairdryer on high for 10-15 seconds, then firmly press down with a felt-edged squeegee. The heat reactivates the adhesive and makes the vinyl more pliable, creating a lasting bond. Allow the area to cool without touching it.
3. Misaligned Graphic
The graphic was placed slightly crooked or off-center. If the adhesive is still wet (typically within the first few minutes of application), carefully peel the graphic back from the surface and respray a light mist of application fluid or soapy water onto both the plastic and the adhesive side. Reposition the graphic and squeegee from the center outward to lock it in place.
4. Dirt Trapped Under Graphic
You spot a speck of dust, dirt, or lint trapped beneath the vinyl. Gently lift the nearest corner of the graphic using a plastic razor blade or your fingernail until you reach the debris. Clean the exposed area with an isopropyl alcohol swab, allow it to dry for 30 seconds, then lay the graphic back down and re-squeegee the section firmly.
5. Wrinkles on Curved Surfaces
Wrinkles form when applying graphics over compound curves like radiator shrouds or number plates. Use a heat gun on medium heat to warm the wrinkled area while stretching the vinyl gently with your fingers or a squeegee. Work from the center of the wrinkle outward, applying heat and pressure in alternating passes until the vinyl conforms smoothly to the contour.
6. Adhesive Not Sticking to Textured Plastic
Factory plastic surfaces with a rough or pebbled texture can prevent graphics from adhering properly. Before installation, apply a thin, even coat of automotive-grade adhesion promoter or vinyl primer to the textured areas. Let it cure for the time specified on the product label (usually 5-10 minutes) before applying the graphic. This creates a smooth, tacky surface that bonds securely with the graphic’s adhesive. To see the full range of vinyl options suited for different plastic types, explore our custom dirt bike graphics collection.
By keeping this checklist handy during your next installation, you can catch and correct common problems before they become permanent. A little heat, patience, and the right tools go a long way toward a professional-looking finish.
Dirt Bike Graphic Care Tips: Making Your Graphics Last All Season
You’ve spent the time and effort to install your new graphics perfectly – now it’s time to protect that investment. Proper post-installation care is just as important as the installation itself. Follow these essential dirt bike graphic care tips to keep your bike looking sharp ride after ride.
1. Cure Time – Let the Adhesive Bond
After installation, the adhesive on your vinyl graphics needs time to reach its full bond strength. Most high-quality graphics require 24 to 48 hours to cure completely. During this window:
- Avoid riding in wet conditions – rain, mud, or even heavy morning dew can seep under un-bonded edges.
- Do not wash the bike – water and soap can compromise the adhesive before it sets.
- Keep the bike at room temperature – cold slows curing, while extreme heat can soften the adhesive too quickly.
If you absolutely must ride within the first 24 hours, try to keep speeds moderate and avoid pressure from wind or debris on freshly applied edges.
2. Washing Tips – Gentle Care Wins
Once the graphics are fully cured, proper cleaning is critical. Dirt and mud left to dry on graphics can cause scratching and premature fading.
| Do ✅ | Don’t ❌ |
|---|---|
| Hand wash with a soft microfiber cloth | Use a pressure washer near graphic edges |
| Use mild, pH-neutral soap (like dish soap or motorcycle-specific cleaner) | Apply harsh degreasers, acetone, or solvent-based cleaners |
| Rinse with a gentle stream of water | Scrub with abrasive pads or brushes |
| Pat dry with a clean microfiber towel | Let the bike air dry (water spots can form) |
Pressure washers are especially dangerous – even at moderate settings, they can lift edges and cause bubbling. If you must use one, keep the nozzle at least 2 feet away from the bike and avoid direct angles on graphic seams.
Proper care after installation keeps your custom graphics looking fresh all season long.
3. Storage – Fight the Sun
UV rays are the number one enemy of vinyl graphics. Prolonged exposure to direct sunlight causes fading, yellowing, and embrittlement over time. To maximize longevity:
- Store your bike in a garage, shed, or under a covered area when not in use.
- If outdoor storage is unavoidable, invest in a high-quality bike cover with UV protection.
- Avoid parking near reflective surfaces (like white walls or metal buildings) that can intensify UV exposure.
A bike stored in shaded conditions can keep its graphics looking factory-fresh for 3 to 5 years or more, while one left in constant sun may show noticeable fading within one season.
4. Touch-Up Heat – Fixing Edges After Rides
After your first few rides, it’s normal to notice small edges beginning to lift – especially around complex curves like the radiator shrouds or rear fender. A quick fix can prevent these from becoming bigger problems:
- Clean the lifted area thoroughly with rubbing alcohol and let it dry.
- Apply heat using a heat gun on low or a hair dryer on high for 15-30 seconds.
- Using a rubber squeegee or a soft cloth, press the edge back down firmly, working from the center outward.
- Hold pressure for 30 seconds as the vinyl cools and re-bonds.
This simple touch-up can extend the life of your graphics significantly and is especially useful after that first muddy weekend ride.
5. When to Replace – Know the Signs
No matter how well you care for them, all graphics eventually wear out. Look for these signs that it’s time for a fresh set of custom dirt bike graphics:
- Extensive edge lifting that no longer responds to heat reapplication
- Deep scratches or gouges that penetrate through the vinyl layer
- Fading or color shifting – especially on bikes stored outdoors
- Brittleness or cracking – vinyl becomes stiff and splits instead of flexing
- Bubbling that returns even after pressing and heating
Most riders find they get 2 to 4 seasons from a set of quality graphics depending on riding frequency and conditions. When the time comes, explore our collection of dirt bike graphics kits to refresh your look.
The Bottom Line
Your dirt bike graphics are a statement of style and personality, but they also take daily abuse from mud, sun, and pressure. Treat the first 48 hours as sacred cure time, wash gently by hand, store out of the sun, reheat any lifted edges promptly, and know when to replace worn-out vinyl. Proper installation paired with smart maintenance means your graphics will deliver that showroom look all season long.
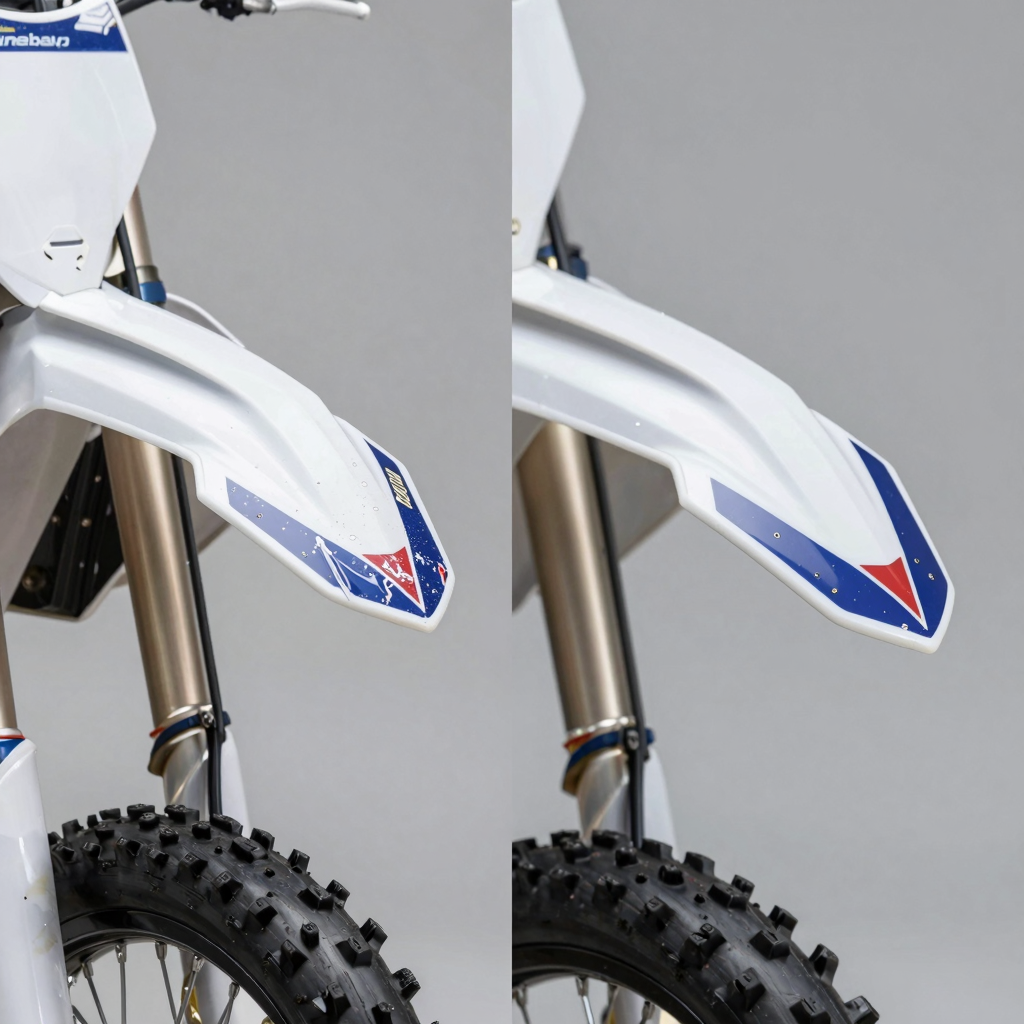
Proper technique transforms the look and durability of your dirt bike graphics.
This side-by-side visual speaks volumes about why installation method matters. On the left, you see a fender with rushed, careless graphic installation – bubbles trapped under the vinyl, edges already lifting, the pattern crooked and misaligned, and wrinkles breaking the smooth surface. On the right, the same fender receives the treatment it deserves: perfectly smooth application, zero bubbles, razor-sharp edges, and flawless alignment.
The difference isn’t just cosmetic. Poorly installed graphics peel faster, collect dirt at lifted edges, and typically need replacement within months. A properly installed set – using the best dirt bike graphics techniques – can last for seasons while maintaining that showroom finish.
Whether you’re working with custom dirt bike graphics or a full kit, the before-and-after proves that patience and the right technique pay off in both appearance and longevity.
Conclusion: Your Path to a Pro-Level Graphic Installation
Installing new graphics on your dirt bike can feel intimidating, but breaking the process down into a few core steps makes all the difference. Whether you’re refreshing an old bike or finishing a full restoration, the techniques are the same. Here’s a quick recap of the best way to install dirt bike graphics:
- Prepare the surface thoroughly – Clean the plastics with isopropyl alcohol and a lint-free cloth, removing all grease, wax, and dirt. A clean surface is the single most important factor for long-lasting adhesion.
- Use the dry-tack method first – Position the graphic without peeling the backing, then use low-tack tape to hold it in place. Once you’re satisfied with alignment, hinge the graphic back and peel the backing for a bubble-free application.
- Work from the center outward – Using a felt-edged squeegee, press the graphic down from the middle toward the edges. This pushes air bubbles out and prevents wrinkles from forming under the vinyl.
- Apply heat to seal the edges – A heat gun on low setting helps the vinyl conform to curves and recesses. After installation, warm the edges one final time and press firmly with a seam roller to lock the graphic in place.
Three Expert-Level Tips for Flawless Results
Even seasoned installers rely on these pro tricks to avoid frustrating mistakes. Add these to your workflow and you’ll elevate your professional dirt bike graphics installation to the next level:
1. Work in a dust-free environment. Airborne dust and lint are the enemies of smooth vinyl adhesion. Run a humidifier in your workspace an hour before you begin – the added moisture helps settle floating particles out of the air and onto surfaces you can wipe away, rather than onto your fresh adhesive.
2. Warm graphics before peeling the backing. Before you start, set your graphics flat in a warm room (70-80°F) or gently warm them with a heat gun from a distance. Warmer vinyl is significantly more pliable, making it easier to stretch around complex curves without creasing or tearing.
3. Use a cutting mat if trimming is needed. If your graphics require any trimming around bolt holes or edges, always place them on a self-healing cutting mat. This protects the plastic underneath from accidental blade scratches that can weaken the base material and ruin the finished look.
You Can Do This
Here’s the truth: anyone can achieve pro-quality results with patience and the right technique. Professional shops simply follow the same steps – they just do them deliberately and with the right tools. Take your time. Lay out your workspace. Warm your vinyl. And don’t rush the squeegee. The difference between an average install and a jaw-dropping one is measured in minutes of extra care. For more inspiration on transforming your bike’s appearance, check out these custom dirt bike graphics ideas to imagine what your bike could look like next.
Now grab your graphics, set up your workspace, and get to work – you’ve got everything you need to make your bike look like it just rolled out of a pro shop.
[INSERT CTA HERE]