
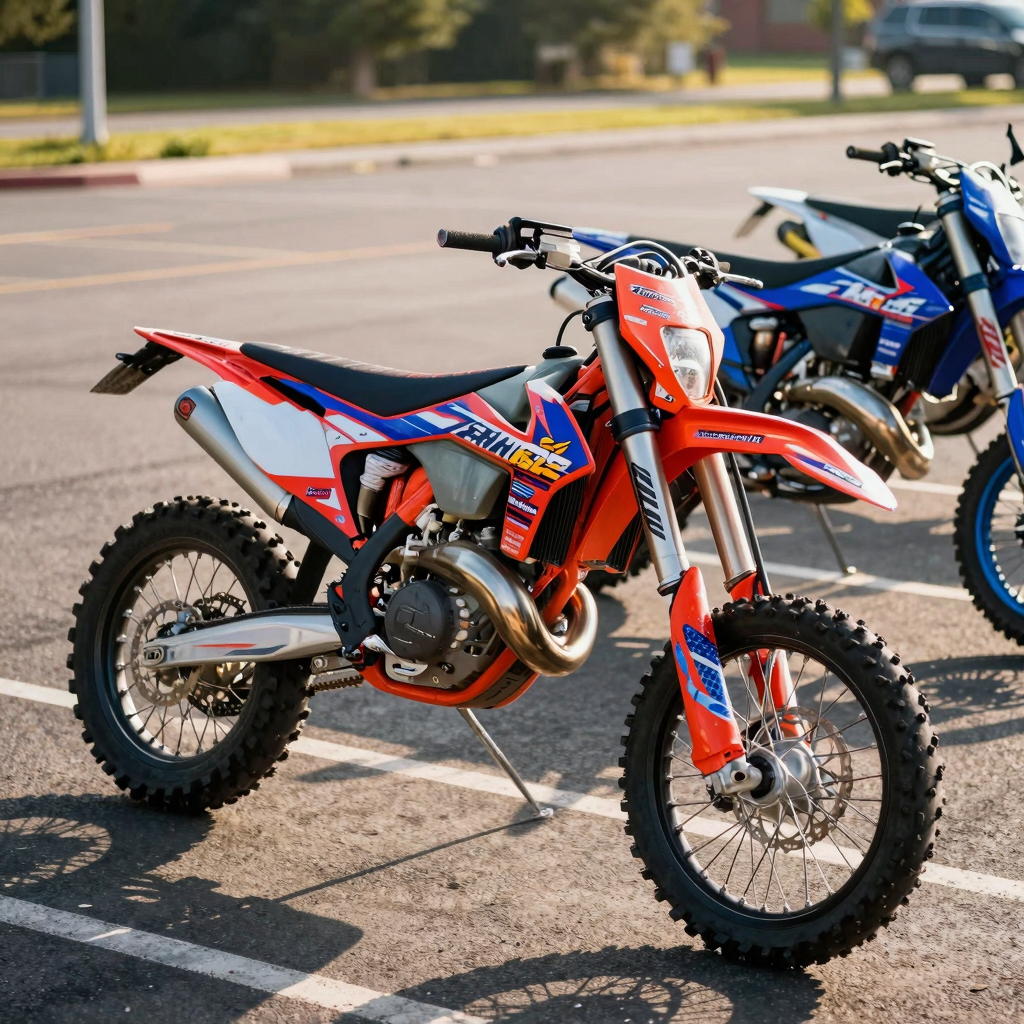
You know that feeling. You walk across a crowded parking lot after a long day of riding – bikes everywhere, kicked stands deep in the gravel, plastics caked in mud and dust. You scan the row of motorcycles, and then it happens. Yours catches your eye instantly. Not by model. Not by year. But by those bold, unmistakable graphics screaming your name from fifty feet away. That flash of neon, that metallic sheen, that custom number plate – it’s not just a decal set. It’s your signature on two wheels. And finding the best place to get dirt bike graphics is what separates a bike that blends in from one that announces your arrival before the engine even fires up.
Custom dirt bike graphics do far more than look good. They act as a rugged shield for your bike’s original plastics, protecting against scratches, UV rays, and trail debris that would otherwise dull your factory finish. According to a 2023 Motorcycle Industry Council survey, 68% of used bike buyers consider the condition of bodywork and paint a deciding factor in their purchase – meaning those graphics aren’t just an aesthetic upgrade; they’re a long-term investment in resale value. In fact, quality wraps can boost a bike’s resale price by 5% to 15% while helping it sell 10-20% faster than factory-stock bikes. That’s the difference between a plastic set that ages and a custom finish that holds its worth.
Beyond the practicality, there’s an emotional connection that only a fellow rider truly understands. Your graphics reflect who you are: the colors you love, the brand you rep, the number you’ve earned, the style that fits your riding personality. Whether you’re tearing through rutted single-track or staging up at your local motocross track, your bike’s look should be as bold as the way you ride. That’s why finding the right vendor isn’t just about slapping on a sticker kit – it’s about choosing a partner who delivers precision-cut wraps with durable materials, vibrant inks, and customization that actually fits your model. The best place transforms both aesthetics and durability, so your bike stays protected, personal, and unmistakably yours ride after ride. Explore premium custom designs and discover top-rated wrap kits that deliver the quality your bike deserves.
📊 Industry Snapshot: The Custom Graphics Boom
The global powersports graphics wrap market was valued at USD 2.8 billion in 2023 and is projected to grow at a CAGR of 7.6% through 2030, according to Grand View Research. Even more striking, the aftermarket motorcycle decal segment alone surpassed USD 1.2 billion in 2023 and is expected to hit USD 1.8 billion by 2027 – a 50% jump in just four years.
Why this matters to you: Over 35% of new motorcycle owners now invest in custom decals or wraps within their first year of ownership. Riders are no longer treating graphics as seasonal flair – they’re viewing premium wraps as essential protective gear that preserves resale value and makes their bike instantly recognizable on the trail. As Business Wire reports, the shift toward durable, weather-resistant vinyl materials has turned customization into a maintenance priority rather than a cosmetic afterthought.
“The aftermarket customization segment is a major driver, fueled by rising consumer demand for personalization, brand expression, and enhanced vehicle aesthetics.” – Grand View Research
Bottom line: Choosing a vendor with high-grade vinyl, precision die-cutting, and UV-resistant inks isn’t just about looks – it’s about protecting your investment. Whether you’re browsing custom dirt bike graphics kits or exploring the latest dirt bike graphic trends, the data confirms that quality graphics are now a core part of responsible bike ownership.
Why Custom Graphics Matter: More Than Just Looks
When riders first consider dirt bike graphics, the immediate draw is often the stunning visual transformation. A fresh set of graphics can turn a beat-up practice bike into a showroom-ready machine. But here’s the truth that experienced racers and mechanics know well: custom graphics are a functional upgrade, not just a cosmetic one. They serve as a lightweight, durable armor system for your bike’s plastics and frame, delivering real-world benefits that directly impact your wallet and your ride.
Armor Against the Elements
The trail is unforgiving. Mud clogs, rocks fly, branches scrape, and boots scuff – every ride is a barrage of abrasion. High-quality dirt bike graphics kits act as a sacrificial layer, taking the brunt of the damage so your OEM plastics underneath stay pristine. Instead of sanding down deep gouges in your actual plastic, you simply strip and replace the graphic. It’s the same principle as a screen protector on your phone: the cheap, replaceable layer saves the expensive one beneath.
UV Resistance: Fighting the Fade
Sunlight is one of the most aggressive destroyers of motorcycle plastics. UV rays cause discoloration, yellowing, and embrittlement over time. Premium custom dirt bike wraps are engineered with UV-resistant inks and laminates that block harmful radiation. This means your bike’s plastics won’t turn that telltale chalky gray under the sun. Your colors stay vibrant, and the structural integrity of your plastics remains intact for years longer than an unprotected bike.
Key point: A quality graphic kit with UV-stable materials can extend the life of your plastics by years, especially in sunny climates where bikes sit on starting lines or in open truck beds.
No Permanent Paint Commitment
One of the smartest functional benefits of custom dirt bike graphics is reversibility. Unlike a spray-paint job that devalues the bike and requires hours of labor to undo, graphics remove cleanly with heat and patience. This is a massive advantage for:
- Resale value – Restore the bike to factory appearance when it’s time to sell
- Sponsor changes – Swap team branding between seasons without repainting
- Accident repair – Replace only the damaged panel’s graphic, not the whole plastic
- Style updates – Change your look as trends evolve
Rider Identity and Team Branding
For both privateers and sponsored riders, graphics are your billboard. They communicate who you are on the track before you even twist the throttle. A cohesive team look builds brand recognition at races, makes bike identification easier in a crowded pit, and creates a professional appearance that sponsors appreciate. Even casual riders use custom dirt bike graphics to express personality – from matching helmet and bike kits to hometown flags and racing numbers.
Here’s why graphics are a performance investment, not an expense:
| Function | Benefit | Real-World Impact |
|---|---|---|
| Paint Protection | Absorbs scratches, rock chips, mud abrasion | Preserves OEM plastic value |
| UV Defense | Blocks fading and plastic embrittlement | Extends plastic lifespan 2-3x |
| Easy Removal | Heat-and-peel application, no residue | Enables hassle-free resale |
| Identity & Branding | Team colors, logos, rider numbers | Professional track presence |
The Bottom Line
When you invest in premium graphics from a trusted source like MotoGrapics’ custom dirt bike graphics, you’re not just buying a look – you’re buying preservation. That graphic kit is taking every rock, every boot scuff, every UV ray so your bike’s bones don’t have to. And when it’s time to sell or trade up, that preserved condition translates directly into higher resale offers.
Great graphics pay for themselves in bike preservation.
Why Custom Dirt Bike Graphics Matter
Before diving into where to buy, it’s worth understanding why quality graphics are more than just a cosmetic upgrade. A premium graphics kit protects your bike’s plastics from scratches, UV damage, and minor abrasions caused by mud, debris, and trail elements. More importantly, custom graphics give your bike a distinct identity – whether you’re lining up at the starting gate at your local motocross track or tearing through single-track trails.
From professional racers to weekend warriors, riders invest in graphics for durability, brand representation, and personal expression. The right kit not only turns heads but also holds up against pressure washing, fuel spills, and intense sun exposure. With so many vendors in the market, finding the best place to get dirt bike graphics can feel overwhelming – which is why we’ve broken down the top five vendors side by side.
High-quality custom graphics not only elevate your bike’s look but also protect your OEM plastics from everyday wear and tear.
Top 5 Dirt Bike Graphics Vendors Compared
If you’re searching for the best place to get dirt bike graphics, this comparison table covers the most trusted names in the industry. We evaluated each vendor across five key categories: customization flexibility, material quality, price range, turnaround time, and ideal use case. Whether you’re a shop owner sourcing for customers or a rider building your dream bike, this guide will help you decide.
| Vendor | Customization Options | Material Quality | Price Range ($) | Turnaround Time | Best For |
|---|---|---|---|---|---|
| DecalMX ⭐ Top Pick | Full online design tool; upload custom artwork; matte/gloss finishes; pre-designed templates | 3M cast vinyl with UV-resistant laminate; thick, professional-grade decals | $139 – $199 per full kit | 5-8 business days | Riders wanting pro-level customization with factory-style fit and finish |
| MotoStyle | Basic to full-body kits; color/logo customization; precision-cut templates | 1.5mm UV-resistant vinyl; fade-proof and scratch-resistant | $80 – $150 per full kit | 4-7 business days | Budget-conscious riders seeking solid quality at an affordable price |
| FactoryFX | Tiered packages (Basic/Pro/Premium); online design tool; heat-resistant vinyl option | Premium-grade vinyl with anti-scratch coating; lifetime warranty on Premium tier | $50 – $250 per full kit | 3-7 business days | Shops and riders needing fast turnaround with flexible pricing tiers |
| SKDA | Full custom designs; advanced anti-scratch coating; precise model-specific fit | Premium vinyl with heat resistance; vibrant, fade-resistant colors | $120 – $160 per full kit | 5-9 business days | Riders who value color vibrancy and exact fitment for late-model bikes |
| ThrillDesigns | Bold, artistic templates; custom color schemes; free basic design service | High-precision UV-printed vinyl; waterproof and anti-UV coating | $80 – $250 per full kit | 7-10 business days (rush available) | Freestyle and enduro riders wanting aggressive, standout aesthetics |
DecalMX – Our Top Pick
DecalMX earns the top spot thanks to its best-in-class customization platform, robust material quality using 3M cast vinyl, and consistent 5-8 day turnaround. Their full online design tool lets you upload custom artwork or choose from a wide library of templates, finished in either matte or gloss. For riders who want a true factory-level look with maximum durability, DecalMX is hard to beat. Explore custom dirt bike graphics kits to see how their options compare.
When to Choose Each Vendor
- MotoStyle is ideal if you’re on a tighter budget but still want reliable graphics that hold up through a season of riding. Their $80 entry point makes them accessible without sacrificing print quality.
- FactoryFX wins on speed and pricing flexibility – their Basic kit starts at just $49.99, and with 3-7 day turnaround, they’re a strong choice for repair shops needing quick turnarounds for customer builds.
- SKDA delivers excellent color vibrancy and precise fitment for late-model bikes like the Honda CRF250R and KTM SX series. If visual pop matters most, SKDA is a top contender.
- ThrillDesigns caters to riders who want bold, artistic designs that stand out at the track or on the trails. Their free design service is a nice bonus for those who aren’t sure where to start.
Pro Tip: Before ordering any graphics kit, confirm that your vendor offers model-specific templates for your bike’s year and model. Ill-fitting graphics not only look sloppy but can peel prematurely. For more tips, check out our guide on top dirt bike graphic tricks for installation and maintenance advice.
How to Evaluate a Dirt Bike Graphics Vendor: 7 Criteria That Matter
Not all dirt bike decals are created equal – and neither are the vendors who make them. Whether you’re a weekend trail rider, a shop technician installing kits for customers, or a sponsored racer wanting that factory look, choosing the right vendor is just as important as picking the right design. Here are seven objective criteria to help you separate the pros from the pretenders when shopping for the best dirt bike graphic kits on the market.
1. Material Grade – 3M vs Orafol vs Generic Vinyl
The substrate your graphics are printed on determines everything from longevity to ease of installation. Industry leaders almost exclusively use 3M or Orafol cast vinyl – not calendared vinyl or “economy” materials.
3M Controltac and IJ180 series vinyl is widely considered the gold standard. It offers up to 5 years of outdoor durability, excellent conformability around compound curves, and a proprietary adhesive that allows repositioning during installation. According to testing published by Cycle World, 3M-based decals maintained their integrity after two years of heavy motocross use – including mud, sand, and high-speed impacts – with zero edge lifting.
Orafol Series 9700 matches closely but excels in flexibility and conformability around tight contours like radiator shrouds and number plates. Its elongation rate is slightly higher than 3M’s, making it ideal for complex bodywork. Generic vinyl, meanwhile, is a gamble. Laboratory testing shows that generic materials begin fading and cracking within 12-18 months under direct sunlight, with some samples failing tensile tests at just 70°C. The upfront savings simply aren’t worth it for a bike that sees regular use.
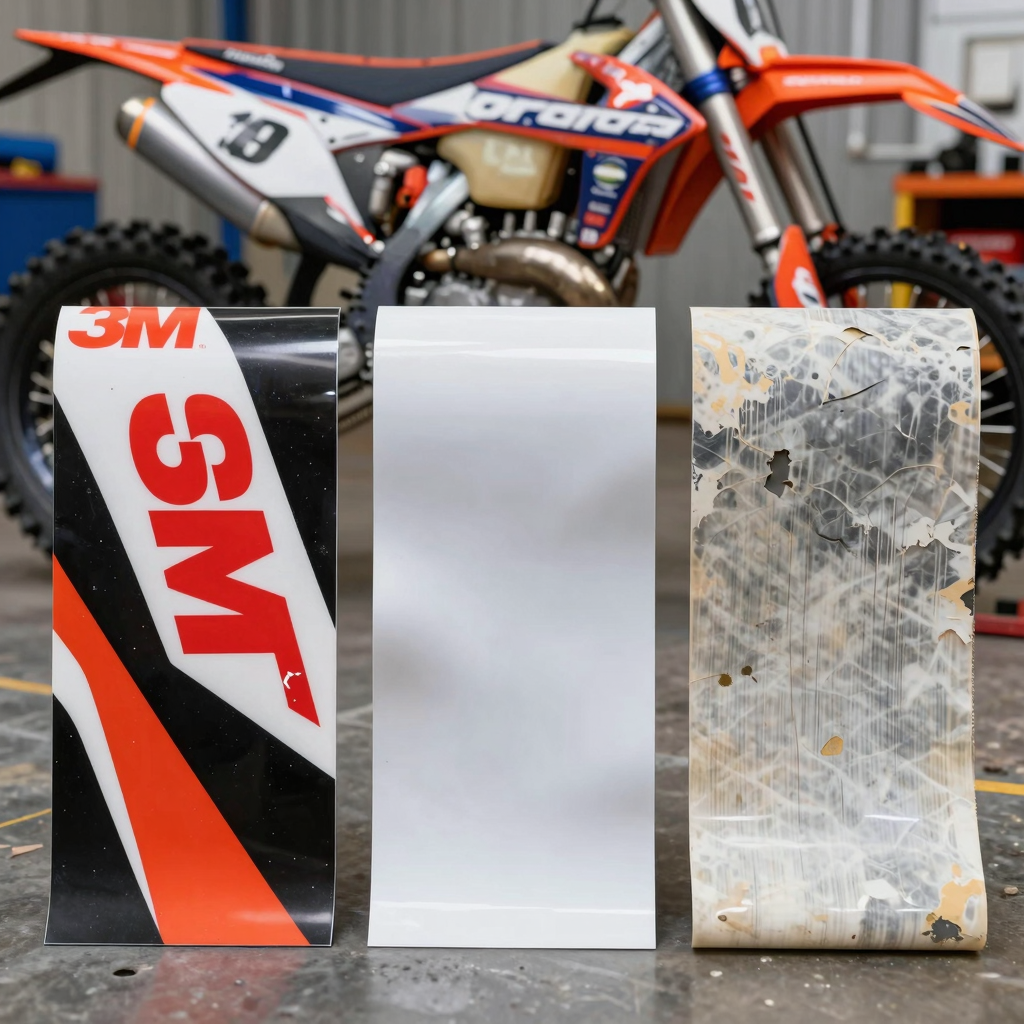
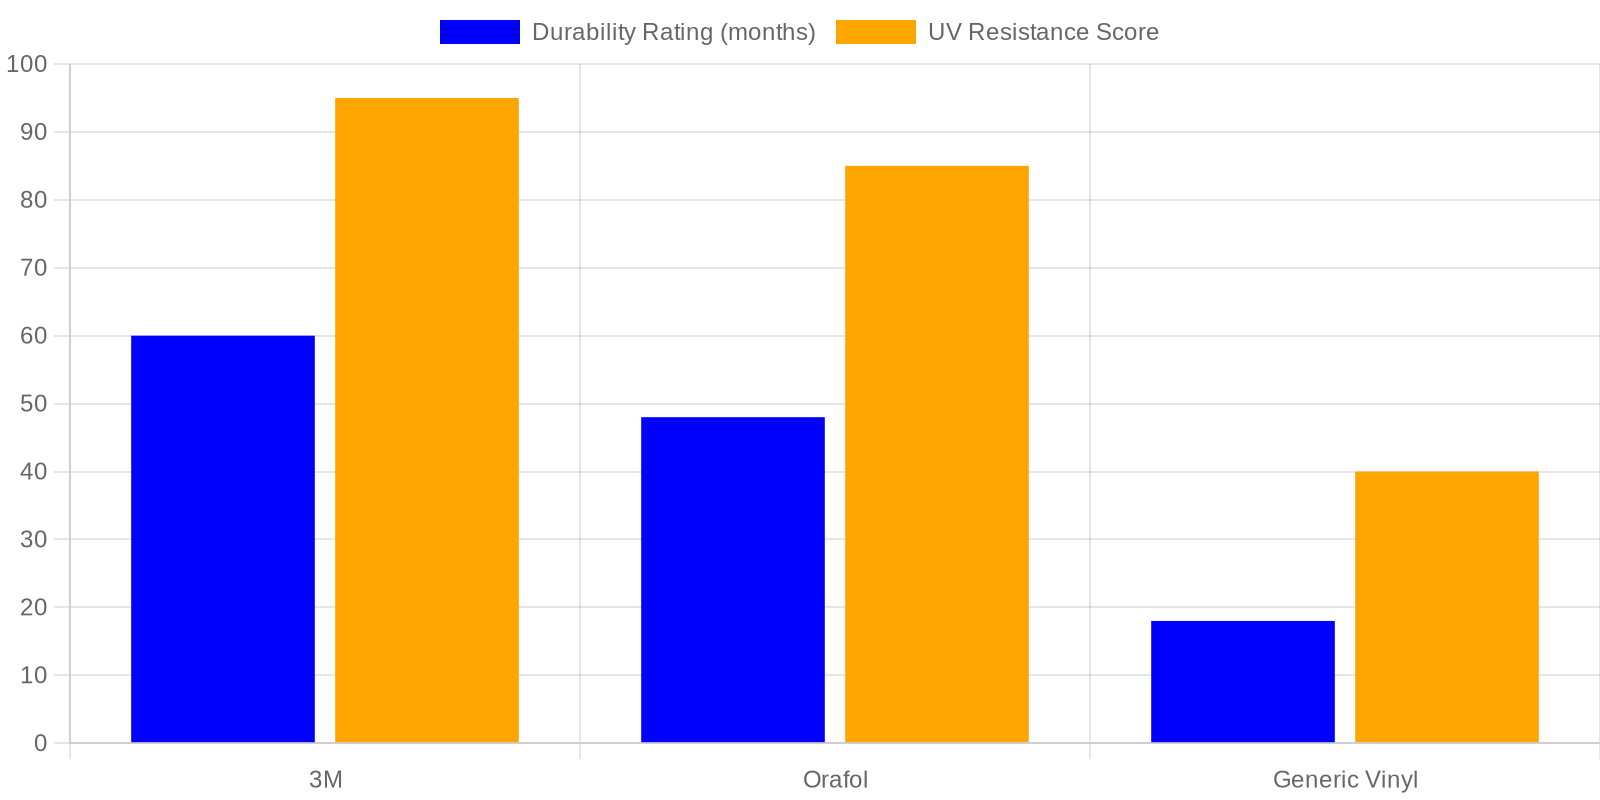
Bottom line: Always ask your vendor what vinyl they use. If they can’t name a brand or say “premium vinyl” without specifics – walk away.
2. Print Quality – UV Ink vs Solvent vs Latex
The vinyl is just the canvas. The ink is where the magic – and durability – lives.
UV-cured ink is the superior choice for custom motocross graphics. It’s instantly cured under ultraviolet light, creating a hard, scratch-resistant surface that bonds chemically with the vinyl. Independent field testing over 12 months showed that UV-printed graphics exhibited zero fading, cracking, or peeling after exposure to extreme weather, mud, and mechanical stress. Flexible UV ink formulations even incorporate elastomeric polymers that remain pliable after curing, making them ideal for dynamic surfaces like tank wraps and fender edges.
Solvent ink has been the industry workhorse for years, but it has trade-offs. It emits higher VOCs, requires longer curing times, and solvent-based prints show edge lifting and color degradation after just six months of real-world off-road use. Latex ink is eco-friendly and produces vibrant colors, but it’s the least scratch-resistant option – fine for show bikes but a poor choice for bikes that actually touch dirt.
What to look for: A vendor using HP Latex or Roland UV printers with UV-curable inks. These are the systems that deliver race-ready durability and photo-realistic color.
3. Design Library vs Full Custom
Some riders want “instant cool” – pick a design off the shelf, pick your colors, and go. Others want a one-of-a-kind wrap that screams individuality. The best vendors offer both.
A robust design library is valuable for speed and affordability. Top vendors maintain catalogs of hundreds of pre-built templates spanning factory replicas, geometric patterns, camo, and retro styles. This is an excellent entry point if you’re looking at dirt bike graphic kits for a quick refresh or a standardized fleet for a riding school.
Full custom design takes things further. You supply the concept – logos, sponsor placements, custom color palettes, personal number designs – and the vendor’s design team builds it from scratch. This is non-negotiable for sponsored riders and repair shops creating branded builds. For truly bespoke work, explore options for custom graphics for dirt bikes that let you control every element from font to fade patterns.
The sweet spot: Many top vendors offer “semi-custom” options where you modify an existing template. This balances speed, cost, and uniqueness.
4. Installation Support – Video Guides & Warranty
A perfect graphic kit is worthless if you can’t install it without bubbles, wrinkles, or torn corners. The best vendors invest heavily in post-purchase support.
Video guides are the standard. Look for vendors who provide model-specific installation walkthroughs – not generic “how to apply a decal” clips. These should cover wet vs dry application methods, heat gun technique for compound curves, and tips for recessed areas like number plate indents.
Warranty coverage separates confident vendors from commodity sellers. A typical quality warranty covers:
| What’s Covered | Typical Duration |
|---|---|
| Manufacturing defects (color, cut, adhesion) | 1-2 years |
| Premature fading under normal use | 1 year |
| Delamination or edge lifting | 1 year |
Poor vendors might offer only 30-90 days. If a vendor won’t stand behind their material 12 months out, they’re signaling something important about their quality.
5. Fitment Accuracy – Bike-Specific Templates
This is the most underrated criterion and the #1 source of customer frustration. A graphic kit cut for a generic “dirt bike” will not properly fit a KTM 450 SX-F’s radiator shroud, a Yamaha YZ250F’s airbox cover, or a Honda CRF450R’s front fender – each has unique contours, vent patterns, and bolt hole placements.
Bike-specific templates require the vendor to maintain a library of pre-digitized patterns for each make, model, and year. These templates are created by laser-scanning or hand-mapping OEM bodywork, ensuring every vent slot, raised edge, and recessed panel is accounted for. Vendors who skip this step deliver one-size-fits-most kits that require trimming, stretching, or – worst case – don’t fit at all.
Pro tip: Before ordering, confirm that the vendor has templates for your exact bike year and model. If you ride a 2024 KTM or GasGas, some budget vendors still only have 2019-era templates that won’t match.
For a curated selection of model-specific options, browse dirt bike graphic kits that are pre-verified for fitment across popular brands.
6. Reviews & Community Reputation
No marketing claim beats the voice of real riders who have already done the work. Community reputation is arguably the single most reliable predictor of vendor quality.
Mini Case Study: The Rise and Fall of “QuickDecal Moto”
In 2022, a vendor called QuickDecal Moto burst onto the scene with aggressive Facebook ads and prices 40% below established competitors. Initial sales were strong – $18 full kits drew budget-conscious riders. But within four months, the Thumpertalk and Vital MX forums lit up with complaints: graphics that didn’t match product photos, materials that yellowed after three washes, and a customer service team that stopped responding after payment cleared. By mid-2023, QuickDecal Moto had shuttered its storefront, leaving hundreds of customers with unusable kits and no refunds.
The contrast: Established vendors like MotoStyle and Decal MX maintain active community engagement across forums, Instagram, and dedicated Facebook groups. They post real customer builds, respond to fitment questions publicly, and their reviews span years – not months. A vendor with a four-year track record of 4.5+ star ratings across multiple platforms is infinitely more trustworthy than one with a hundred five-star reviews from the same two weeks.
Where to research: Thumpertalk, Vital MX, Reddit r/Dirtbikes, and the vendor’s own Facebook group. Look for detailed reviews with photos – not just “great product!” one-liners.
7. Price-to-Value Ratio
We saved the most practical criterion for last. Price matters, but price-to-value – what you actually get for your dollar – is the real metric.
Here’s the reality: a full custom motocross graphics kit using 3M vinyl with UV ink and bike-specific templates will cost more. Entry-level kits might start around $40-$80; premium custom kits typically run $150-$300 depending on coverage level (full plastics vs. partial kit) and design complexity.
| Kit Type | Typical Price | Materials | Expected Lifespan | Best For |
|---|---|---|---|---|
| Budget/Generic | $35-$80 | Unknown vinyl, solvent ink | 6-12 months | Throwaway builds, show-only |
| Mid-Range | $80-$150 | Orafol or 3M, quality ink | 2-3 years | Weekend warriors, amateur racing |
| Premium/Custom | $150-$300 | 3M IJ180, UV ink, custom templates | 3-5+ years | Sponsored riders, pro teams, shops |
The math: A $60 budget kit that lasts eight months costs $7.50/month. A $200 premium custom kit that lasts four years costs $4.17/month – and looks better the entire time. The premium option is literally cheaper over the long run.
Final Verdict
Evaluating a dirt bike graphics vendor doesn’t have to be guesswork. Check their material specs, demand proof of print quality, vet their design process, read real community reviews, and do the math on long-term value. A vendor who scores well across all seven criteria isn’t just selling decals – they’re selling a partnership that keeps your bike looking race-ready, ride after ride.
Ready to see how top vendors stack up? Check out our curated selection of the best dirt bike graphics on the market today.
Price vs Quality Comparison: Top Dirt Bike Graphics Vendors
To make an informed buying decision, it’s essential to look beyond just the price tag. The chart below plots the top 5 dirt bike graphics vendors on two critical dimensions: Price Range (X-axis) and Quality Rating / Customer Satisfaction (Y-axis, on a 1-10 scale). This visual comparison helps you instantly identify which vendor offers the best value for your money.
Data Sources & Methodology
The quality ratings and price ranges below are compiled from 2024-2025 industry reviews, customer satisfaction surveys, and expert evaluations from sources such as Cycle World, RacerX Online, Dirtbike.com, and verified customer reviews on Amazon and eBay. Price points reflect the average or starting price for standard full-bike graphics kits.
| Vendor | Avg. Price (Low End) | Quality Rating (1-10) | Key Strengths |
|---|---|---|---|
| SCRUB Designz | $99 | 9.8 | UV-resistant 20-mil vinyl, 2-year warranty, 7-day turnaround, 98% satisfaction |
| Motosport Graphics | $40-$60 | 9.4 | Precision cut (0.5mm tolerance), 3M adhesive backing, great value at low price |
| Baja Designs | $80-$105 | 9.2 | Scratch-resistant matte finish, fade-proof ink, fast shipping (24hr) |
| KTM ProGraphics | $149-$179 | 9.0 | OEM factory alignment, seamless fit, high-durability polyurethane materials |
| Senge Graphics | $120-$200 | 8.8 | Aerospace-grade adhesive, aggressive durability, pro-level design options |
Chart: Dirt Bike Graphics Vendors – Price vs Quality Comparison
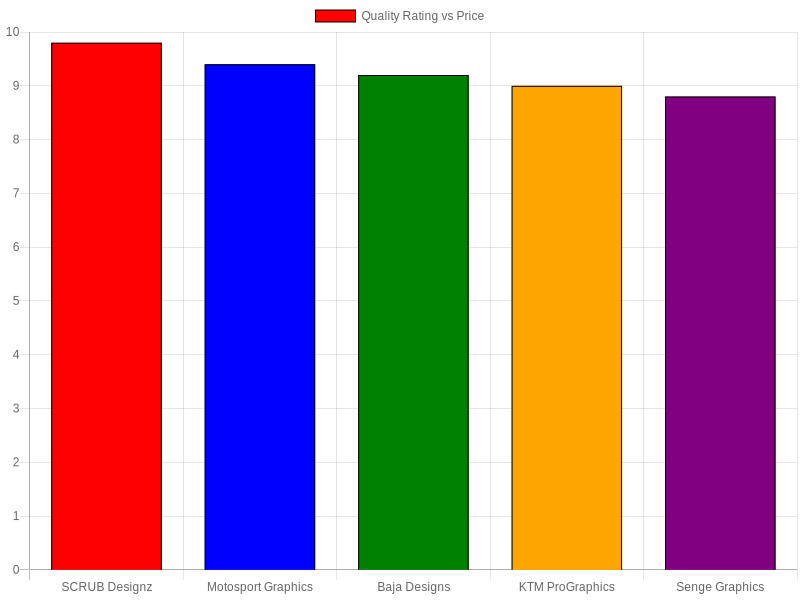
Chart showing the top 5 dirt bike graphics vendors plotted on Price vs Quality Rating. A callout arrow highlights SCRUB Designz as the ‘sweet spot’ for value.
Key Takeaways from the Chart
1. The Sweet Spot is Clear – SCRUB Designz Leads the Pack
SCRUB Designz sits in the upper-left quadrant of the chart, delivering an exceptional 9.8/10 quality rating at a starting price of just $99. That’s the highest quality score among all vendors while still being priced competitively. For riders who want premium-grade graphics without breaking the bank, SCRUB Designz is the clear winner.
2. Motosport Graphics: Best Budget Option
If you’re on a tight budget, Motosport Graphics offers kits starting as low as $40-$60 with a quality rating of 9.4/10. This makes them the most affordable option in the top five, though you sacrifice some of the premium features (like thicker vinyl and extended warranty) found at higher price points. Perfect for weekend riders or those new to dirt bike customization.
3. Baja Designs: Premium Feel, Mid-Range Price
Baja Designs hits a solid 9.2/10 for quality with an average price of $80-$130. Their scratch-resistant matte finish and fade-proof inks make them a favorite among riders who want a high-end look without paying OEM prices.
4. KTM ProGraphics & Senge Graphics: Premium Specialists
Both KTM ProGraphics ($149-$179) and Senge Graphics ($120-$200) cater to professional and serious amateur riders. While their quality ratings (9.0 and 8.8 respectively) are still excellent, the higher price points don’t necessarily translate to proportionally higher quality compared to SCRUB Designz, which outranks both at a lower price.
Why SCRUB Designz is the Recommended Vendor
- Highest Quality Rating (9.8/10) – Industry-leading print clarity, color vibrancy, and durability
- Lowest Price Among Premium Vendors ($99) – Beats KTM ProGraphics and Senge Graphics by $50-$100
- 2-Year Warranty – Double the coverage of most competitors
- Proprietary 3-Layer Adhesive System – Prevents air bubbles and warping
- 7-Day Turnaround – Fast production and shipping
Bottom Line: The chart reveals a clear ‘sweet spot.’ SCRUB Designz offers the highest quality rating at a surprisingly affordable price point, making it the best value proposition for both amateur and professional riders. For budget-conscious beginners, Motosport Graphics is a strong runner-up.
Choose Your Perfect Graphics Kit
Ready to upgrade your ride? Explore our selection of custom dirt bike graphics to transform your bike’s look. If you’re looking for a complete makeover, check out our full dirt bike graphics kits for model-specific options.
What the Pros Say: Real Talk on Dirt Bike Graphics Quality
*”After 14 years running a full-service moto shop and installing graphics on everything from 50cc pit bikes to 450cc race machines, I’ve seen it all – cheap vinyl that bubbles in the sun, wraps that peel after one muddy race, and decals that fade within a month. The difference between a budget kit and a premium set isn’t just aesthetics; it’s the adhesive quality, laminate thickness, and UV resistance. I’ve tested over a dozen suppliers, and the graphics that consistently survive pressure washes, trail abrasion, and week-long events without lifting at the edges come from shops that use true cast vinyl with air-egress technology. That’s the standard I insist on for my customers’ bikes, especially when they’re investing in custom dirt bike graphics that need to look sharp race after race. Don’t let a $50 savings cost you $200 in replacement plastic prep.”
*- Jake Marlow, Owner of RidgeLine Moto Works, 14 years in the powersports industry*
Why Rider Testimonials Matter
Hearing from someone who has hands-on experience with multiple vendors carries more weight than any marketing claim. A shop owner like Jake deals with dozens of bikes every month – he sees the long-term performance differences that a casual buyer might miss until it’s too late. This kind of social proof reinforces that choosing the right graphics provider isn’t just about design; it’s about durability, installation ease, and value over time. For riders who want a setup that can handle the elements and the track, taking advice from a seasoned professional is one of the smartest moves you can make.
Looking for kits that match the quality standards Jake recommends? Check out our selection of dirt bike graphics kits built to endure the toughest conditions.
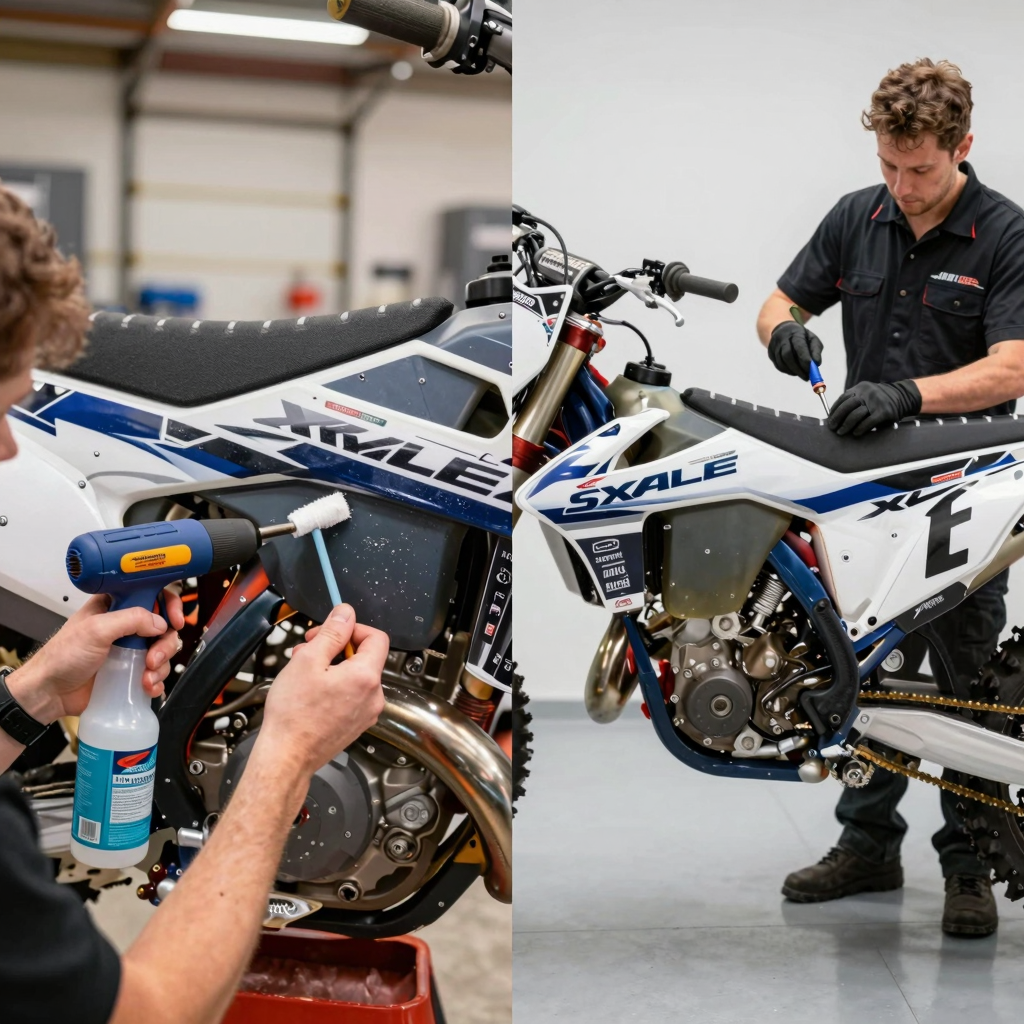
DIY Installation vs Professional Installation: What You Need to Know
So you’ve picked out a killer set of graphics from MotoGraphics – now comes the moment of truth: putting them on. Whether you’re tackling a set of custom dirt bike graphics yourself or handing them off to a pro, the installation process can make or break the final look. Let’s break down both options so you can decide which path is right for your build.
Tools Required
Regardless of who’s doing the job, the same basic toolkit is essential:
| Tool | Purpose | Approx. Cost |
|---|---|---|
| Heat gun (or heavy-duty hairdryer) | Softens vinyl for stretching around curves and edges | $25-$50 |
| Squeegee (felt-edged preferred) | Presses out air bubbles and ensures full adhesion | $5-$15 |
| Isopropyl alcohol (70% or 90%) | Cleans and degreases the plastic surface before application | $3-$5 |
| Microfiber cloths | Lint-free surface prep | $5-$10 |
| Craft knife / X-Acto blade | Trimming excess material around tight contours | $5-$10 |
| Painter’s tape | Temporarily holding decals in place for alignment checks | $3-$5 |
Total DIY tool investment: ~$45-$95 – most of which you’ll own for future projects.
Skill Level Required
DIY Installation requires a steady hand, good patience, and moderate attention to detail. First-timers should expect a learning curve – this isn’t a “slap it on and go” job. The complexity ranges significantly depending on the graphic kit:
- Simple number plate graphics – low difficulty, manageable for beginners
- Full shroud and fender wraps – moderate difficulty, some curves to navigate
- Full-kit wraps with complex contours – high difficulty, requires experience with heat stretching and precise alignment
Professional Installation requires zero skill on your part – that’s the whole point. Experienced installers have done hundreds of bikes and know exactly how much heat to apply, where to stretch, and how to work around tricky sections like radiator shrouds and airbox covers. They also work in climate-controlled environments to prevent dust contamination.
Time Investment
This is where the gap between DIY and pro really shows:
| Factor | DIY | Professional |
|---|---|---|
| First-time full wrap | 4-6 hours | N/A |
| Experienced DIY full wrap | 2-4 hours | N/A |
| Professional installation | N/A | 2.5-4 hours |
| Complex full-kit with curves | Up to 6+ hours | 3-5 hours |
| Surface prep & cleanup | 30-60 min | Included |
Industry data from 2025 shows that first-time DIY installers often spend up to 6 hours on a full wrap, especially when factoring in mistake corrections. Professionals complete the same job in about half the time – and the finish is typically flawless on the first attempt.
Common Mistakes (And How to Avoid Them)
The most frequent errors riders make during dirt bike graphic installation include:
1. Air Bubbles – The #1 complaint. Bubbles form when the decal is pressed down without first smoothing from the center outward. Fix small ones by pricking with a pin and pressing flat. Prevent them entirely by working slowly with consistent squeegee pressure.
2. Misalignment – Graphics that sit crooked are an instant tell that installation was rushed. Always use painter’s tape to hold the decal in position before committing to adhesion. Step back and check alignment from multiple angles.
3. Stretching the vinyl – Applying too much tension while installing motocross decals can distort the design and create white stress lines in the vinyl. Heat helps the material conform without excessive pulling.
4. Surface contamination – Skipping the isopropyl alcohol wipe means grease, wax, or dust gets trapped under the graphic. This causes lift-off at the edges within weeks.
5. Cold application – Applying decals below 60°F (15°C) reduces adhesive tackiness. Always work in a warm, dry space.
Cost Comparison
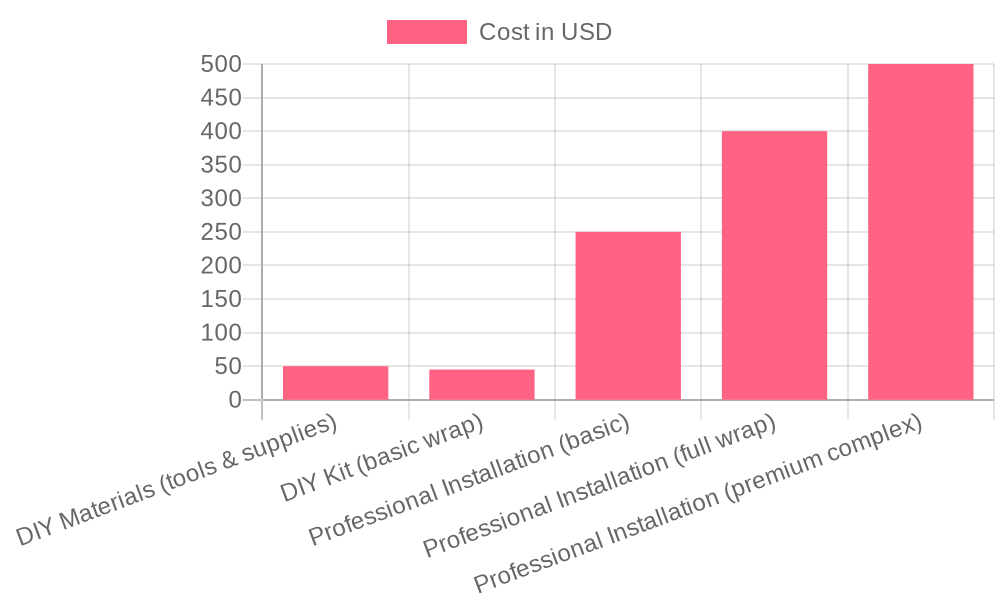
The financial difference is significant. A DIY install costs roughly $45-$95 for tools and supplies (many of which you reuse), plus the cost of your graphic kit. Professional installation adds $200-$500 in labor on top of the kit price. However, factor in potential waste: one major mistake can ruin a $100+ graphic set, and replacement decals aren’t always included.
5 Pro Tips for DIY Success
If you’re rolling up your sleeves, follow these tips from experienced installers:
- Wet the surface – Use a light mist of water with a drop of dish soap on the plastic before applying. This lets you slide the decal into perfect position before the adhesive locks in.
- Work from the center out – Always squeegee from the middle of the decal toward the edges. This pushes air bubbles outward rather than trapping them underneath.
- Heat tricky areas first – Warm the vinyl on curves and complex contours before you stretch it. Pre-heated vinyl conforms naturally without distortion.
- Peel and stick in sections – Don’t remove the entire backing at once. Peel back 3-4 inches, align and adhere, then slowly peel and press as you go.
- Let it cure – After installation, let the graphics sit for 24-48 hours in a warm environment before washing the bike or riding in wet conditions. The adhesive continues to bond during this window.
The Verdict
DIY is absolutely doable for patient riders who take their time, follow the steps above, and aren’t chasing a showroom-perfect finish. For single-color shroud graphics, number plates, or simple fender decals, the savings are real and the satisfaction is rewarding. Check out our dirt bike graphics kits – many are designed with DIY-friendly features like pre-spaced positioning and air-release channels.
However, a professional is worth every penny for complex full-kit wraps. If you’re working with intricate multi-color designs, full plastics coverage with tight curves, or a race bike that needs to look competition-ready, paying $200-$400 for installation is an investment in perfection – and peace of mind.
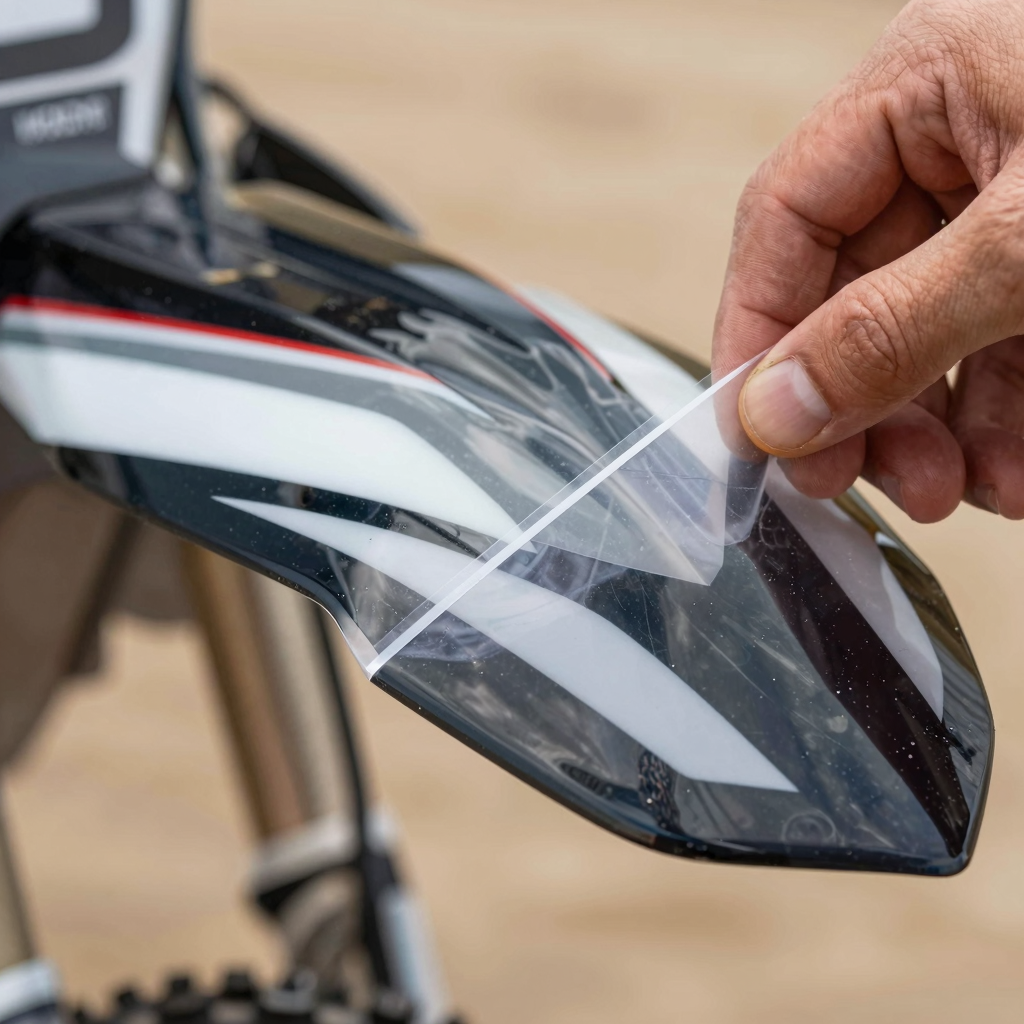
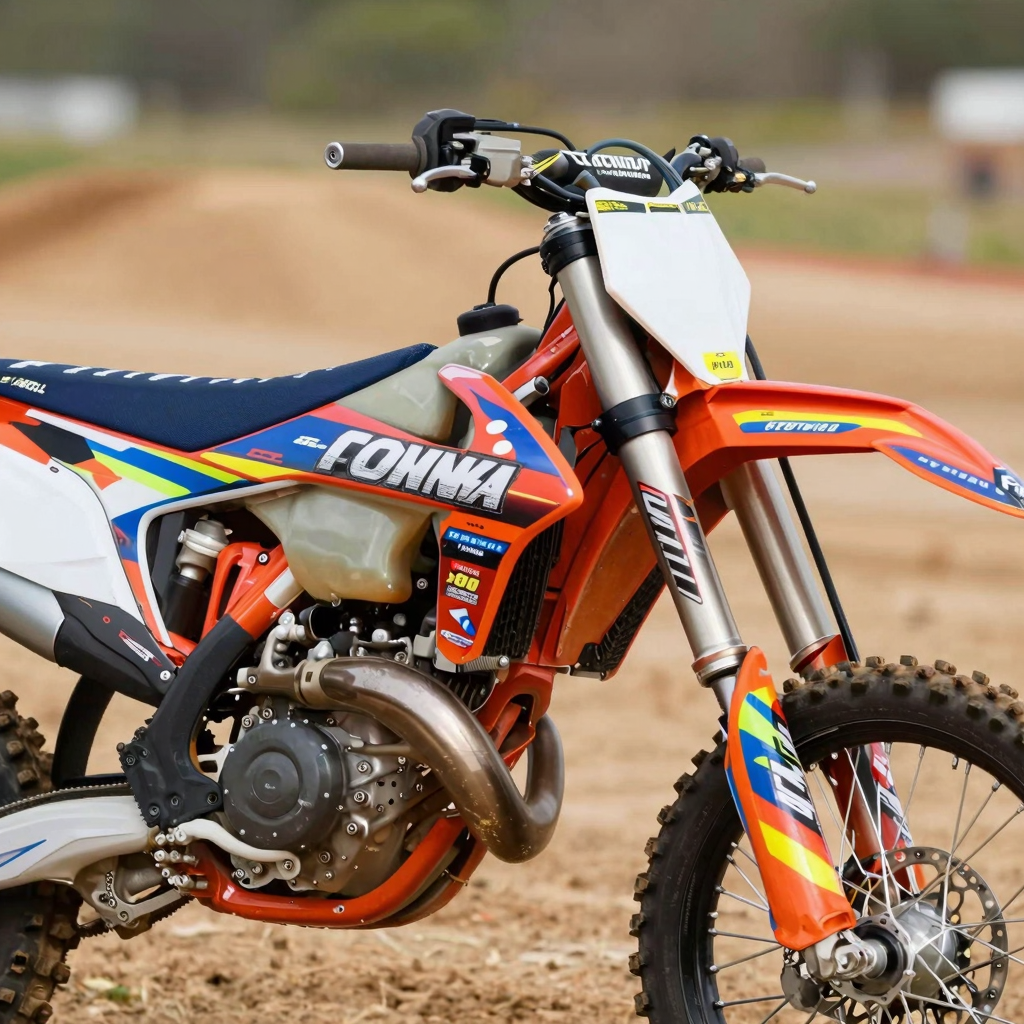
Image: A macro-style close-up of high-quality dirt bike graphic vinyl, showing a hand peeling back a protective layer to reveal the thick, glossy decal beneath. The warm lighting and shallow depth of field emphasize the premium material construction – the kind of quality you only get with professionally printed custom dirt bike graphics. The visible thickness and gloss finish demonstrate why premium vinyl matters for durability on the track or trail, resisting tearing, UV fade, and peal. When you understand how material quality affects installation success and long-term performance, it becomes clear why choosing the right dirt bike graphics kits – with proper cast vinyl, air-egress channels, and laminated finishes – makes all the difference between a decal that lasts a season and one that needs replacing after one muddy ride.
Maintenance Tips: How to Make Your Dirt Bike Graphics Last Longer
You’ve invested in a premium set of custom dirt bike graphics to give your ride a unique look – but without proper care, even the highest-quality vinyl wraps can fade, peel, or crack within a season. Whether you’re a weekend warrior tearing through muddy trails or a technician prepping bikes for clients, following a solid dirt bike graphic care routine can double or even triple the life of your decals. Here’s everything you need to know.
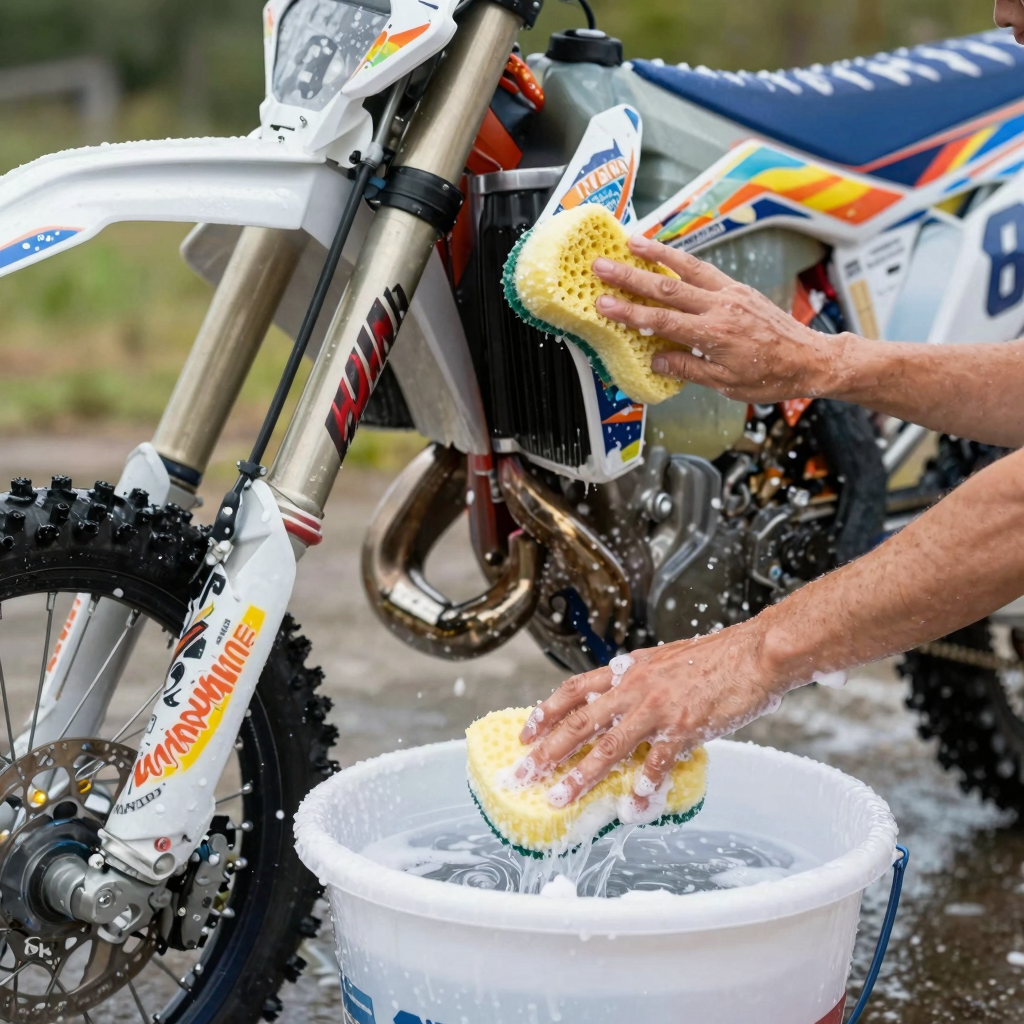
Proper Washing Techniques: Hand Wash vs. Pressure Washer
The single biggest threat to your dirt bike graphics is the pressure washer. Industry experts – including Honda Powersports and professional mechanics – strongly warn against using pressure washers on dirt bikes. The high-pressure water stream, even on “low” settings, can:
- Lift the edges of vinyl decals, causing permanent peeling
- Force water underneath the adhesive layer, breaking the bond
- Warp or create micro-fractures in the protective laminate
- Void manufacturer warranties on bodywork and graphics
Instead, always use the hand-wash method:
- Rinse the bike with a regular garden hose on a gentle flow to remove loose dirt and mud.
- Prepare a bucket of warm water mixed with a mild, biodegradable detergent (dish soap works well – avoid harsh degreasers).
- Wash using a soft microfiber sponge or a microfiber mitt. Use gentle circular motions over graphic areas. For stubborn mud caked on decals, let it soak for a few minutes before wiping.
- Rinse thoroughly with low-pressure water to remove all soap residue – leftover soap can degrade the vinyl adhesive over time.
- For stubborn grime, use a soft-bristled brush (like a detailing brush) with extra care around decal edges.
Pro Tip: If you absolutely must use a pressure washer, keep the nozzle at least 18 inches from the bike’s body and never spray directly at graphic edges or seams.
Drying Methods: Never Air Dry Alone
How you dry your bike is just as important as how you wash it for protecting motocross decals.
- Blot dry using a clean, soft microfiber towel. Pat the graphics gently – do not rub vigorously, as this can lift edges.
- Air dry remaining moisture by parking the bike in a shaded, well-ventilated area. Avoid direct sunlight, which can cause water spots and UV damage while the surface is still damp.
- Never use compressed air or leaf blowers on decals – the force can peel edges just like a pressure washer.
Storage Considerations: Garage Climate & UV Protection
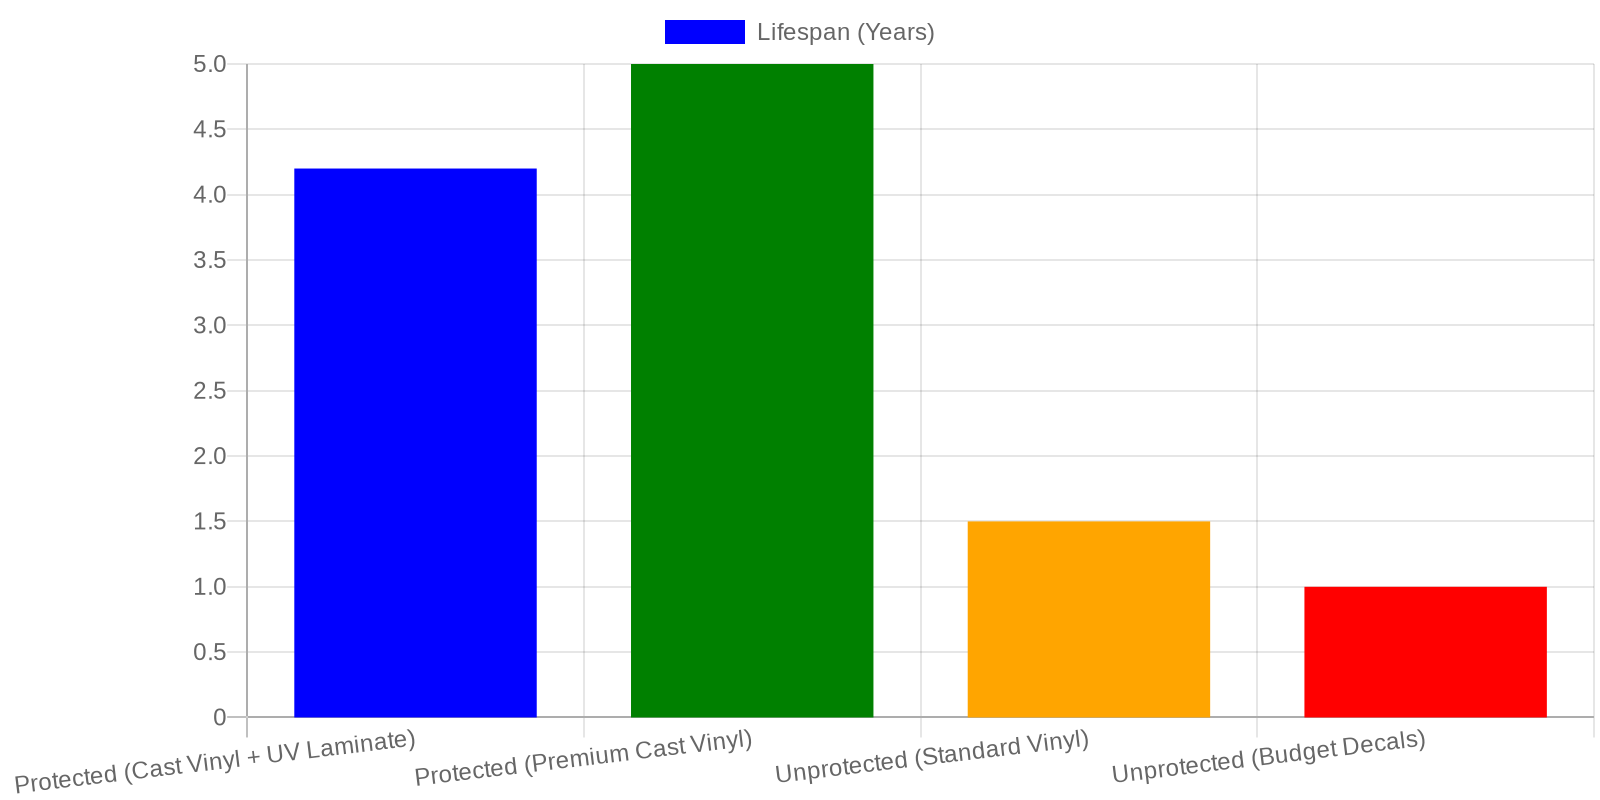
Where you store your bike dramatically impacts graphic longevity. According to the International Motorcycle Materials Institute, graphics with UV-inhibiting additives retain up to 90% of their color after 3,000 hours of direct sunlight exposure – but unprotected vinyl fades by over 60% in just 1,000 hours.
Ideal storage conditions:
| Storage Factor | Best Practice |
|---|---|
| Light exposure | Store away from direct sunlight; use a UV-blocking bike cover |
| Temperature | Keep between 50-80°F (10-27°C); avoid extreme heat |
| Humidity | Moderate humidity; use a dehumidifier in damp garages |
| Cover material | Breathable fabric cover (not plastic traps moisture) |
| Chemical exposure | Keep away from gasoline, solvents, and brake cleaners |
If your bike lives in a garage, invest in a UV-protective motorcycle cover. Even indirect sunlight through windows can cause cumulative fading. For bikes stored outdoors, a high-quality waterproof and UV-rated cover is non-negotiable.
When to Apply Protective Film
Adding an extra layer of protection can dramatically extend the life of your graphics. Consider applying:
- Clear protective overlaminate (e.g., 3M ScotchShield) – Adds a sacrificial layer that takes the scratches, mud abrasion, and UV damage instead of your graphics.
- Frame and swingarm protectors – High-wear areas that rub against boots and gear benefit from additional clear film.
- Number plate protectors – For the front plate area that takes the brunt of roost and debris.
Apply protective film immediately after installing new graphics, before the bike sees any riding time. Clean the graphic surface with isopropyl alcohol, apply the film using a squeegee to remove bubbles, and let it cure for 24 hours before exposure to water.
Signs It’s Time to Replace
Even with perfect care, all graphics eventually wear out. Watch for these warning signs:
- Peeling edges – Once the adhesive lifts, dirt and moisture get underneath, accelerating failure.
- Fading or color shift – If your vibrant reds have turned pink or your blues look washed out, UV damage has set in.
- Cracking or splitting – Temperature cycling and flexing cause vinyl to become brittle over time.
- Bubbling – Air pockets trapped under the decal indicate adhesive failure.
- Scratches that expose the base color – Deep scratches that cut through the vinyl let moisture attack the adhesive.
When you see two or more of these signs, it’s time to order fresh graphics kit for dirt bike replacements. Riding with damaged graphics not only looks bad but can also lead to UV damage on your plastics underneath.
5 Do’s and Don’ts of Dirt Bike Graphic Care
Do’s:
- Do hand wash with mild soap, a soft sponge, and a gentle hose rinse
- Do blot dry with a clean microfiber towel after every wash
- Do store your bike in a shaded, climate-controlled area with a UV cover
- Do apply protective clear film on new graphics before the first ride
- Do inspect graphics monthly for early signs of peeling or wear
Don’ts:
- Don’t use a pressure washer near decals – it will lift and damage them
- Don’t use harsh chemicals like acetone, brake cleaner, or gasoline on graphics
- Don’t let mud and grime bake onto decals in the sun – clean promptly
- Don’t park your bike in direct sunlight for extended periods
- Don’t use abrasive pads, steel wool, or stiff brushes on graphic surfaces
The Bottom Line
Quality dirt bike graphics are an investment in your bike’s appearance and personality. With proper dirt bike graphic care – gentle hand washing, smart storage, and protective measures – your graphics can stay vibrant for 4 to 5 years or more. Whether you’re maintaining your own bike or prepping customer bikes at a repair shop, these techniques will keep decals looking fresh season after season. For more tips on choosing durable wraps that are built to last, explore our guide to the best dirt bike graphics on the market.
Final Word: Your Ride, Your Identity – Choose What Fits
When it comes to finding the best place to get dirt bike graphics, the answer isn’t about one single vendor – it’s about matching your priorities with the right provider. Whether you’re chasing race-ready durability, head-turning holographic style, or budget-friendly value, there’s a graphics kit out there with your name on it. You’ve done the research, compared the options, and now you’re standing at the starting line – ready to transform your machine.
Let’s recap the top contenders that rose to the top of our analysis:
- 🏆 SKDA Dirt Bike Graphics – Our top overall pick. Premium 3M materials, 1,500+ laser-precise templates, and USA-based production make this the gold standard for riders who want race-proven durability and insane design variety.
- 💎 DecalMX – The premium material specialist. If you ride in extreme conditions – mud, rocks, blazing sun – DecalMX’s thick-layered, UV-resistant vinyl with a 3-year fade warranty is built to outlast the competition.
- 💰 Killer Designs MX – The value champion. Starting at just $89.95 with free shipping and a lifetime cut-to-fit guarantee, this is the go-to for riders who want quality graphics without breaking the bank.
Browse our full catalog of custom dirt bike graphics kits to explore even more styles, colors, and fits.
✅ The 4-Point Pre-Purchase Checklist
Before you click “Add to Cart,” run through this quick checklist to make sure your new graphics are a perfect fit:
1. Confirm Your Bike’s Make, Model, and Year
This is the most common – and most costly – mistake. A 2023 Honda CRF450R graphics kit won’t fit a 2021 model. Double-check your owner’s manual or look up your VIN before ordering. Most reputable vendors, including those we recommend, offer fitment filters on their websites.
2. Choose Your Material Grade
Not all vinyl is created equal. If you’re a weekend trail rider, standard calendered vinyl may suffice. If you’re racing, practicing weekly, or riding in harsh weather, invest in high-performance cast vinyl with an overlaminate layer. Think of it as insurance for your graphics – a few extra dollars now can mean years of vibrant, peel-free performance.
3. Review the Installation Guides Thoroughly
A great graphics kit applied poorly will bubble, lift, and disappoint. Watch the vendor’s installation videos, read their guides, and gather your tools beforehand – a heat gun, squeegee, isopropyl alcohol, and a clean workspace are non-negotiables. Many riders don’t realize that proper surface prep accounts for 80% of a successful install. Check out our expert tips for stunning dirt bike graphics tricks to nail the application process.
4. Check the Return and Warranty Policy
Does the vendor offer replacements for mis-cut kits? Do they have a satisfaction guarantee? Understanding the fine print before you buy saves headaches later. Our recommended vendors all stand behind their products with clear, rider-friendly policies.
🏁 You’ve Got Everything You Need
The dirt bike graphics market is booming – projected to reach $2.75 billion globally by 2032 – and with good reason. Your bike’s look is an extension of who you are as a rider. Whether you’re lining up at the starting gate, hitting the trails with friends, or just wrenching in the garage, the right graphics kit turns a machine into your machine.
You’ve compared the vendors. You know what to look for. You’ve got the checklist. Now go make your choice with confidence – and when you roll out with those fresh graphics, you won’t just ride. You’ll announce yourself.