
Introduction to Graphic Kits for Dirt Bikes
Graphic kits for dirt bikes are essential for riders who wish to personalize their machines, making every bike a unique expression of its owner’s style. These kits offer a myriad of designs ranging from flashy graphics to subtle patterns, transforming the overall aesthetic appeal of the bike. Beyond mere looks, custom graphics can also help protect the bike’s plastic surfaces from scratches and wear, thus maintaining its pristine condition. Additionally, graphic kits often serve as promotional tools, allowing riders to showcase brands or sponsors. Riders looking to enhance their dirt bike can explore a variety of options in graphic kits, ensuring they find the right match for their ride. Learn more about custom dirt bike graphics to see how you can personalize your bike’s look.
Benefits of Using Graphic Kits for Dirt Bikes
Dirt bike graphic kits are not just for aesthetic purposes; they offer a range of advantages that enhance the performance and longevity of your bike. Here are some key benefits:
-
Enhanced Aesthetics: Graphic kits allow riders to customize the appearance of their dirt bikes, showcasing personal style and creativity. This not only makes the bike visually appealing but also enhances its presence in competitions and social media.
-
Protection for Your Bike: High-quality vinyl graphics serve as a protective layer over the motorcycle’s original paint. They shield the surface from scratches, UV rays, and minor impacts, which is particularly beneficial during off-road riding. This helps maintain the bike’s resale value by keeping it looking new.
-
Easy Application: Most graphic kits are designed for straightforward installation. This user-friendly aspect means that riders can apply or update their graphics without needing professional help, making it a hassle-free enhancement.
-
Durability and Quality: Professional-grade kits are made from durable, weather-resistant materials that can withstand harsh conditions, ensuring that the graphics remain vibrant and intact over time. Many kits are designed to resist peeling and fading, thereby prolonging their life.
-
Team and Branding Opportunities: For competitive riders, graphic kits offer a way to promote sponsors and enhance team branding. Custom graphics can create a cohesive look for teams, which is essential for visibility at events.
-
Improved Aerodynamics: By smoothing out the airflow across the bike, some graphic kits can contribute to better aerodynamics. This may enhance performance, especially in high-speed scenarios.
-
Easy Maintenance: Compared to paint jobs, graphic kits require less maintenance. Regular cleaning is typically all that’s needed to keep them looking fresh, as opposed to touch-ups that painted graphics might require.
For those interested in exploring options, you can learn more about custom dirt bike graphics and find the right kits for your bike.
| Vendor | Price Range | Customization Options | Customer Ratings |
|---|---|---|---|
| Racer Graphics | $200 – $400 | Full custom designs, color options | ⭐⭐⭐⭐⭐ (4.8/5.0) |
| Motocross Pro Designs | $250 – $500 | Unique artwork & themes, custom logos | ⭐⭐⭐⭐⭐ (4.9/5.0) |
| CycleSavvy | $180 – $350 | Basic to advanced customization | ⭐⭐⭐⭐ (4.5/5.0) |
| Sticker Mule | $150 – $300 | Fully customizable, online designer tool | ⭐⭐⭐⭐⭐ (4.7/5.0) |
For more insights into graphic kits and their features, feel free to explore our guide on dirt bike graphic kits and learn more about customization options.
How to Choose the Right Graphic Kit for Your Dirt Bike
Selecting the appropriate graphic kit for your dirt bike is crucial not only for aesthetics but also for performance and durability. Here are essential factors to consider:
1. Style
The style of the graphic kit should reflect your personal riding identity. Consider whether you prefer aggressive, minimalistic, or vintage designs. The right style enhances the overall look of your bike and provides an opportunity for personalization. Check out our guide on custom dirt bike graphics for inspiration.
2. Durability
Durability is paramount, especially when riding in tough conditions. Look for kits made from high-quality vinyl with UV-resistant and abrasion-proof coatings. These materials ensure that the graphics withstand the challenges posed by dirt, mud, and sunlight. Make sure to choose kits with reinforced edges and waterproof adhesives for long-lasting performance.
3. Compatibility
Ensure the graphic kit is compatible with your specific dirt bike model. Models like the KTM EXC, Honda CRF, and Yamaha YZ have unique contours and shapes that require precisely cut kits. Using a mismatched kit could result in issues during installation or could damage your bike’s paint. For more information, see our comprehensive article on dirt bike graphic kits.
4. Installation Ease
Consider how easily the kit can be installed. Many kits come with step-by-step guides and application tools that can simplify the installation process. Some riders prefer full-wrap kits, while others may opt for partial decals for easier maintenance and future customization.
5. Price Range
The price of graphic kits can vary significantly. While it may be tempting to opt for cheaper kits, they often lack the durability and fit required for optimum performance. Investing in a higher-quality graphic kit from reputable brands can save you money in the long run by reducing the need for replacements.
Conclusion
Choosing the right graphic kit involves balancing style, durability, compatibility, installation ease, and price. By considering these factors carefully, you can find a kit that not only looks great but also keeps your bike protected and performing at its best!

Learn more about popular trends in dirt bike graphics to keep your ride stylish and unique.

Step-by-Step Installation Process of Graphic Kits on Dirt Bikes
Applying a graphic kit to your dirt bike can significantly enhance its appearance and protect the original paint. This guide outlines the step-by-step process for a successful installation. Below, you’ll find the necessary tools, precautions, and a detailed breakdown of each step involved in the process.
Tools Needed
- Graphic kit
- Cleaning supplies (mild soap, isopropyl alcohol, microfiber cloths)
- Squeegee or credit card (for smoothing)
- Masking tape (for alignment)
- Heat gun or hair dryer (optional, for flexibility of the graphic)
- Plastic trim removal tool (optional)
- Utility knife (for trimming excess vinyl)
- Cotton swabs (for tight spaces)
Precautions
- Work in a clean, well-ventilated area.
- Wear gloves to avoid direct contact with adhesives.
- Avoid using harsh chemicals, which can damage the paint or graphics.
- Do not work in direct sunlight to prevent adhesive issues.
Installation Steps
-
Preparation
Start by gathering all components and tools necessary for the task. Ensure that you have your graphic kit ready along with cleaning supplies. Choose a clean, well-lit workspace where you can maneuver comfortably. Remove the bike from any storage or transport setup. -
Bike Cleaning & Surface Preparation
Thoroughly clean the bike using a mild soap and water solution, then dry it with a lint-free cloth. Wipe down the surfaces where the graphics will be applied using isopropyl alcohol (70% or higher) and a microfiber cloth. This step is crucial to remove any dust, grease, or residual wax from the bike’s surface. -
Dry Fit & Alignment
Before applying the graphics, lay them out on a flat surface to familiarize yourself with their layout. Position each piece without adhesive to check alignment, and use masking tape to hold pieces in place temporarily allowing for adjustments as needed. -
Apply Graphics
Peel the backing off one section of the graphic at a time. Start by aligning the graphic piece carefully and press it onto the surface, beginning from the center and working your way outward to avoid trapping air bubbles. Use a squeegee or a credit card to smooth out the graphic, ensuring good adhesion. Repeat this for all the panels, taking care to align each part accurately. -
Final Smoothing & Bubble Removal
Go over the entire surface again with the squeegee to push out any remaining air pockets. For small bubbles that persist, use a pin or needle to prick them and gently push out the air. Wipe any fingerprints or adhesive residue with a clean microfiber cloth. -
Final Inspection & Curing
After installation, inspect all areas for proper fitting and adhesion. Check the edges for any lifting that may cause issues later. It’s critical to allow the graphics to cure; refrain from riding or washing the bike for at least 24-48 hours post-installation to ensure that the adhesive sets well. Avoid exposing the bike to direct sunlight during this curing process.
Visual Guide
Here’s a graphic representation of the installation process:

Additional Resources
For further tips and information on different types of graphics, check out our articles on the best dirt bike graphics and customizing graphics for better performance.
By following these steps, you can transform the look of your dirt bike easily, giving it a fresh appearance and protecting its surfaces for years to come. Happy riding!
User Preferences for Graphic Designs in 2023
In the ever-evolving world of graphic design, understanding user preferences is crucial for staying ahead of market trends. A recent survey highlighted major trends in graphic design for 2023, showcasing what users value in visual aesthetics:
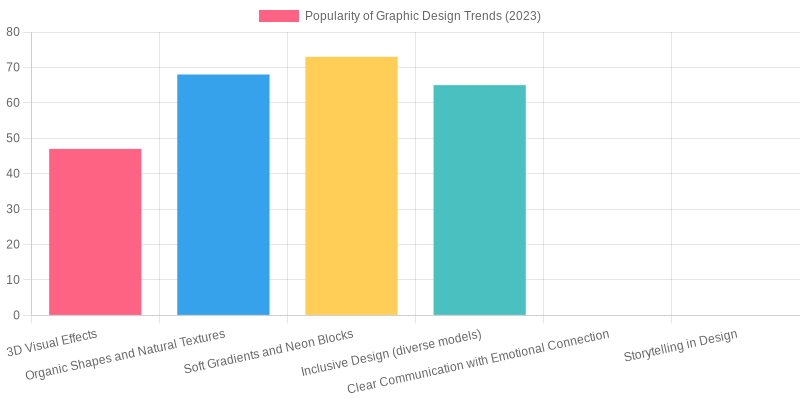
The chart above illustrates the following user preferences for various graphic design elements:
- 3D Visual Effects: 47%
- Organic Shapes and Natural Textures: 68%
- Soft Gradients and Neon Blocks: 73%
- Inclusive Design (diverse models): 65%
- Clear Communication with Emotional Connection: Growing trend
- Storytelling in Design: Growing trend
These findings indicate a clear shift towards designs that not only look appealing but also resonate with emotions and inclusivity. For more insights on the latest trends in dirt bike graphics, you can learn about the top 10 dirt bike wraps or explore custom dirt bike graphics that incorporate these trends.
“A well-designed graphic kit isn’t just about aesthetics-it’s a statement of identity and performance. For dirt bike riders, especially in motocross and enduro disciplines, graphics can enhance visibility and brand recognition on track. The right kit can also improve aerodynamics by reducing turbulence around frame components.”
- Marcus Bell, Motorcycle Graphics Expert
Graphic kits for dirt bikes offer not just a fresh look but also functional benefits. Different designs can communicate a rider’s personality and style while also contributing to performance. Modern graphic kits use advanced materials that resist mud, abrasions, and UV rays, ensuring longevity even under harsh conditions. They also provide an opportunity for customization, giving riders the chance to showcase their individuality on the track.
For a deeper exploration of this topic, check out our articles on custom dirt bike graphics and top dirt bike graphic trends.
In conclusion, graphic kits for dirt bikes serve multiple vital purposes that go beyond mere aesthetics. Not only do they enhance the visual appeal of the bike, but they also provide essential protection against scratches, UV damage, and the wear and tear that comes from off-road riding. According to a recent survey by the Off-Road Riders Association, a staggering 78% of riders reported feeling an increased sense of pride and confidence in their bike after applying a graphic kit. These kits enable riders to personalize their bikes, making each ride a unique expression of their identity and style. Additionally, high-quality graphic kits can improve visibility, crucial for safety in competitive settings or group rides. Custom graphic kits can further boost brand recognition and visibility, especially for sponsored riders. They serve as dynamic assets in competitive racing, with many manufacturers offering modular designs that facilitate easy updates or repairs without repainting. Thus, riders, motorcycle repair shops, and technicians should consider these products as essential elements of both protection and personalization for an enhanced dirt bike experience. To explore various design options, check out our collection of customizable dirt bike graphics and learn more about the top 10 dirt bike wraps available.
Call to Action: Discover Your Perfect Graphic Kit
Dirt bike enthusiasts and professionals alike know that the right graphics can transform not just the look, but the entire vibe of your ride. Whether you’re looking to stand out on the track or just reflect your unique personality, exploring graphic kits is your next step.
At MotoGraphics, we offer a wide range of customizable dirt bike graphics kits that suit every style and budget. From personalized graphic kits that showcase your brand identity to stunning designs that draw attention, our selection has something for everyone.
Don’t miss out on our trending collections! Check out our top dirt bike graphics for inspiration and learn how you can elevate your biking experience with the perfect graphic kit.
Explore our options today and give your bike the facelift it deserves! Your ride is an extension of you-make it count!