
OK
Why the Tank Seam Triggers Bubbling and Peeling
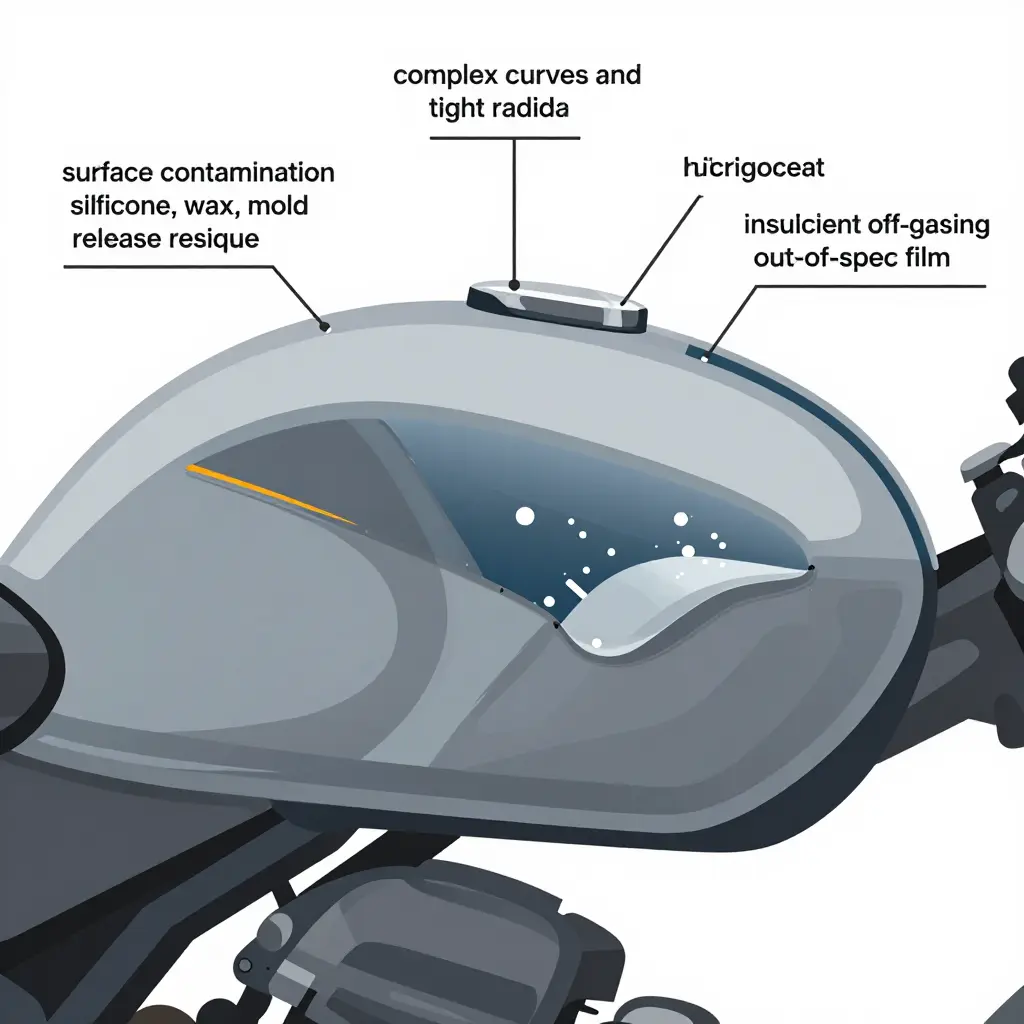
Most decal failures start at the tank seam. It is a narrow strip where sharp angles, heat, fuel vapor, and constant flexing all meet. Sorting the causes matters, because they point to different fixes: some come down to prep, others to the film you bought. Any one of them can lift a decal on its own.
Tight Radii and Compound Curves
Fuel tanks rarely offer a flat surface. The seam sits where panels meet at an acute angle and a tight radius, so the vinyl has to stretch in two directions at once. Stretched film thins out and keeps some of that stretch as elastic tension, which tugs at the adhesive and lifts the edges.
Sharp geometry needs a film that stretches and still holds.
Fuel Vapor and Temperature Cycling
Plastic tanks let a little fuel vapor pass through the wall. Heat expands the tank, cool air contracts it, and every ride repeats the cycle. Vapor that collects under the decal builds pressure and pushes the film off the surface. The raised lip along the seam is usually where the first bubble appears.
Surface Contamination
Silicone, wax, and mold-release residue are invisible, and they survive a quick wipe-down. Adhesive cannot bond to a slick layer, so the film sits on the contamination instead of the plastic. A proper cleaner, used before the decal touches the tank, removes them.
Adhesive bonds to the tank, not to what is left on it.
Insufficient Off-Gassing Time
Fresh paint and new plastic release solvents and gas for weeks. Apply vinyl too soon and those gases come off under the film, where heat makes the bubbles grow. Wait out the full cure and off-gassing window before you seal the surface.
Out-of-Spec Film
Not every vinyl handles a deep recess. Low-grade or out-of-spec film lacks the conformability and adhesive bite for it, so it lifts at the seam edges and peels back over time. Confirm the film specification before you order custom dirt bike graphics.
The right film grade conforms; the wrong one quits.
Between them, these causes account for nearly every bubbling and peeling complaint at the tank seam. Prep, environment, and film grade are the levers you control.
Warning Signs That Precede a Reprint
Inspect the failing panel before you strip the old set and start over. These symptoms show up early enough to plan a reprint:
- A tight, repeating row of trapped bubble shapes runs directly along the tank seam line.
- Corners lift or curl, letting motorcycle decals begin to peel away from the surface.
- Cloudy or silvered areas spread under the graphic where air and moisture stay trapped between the film and the paint.
- Creasing develops near tight radii where the film cannot stretch far enough to follow the curve cleanly.
- Adhesive residue trails streak outward from the failing edge, collecting dust and confirming that the bond is breaking down.
- Color fading appears around the affected zone, often showing as a dull halo where the decal no longer sits flat.
Symptoms that cluster in one narrow band point to a prep or film-grade fault, not normal wear; heat, sunlight, and road time do not single out a single strip of a panel. When every failure lands on the same seam, the surface was probably contaminated or the film too stiff for the shape. Clean the plastic properly and apply a fresh set of custom dirt bike graphics.
The Prep Order at a Glance
The whole surface prep workflow comes down to six stages in one direction:
Clean -> Degrease -> Abrade lightly -> Wipe with isopropyl alcohol -> Dry -> Apply
The diagram shows each stage as an icon connected by arrows, so you can check the order at a glance if you lose your place.
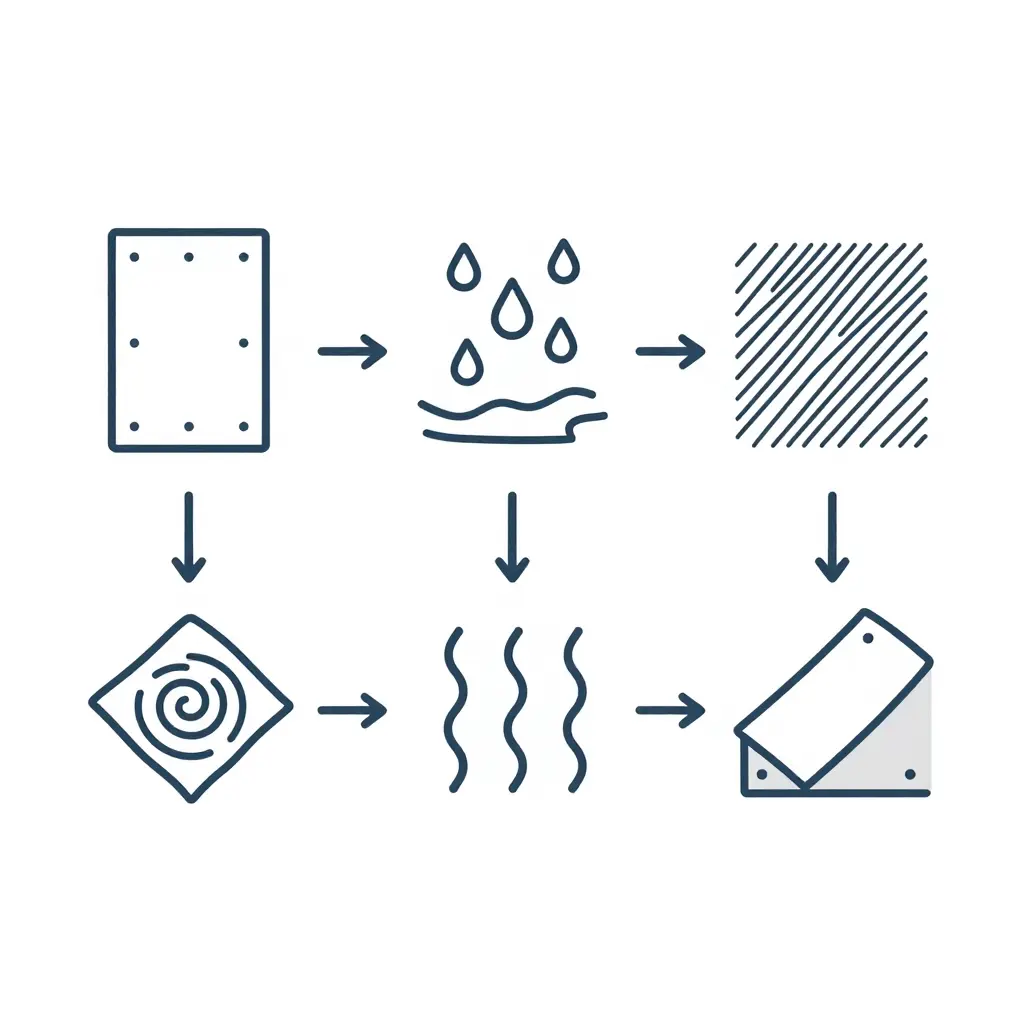
Each stage sets up the next, and skipping or reordering one is a common reason decals bubble at the seam. Cleaning removes loose grit; degreasing strips the oils that would trap air; light abrasion gives the adhesive something to bite into; the alcohol wipe clears residue and dust; drying removes moisture. Only then does the film go on.
Understanding Film Grade: Cast Versus Calendered Vinyl
Film grade decides how a wrap survives the geometry around a fuel tank. Cast vinyl starts as a liquid poured onto a moving liner and cured into a sheet roughly two mils thick. It is never stretched during manufacture, so it carries almost no built-in memory: it lies flat and follows compound curves instead of fighting them.
Cast film also stretches well before it tears, and most cast products are rated for 150 to 200 percent elongation or more. That elasticity lets one piece of vinyl wrap a tank seam without lifting. Specialty finishes behave the same way: holographic dirt bike graphics conform where the backing is cast film, which is why the material matters more than the print.
Calendered vinyl is made differently. The resin is squeezed between heavy rollers into a thicker sheet, usually three to four mils, with internal stress locked into the surface. It is stiffer and less conformable, and it tends to pull back from sharp recesses after installation.
Motorcycle decals cut from calendered stock bridge over a tight tank seam instead of settling into it. Air pockets form at the edges, and fuel vapor plus heat cycles push them wider. Cast film relaxes into the curve and keeps contact.
Adhesive chemistry matters too. Cast films usually carry a solvent-based or acrylic pressure-sensitive adhesive that flows and grips under heat, while economy calendered products often use a thinner adhesive layer that struggles on textured or low-energy plastics. When a tank expands in the sun and contracts at night, a flexible cast adhesive moves with the panel; a rigid one fatigues.
For any panel that bends in two directions or crosses a tank seam, specify cast film and check the elongation rating before ordering. Paying more for the right film grade prevents bubbling that no amount of reprinting will fix.
Film Grade Is the Second Decisive Variable
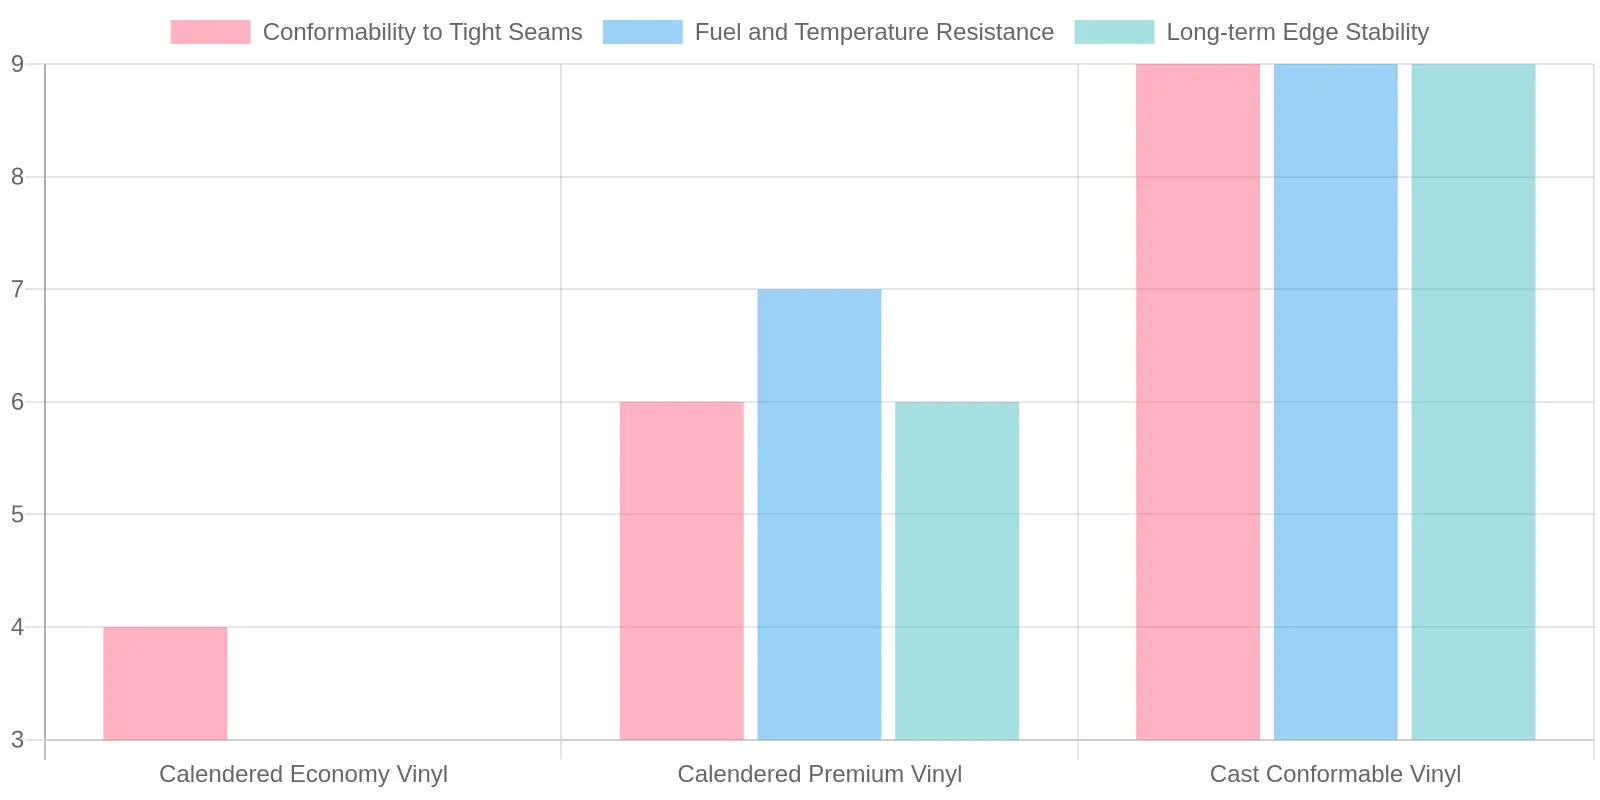
With the surface prepped, the film becomes the next decisive factor. Not all vinyl is built for the tight radius of a tank seam. The chart scores three grades – calendered economy, calendered premium, and cast conformable – on the three performance factors that matter at a hard seam.
How to Read the Scores
| Film Grade | Conformability to Tight Seams | Fuel and Temperature Resistance | Long-term Edge Stability |
|---|---|---|---|
| Calendered Economy Vinyl | 4 | 3 | 3 |
| Calendered Premium Vinyl | 6 | 7 | 6 |
| Cast Conformable Vinyl | 9 | 9 | 9 |
Economy calendered film scores low on all three, which is why bubbles and lifting edges keep appearing at the seam. Cast conformable vinyl stretches into compound curves, tolerates fuel spills and heat cycles, and holds its edges. If the same faults return after a reprint, the cause is usually surface prep plus the wrong film grade, not the artwork. Pairing the right material with proven decal installation tricks is the quickest way to break the cycle.
Diagnosing the Failure Before You Reprint
The failure pattern tells you which cause you are dealing with.
A prep failure looks uniform. Edge lift runs evenly along the seam, bubbles form a repeating grid, and the grid lines follow the surface texture rather than the decal outline; air and moisture escape along the same paths every time. Contamination or trapped moisture sat under the film and the adhesive never bonded. Clean the panel, dry it fully, and control the room before trying again.
A film-grade failure looks different. It creases at tight radii and tunnels where the film stretched too far, because the material cannot follow the sharp curve. Low-grade or brittle film lacks the elasticity for that seam: it lifts, then it peels. Choose dirt bike graphics kits rated for high-stretch curves.
Then work through it in order. Is the lift uniform or localized? Uniform edge lift with grid-like moisture paths means correct the prep. Creasing and tunneling at tight radii means change the film grade. If both are present, fix the prep first, then reprint with better material. That order saves a wasted second install.
Frequently Asked Questions
Does bubbling always mean poor surface prep?
No. Bubbles can also come from trapped air or too much application fluid, though surface prep is the most common culprit. When bubbles cluster around tight curves or edges, silicone or wax residue is usually to blame, and an alcohol wipe-down test will show it quickly. Clean and degrease first, but do not assume every bubble means dirty paint.
Can a reprint fix a bubbling decal?
Sometimes, but only if the bubble traces back to a manufacturing defect rather than an application error. If the same motorcycle decals bubble in the same spot on a fresh install over clean panels, a reprint from your supplier is justified. Otherwise, new film just reproduces the original mistake.
Does a heat gun help conformability at the tank seam?
Yes, if you control it. Warming the film to roughly 60-70 C lets it soften and wrap compound curves without tearing; too much heat and the adhesive fails or the print distorts. Use a low setting, work in small sections, and press the film down as you go.
Is cast vinyl always worth the higher cost?
Not always, but it usually pays off in high-stress areas. Cast film grade vinyl is thinner and more conformable than calendered stock, so it holds compound curves and the tank seam better while resisting shrinkage over time. Cheaper calendered film is fine on flat panels; for tanks and shrouds the cast upgrade earns its price. Compare options in these custom graphics for dirt bikes before you buy.
How long should a tank off-gas before applying fresh decals?
Freshly painted or sealed tanks release solvent vapors that can lift adhesive, so the wait is real. Most installers want at least 30 days after painting, and ideally 60 to 90. Off-gassing bubbles look identical to prep bubbles, so let the surface cure fully before you judge the install.
Your Reprint Checklist
Bubbling and peeling at the tank seam rarely has a single cause. Two variables you control sit behind almost every case: surface prep and film grade. Work through this sequence before you reprint.
Before You Reorder
- Strip the old film completely and clean the tank seam with a wax-and-grease remover, then wipe it dry.
- Confirm the surface is smooth, dust-free, and at a reasonable ambient temperature.
- Check that the chosen vinyl decals use a conformable, fade-resistant film rated for fuel-vapor exposure.
- Dry-fit each panel, apply with steady pressure, and let the adhesive cure fully before riding.
- Inspect the seam again after the first heat cycles to catch lifting early.
Prep controls how well the adhesive bonds; film grade controls how long that bond survives heat, fuel, and UV. Address both and the seam that failed once usually holds. That is why riders and shops planning a reprint often start with fade-resistant graphics such as custom dirt bike graphics built for the tank area. Follow the checklist once and the second application tends to outlast the first.