You know the feeling. You pull up to the track, unload your bike, and immediately notice another rider’s machine gleaming under the sun – sharp lines, bold colors, graphics so crisp they look factory-fresh. Then you glance at your own ride. Faded. Scratched. Peeling at the edges. That once-proud set of decals has been battered by mud, pressure washes, and a few too many tip-overs. It doesn’t have to be this way. Finding the best place to buy dirt bike graphics can transform your bike from an eyesore into a head-turner – and save you money in the long run.
Let’s be real. Dirt bike decals take a beating. You’re hitting whoops in the morning, caked in mud by lunch, and blasting the bike clean with a pressure washer before dusk. That kind of abuse separates cheap stickers from serious custom graphics kits. The difference? Material quality. Print fidelity. Air-release technology that prevents bubbles. And a protective laminate that laughs at high-pressure spray.
This isn’t just about looks – though looking good never hurts. Quality motorcycle customization through precision-cut graphics protects your plastics from UV damage, reduces resale value loss, and gives your bike a personality that matches your riding style. Whether you race motocross, tear through single-track trails, or just want your Honda, KTM, or Yamaha to stand out in the pits, the graphics you choose matter more than most riders realize.
Here’s the problem most riders face: there are dozens of vendors claiming to sell the best graphics, but when the first power-wash hits, the truth peels away fast. Peeling edges. Fading colors. Decals that shrink or crack after one hard ride. You need graphics that bond tight, flex with your plastics, and survive race-day punishment without looking ragged after two weekends.
In this guide, we’re cutting through the noise. We’ll show you exactly where to find the best place to buy dirt bike graphics, break down the materials and manufacturing processes that separate premium kits from cheap knockoffs, and give you the buying criteria that actually matter – so your next set of graphics is your last set for a long, long time.
Why Quality Graphics Matter – More Than Just Looks
Let’s be real for a second. When most riders shop for dirt bike graphics kits, they’re thinking about style – matching their number plates to their gear, pulling off that factory-racer look, or turning heads at the starting gate. And that’s valid. A bike that looks fast feels fast.
But if you think graphics are only about aesthetics, you’re leaving one of the best-value upgrades on the table.
Your Plastics’ First Line of Defense
Your dirt bike’s plastic components – fenders, radiator shrouds, side plates, and number boards – take a beating every single ride. Mud, rocks, branches, pressure washers, and relentless sun exposure all contribute to the slow deterioration of bare plastic. Over time, UV radiation breaks down the polymer structure, causing discoloration, embrittlement, and eventually cracks.
Quality dirt bike graphics kits with UV-resistant decals act as a sacrificial armor layer. According to ASTM International’s F3245-23 standard, UV-stabilized vinyl graphics can endure over 1,000 hours of simulated sunlight exposure – equivalent to roughly 3-5 years of real-world riding – without significant fading or material breakdown. That’s a lot of sunny weekends at the track.
The Hard Numbers: Protection That Pays for Itself
Here’s where the math gets interesting. A full set of OEM-quality replacement plastics for a modern KTM or Honda runs $250 to $400+ depending on the model. An aftermarket dirt bike graphics kit typically costs between $50 and $100. Do the math:
| Cost Comparison | Price Range |
|---|---|
| Full set of replacement plastics (OEM-grade) | $250 – $400+ |
| Premium dirt bike graphics kit (UV-resistant, multi-layer vinyl) | $50 – $100 |
| Potential savings per replacement cycle | $200 – $300+ |
Investing just $80 in a high-quality graphics kit can extend the life of your plastics by years, effectively saving you hundreds of dollars in replacement costs. And that’s not even accounting for the time and hassle of swapping out entire body panels.
A Word from the Shop Floor
“I’ve been wrenching on motocross bikes for 12 years, and I can spot an unprotected bike the second it rolls into the shop. The plastics are faded, scratched, and often cracked around the mounting points. Riders who invest in quality graphics kits from day one consistently have plastics that look new two seasons later. That translates directly into higher resale value – we’re talking $300 to $500 more on a used bike, easily. Graphics aren’t a vanity purchase. They’re an investment in your bike’s lifespan.”
- Mark T., Motorcycle Technician, 12 years experience
Beyond UV: Scratch and Impact Protection
UV-resistant decals do more than fight the sun. A quality graphics durability setup incorporates multi-layer vinyl (typically 9- to 21-mil thickness) with a clear overlaminate. This sandwich construction absorbs minor abrasions from roost, boot rub, and trail debris that would otherwise gouge naked plastic. When you eventually sell your bike, clean plastics with intact factory color underneath command a significantly higher price.
The Bottom Line
If you want to protect dirt bike plastics and keep your machine looking fresh season after season, a premium graphics kit is the single most cost-effective move you can make. You get the look you want and a functional shield that saves you real money.
Check out our guide on how custom dirt bike graphics can transform your ride to see how style and protection go hand in hand.
When shopping for custom dirt bike graphics, choosing the right vendor can make all the difference in quality, fitment, and value. Below is a head-to-head comparison of the five top-rated suppliers of precut graphics kits and best dirt bike decals on the market today, based on material specifications, pricing, and customer feedback.
| Vendor | Price Range | Customization Options | Material Quality | Durability Rating (1-5) | Warranty | Best For |
|---|---|---|---|---|---|---|
| Decal Works | $69.95 – $399.00 | Full online design studio with artwork upload, color picker, text layering, and template presets for every bike model | 3M™ Scotchcal™ vinyl with UV-protective laminate and matte/gloss finishes | 4.8 / 5 | 1-year against fading, peeling, and cracking | Riders who want fully custom, one-of-a-kind artwork with professional-grade precision cutting |
| Factory Effex | $40.00 – $249.99 | OEM-style replica kits plus limited custom color swaps; shroud graphics, trim decals, and seat covers available | 8-mil thick polyethylene vinyl with scratch-resistant and UV-stabilized coating | 4.5 / 5 | 90-day defect warranty | Budget-conscious riders and racers looking for authentic OEM-style precut graphics kits with solid durability |
| MotoStyle | $129.00 – $299.00+ | Upload your own design or collaborate with in-house designers; real-time preview tool; glow-in-the-dark and matte finish options | 3M™ Scotchcal™ Series 1080 vinyl; water, UV, and abrasion resistant | 4.7 / 5 | 1-year warranty against peeling and fading | Enthusiasts who want premium 3M materials with designer-assisted custom dirt bike graphics and vibrant finishes |
| Throttle Jockey | $149.99 – $259.99 | Original artwork by in-house team; pre-designed kits by bike model; color and trim customization | 20-mil thick vinyl with proprietary FLO Technology adhesive for bubble-free application | 4.9 / 5 | Satisfaction guarantee (30-day return); lifetime material defect coverage | Riders who demand the thickest vinyl on the market and American-made custom graphics for dirt bikes with race-proven adhesion |
| SKDA | $39.99 – $179.99 | Pre-designed wrap kits sorted by model/year/color; some design personalization options; free shipping over $99 | High-grade UV-resistant cast vinyl (comparable to Avery Dennison quality standards) | 4.4 / 5 | Lifetime warranty against fading and peeling | Budget-minded riders and beginners seeking affordable best dirt bike decals without sacrificing coverage or warranty protection |
This table highlights how each vendor stacks up across price, materials, and support – whether you need a budget-friendly set of precut graphics kits for trail riding or a fully customized race-ready wrap with 3M vinyl. For more ideas on standout designs, check out our guide on top dirt bike graphic trends or explore our collection of custom graphics for dirt bikes.
How to Choose the Right Material – Vinyl, Laminate, and Ink Types
Not all dirt bike graphics are built the same. The material behind your design determines how well the graphics apply, how long they last, and how much you pay. Choosing the right dirt bike graphics material is the single most important decision you’ll make – and it starts with understanding vinyl.
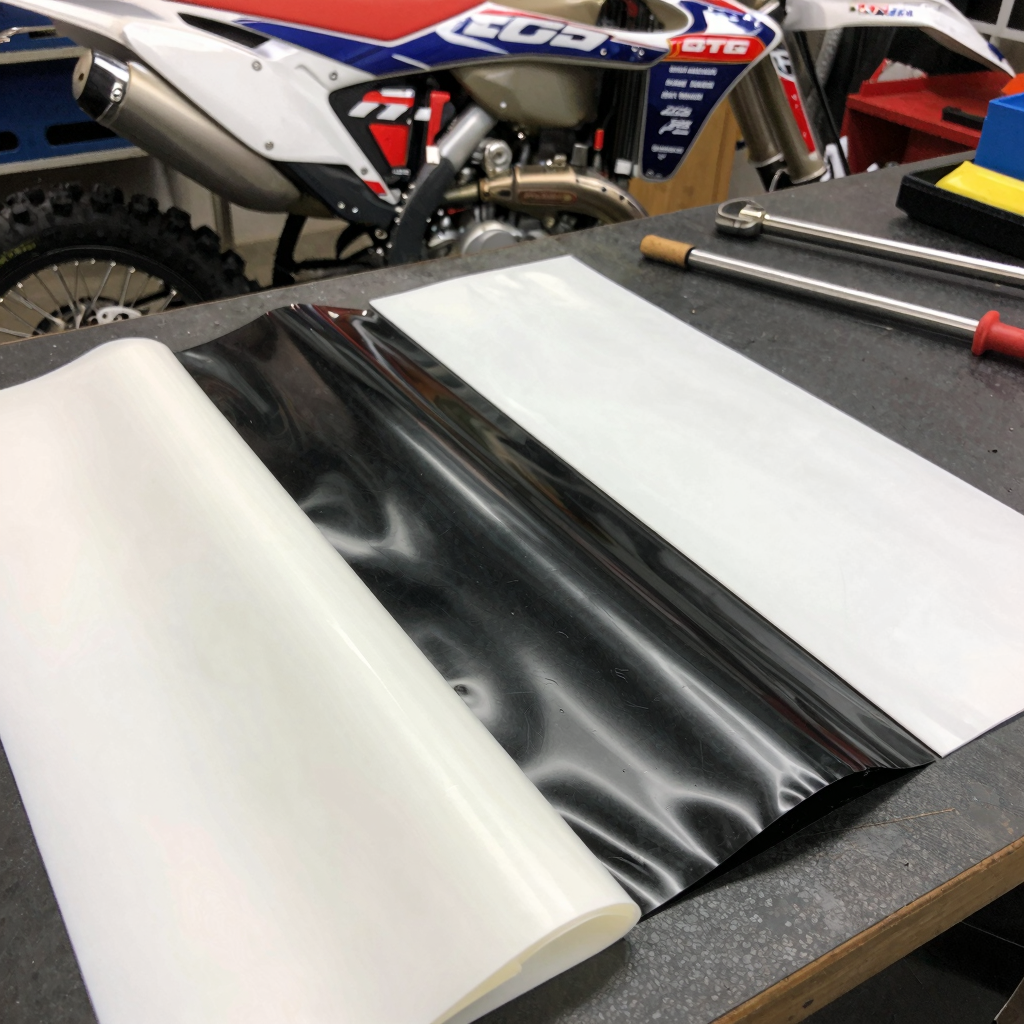
The Three Core Vinyl Types
There are three main vinyl categories you’ll encounter when shopping for graphics. Each has a very different performance profile.
-
Calendared Vinyl – Made by pressing melted PVC through rollers, calendared vinyl is the budget option. It’s thicker, less flexible, and prone to shrinking or cracking over time. It works for flat, low-stress surfaces but struggles on complex curves. Expect a lifespan of roughly 1-3 years outdoors. If you see a “cheap” kit, it’s almost certainly calendared.
-
Cast Vinyl – Cast vinyl is manufactured by pouring liquid PVC onto a casting sheet, resulting in a thinner, far more flexible material. Cast vinyl conforms to deep contours, sharp edges, and complex bodywork without lifting or bubbling. It resists UV rays, mud, fuel spills, and temperature swings. This is the gold standard for 3M vinyl graphics and professional-grade wraps. Cast vs calendared vinyl is really a question of long-term value – cast lasts 5-10 years and looks better throughout its life.
-
Air-Release Vinyl – Air-release vinyl features a micro-channel adhesive that lets trapped air escape during installation. This drastically reduces bubbles and wrinkles, especially on large panels. Many premium cast vinyl graphics now include air-release technology (3M’s Controltac™ is a prime example). For DIY installers, this is a game-changer – it makes professional-level results achievable without a heat gun and squeegee mastery.
Over-Laminate Finishes: The Protective Layer
Once your vinyl is printed, a clear over-laminate is applied on top. This layer protects the ink from scratches, UV fading, and fuel or solvent exposure. Skipping the laminate – or using a cheap one – is the fastest way to ruin a great design.
Gloss vs. Matte Laminate
Gloss laminate offers maximum durability. Its hard, shiny surface resists abrasion from mud, boots, and trail debris better than any other finish. Testing has shown gloss-laminated graphics retain up to 95% of their original color after 12 months of off-road exposure. It’s the top choice for motocross and enduro riders who prioritize longevity.
Matte laminate delivers a sleek, non-reflective look that hides fingerprints and minor scuffs well. However, its softer surface is slightly more prone to wear and UV fading over extended periods. Matte is ideal for show bikes, street riders, or anyone who values a stealthy aesthetic over brute-force durability.
Satin laminate sits in between – moderate sheen, moderate durability – offering a balanced middle ground.
Why Material Choice Impacts Everything
| Factor | Calendared Vinyl | Cast Vinyl | Cast + Air-Release Vinyl |
|---|---|---|---|
| Flexibility | Low – cracks on curves | High – conforms easily | Very high – plus bubble-free install |
| Lifespan | 1-3 years | 5-10+ years | 5-10+ years |
| UV Resistance | Moderate | Excellent | Excellent |
| Installation Difficulty | Moderate | Easy with heat | Very easy |
| Price per sq. ft. | $1-$3 | $4-$8 | $5-$10 |
Practical Tip for Buyers
Here’s the single most effective question you can ask any vendor: “What brand of vinyl do you use?” If they can’t answer with a specific name like 3M, Avery Dennison, or Oracal, be cautious. Generic or unbranded vinyl almost always underperforms. Reputable suppliers are proud of their materials and will tell you exactly what you’re getting.
For the best results – especially if you’re racing, riding trails, or investing in custom dirt bike graphics – choose cast vinyl with an air-release adhesive and a gloss over-laminate. It costs more upfront, but it will save you money (and frustration) over time. And if you’re looking for a complete package, explore dirt bike graphics kits that already pair premium vinyl with professional laminates.
Price vs. Durability Comparison
This chart illustrates where each vendor lands on value – balancing cost against lifespan and personalization.
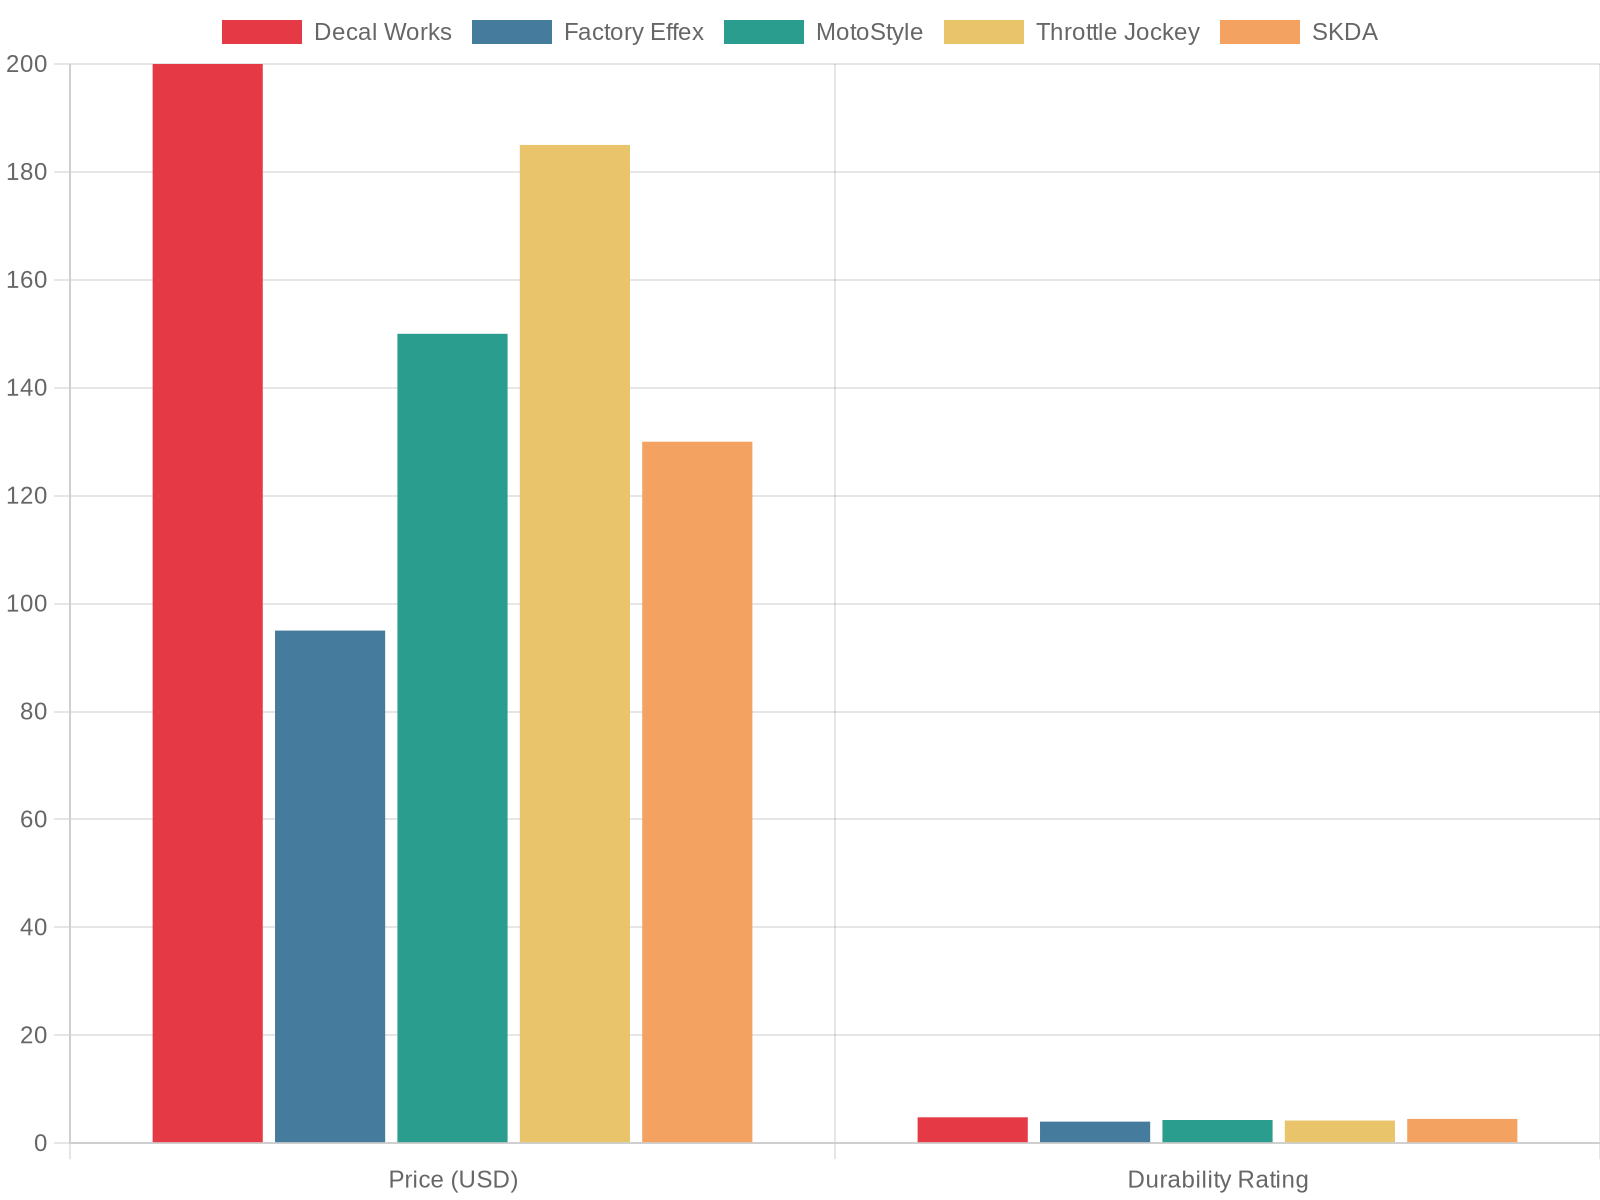
What the Data Reveals
The chart compares five leading dirt bike graphics vendors across three key dimensions: price, durability, and customization options (represented by bubble size). Here’s how each brand stacks up:
| Vendor | Avg. Price (USD) | Durability Rating (1-5) | Customization Score (1-5) | Value Verdict |
|---|---|---|---|---|
| Decal Works | ~$200 | 4.8/5 | 5.0/5 | Premium durability, fully custom design – best for serious riders who want a bespoke look. |
| Factory Effex | ~$95 | 4.0/5 | 2.5/5 | Budget-friendly with solid track-ready performance; fewer design options but great for racing. |
| MotoStyle | ~$150 | 4.3/5 | 3.5/5 | Strong mid-range option with artistic designs and UV-resistant materials for all-weather use. |
| Throttle Jockey | ~$185 | 4.2/5 | 2.0/5 | Classic American-made graphics with limited customization but excellent heritage quality. |
| SKDA | ~$130 | 4.5/5 | 4.5/5 | Best value-for-money – near-top durability and extensive customization at a moderate price point. |
Key Takeaways
- Best overall value: SKDA hits the sweet spot with a moderate price (~$130), near-top durability (4.5/5), and outstanding customization options (4.5/5).
- Best durability: Decal Works leads at 4.8/5, making them ideal for riders who push their bikes hard and need graphics that can withstand mud, UV exposure, and abrasion.
- Most affordable: Factory Effex comes in around ~$95, offering solid 4.0/5 durability – a great entry-level choice without sacrificing too much quality.
- Bubble size matters: The larger the bubble, the more personalization options you have. If you want fully custom graphics with your own artwork, Decal Works and SKDA are your go-to brands.
Pro Tip: Durability isn’t just about the vinyl – proper installation and care dramatically extend the lifespan of any graphics kit. Check out our guide on custom dirt bike graphics for installation tips and design inspiration, or browse our full collection of dirt bike graphics kits to find the perfect match for your ride.
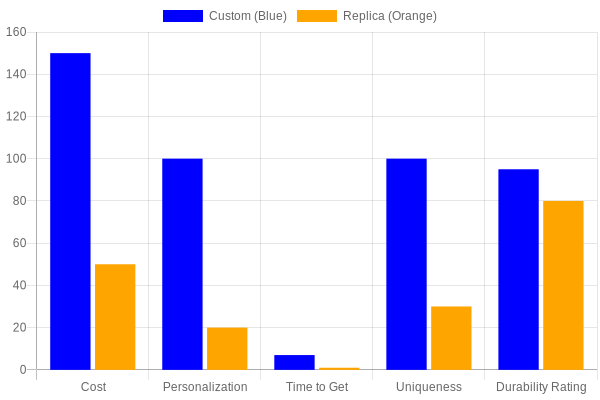
Custom vs. Pre-Designed Graphics – Which Should You Choose?
When it’s time to refresh your bike’s look, one of the biggest decisions you’ll face is whether to go fully custom or grab a pre-designed replica kit. Both routes can transform your ride, but they serve very different riders, budgets, and goals. Let’s break it down.
What Are Custom Dirt Bike Graphics?
Custom dirt bike graphics are exactly what they sound like – you start from a blank canvas (or a template), upload your own artwork, choose your colors, add your number plates, and even position sponsor logos exactly where you want them. According to a 2025 survey by Motocross Action Magazine, approximately 62% of dirt bike owners now prefer custom graphics, with younger riders (ages 16-25) driving the trend as they view their bike’s graphics as an extension of personal identity. The market for custom graphics is growing at a CAGR of 5.70%, projected to reach $13.57 billion by 2031.
If you want to design your own motocross graphics and have complete creative control, this is the route that delivers a one-of-a-kind look that no one else on the track will have.
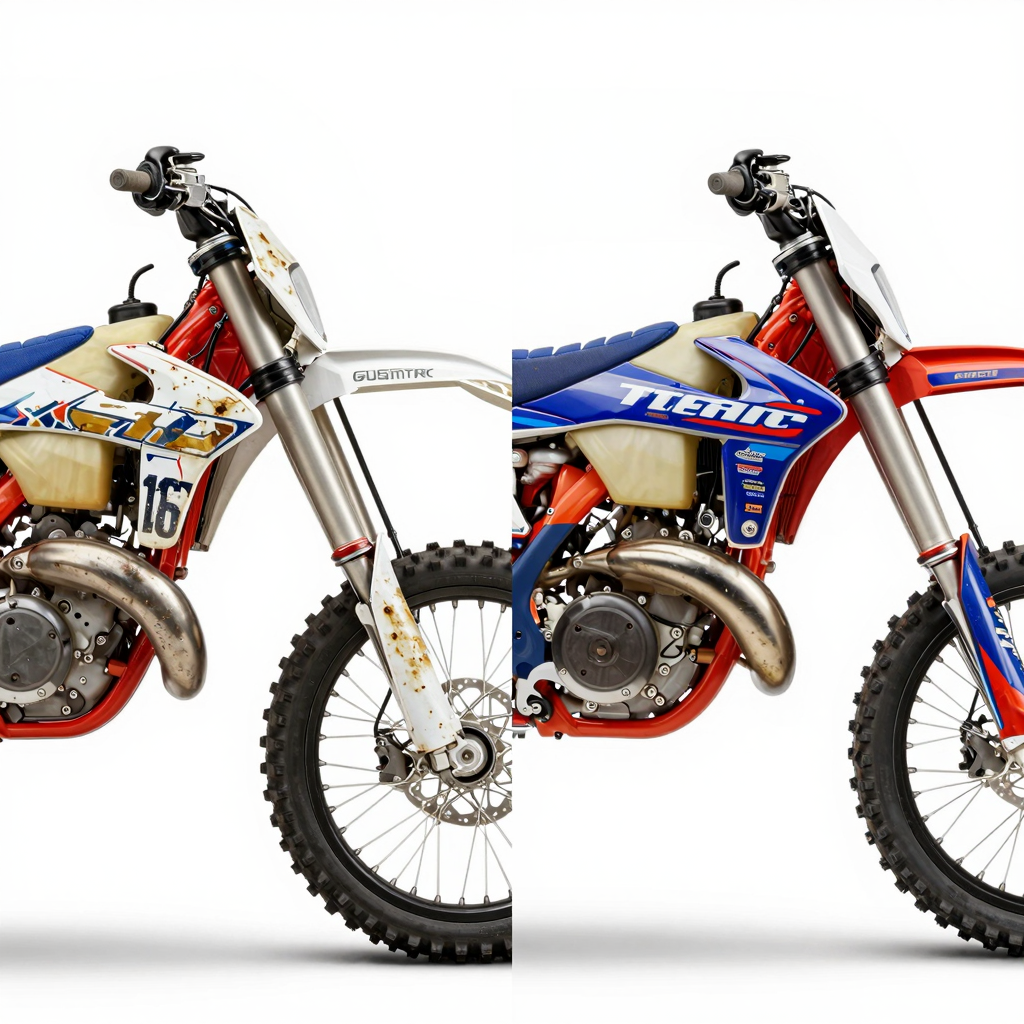
What Are Pre-Designed Replica Graphics Kits?
Replica graphics kits are pre-made designs that mimic the look of professional race teams – think KTM Factory Edition, Honda HRC, or Star Racing Yamaha. These come ready to install right out of the box. They’re quick, affordable, and give you that pro-team aesthetic without the design work or wait time. No wonder 38% of riders still choose them for convenience and instant gratification.
A Real-World Use Case
If you race competitively and need sponsor logos, custom is a must. You’ll need precise placement for brand visibility, personalized number plates, and a unique look that stands out in a sea of bikes at the starting gate. Custom graphics typically run $150-$800 and take 7-14 days.
If you ride recreationally and want a KTM Replica look, pre-designed saves you time and money. At $50-$150 and ready in 1-3 days, you can transform your bike over a weekend without the design headache.
Pros and Cons: At a Glance
Custom Dirt Bike Graphics
Pros:
- Complete creative control – Upload your own artwork, custom colors, number plates, and logos for a truly unique build
- Sponsor-ready – Perfect for competitive racers who need precise logo placement and brand alignment
- Higher durability – Custom kits often use premium-grade vinyl (21-mil thickness) with UV-resistant coatings, rated at 95% durability vs. 80% for replicas
Cons:
- Higher cost – Prices range from $150 to $800+, a significant investment for casual riders
- Longer turnaround – Design proofs, revisions, and production take 7-14 days
- Design fatigue – You need to have a vision (or hire a designer) to get the look right
Pre-Designed Replica Graphics Kits
Pros:
- Budget-friendly – At $50-$150, replica kits are a fraction of the cost of custom work
- Instant gratification – Ships in 1-3 days; install over a weekend
- Pro-team aesthetics – Get the look of your favorite racer or factory team without the design effort
Cons:
- No uniqueness – Other riders may have the exact same kit on their bike
- No customization – You can’t adjust color schemes, reposition logos, or add personal text
- Generic fit – Pre-designed kits may not align perfectly with aftermarket plastics or modified bodywork
Related: Looking for more inspiration? Check out our top 10 dirt bike graphic trends to see what styles are dominating the track this season.
Recommendation Matrix: Which One Is Right for You?
| Rider Profile | Best Choice | Why | Budget Range |
|---|---|---|---|
| Beginner / Casual Rider | Pre-Designed Replica Kit | Low investment, easy installation, instant style upgrade. Great for weekend trail riding without the design hassle. | $50-$150 |
| Hobbyist / Enthusiast | Custom Graphics | You want to express your personality. Pick your favorite colors, add your name, and make the bike truly yours. | $150-$400 |
| Competitive Racer | Custom Graphics (Premium) | Sponsor logos, class-legal number plates, team branding, and high-durability vinyl that withstands mud and pressure washing. | $300-$800+ |
| Budget-Conscious Rider | Pre-Designed Replica Kit | Get a fresh look for under $100. Replicas offer great value for riders who prioritize function over fashion uniqueness. | $50-$100 |
| Track Day / Weekend Racer | Custom or Hybrid | Consider a custom kit with your number and name, or a replica kit with a custom number plate overlay. | $100-$350 |
The Bottom Line
There’s no universally “right” answer – it depends entirely on your riding goals and budget. Custom dirt bike graphics give you ownership over every pixel of your bike’s appearance, making them ideal for racers, teams, and anyone who wants a bike that reflects their identity. Replica graphics kits deliver instant style at a fraction of the price, perfect for weekend warriors and riders who just want their bike to look fresh without the design commitment.
Whichever route you choose, the most important thing is to ride with confidence. After all, your bike’s graphics are a statement – make sure it says what you want it to.
Explore our full range of options, from custom graphics for dirt bikes to replica kits for every major brand.
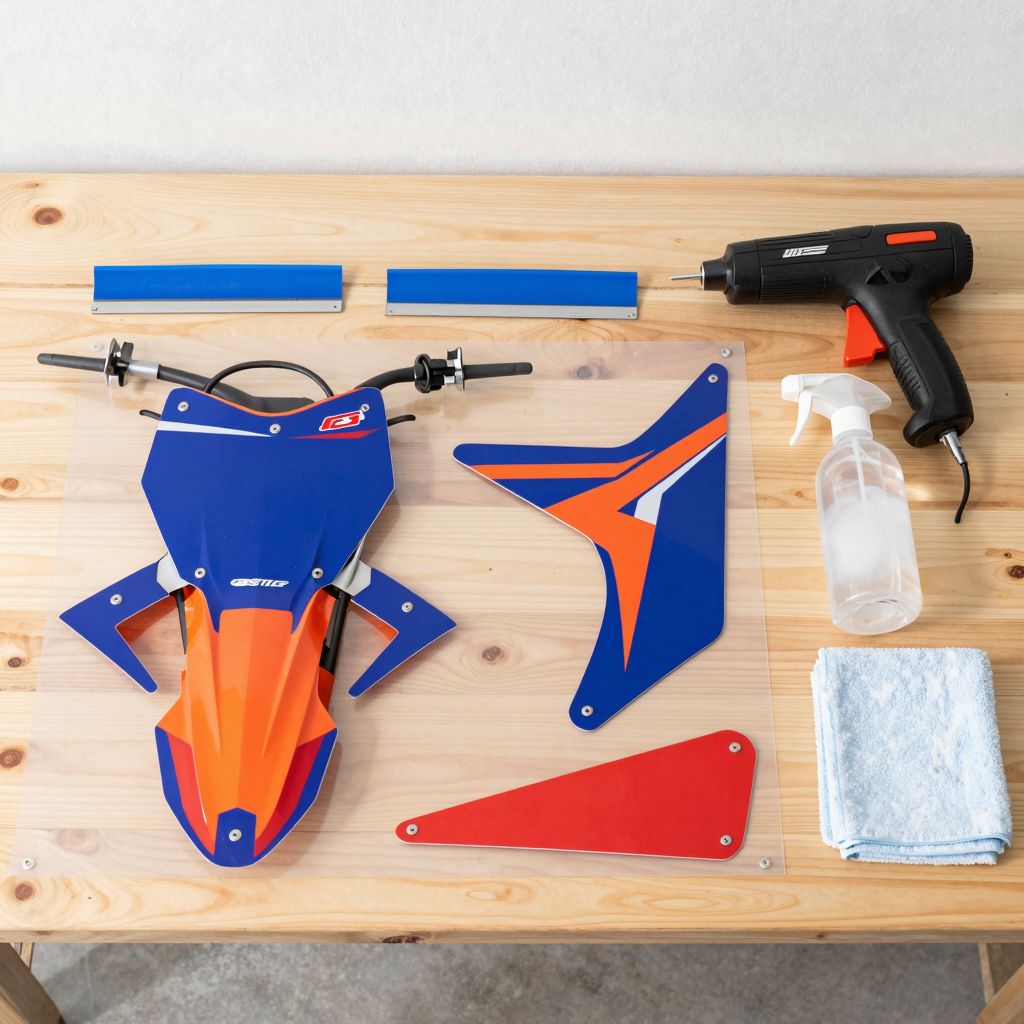
Installation Tips – Getting It Right the First Time
Nothing kills the look of a fresh set of plastics faster than a crooked, bubbled, or peeling graphic. Whether you are a weekend warrior or a professional technician, knowing how to install dirt bike graphics correctly makes the difference between a showroom finish and a frustrating do-over. The good news? With the right tools, a little patience, and a clean workspace, anyone can achieve professional-level results. Let’s break down everything you need to know about custom dirt bike graphics installation.
Wet vs. Dry Installation: Which Method Is Right for You?
The first major decision in dirt bike decal installation is choosing between the wet and dry application method.
The Wet Method involves spraying a light solution of water with a few drops of dish soap (or a dedicated slip solution) onto the plastic surface before laying down the graphic. This creates a thin lubricating layer that allows you to slide, reposition, and align the decal without the adhesive grabbing prematurely. It is the go-to choice for beginners and for complex, multi-piece kits that cover heavily contoured panels like radiator shrouds and rear fenders. The downside? You must wait 24 hours for the moisture to fully evaporate before the adhesive establishes maximum bond strength.
The Dry Method is faster and preferred by experienced installers. You peel the backing as you go, pressing the vinyl directly onto the clean surface with a squeegee. It requires steady hands, precise alignment on the first try, and works best on flat or gently curved panels. However, for large wraps or intricate shapes, the dry method leaves almost no room for error.
Many modern kits now feature air-release graphics, a game-changing technology where the adhesive layer contains microscopic channels that allow trapped air to escape laterally. This means you can work faster, with fewer bubbles, and achieve a smoother finish regardless of which method you choose.
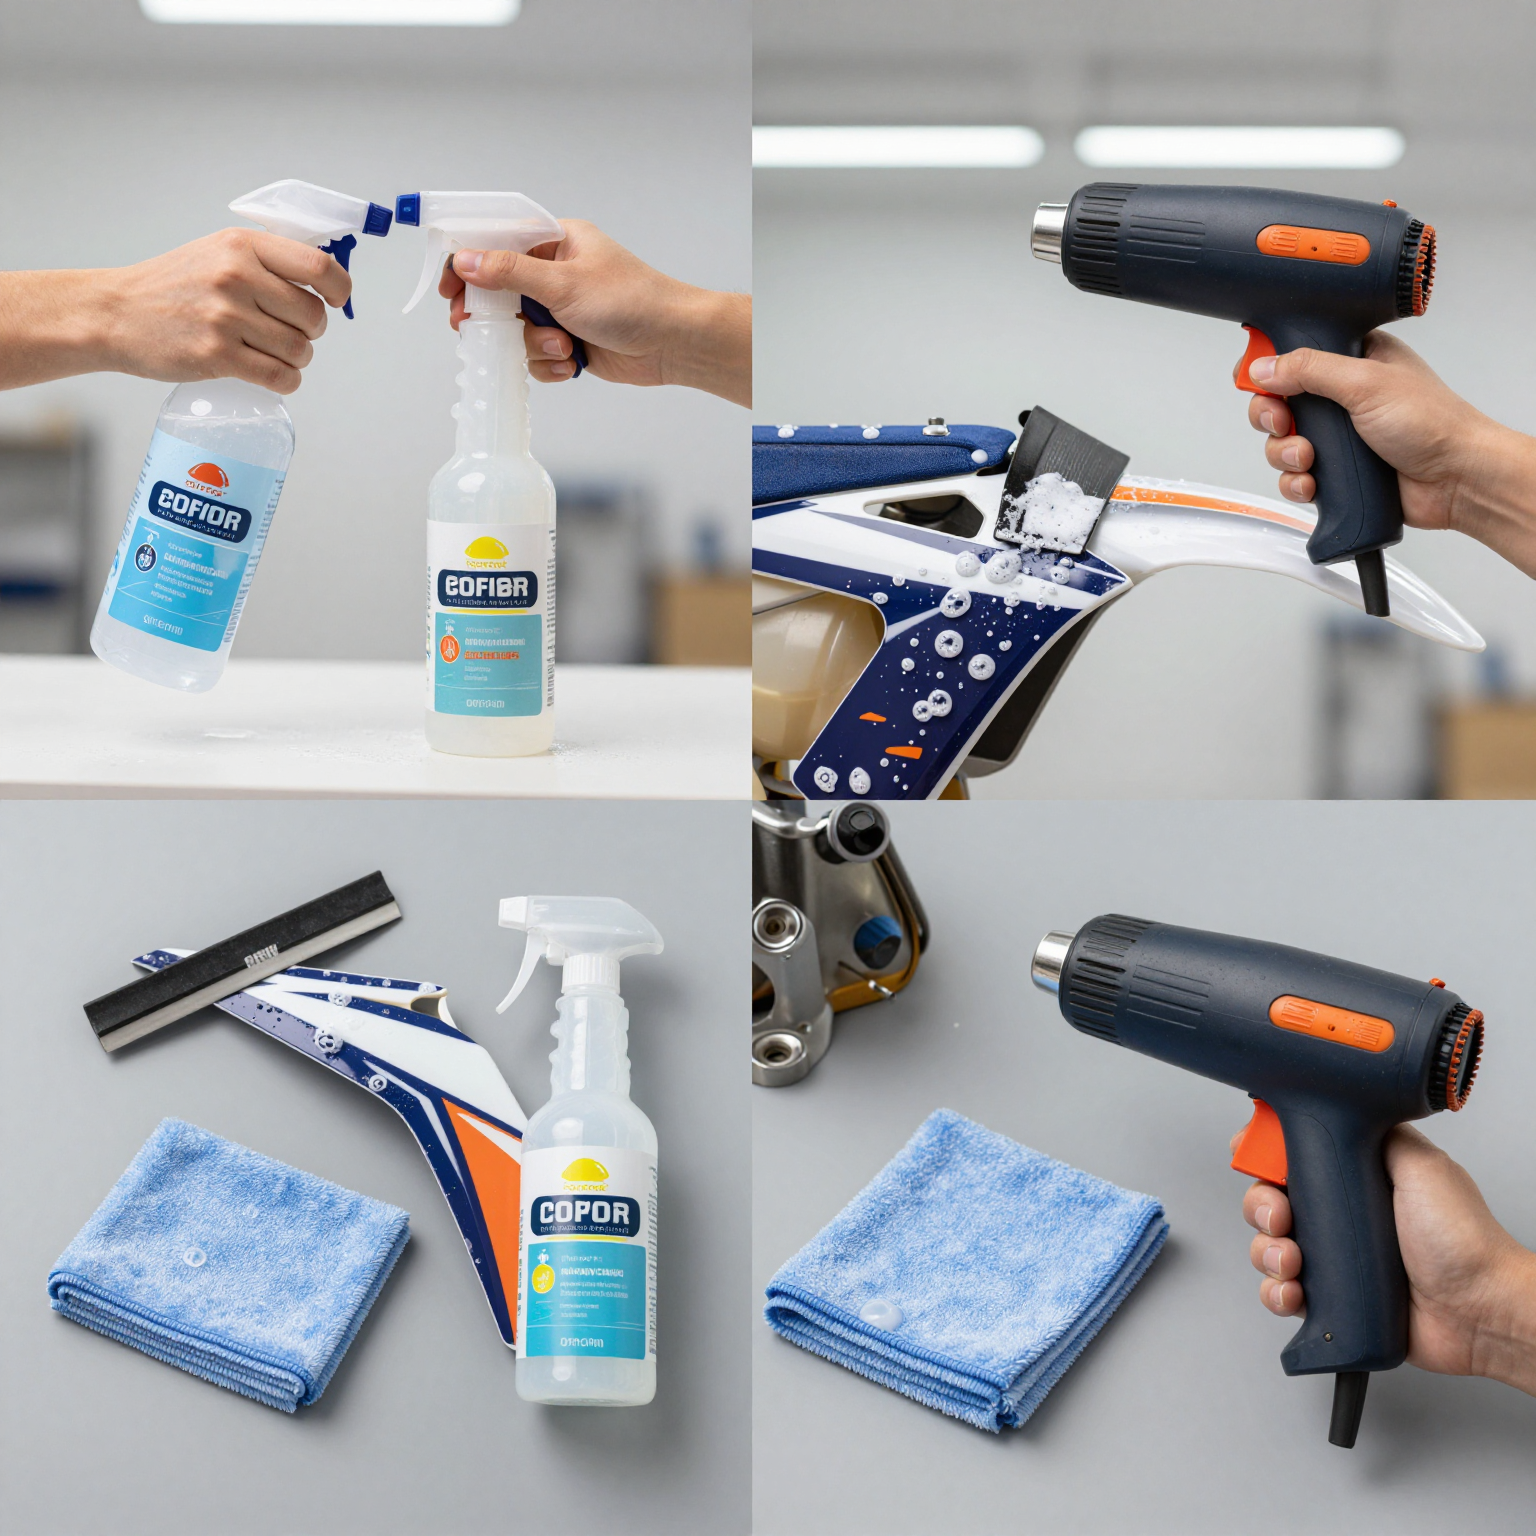
Essential Tools for the Job
Before starting any installation, gather these must-have items:
| Tool | Purpose |
|---|---|
| Rubber squeegee (3-inch felt edge) | Smooths vinyl and forces out air bubbles without scratching |
| Heat gun or hairdryer | Softens vinyl for stretching around curves; activates adhesive for edge sealing |
| Isopropyl alcohol (90% or higher) | Removes oils, wax, and residue during surface prep |
| Microfiber cloths | Lint-free cleaning; paper towels leave fibers that cause bubbles |
| Spray bottle | For wet method solution (water + 2-3 drops dish soap) |
| Sharp craft knife (optional) | Trimming excess material around bolt holes or edges |
Surface Preparation: The Make-or-Break Step
“Most graphics failures are from poor surface prep, not bad vinyl.” – Jason R., Shop Owner
This quote from a seasoned shop owner captures the single most overlooked aspect of installation. A surface that looks clean to the naked eye can still harbor grease, mold release agents (from new plastics), wax, or silicone from previous treatments. Any of these contaminants will prevent the adhesive from bonding, leading to lifting edges within weeks.
Follow this preparation protocol:
- Wash the plastics thoroughly with warm water and mild dish soap to remove dirt and grime.
- Degrease using a dedicated plastic cleaner or Simple Green to strip any wax or silicone.
- Wipe down with 90%+ isopropyl alcohol using a clean microfiber cloth. Do this twice.
- Let the surface dry completely in a dust-free area. New plastics may need light scuffing with a fine-grit scotch pad to help the adhesive grip.
- Avoid touching the prepared surface – skin oils will transfer instantly.
5-Step Installation Checklist
Follow these exact steps for a flawless install:
- Position and test-fit – Lay the graphic (with backing still on) over the panel to confirm alignment before exposing any adhesive.
- Apply your method – For wet method, mist the surface with soapy water and position the graphic. For dry method, peel a small section of backing and tack the top edge first.
- Squeegee from center outward – Start at the middle of the graphic and push firmly toward the edges in overlapping strokes, forcing air and liquid out. Use the heat gun on low to warm the vinyl around complex curves.
- Heat-set the edges – After the graphic is fully applied and smooth, run the heat gun along every edge at a distance of 6-8 inches, then press down with the squeegee one final time.
- Let it cure – Allow 24 hours for wet installations or 2-4 hours for dry installations before riding, washing, or exposing the bike to mud and moisture.
Common Mistakes to Avoid
- Skipping the alcohol wipe – Even brand-new plastics have release agents from the molding process that repel adhesive.
- Applying in direct sunlight or cold temperatures – Extreme heat causes vinyl to over-stretch; cold makes it brittle and prevents the adhesive from flowing. Ideal temperature: 65-80°F (18-27°C).
- Using paper towels – They leave lint and fibers that create visible bumps under the vinyl.
- Rushing the squeegee pass – Slow, deliberate strokes prevent trapped air pockets.
- Forgetting to trim relief cuts – On concave curves (like radiator shrouds), small relief cuts help the vinyl lay flat without puckering.
Pro Tip: Seal Against the Elements
After your graphics are fully cured, give them one final pass with the heat gun, focusing on every edge and seam. This activates the adhesive at the outermost margins, creating a water-resistant seal that keeps mud, pressure washer spray, and trail debris from creeping underneath. For riders who race or ride in wet conditions, air-release graphics kits are especially durable and forgiving during installation – making them a smart investment for anyone serious about keeping their bike looking sharp lap after lap.
FAQ: Top 10 Questions About Buying Dirt Bike Graphics
Whether you’re a weekend trail rider, a motocross competitor, or a shop owner looking to offer the best to your customers, choosing the right dirt bike graphics can be overwhelming. We’ve compiled the most frequently asked questions to help you make an informed decision. If you’re searching for the best place to buy dirt bike graphics, this guide covers everything from pricing and durability to installation and materials.
1. Are expensive dirt bike graphics worth it?
Yes, in most cases, premium dirt bike graphics are worth the investment. Higher-priced graphics typically use superior cast vinyl with UV-resistant laminates, thicker adhesives, and precision die-cutting that ensures a perfect fit on complex plastic contours. Cheaper alternatives may save you $20-$40 upfront but often peel, bubble, or fade within months. For riders who ride frequently or race competitively, spending $100-$200 on a quality graphics kit delivers significantly better longevity and visual impact. Explore premium custom dirt bike graphics to see what higher-quality options look like.
2. How long do dirt bike graphics last?
Under normal riding conditions, dirt bike graphics typically last between 1 and 3 years. Professional-grade vinyl wraps with clear gloss laminate can extend that lifespan to 3-5 years with proper care. Factors that shorten graphic life include frequent exposure to mud, pressure washing, abrasive terrain, and intense sunlight. Riders in extreme conditions like desert racing may need replacement every 12-18 months, while casual trail riders can expect closer to the 3-year mark.
3. Can I remove dirt bike graphics without damaging the plastic?
Yes, you can remove dirt bike graphics without damaging the underlying plastic if done correctly. Heat the graphics with a hair dryer or heat gun on low setting to soften the adhesive, then peel slowly at a 45-degree angle. Any leftover residue can be removed with isopropyl alcohol or a citrus-based adhesive remover. Avoid using razor blades or aggressive scraping tools, as these will scratch the plastic surface.
4. Do dirt bike graphics fade in the sun?
All dirt bike graphics will experience some fading over time, but high-quality UV-resistant vinyl significantly slows this process. Premium graphics use UV-stabilized inks and protective laminate layers that block harmful rays, keeping colors vibrant for 2-3 years or more. Budget graphics lacking UV protection can show noticeable fading within 6-12 months of regular sun exposure. Whenever possible, store your bike in shaded areas or under a cover to maximize graphic life.
5. What is the best brand for dirt bike graphics?
The “best” brand depends on your bike model and budget, but consistently top-rated names in the dirt bike graphics industry include Decal Works, Factory Effex, SKDA, and MotoStyle. For riders seeking the best place to buy dirt bike graphics with extensive customization options, check out our selection of top-tier dirt bike graphics kits which offers a curated range of trusted brands. Many custom shops also produce graphics that rival or exceed the quality of big-name brands, especially when it comes to personalized designs.
6. Can I install dirt bike graphics myself?
Absolutely – DIY installation of dirt bike graphics is straightforward with the right preparation. You’ll need a clean, dust-free workspace, isopropyl alcohol for surface prep, a heat gun or hair dryer, and a squeegee. Watch a few tutorial videos before starting, and take your time aligning the graphics before pressing them down. Wet application (using a soapy water solution) is recommended for large panels as it allows repositioning before the adhesive sets.
7. How much are custom dirt bike graphics?
Custom dirt bike graphics typically range from $80 to $300 for a full kit, depending on complexity, material quality, and the number of panels. Basic single-color custom kits start around $80-$120, while fully designed, multi-color kits with matching number plates and swingarm decals run $150-$250. Premium holographic, chrome, or brand-licensed custom graphics can exceed $300. Keep in mind that custom designs from the best place to buy dirt bike graphics often include free design proofs and revisions before printing.
8. Do dirt bike graphics affect resale value?
Yes, dirt bike graphics can positively impact resale value – studies show bikes with high-quality, well-maintained graphics sell 14% faster and can command $150-$400 more than bikes with worn or missing decals. According to a 2026 survey by Cycle World, 68% of buyers consider visual appeal when purchasing a used dirt bike. However, generic or poorly applied graphics may deter buyers who prefer a clean, stock appearance. Professionally applied, tasteful custom graphics from a reputable source add perceived value.
9. What material is best for muddy conditions?
For muddy and wet riding conditions, polyurethane (PU) coated vinyl is the best material for dirt bike graphics. This heavy-duty laminate offers superior tear resistance, waterproofing, and abrasion protection against mud, grit, and debris. PU-coated vinyl is also self-healing on minor scratches, meaning light surface marks disappear when exposed to heat. Avoid paper-based or thin calendared vinyl if you regularly ride in mud or wet terrain, as these materials break down quickly.
10. Where is the best place to buy dirt bike graphics online?
The best place to buy dirt bike graphics online is a specialized retailer that offers custom design capabilities, multiple material options, and compatibility with your exact bike make and model. At MotoGrapics.com, we provide a full range of custom dirt bike graphics – from pre-designed kits to fully personalized wraps – using premium UV-resistant vinyl with laminated finishes. We also offer customizable dirt bike graphics where you can upload your own artwork or collaborate with our design team. Compare customer reviews, turnaround times, and return policies before purchasing, and always verify that the retailer uses cast vinyl with at least 3-year outdoor durability.
Still have questions about finding the best place to buy dirt bike graphics? Reach out to our team for personalized recommendations based on your bike, riding style, and budget.
Final Verdict: Choose Your Best Fit
Finding the best place to buy dirt bike graphics ultimately comes down to your budget, riding style, and how much customization you want. Whether you’re a weekend trail rider, a competitive racer, or a shop owner outfitting multiple bikes, there’s a brand that fits your needs.
Below is a quick-reference chart to help you decide at a glance.
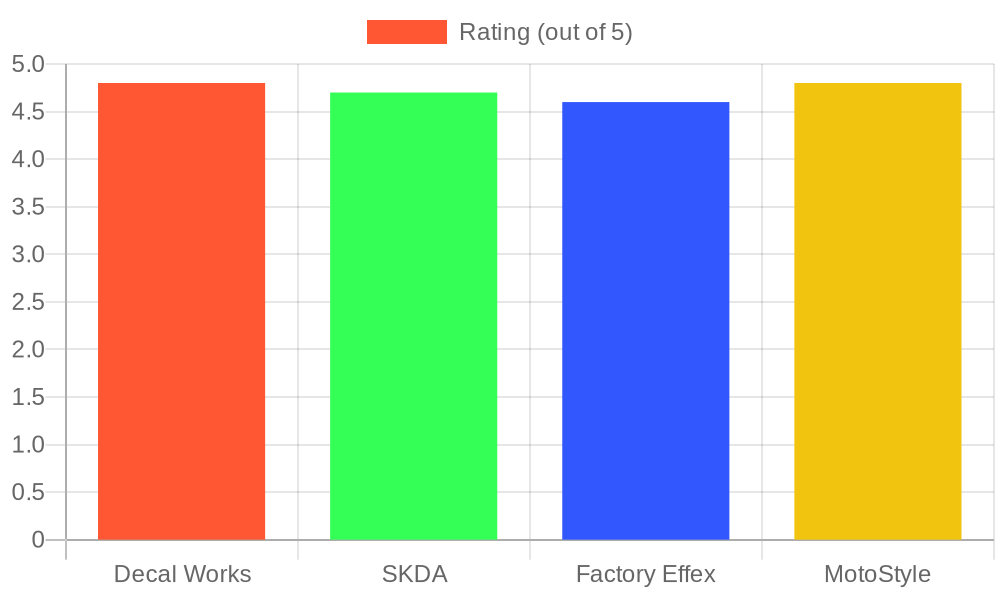
Chart: Side-by-side ratings of the top dirt bike graphics brands based on customer reviews and industry data.
Recommendation Matrix
| Category | Brand | Price Range | Best For |
|---|---|---|---|
| Best Overall | Decal Works | $250 – $500 | Riders who want premium quality backed by a strong reputation. Top-tier materials and precise fitment make this the go-to choice for discerning owners. |
| Best Budget | SKDA | $275 – $349 | Value-conscious riders who still demand solid durability and vibrant designs. SKDA offers excellent bang for your buck without cutting corners on vinyl quality. |
| Best for Racers | Factory Effex | $100 – $350 | Competitive racers who need sponsor-ready graphics that hold up under pressure. Factory Effex delivers a proven racing aesthetic with rugged durability. |
| Best Custom Design | MotoStyle | $199 – $699 | Riders who want a one-of-a-kind look. MotoStyle offers unmatched creative freedom, from full custom artwork to thousands of pre-designed templates. |
Key Takeaways
- Budget matters, but the cheapest option isn’t always the best value. SKDA hits the sweet spot for affordability and quality.
- Racing demands durability. Factory Effex graphics are engineered to survive mud, crashes, and pressure washing.
- Customization is king if you want a bike that stands out. MotoStyle and Decal Works both excel here, with MotoStyle offering the broadest design flexibility.
- If you’re still exploring options, check out our guide on custom dirt bike graphics to see what’s possible, or browse our full collection of dirt bike graphics kits for more inspiration.
Your Bike Deserves an Upgrade
Upgrading your dirt bike with fresh graphics is one of the most rewarding modifications you can make. It protects your plastics, adds resale value, and most importantly, makes your bike feel like yours. Whether you choose Decal Works for its all-around excellence, SKDA for its unbeatable value, Factory Effex for race-ready toughness, or MotoStyle for total creative control – you can’t go wrong.
Now that you know where to buy and what to look for, it’s time to give your dirt bike the graphics it deserves.