
The Seat Cover Edge Checkpoint: Verify Before You Stick
Before anyone peels the backing on Honda dirt bike graphics, confirm the seat junction. The seat cover edge is where the vinyl cover wraps the seat pan and folds underneath it. The staple line anchors that cover to the pan, and the graphic overlap is how far the decal runs onto the cover, or how far short of the edge it stops. All three get sorted before any adhesive touches plastic.
The cost surfaces later if you skip it. A decal that crosses the staple line without clearance lifts at the junction, traps air under the vinyl and peels back from the edge within the first rides. Rework bills the install labor twice and ties up a bay that was meant to be earning, which is how a paid job turns into unpaid time.
The sections below follow the order the work happens in: reading the staple line and cover edge to set a tolerance, measuring and trimming the overlap before a dry fit, choosing a tolerance the whole shop can apply, adjusting the dry fit for cover thickness, and writing the check down so it survives a change of installer. Shops installing at volume can hand the inspection matrix and the sign-off sheet to new staff on day one, and they work across KTM graphics kits as readily as any other.
Anatomy of the Seat-to-Shroud Junction: Staple Line and Overlap Geometry
The seat and the side shroud meet along a seam a few millimeters deep, and that seam sets how much printed area a kit can actually use. The parts below and the two overlap choices explain why the same panel sits cleanly on one bike and lifts on the next.
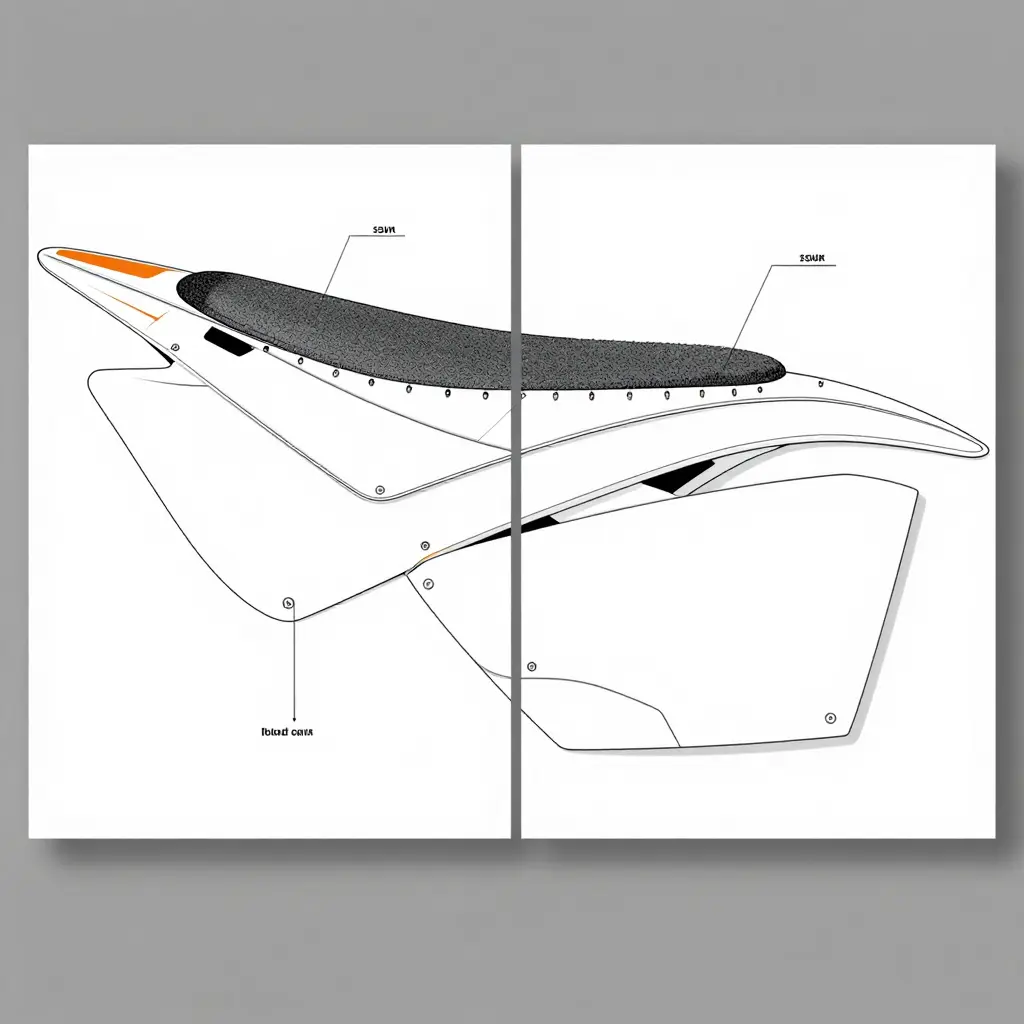
The Stack at the Pan Edge
Seat pan – the rigid molded plastic base of the seat that the foam sits on and the cover attaches to.
Seat cover – the vinyl or gripper material stretched over the foam.
Cover hem – the folded border of the cover that wraps around and under the pan edge.
Staple line – the row of metal staples driven through the cover hem into the pan to hold tension. Where it sits matters more than how it looks.
Shroud tab – the molded locating lip on the plastic shroud that sits next to the seat edge and controls how far the panel can travel.
Two variables push the cover outward at that seam. Staple spacing is the distance between staples along the hem: tight, even spacing pulls the hem flat against the pan, while wide or uneven spacing lets it bulge and lift. Cover thickness is the gauge of the vinyl plus any doubled-over hem material; a thick or re-covered seat adds a step where the hem meets the pan.
Both displacements move the visible edge of the seat outward and shrink the flat, usable area on the shroud by the same amount. A graphic trimmed to a nominal panel outline will then overhang the staple line, sit on a compressible ridge, and lift at the edge.
The Two Overlap Directions
Graphic tucked under the seat edge. The film, backed by its adhesive backing (the peel-off liner protecting the pressure-sensitive glue), is trimmed to slide under the cover hem. The edge disappears for a factory-clean line, and the seat clamps the film down. What you give up: staple crowns and hem thickness leave a shadow line that no squeegee pass (a single controlled stroke with a felt or plastic squeegee to push air out from under the film) can reach, so air and dirt gather there.
Graphic layered over the seat edge. The graphic runs across the shroud tab and over the hem, sealing the junction completely. Installation is faster, every edge is squeegee-reachable, and the hem is protected from wear. What you give up: the edge lands on a curved, compressible surface, so it needs a firm post-heat seal, and any seat removal later can pull the edge up.
| Overlap direction | Best for | Main risk |
|---|---|---|
| Tucked under seat edge | Concealed, stock-style finish | Air trapped against staple crowns; harder trim work |
| Layered over seat edge | Full coverage and hem protection | Edge on a soft curve; needs heat sealing |
The Check Before Any Trim
Measure the hem overhang with a steel rule from the pan edge to the outermost point of the cover, transfer that figure to the trim line, and confirm the graphic clears the shroud tab. Do this before peeling the adhesive backing, not after.
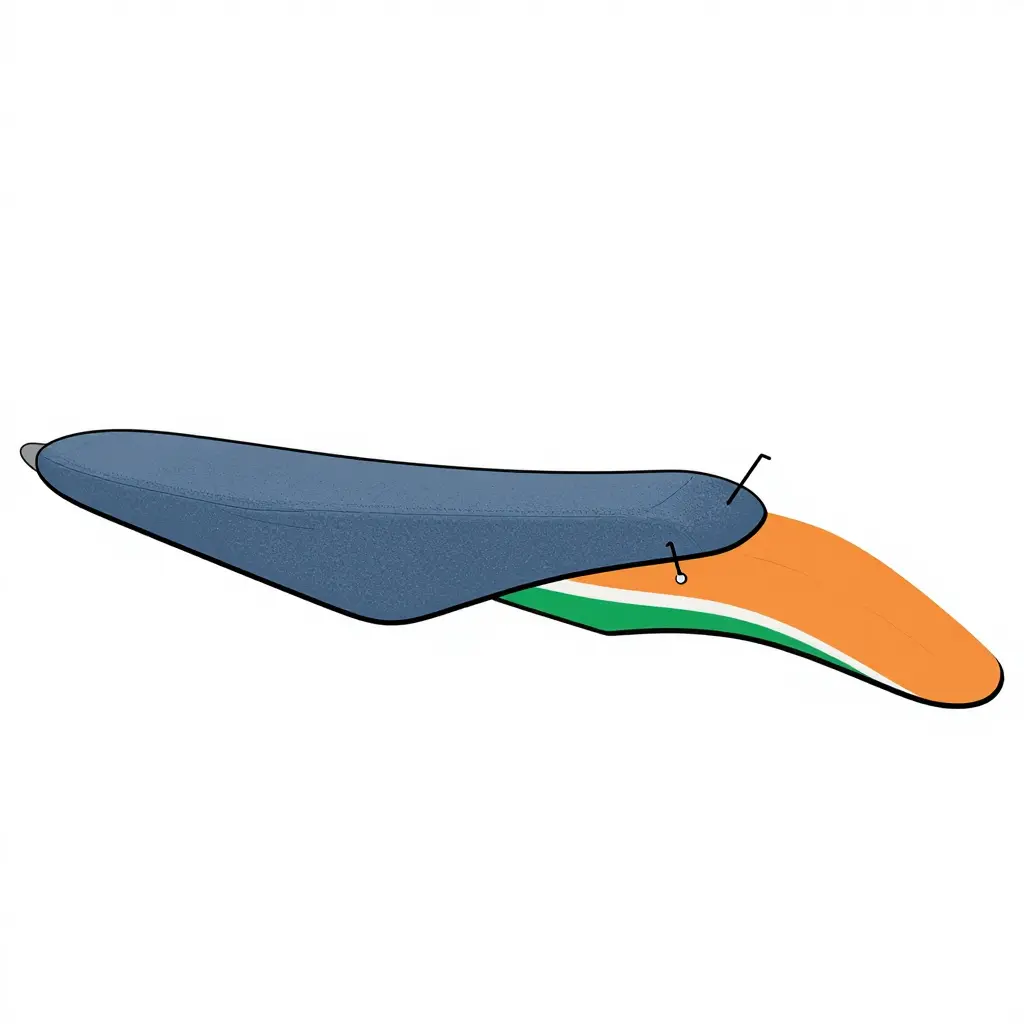
The staples pass through the cover hem and the graphic overlap zone before biting into the seat pan edge, so the two layers must sit flush before you fire a single staple.
Run this before you peel a backing sheet. A few minutes at the seat cover edge is cheaper than a wasted print.
- Sight down the full staple line along the top of the pan. It should track straight with even spacing; if the row wanders, the trimmed edge will follow it.
- Press every staple with a fingertip or a plastic scraper. Proud legs, sharp tabs and backed-out staples telegraph through the vinyl at the junction.
- Measure the cover hem thickness at the top edge with calipers and compare it against your graphic’s conformability. A thick hem needs more heat and slower squeegee work than a thin one.
- Dry-measure from the hem edge downward to map the available graphic overlap, so you know there is margin to wrap past the cover without landing on bare pan.
- Dry-fit each panel unbacked and unactivated, and check that the cut lines follow the seat’s contours before any slip solution touches the surface.
Overlap Tolerance and Its Effect on Shop Economics
The strip of graphic that tucks under the seat cover is the smallest measurement on the job and the one that decides whether the install makes money. Graphic overlap at the seat line is not a cosmetic preference. It is a tolerance, and a shop that leaves it to the installer’s mood prices risk into every unit.
When there is too little overlap
An under-tucked edge sits exactly where the rider loads the bike. Seat contact, thigh pressure and the constant scrub of movement pull at the graphic from underneath, and the adhesive never gets a stable substrate to bond to. The edge lifts first at the corners, then along the seam, weeks after the bike left the bay. The customer notices a lifting edge; the shop eats the redo.
When there is too much overlap
The opposite error is just as expensive. Pushing too much material under the seat cover bulks up the panel, and that excess has nowhere to go. It creates a visible ridge along the seat line and traps air that no squeegee can reach. On a tight Honda seat pan, that bulge can also fight the cover during refitting, which turns a clean job into a wrestling match and sometimes into a torn graphic.
The cost logic a shop actually feels
Every overlap decision shows up somewhere in the P&L, usually in more than one place.
| Cost channel | How it presents | Why it compounds |
|---|---|---|
| Rework time per unit | Edge lifted, panel pulled, adhesive cleaned | The bay is occupied twice for one invoice |
| Material waste | Replacement vinyl decals cut from stock | Printed sets are consumed without revenue |
| Warranty claims | Free replacement or refund on a failed edge | Cost lands after the sale is booked |
| Labor scheduling disruption | Rebuild slotted into a full calendar | Other customers wait or get rescheduled |
| Repeat business lost | Customer returns with lifted edges, then shops elsewhere | Loses the next set, the referral, and the review |
The last row is the expensive one. A rider who brings a bike back with lifted edges is not just costing a redo. That rider is deciding whether the shop knows what it is doing, and graphics work travels by referral, so the judgment leaves the building with them.
What to standardize before the next batch
Pick one overlap specification, write it down, and apply it to every unit regardless of installer. In practice that means a single target measured in millimeters, a defined trim line at the seat edge, a dry-fit check against the staple line before backing paper comes off, and a calibration card or marked template so the tolerance can be verified rather than eyeballed. Post it at the bay, put the target on the job sheet, and inspect against it before the seat cover goes back on. A fixed tolerance turns an unpredictable comeback cost into a controllable line item, and two installers give the same answer to the same question.
The matrix below is the version handed to installers before a staple gun or squeegee comes out. Print it, tape it to the bench, and work down the rows in order.
Seat Edge Inspection Matrix
| Inspection Point | What to Measure | Acceptable Condition | Risk if Missed |
|---|---|---|---|
| Staple line straightness | Drift from the pan edge reference line | Consistent line along the pan lip | Uneven tension, lifted cover |
| Staple spacing | Gap between adjacent staples | Even spacing, no crowding or gaps | Puckering and weak grip |
| Staple depth and protrusion | Leg penetration into the pan | Legs fully seated, no tips poking through | Ripped vinyl, scratched hands |
| Cover hem thickness | Material stack at the hem | Hem fits inside the staple crown | Staples fail to clamp the hem |
| Available graphic overlap | Film wrap onto the cover edge | Enough margin for a full edge wrap | Edge lifting and peeling |
| Residue and contamination | Cleanliness of hem and pan edge | Dry, free of dust and adhesive | Poor adhesion, early failure |
| Seat-to-shroud fit after dry assembly | Gaps at shroud and tank junction | Panels sit flush, nothing pinched | Rubbed graphics, rework time |
Note: tolerance values depend on the specific graphics kit and seat cover, so confirm the exact figures against your supplier’s specifications before cutting or stapling.
Seat Cover Thickness and How It Shifts the Graphic Edge
The staple line is the one reference point you cannot move. It sits on the plastic pan, and every layer you add between the pan and the foam pushes the usable graphic edge somewhere else. That is why the printed dimensions on a kit are only a starting point. Treat the kit as nominal and the cover in front of you as the truth.
Three cover types, three behaviors
Grip-material covers. Rubberized grip panels usually carry a thick, multi-layer hem with very little give. That hem eats overlap: more of the cover is consumed before the staples actually bite, and the material resists compression, so the seam sits proud of the pan. The effective edge for a graphics kit moves inboard, away from the staple line, and the corner tabs have less material to wrap.
Standard vinyl covers. Thinner and far more elastic. The hem flattens under the staple gun, so the bonded edge can sit closer to the pan lip. The cost is creep: stretch lets the cover walk after a hot ride, and it drags the graphic edge with it.
Re-covered seats. Two covers, old adhesive and compressed foam make the thickest stack of the three. Expect the largest edge shift here, and expect a lift risk when the combined hem is too bulky to tuck cleanly past the staples.
| Cover type | Hem behavior | Effective edge shift | Main risk |
|---|---|---|---|
| Grip material | Thick, low stretch | Inboard, larger | Corner lift, short wrap |
| Standard vinyl | Thin, high stretch | Minimal | Creep and edge drift |
| Re-covered seat | Double layer, compressed foam | Largest | Puckering and lift |
Why measure the cover instead of trusting the kit
Kit dimensions are drafted around a nominal seat profile, and no two seat pans arrive at the bench in the same condition. Measure the cover itself at the edge: hem thickness at four points with calipers, where the stretch runs, and the distance from the staple line to the foam crown. The same discipline holds whether you are fitting Honda dirt bike graphics or any other family in the range. When a thick hem has already consumed most of the overlap, a panel sized to the kit’s printed numbers will overhang the curve and lift.
Adjusting the dry-fit position
- Dry-fit the panel with the backing intact and no adhesive.
- Mark where the panel edge lands against the cover hem, not against the pan.
- Offset the panel by roughly half the hem thickness, plus a 2 to 3 mm working margin.
- Re-check the corner tabs and trim in small increments.
- Only then peel and bond, working from the seat crown outward.
Shops that also handle KTM graphics know the habit transfers: measure the cover at the edge, offset the dry fit, and the staple line stops being a guess. It adds a couple of minutes and saves a full reprint.
Edge Failure Rate by Overlap Condition
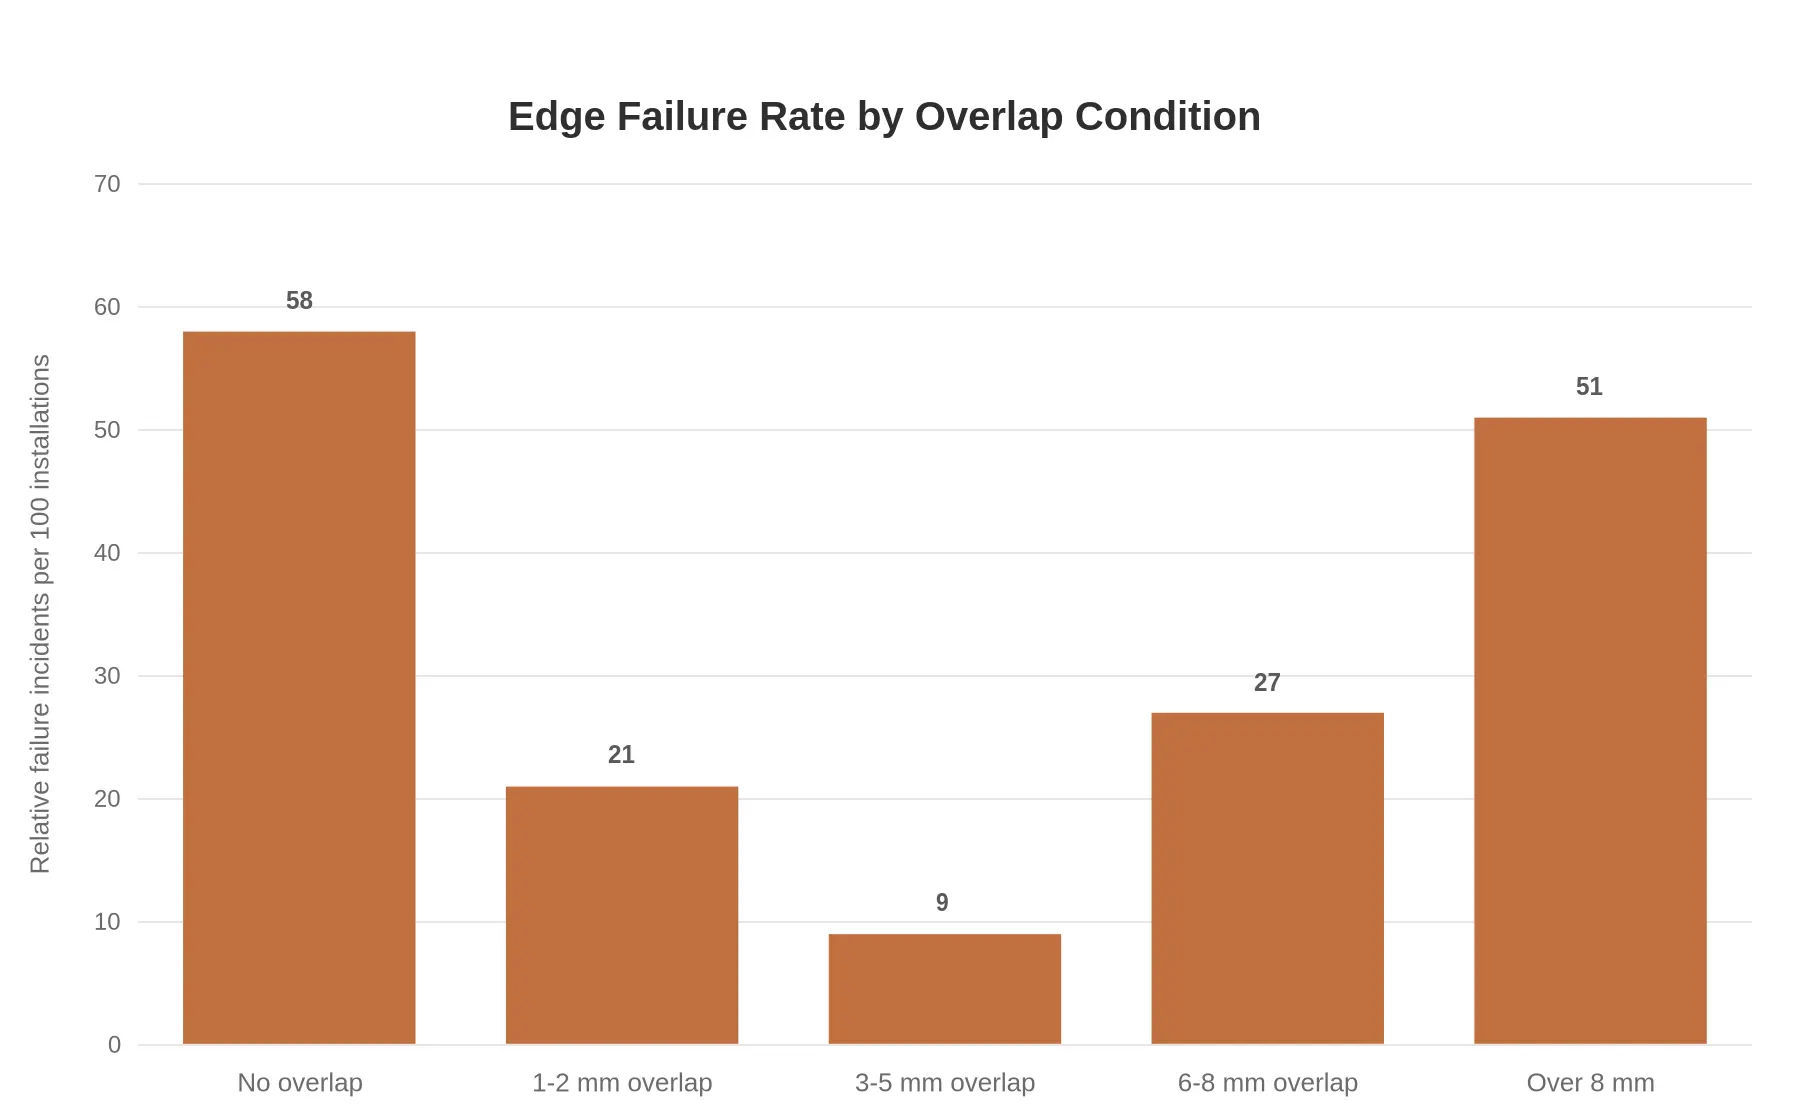
Figure: Relative edge failure incidents per 100 installations, grouped by overlap condition. The figures shown are representative examples for planning purposes, not measured survey data.
The 3 to 5 mm band is where the failure rate bottoms out, at roughly 9 incidents per 100 installations: enough material to tuck under the seat edge without forcing the graphic to buckle. Move either way and the rate climbs fast. A flush, zero-overlap edge spikes to 58, and an overlap over 8 mm comes back to 51 as excess film lifts, traps grit, and peels back from the staple line.
Ordered Trimming and Dry-Fit Sequence for the Seat Cover Edge
Each step produces the reference data the next one depends on. Skip a step or run them out of order and you end up trimming twice, re-cleaning contaminated plastic, or repositioning vinyl decals after they have already grabbed the surface. Worked in sequence, every cut, mark and wipe stays reversible until the moment you commit to adhesion.
- Measure the exposed overlap – Use a flexible tape to record the widest gap between the panel line and the staple row at the seat cover edge. The trim allowance needs to be a number.
- Trim the panel line – Cut with a fresh blade against a straightedge, staying inside the measured allowance, so the graphic edge stays parallel to the seat contour instead of drifting into it.
- Dry-fit the kit with the seat in place – Set the panel on the plastic with the seat bolted down. You are confirming the vinyl decals sit flat and clear the seat cover edge without bridging a recess.
- Mark the alignment reference – Place two strips of low-tack tape as fixed datum points. The panel goes back in exactly the same position after it is lifted for cleaning.
- Clean the edge with the correct agent – Isopropyl alcohol on bare plastic, mild soap and water on matte finishes. That removes dust, mold release and adhesive residue without dulling the surface.
- Confirm the final squeegee path – Plan the last stroke to travel away from the staple line, pushing trapped air outward instead of lifting the edge where the upholstery is thickest.
Trimming Before the Dry-Fit
Trimming the panel line before the dry-fit is a common source of rework, usually because the kit was cut on a bench with the seat removed. Without the seat installed, the cover relaxes and the staple row shifts, so the measured overlap no longer matches what the panel has to clear. The edge ends up trimmed too tight, the graphic peels back at the first wash, and a second cut cannot restore the original panel line. Dry-fit first, mark second, cut last, and clean once the trim is final.
Layer Order at a Glance
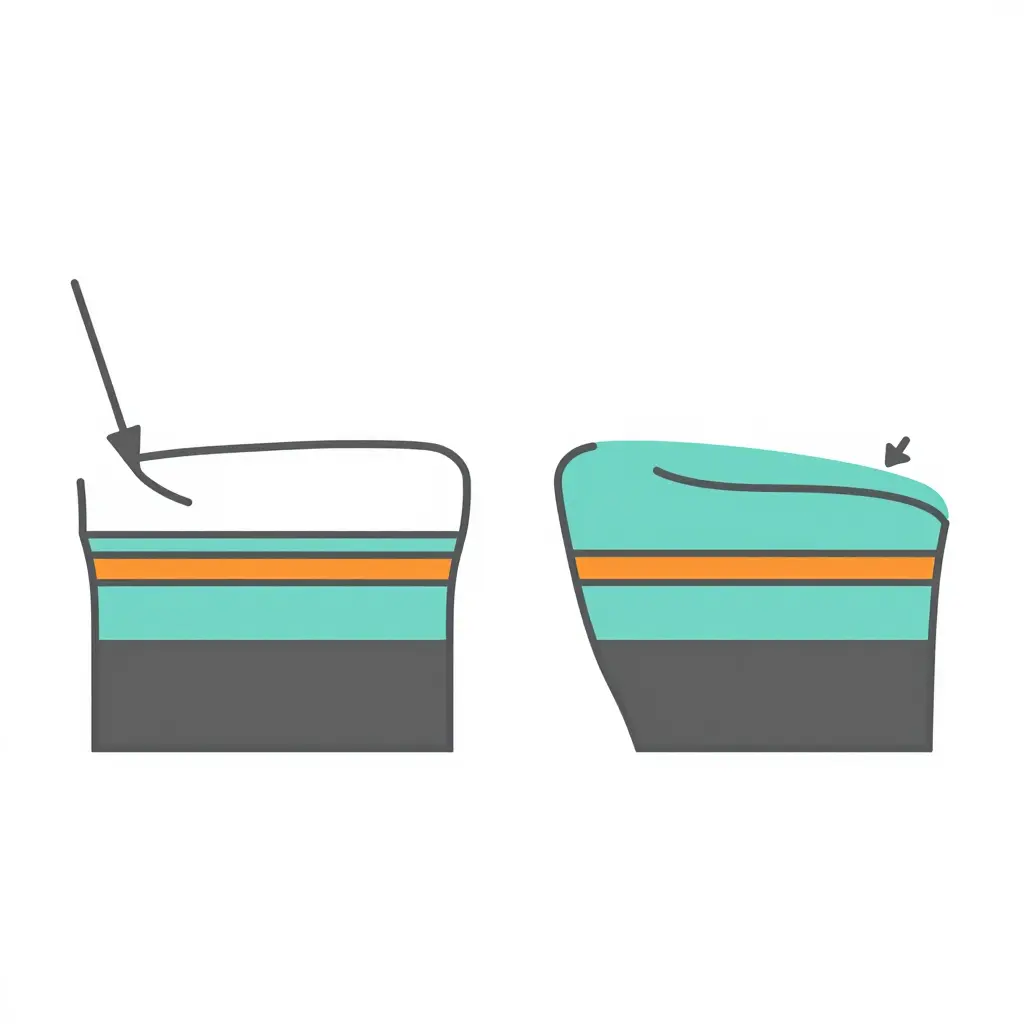
Left: graphic tucked under the hem (hem sits on top of the graphic). Right: graphic layered over the hem (graphic sits on top of the hem). Follow the arrow in each panel to confirm which surface wins at the overlap.
Check your work against this view right after trimming. If the shroud or seat-panel decal should disappear beneath the cover edge, follow the left sequence; if it needs to sit proud of the hem for a wrapped, finished look, follow the right one. Either way only one layer touches the staple line, and the arrow in the panel you chose tells you which one.
Standardizing the Seat Edge Check: Turning a Shop Habit into a Written Standard
Almost every shop has one technician who reads the seat edge well by eye, and several who don’t. The staple line, the seat cover lip and the graphics overlap meet in a space of a few millimeters, so a check that lives only in one person’s head is not really a check. The fix is unglamorous: a written pre-install sign-off, a tolerance reference that replaces adjectives with numbers, and short briefing notes that keep everyone reading the same page.
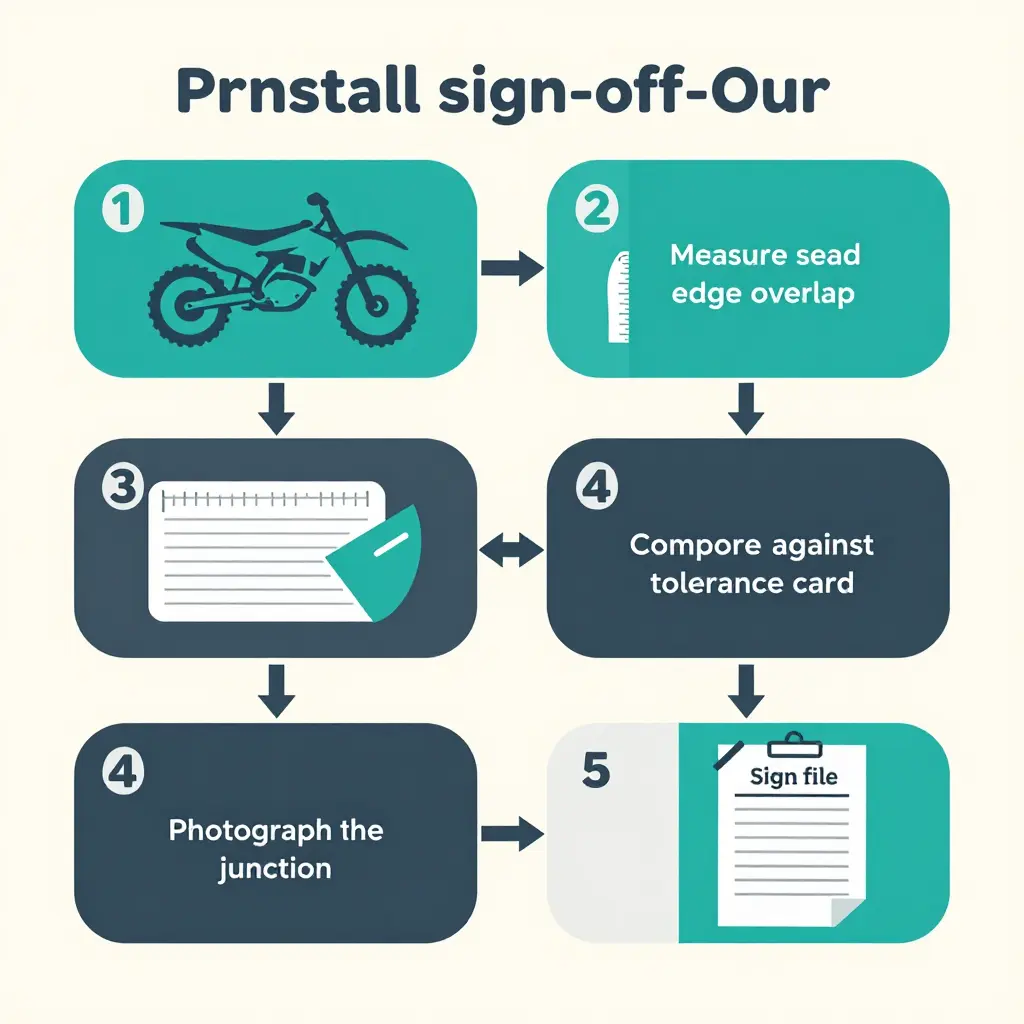
Step 1: Put the Check on Paper Before Anyone Picks Up a Squeegee
A pre-install sign-off is a half-page sheet filled in before the first decal touches plastic. It records what was actually measured, not what was assumed. A workable structure looks like this:
| Line | What gets recorded | Who fills it in |
|---|---|---|
| 1 | Seat removed or still fitted, and by whom | Prep tech |
| 2 | Staple line position and visible staple count | Prep tech |
| 3 | Measured clearance from staple line to graphics edge (mm) | Installer |
| 4 | Left-side vs right-side variance (mm) | Installer |
| 5 | Photo of the junction, filed with the job ticket | Installer |
| 6 | Go / hold decision and initials | Shop lead |
Two things keep that sheet from being decoration. The photo is mandatory, because the argument you avoid six weeks later is almost always about what the junction looked like on the day. And the sheet is signed before installation, so a “hold” costs ten minutes of trimming rather than a full set of decals and a resentful conversation.
Step 2: Build One Tolerance Reference Everyone Uses
“Close enough” is where quality drifts. Write the numbers down once, laminate the card, pin it above the bench. Treat the values below as a starting point you tune to your own warranty experience rather than gospel:
| Junction condition | Acceptable range | Action if outside |
|---|---|---|
| Staple line to graphics edge | 3 to 5 mm clearance | Trim, do not stretch |
| Graphic overlap onto seat foam | 0 mm | Re-trim and recheck |
| Left vs right side variance | 1.5 mm or less | Adjust before pressing |
| Staple leg protruding into graphic zone | Any amount | Re-seat or replace the staple before pressing |
| Seat cover replaced after graphics fitted | Not permitted without review | Re-quote before work |
| Bubbles within 15 mm of the seat edge | None at hand-off | Re-lay the panel |
Posting the same numbers in the bay and in the office matters more than it sounds. When a customer asks why a job is on hold, the answer is a measurement, not an opinion.
Step 3: Keep Briefings Short, Specific, and Repeatable
Briefing notes do not need to be a meeting. A five-minute stand-up once a week, backed by a one-page note, is enough if the note is concrete: two photos of a clean junction, one photo of a failure next to the measurement that would have caught it, and the tolerance card restated. Rotate who presents. A junior tech who has to explain the overlap rule remembers it far longer than one who simply read it.
Keep the notes in the same folder as the sign-off sheets, so a new hire sees not just the rule but the evidence behind it. Worth logging in the same notes: jobs where the seat was re-covered mid-build, jobs where the customer supplied their own seat, and jobs booked as “graphics only” that quietly became a seat rebuild.
Step 4: Let the Documentation Carry Your Quotes and Conversations
A documented check does two commercial jobs at once. On the quoting side it gives you real line items instead of a rounded guess: seat removal and refit time, trimming allowance, re-staple allowance, and an inspection step that someone is paid to do. Shops that track this usually find their quotes get more accurate, not more expensive, because surprise labor stops appearing after the fact.
On the communication side, the sign-off lets you describe what you will do without promising an outcome you cannot control. “We measure the clearance at the seat edge before we press anything, and we will call you if it falls outside our tolerance” is honest, verifiable and reassuring. “Guaranteed perfect fit on any seat” is the kind of line that starts arguments, especially on older bikes with a re-covered or aftermarket seat. Show the photo at hand-over and keep the language factual.
Step 5: Choose Kits Whose Pieces End Where the Seat Begins
Standardizing the check also sharpens how you buy. Before committing to a design, look at how the artwork terminates at the seat junction: does the side panel edge follow the seat lip cleanly, are there relief cuts where the shroud curves, and does the kit assume a stock seat height? Compact electric platforms are a good classroom here, because the seat, tank cover and frame spars sit much closer together than on a full-size motocross bike. On an Surron Ultra Bee graphics kit, the tight rear corner is where a generic template shows its weaknesses.
Lightweight trail bikes have their own geometry: the narrower seat and tank transition on Talaria MX3 and MX4 graphics kits means the overlap allowance has to be read differently than on a full-size machine. On KTM graphics the long shroud run and seat bolt access are the practical checks, while frame-spar bikes such as the Arctic Leopard graphics range reward a close look at how the panel wraps around exposed structure.
Motograpics prints fade-resistant vinyl decals in pre-made designs and custom artwork, so a shop can buy both the standard kits and the one-off designs from the same place. The practical rule: if a kit’s seat-edge termination needs more than a light trim to sit within tolerance, that is a design conversation, not an installation problem.
Frequently Asked Questions: Seat Cover Edge Fit and Graphic Overlap
How much graphic overlap do I need at the seat cover edge?
Around 3 to 5 mm is the working range for most Honda dirt bike graphics. That margin is wide enough to hide the trimmed edge under the seat cover lip, yet narrow enough that the cover still seats flush against the shroud or side panel. Anything under 2 mm tends to peek out and peel; anything past 6 mm bunches up and pushes the cover off its line.
Do I need to remove the factory staples before installing a graphics kit?
No – leave the staples in place unless one is loose, bent, or sitting proud of the plastic. Removing good staples gains nothing and leaves fresh holes for water to enter. Run your thumb along the entire staple line and re-staple or tap down anything that sits higher than the surrounding surface.
What causes vinyl to lift along the staple line?
Air pockets trapped over protruding staple heads are the usual cause. When the staple line is uneven, the vinyl bridges the high points instead of bonding to them, so vibration and washing work it free. A second cause is a skipped edge seal – unsealed edges wick moisture and lift within a few rides.
Can a graphic be reinstalled after I reposition it?
Usually yes, provided the adhesive has not fully cured and you have not creased the vinyl. Lift slowly from a corner, keep the adhesive side clean, and reapply within a minute or two while the glue can still flow. If the film has already stretched into a sharp crease or picked up grit, replace that piece rather than risk a lifted edge later.
How do I check seat cover edge fit without damaging a new kit?
Dry-fit everything first, before you peel a single liner. Set the seat cover in place, trace the edge with masking tape, then lay the graphic on top and confirm your graphic overlap sits inside that taped line. A scrap piece of vinyl or a paper template does the same job – it costs nothing and tells you exactly how much material to trim.
Key Takeaways for the Shop Floor
Before an installer peels a backing sheet, the edge geometry has to be settled. These four points are the handoff from the counter to the lift, and they should hold whether a veteran or a first-week hire runs the job.
- Verify the staple line before touching adhesive. Set the cover on the pan, locate where the factory staples land, and confirm the graphic edge clears that row with usable margin. If the staple path runs under the artwork, stop and reposition before the backing comes off.
- Measure the available overlap against cover thickness. A thin laminate on a thick foam and cover stack needs more wrap than a heavy film on a slim one. Compare the real gap to the gauge in front of you, not to the last bike that came through.
- Dry-fit and mark before trimming. Seat the piece with the backing intact, trace the trim line, and cut once. A pencil mark costs seconds; a short cut costs a reprint and a re-booked slot.
- Document the check as a shop standard. Record your minimum staple clearance and overlap figure on the install sheet so the measurement is a habit instead of a judgment call.
Material, labor and customer confidence are all expensive to recover once a job is on the lift. At the seat junction there is not enough margin to fix an edge later, so the check happens at intake or it happens as a comeback.