
Two Ways to Deliver the Same Decal
A dirt bike graphics order always ends the same way: a sheet of vinyl, a plastic body panel, and someone hoping the two line up. Whether that moment goes cleanly or turns into forty minutes of swearing is decided earlier, when the shop chooses between transfer tape and pre-masked graphics kits.
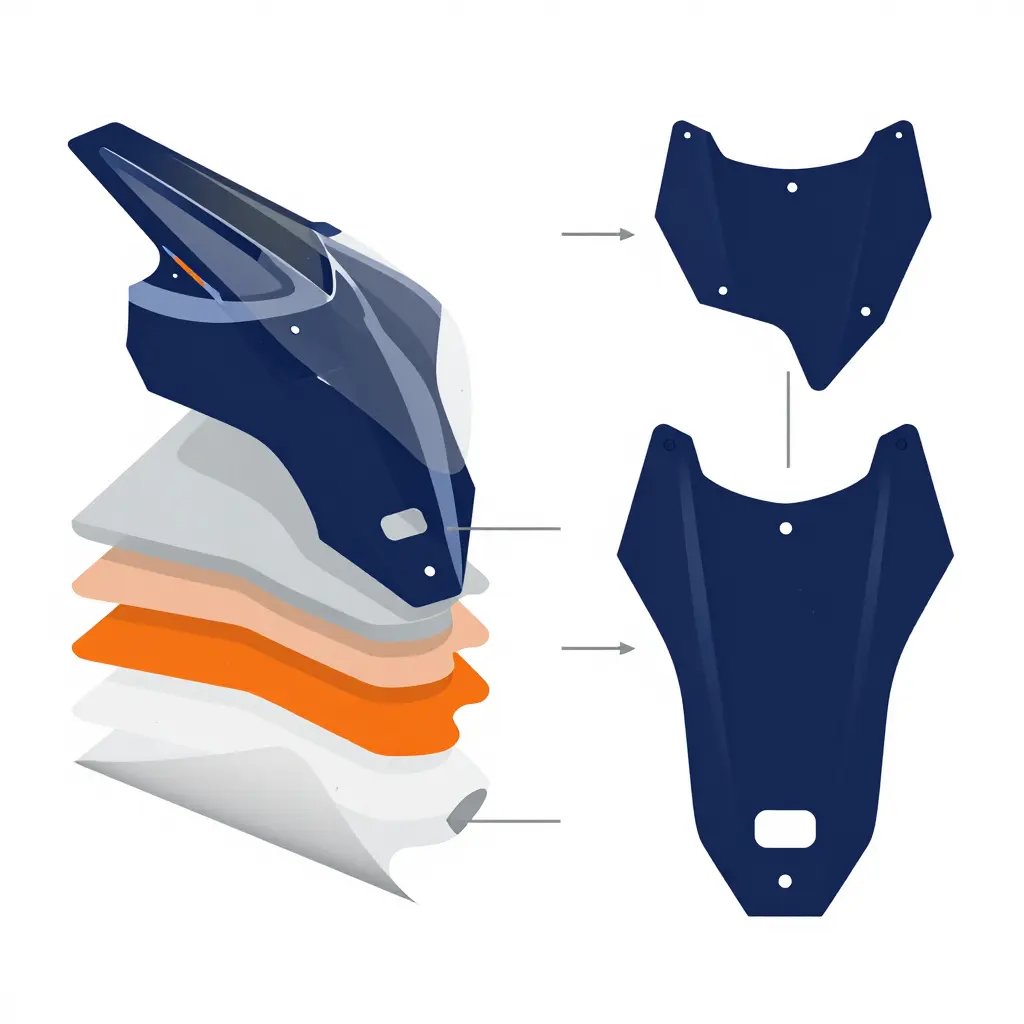
Transfer tape is a separate application film. The installer lays it over a multi-layer vinyl decal, burnishes it down, lifts the whole stack, then positions it on the shroud as one unit. Every step asks for a decision: how much film to use, where to anchor the first corner, how hard to squeegee, when to peel. On a busy service bench, those decisions cost time.
Pre-masked graphics kits arrive with the application film already bonded to the graphics, aligned at the factory, so registration is something the kit does for you rather than something you do at the bench. You position one piece, squeegee it, and peel the carrier in a single motion.
Why the Choice Matters on a First Install
For a first-time installer, the gap between the two methods shows up in four places:
- Layer alignment – pre-masked kits lock the layers together at the factory, so registration is a manufacturing job rather than a bench job.
- Air-bubble risk – a pre-bonded film lets you squeegee from one predictable anchor point instead of chasing wrinkles across loose film.
- Stretch control – transfer tape can slip and stretch during the lift; on a pre-masked kit the film and decal move as one, so tension stays even.
- Installer judgment – the real variable. Transfer tape leaves more decisions to the person holding the squeegee, and each one is a chance at a reprint.
For a shop or a reseller, those decisions carry a price. Installation time is billable, and a bubbled panel becomes a callback, a replacement, and a customer who now associates your name with a wrinkly shroud. A pre-masked kit costs a little more per unit and returns a shorter, more repeatable install that a newer technician can finish unsupervised. If you are building out a lineup to stock, browse our KTM dirt bike graphics range to see how the kits are assembled for hands-on fitting.
Transfer Tape vs. Pre-Masked Kits: A Side-by-Side Look
If you are deciding how to handle dirt bike graphics on a first install, this table lays out the practical differences between the two methods before you commit to either one.
| Criterion | Transfer Tape | Pre-Masked Kit |
|---|---|---|
| What ships in the box | Loose printed decals plus a roll of application tape | Decals already laminated to a carrier sheet |
| Layer alignment effort | Manual stacking of each layer | Alignment fixed at the factory |
| Air-bubble and rework risk | Higher; every layer can trap air | Lower; one squeegee pass per panel |
| Stretch and conform control | Full control per panel; easy to over-stretch | Carrier limits stretch; shape held |
| Trimming and edge finishing | Trim after transfer; edges need extra care | Trim carrier, then wrap edges once |
| Learning curve for a first-time installer | Steep; practice on scrap panels first | Gentle; carrier sheet guides placement |
| Best fit for a business model | One-off custom work and tight budgets | Repeatable volume with consistent output |
For one-off custom work, transfer tape keeps material costs down and leaves room to change your mind mid-job. Once order volume becomes predictable, a pre-masked kit usually earns back its higher unit price by cutting install time and rework on every set that ships.
Applying Transfer Tape, Step by Step
An experienced installer runs a transfer-tape job in this order, from bare plastic to sealed edges. The sequence is not decorative: most of the damage happens when a step gets skipped.
- Clean and degrease the panel. Wash the plastics with mild soapy water to float off grit, then wipe them down with isopropyl alcohol to strip oils, polish residue, and fingerprints. Let the surface dry completely before anything touches it.
- Dry-fit and position the graphic. Hold the piece against the panel with the backing liner still attached, step back, and check the edges, curves, and bolt holes. Mark one reference point with a strip of masking tape so you know where the piece belongs.
- Anchor one edge. Peel back two or three inches of liner and press that strip firmly along your reference line. The anchored edge acts as a hinge, and everything else follows it.
- Squeegee from the center outward. Work a felt-edged squeegee in overlapping passes, starting at the middle of the piece and pushing trapped air toward the outer edges. Keep the tool flat and let steady pressure do the work rather than speed.
- Lift and peel the carrier film at a controlled angle. Fold the transfer tape back over itself at a shallow, consistent angle, close to the surface, so the vinyl stays down while the film releases cleanly. Squeegee again behind the peel line as you go.
- Press and seal the edges. Run a thumb or squeegee along every edge and around each bolt hole, then warm the perimeter lightly and press once more to lock it in place.
The advantage of this method is that you commit gradually. With one edge anchored and short passes worked outward, trapped air and misalignment show up while they can still be fixed, and you can peel back to the hinge instead of lifting an entire sheet. That is a different kind of forgiveness from a pre-masked kit: the kit is easier to place, but once the adhesive touches down, correcting a panel is harder than sliding loose film. It is also why plenty of graphics brands ship multi-layer decals with a separate tape rather than a factory mask. If you are fitting a specific machine, start with a kit cut for that model, such as these KTM graphics kits, so the panel breaks and edges line up before you peel a liner.
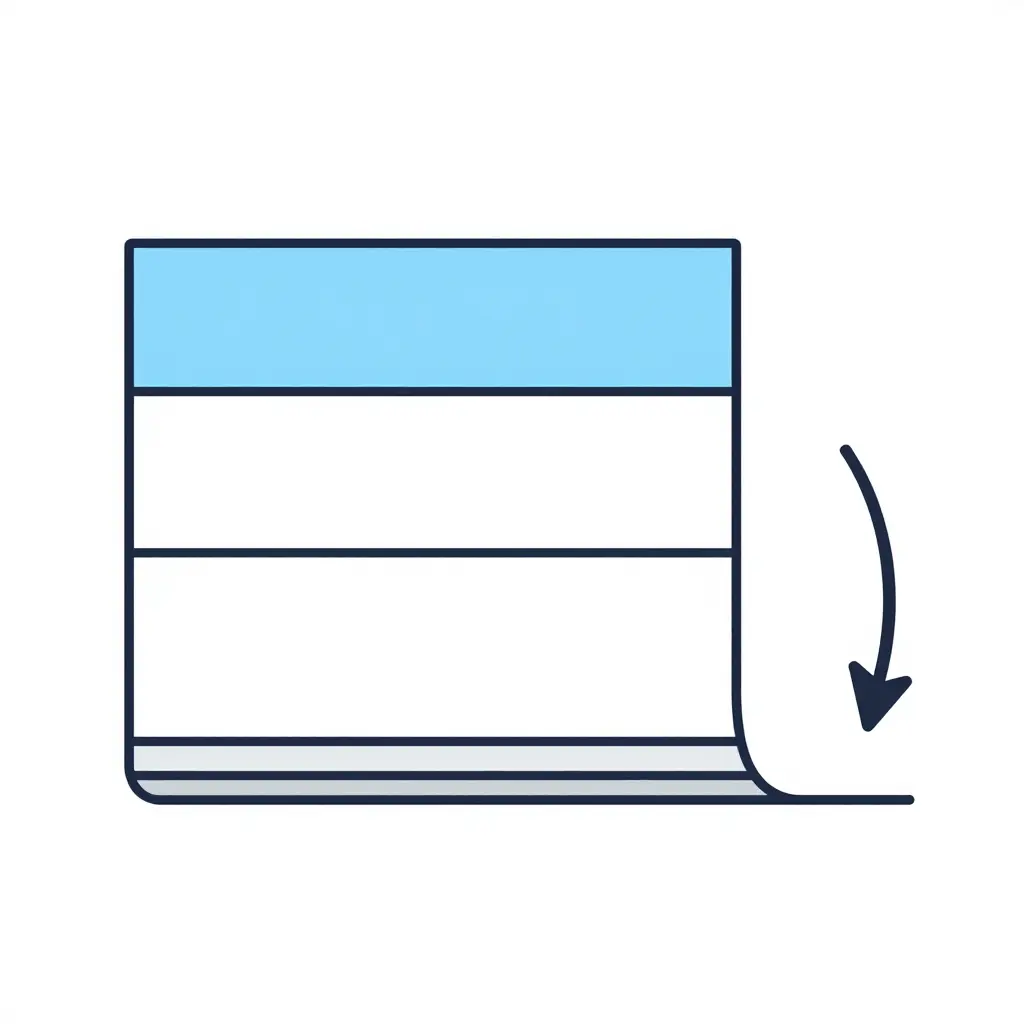
Three layers, one job: the backing liner protects the adhesive, the printed vinyl carries the design, and the application tape holds every piece in alignment until you press it down. That top layer is what keeps a multi-piece kit from shifting mid-install.
The chart below puts both methods on the same footing, so the trade-off is visible before you buy: pre-masked kits cut the time spent lining panels up, while transfer tape tends to cost extra passes and wasted vinyl before you get a clean result.
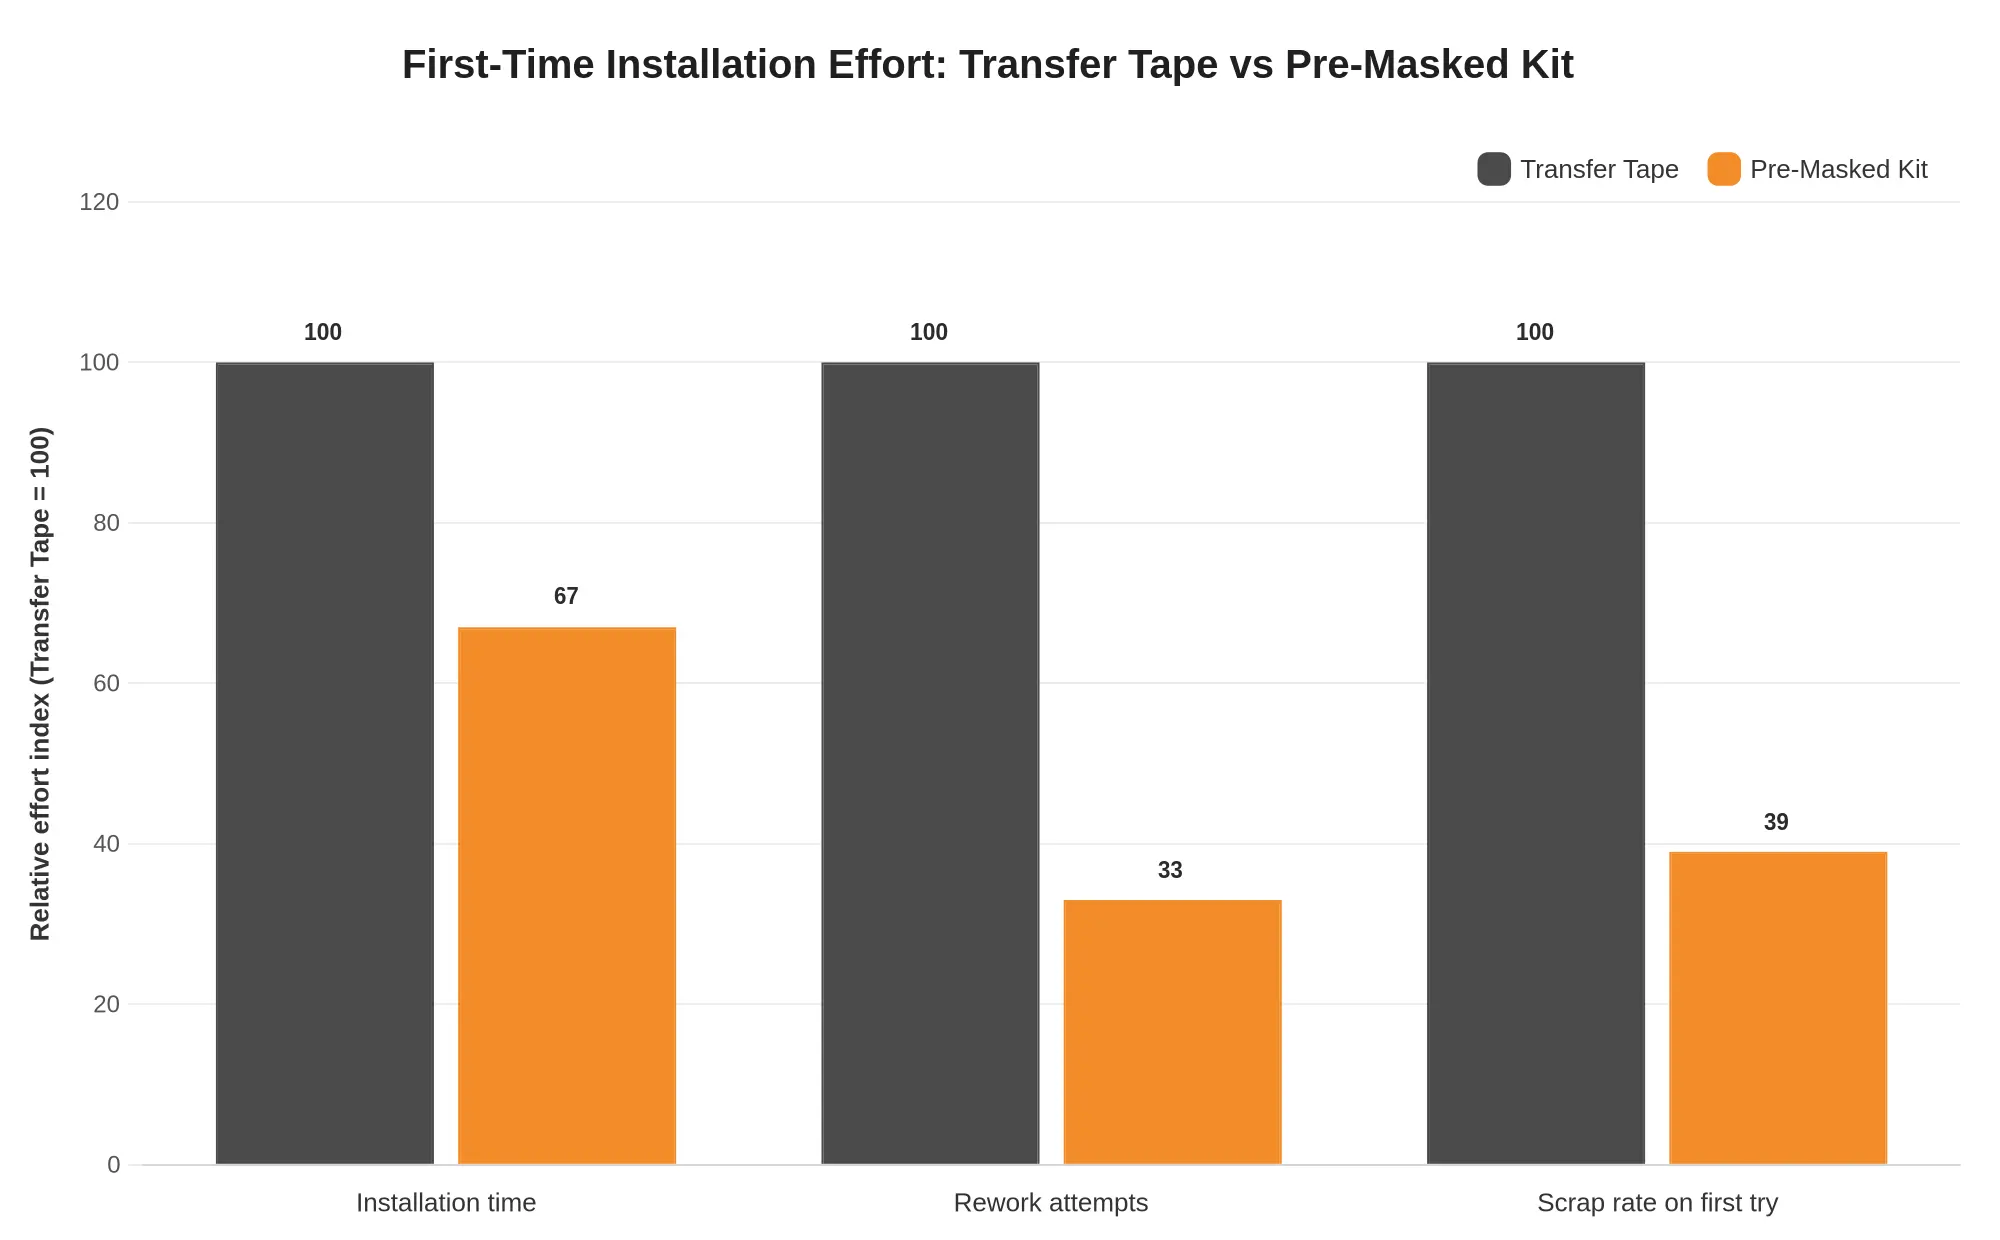
Figure 1. First-time installation outcomes for transfer tape versus pre-masked kits, shown as a relative effort index with the transfer tape method set at 100. The values behind the bars are representative ranges rather than measured study data, and your own numbers will vary with panel count, surface prep, and how steady your hands are on a cold morning.
The gap is widest on rework attempts and scrap rate, which is where the cost actually sits. A second attempt burns another sheet of vinyl, another half-hour, and a good chunk of patience, and a scrapped panel means starting over entirely. If your shop bills by the job rather than the hour, that spread is the number worth circling.
- Installation time – pre-masked kits win, since alignment guides shorten the positioning phase.
- Rework attempts – the biggest divide, because a pre-masked panel that is barely in contact can still be lifted and re-seated.
- Scrap rate on a first try – lower with kits, which matters most when you are fitting a full set of graphic kits rather than a single shroud decal.
Transfer tape rewards experienced hands and a patient schedule; pre-masked kits reward anyone working against a clock, or with a customer waiting at the counter.
Durability, Material, and Cost: Where Longevity Comes From
For a shop, the sticker price on a kit is the smallest number in the equation. What you are buying is a cost per installed unit: kit cost plus labor plus the rework that weak material generates. At a realistic shop rate, the answer is closer than the price list suggests.
Vinyl grade sets the ceiling
Cast vinyl, usually around 2 mil, is stretched during manufacturing, so it conforms to shrouds, radiator wings, and compound curves without fighting back. Calendered vinyl is cheaper and thicker, but it has memory – it wants to return to flat, which shows up as lifted edges on tight radii after a few heat cycles. For graphics that see mud, roost, and weekly washing, cast film is the sensible baseline. On a quality ink set, a cast kit typically holds color through a full season of UV exposure; budget prints on calendered stock go chalky in a fraction of that time. When you are choosing what to stock, model-specific kits with a stated film type are easier to audit than unbranded sheets.
Laminate and UV resistance are the real wear layer
The laminate does more of the wearing than the print does. A 3 to 5 mil cast overlaminate with UV inhibitors absorbs abrasion from boots, pressure washing, and wash brushes, and it is what keeps the ink from fading. An unlaminated print is the first thing to fail, often within weeks on a rear fender. Skipping the laminate saves a couple of dollars and costs a full reprint plus the labor to strip and reinstall, which is a lesson anyone producing custom motorcycle graphics learns early.
Adhesive behavior under heat and pressure washing
Most failures start at installation rather than in the material. A 3,000 psi wand held 15 cm from an edge will lift almost any film. Surface prep (degrease, IPA wipe, no wax), installation at 20 to 30 C, and a post-install post-heat to roughly 50 to 60 C matter at least as much as the grade of vinyl; the heat helps the adhesive wet out and hold the edge. Cold, dry, or greasy surfaces guarantee edge lift no matter what you paid for the film.
Rework and scrap: the multiplier most quotes ignore
Every failed kit costs the kit again, the labor twice, and some of the customer’s confidence. Rough guide before you commit inventory dollars:
- Cast vinyl with cast laminate: highest unit cost, lowest rework hours
- Calendered with laminate: middle unit cost, moderate rework
- Budget unlaminated: lowest unit cost, highest scrap rate and unbilled time
Worked example at $90/hr shop labor and 1.5 hours per install:
| Material scenario | Kit cost | Labor | Rework rate | Modeled cost per installed unit |
|---|---|---|---|---|
| Cast vinyl + cast laminate | $95 | $135 | 3% | $237 |
| Calendered + laminate | $60 | $135 | 12% | $218 |
| Budget, unlaminated | $35 | $135 | 28% | $218 |
The gap is smaller than the format debate suggests. Once rework is priced in, the budget kit saves roughly $19 per install and delivers the worst experience of the three: the savings come out of the kit, the losses come out of callbacks. The cast option costs that $19 back and removes most of the come-backs, which makes it the safer inventory bet for a shop that bills by the hour.

Reading the decision path
The diagram carries the same logic without the words. The single circle at the top is your starting point, before any kit has been ordered. The left branch is the low-volume, low-complexity case; the right branch is the higher-volume, more intricate one. Both end at the shape at the bottom: the one application method your situation calls for.
Two questions pick the branch. How many panels are you laying down in one session, and how detailed is the artwork?
First-Time Installer Pitfalls to Avoid
Ruined first installs usually have nothing to do with the artwork. A handful of handling errors in the first five minutes account for most of them, with both transfer tape and pre-masked kits, and each one has a habit that prevents it.
- Skipping surface degreasing: soapy water alone leaves mold-release oils and polish residue behind, so the adhesive grabs dust instead of plastic and lifts within days.
- Installing in direct heat or cold: a sun-baked panel turns vinyl stretchy and grabby while a cold workshop makes it brittle, so work in shade at roughly room temperature.
- Over-stretching an edge: hauling a corner hard just to make it “fit” thins the vinyl, which then relaxes back and leaves a lifted lip that collects dirt.
- Trapping air without a squeegee path: pressing the film down at random with no planned stroke direction locks bubbles in place, whereas one steady pass from center to edge pushes air ahead of the blade.
- Peeling the carrier film too steeply: yanking the liner back at a sharp 90 degrees drags the graphic with it, so peel it flat against itself in slow, shallow passes.
- Trimming on the bike instead of off it: a blade that slips across an installed panel scores the plastic and locks in curves you cannot correct, so cut oversize, test-fit, then trim off the bike.
- Mixing panel order during a multi-panel kit: laying shroud, tank, and fender pieces in random sequence throws off alignment lines, so dry-fit everything and label each piece before you expose any adhesive.
A fixed installation routine prevents most of this, and the kit you buy prevents the rest. Pre-masked kits remove the carrier-film and panel-order mistakes, because the tape arrives aligned and every piece is handled as one unit; loose tape gives you more control over squeegee path and edge stretch on tight, curved shrouds. If you want panels that arrive pre-masked, browse pre-masked graphics kits by model and check the panel count before you book the install day.
Frequently Asked Questions: Transfer Tape vs. Pre-Masked Graphics Kits
Is transfer tape actually required for a single-layer decal?
No. A single-layer decal can be applied without transfer tape because there is only one vinyl layer to align and press down. Transfer tape becomes necessary when a design is made of multiple separate pieces that must hold their relative spacing, such as lettering with detached dots or a graphic split into several vinyl islands. For one solid piece, peeling the backing paper and setting the decal by hand is enough.
Can pre-masked graphics kits be repositioned after contact?
Only briefly, and only with light contact. Pre-masked graphics kits usually use an adhesive with a short working window, so a corner that has barely touched a clean panel can often be lifted and reset. Once the film is pressed down firmly or the adhesive has bonded to the plastic, lifting it risks stretching the vinyl or trapping air, which is why a dry fit before removing the backing is standard practice.
Which method suits a shop producing repeatable volume versus one-off custom motorcycle graphics?
For repeatable volume, pre-masked graphics kits reduce labor because alignment is built into the sheet, so each install follows the same sequence with less measuring. For one-off custom dirt bike graphics, where the artwork changes from bike to bike, loose vinyl with transfer tape lets the installer place each element individually. Shops that stock KTM graphics often standardize on kits for this reason, since identical panels can be reproduced without re-planning the layout.
Does surface preparation affect both methods equally?
Yes, and it is the step that most often decides whether an install holds. Both methods rely on the same adhesive chemistry, so oil, silicone residue, or dust on the plastic will cause lifting, bubbles, or peeling whether or not transfer tape was used. Wiping the panel with isopropyl alcohol and letting it dry fully is the baseline for either approach.
Do pre-masked graphics kits still need trimming or edge sealing?
Trimming is usually minimal because the kit is cut close to the panel shape, though overhangs on wrap-around edges may need a light blade pass. Edge sealing is still worth doing: run a felt-edged squeegee firmly along the perimeter and warm the curved sections, which limits how much dirt can work under the edge.
Which Method to Pick
Reach for transfer tape when flexibility and multi-layer control matter most. A tape-based sheet lets you position, lift, and re-seat a panel before the adhesive commits, and it lets you build color layers in sequence so overlaps and edges land where you intended. That control earns its extra handling time on one-off builds, awkward bodywork, or any model where the alignment is tight.
Pre-masked kits win on speed and consistency. The carrier comes off in one motion, and the same motion produces the same result on the tenth bike as on the first. For a fleet, a rental line, or a dealer prepping repeatable models, that predictability is the value.
What Decides Longevity
Neither format rescues a weak material. A fade-resistant cast vinyl with a proper clear laminate will outlast a premium format built on cheap film, and no kit applies itself: clean, solvent-free panels, a squeegee worked from the center outward, and a controlled post-heat matter more than the choice between tape and pre-mask.
Where the Graphics Ranges Sit
Motograpics supplies graphics in both formats, so the pathway below is about fit rather than format. On the lighter electric dirt bikes, the 79Bike graphics collection and the E-Ride graphics range cover the smaller chassis, while the Stark Varg MXEX graphics and ReRode R1 graphics pages serve the higher-output end, with the Arctic Leopard graphics line rounding out the e-moto options.
On the motocross side, KTM graphics cover the mainstream plastics. The Surron family splits into Surron Light Bee graphics, Surron Ultra Bee graphics and Surron Hyper Bee graphics for three different body shapes.
Talaria owners are served through the Talaria XXX graphics, the shared Talaria MX3 and MX4 graphics, the Talaria MX5 graphics and the Talaria Komodo graphics pages, each mapped to its own panel set rather than a generic template.