
Unleashing Creativity: The Power of Dirt Bike Graphics
Personalizing your dirt bike is not just about aesthetics; it’s an opportunity to express your individuality and enhance your performance. Enter dirt bike graphics: vibrant decals that transform your motorcycle into a canvas, showcasing your unique style and improving visibility on the track. Whether you’re a casual scooter rider or a seasoned motocross competitor, these graphics play a vital role in creating a cohesive look and evoking a sense of pride in ownership. Moreover, custom graphics can be tailored for performance; specific designs can help improve aerodynamics and reduce drag, giving you that competitive edge on the racetrack.
But how do you bring your vision to life? Enter Cricut-a cutting-edge tool that empowers motorcycle enthusiasts and professionals alike to create custom graphics right at home. With its user-friendly software and precise cutting capabilities, Cricut allows for endless possibilities in design, enabling motorcycle owners, repair shops, and technicians to craft personalized graphics that mirror their personality and brand identity. From sleek minimalist designs to bold statement pieces, Cricut makes it easy to experiment and find what works best for your bike or your customers’ bikes.
Imagine rolling onto the racetrack with a one-of-a-kind graphic that turns heads and showcases your creativity. Not only does this make your dirt bike stand out, but it also creates an emotional connection with fellow riders. Whether you want to learn more about specific dirt bike graphics for various models or explore innovative options for enhancing your ride’s look and feel, this guide will provide you with all the tools you need to get started. Prepare to take your bike to the next level!
Overview of Dirt Bike Graphics
Dirt bike graphics are more than just stickers; they are an integral part of a dirt bike’s identity. Whether you’re a casual rider or a seasoned racer, graphics not only enhance the bike’s aesthetic appeal but also offer various practical benefits. From branding to protective functions, the right graphics can make your motorcycle standout on the trail.
What Are Dirt Bike Graphics?
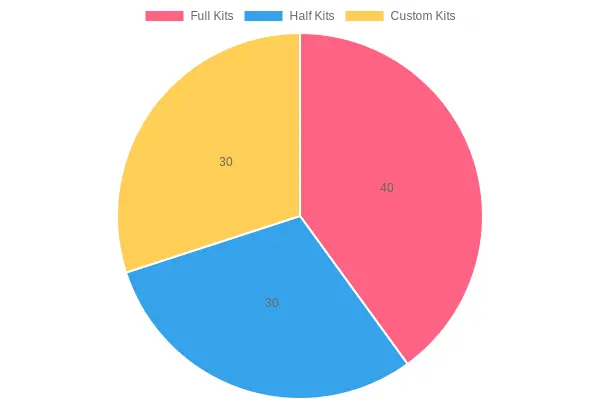
Dirt bike graphics typically refer to various types of decals and wraps designed specifically for off-road motorcycles. These graphics come in different forms, including:
- Full Kits: Covering the entire motorcycle surface, full kits include graphics for the fenders, airbox, seat, and frame. They offer a complete transformation and often come in design themes that can reflect personal style or team identity.
- Half Kits: These are more affordable options that cover just the main visible areas, like the fenders and airbox, while allowing riders to mix and match with existing graphics.
- Custom Kits: Totally unique, these kits allow for personalized designs incorporating custom logos, colors, and artwork. They are perfect for riders who want to showcase their individuality or sponsor logos.
For examples of various dirt bike graphics, check out the Motograpics collection to find something that matches your style.
Functions of Dirt Bike Graphics
Aesthetic Improvement
One of the primary reasons to invest in quality graphics is the aesthetic enhancement they offer. When it comes to off-road riding, a bike’s look can reflect the rider’s personality. Custom graphics can make a dirt bike look more professional, intimidating, or vibrant, based on the rider’s preferences. Riders have a plethora of options to choose from, allowing them to express their unique styles.
Additionally, a well-designed bike can command attention, especially in competitive settings. The visual appeal can even contribute to a rider’s confidence while racing.
Branding
For competitive riders or those representing teams, branding becomes essential. Decals and wraps can include team logos, sponsor names, and other branding elements that help establish visibility. A well-branded bike not only portrays professionalism but can also attract potential sponsorships or partnerships, crucial for those looking to advance in the sport. Graphic kits that promote brand unity can be ordered through sites like Motograpics graphics to coordinate designs among team members.
Protection
Dirt bike graphics also serve a functional purpose beyond aesthetics. High-quality decals and wraps provide protective shields for critical components against dirt, mud, and debris encountered on trails. They help to resist scratches, UV damage, and fading, prolonging the lustrous appearance of your bike.
Moreover, certain materials used in graphics can contribute to reducing wind drag slightly, enhancing performance at high speeds. While these benefits may seem minimal, they add value to the overall riding experience.
Types of Dirt Bike Graphics
Here’s a quick summary of the types of dirt bike graphics:
| 类型 | 描述 | 优点 | 应用场景 |
|---|---|---|---|
| 全套贴纸 (Full Kits) | 完整覆盖摩托车表面,设计统一 | – 全面外观改造 – 提升视觉冲击力 – 成本效益高 |
– 想彻底改变外观的骑手 – 需要统一品牌形象的场合 |
| 半套贴纸 (Half Kits) | 仅覆盖摩托车的一部分区域 | – 成本低 – 安装灵活 |
– 希望局部改善外观的骑手 |
| 定制贴纸 (Custom Kits) | 完全根据个人需求定制 | – 独一无二 – 更具创意 |
– 追求个性化的骑手 |
Conclusion
Dirt bike graphics are a key component for enhancing the visual and functional aspects of off-road motorcycles. They stand as a testament to riders’ personalities, help forge brand identities, and protect key areas of the bike. No matter your riding style or need, there’s a graphic type that can elevate your riding experience. For both amateur and professional riders, investing in good-quality dirt bike graphics can result in significant performance enhancement and a more striking visual profile on and off the track. Explore a wide range of options including specific designs for your bike at Motograpics.
Whether you’re looking to express individuality, seek protection from harsh elements, or promote a brand, think about the significance of dirt bike graphics for your motorcycle.
Benefits of Using Cricut for Creating Dirt Bike Graphics
Creating custom graphics for dirt bikes can be an exciting venture, especially with the versatility and ease of using a Cricut machine. Here are some key benefits that make Cricut an ideal choice for motorcycle owners, repair shops, and technicians looking to personalize their rides:
-
Customization Options: Cricut provides extensive design flexibility through its Cricut Design Space software. Users can choose from thousands of built-in fonts, images, and designs or upload their own artwork. This means every graphic can be tailored to meet personal style and preferences, from intricate patterns to bold logos.
-
Cost Efficiency: Opting for a Cricut machine can significantly lower the cost of creating custom graphics compared to purchasing pre-made decals. Typically, sourcing custom graphics can be pricey and time-consuming. With Cricut, the costs are primarily from the materials-such as vinyl, adhesive paper, or infusible ink-leading to more savings in the long run.
-
Ease of Use: Operating a Cricut machine is straightforward, thanks to user-friendly features within the Cricut Design Space. Even beginners can quickly learn how to create designs, cut them precisely, and apply them to their dirt bikes. The intuitive interface makes the creative process smooth and enjoyable.
-
Quick Turnaround Time: With Cricut, users can create and apply new graphics in a fraction of the time it would take to order from a custom shop. The immediate cutting feature means that designs can be produced on-demand, allowing for rapid updates and styling changes.
-
Durable and High-Quality Results: Cricut machines use precision cutting technology, ensuring that even the most complex designs are flawlessly executed. The materials used, such as high-quality vinyl or infusible ink, are designed to withstand the rigors of dirt biking. This means that the graphics will endure harsh conditions, maintain their vibrancy, and resist peeling or fading over time.
-
Creative Freedom: Whether you’re designing for personal satisfaction or to showcase a brand, Cricut offers unparalleled creative freedom. Users can explore a vast array of styles, colors, and graphics, allowing every bike to be a unique representation of its owner.
-
Accessible Online Resources: The Cricut community is rich with tutorials, project ideas, and inspiration. Resources are available to guide users through the design process, from setting up their Cricut machine to achieving advanced techniques. This access to information can enhance creativity and boost skill levels dramatically.
Conclusion
Utilizing a Cricut machine for dirt bike graphics not only simplifies the design process but significantly enhances the customization experience. By leveraging the cost efficiency and ease of use, motorcycle enthusiasts can transform their bikes into personalized masterpieces. To get started on your own projects, explore various graphic options available at MotoGraphics!
Enhancing Creativity in Dirt Bike Graphics with Cricut
Creating stunning dirt bike graphics has never been easier, thanks to the array of features offered by Cricut machines and their design software. Whether you’re a motorcycle owner looking to personalize your ride or a professional shop needing to deliver top-notch designs, Cricut provides a user-friendly platform that enhances creativity and usability.
Key Features for Graphics Creation
Cricut’s powerful tools are designed to facilitate the graphic design process, allowing users to create customized, high-quality graphics efficiently.
1. Cricut Design Space
Cricut Design Space serves as the central hub for creating graphics. It offers:
- Extensive Library: Access to over 100,000 images, fonts, and projects.
- Design Tools: Users can unlock creativity with built-in tools such as the image editor, text tool, and shape tools that allow for resizing, rotating, and grouping elements.
- Advanced Features: Options like layering and alignment guides help in developing complex designs. Additionally, the ability to import SVG, PNG, or JPG files allows users to bring their visions to life. For more details, visit Cricut Design Space.
2. Cutting Machine Technology
Cricut cutting machines are renowned for their precision. Designed with advanced technology, these machines can cut through a wide variety of materials, including vinyl, paper, and adhesive. This versatility is crucial for creating intricate dirt bike graphics that demand both detail and durability.
3. Cricut Access
Cricut Access is a subscription service that provides exclusive access to premium graphics and advanced design tools. Key features include:
- Auto-Slice: This intelligent feature divides images into manageable parts for easier cutting.
- Smart Layers: Automatically adjust cut order for complex layered projects. This can drastically improve the efficiency of producing multiple graphics quickly, an important factor for busy motorcycle shops. For more insights on premium content, check out the Cricut Blog on Cricut Access.
Creativity Unleashed: Real-World Applications
In 2023, the dirt bike graphics trend has evolved, leaning towards bold color schemes and customizable designs that resonate with rider personalities. According to Rider Pro, top trends include:
- High-Contrast Colors: Bold combinations such as electric blue and matte black.
- Minimalist Aesthetics: Clean graphics with subtle branding-perfect for professional racers.
- Custom Graphic Kits: Riders increasingly desire kits that showcase their names and sponsor logos, all while offering a cohesive look.
Cricut machines allow for easy creation of these custom kits. Shop owners can efficiently produce graphics that fit current trends, ensuring their designs are market-relevant.
Conclusion
Cricut machines and software dramatically alter the landscape of dirt bike graphics production, making creativity accessible at every skill level. Their innovative features not only streamline the graphic design process but also elevate the quality and personalization of the finished product. Whether for personal or professional use, Cricut is equipped to meet the demands of today’s dirt bike enthusiasts. For those looking to explore further, check out our selection of dirt bike graphic kits.
Comparison Table of Cricut Models for Dirt Bike Graphics
| Model | Price (USD) | Material Compatibility | Cutting Area | Best For |
|---|---|---|---|---|
| Cricut Maker 3 | $429.99 | 300+ (including leather, wood) | 12″ x 12′ | Professionals, complex graphics |
| Cricut Explore 3 | $319.99 | 100+ (including vinyl, cardstock) | 12″ wide | Hobbyists, light-duty graphics |
| Cricut Explore Air 2 | $249.99 | 100+ (less thick materials) | 12″ wide | Beginners, basic projects |
When considering a machine for creating custom dirt bike graphics, the Cricut Maker 3 is ideal due to its ability to cut thicker materials like leather and wood, making it suitable for complex designs. The Cricut Explore 3 is a middle-ground choice, offering good support for a variety of materials at a more affordable price point. The Cricut Explore Air 2 is an economical option for beginners focusing on basic vinyl graphics.
For more information on dirt bike graphics, check out our product categories here and explore e-ride graphic options.
When it comes to customizing motorcycle graphics, many enthusiasts turn to Cricut as a versatile and cost-effective solution. Below, we summarize user experiences and insights regarding Cricut machines based on various reliable sources. The feedback highlights pros and cons, offering a well-rounded view of how Cricut fares in creating motorcycle decals.
Real User Experiences
- High Precision and Customizability
- A Reddit thread showcases firsthand experiences from motorcycle customizers who have successfully used Cricut machines for making decals. Users have praised the machine’s ability to cut complex designs with high precision, especially when using Cricut’s permanent vinyl.
- Reviewers noted how well the decals adhered to clean, prepped metal surfaces, providing durability against UV exposure and light rain when properly laminated. However, meticulous surface preparation is essential to avoid issues during application.
- Cost-Effectiveness
- An insightful article from Motorcycle.com evaluates the Cricut Maker 3 for creating custom decals. Users can achieve professional-quality results at a fraction of the cost of hiring a professional. The review recommends using Cricut’s Permanent Adhesive Vinyl along with Design Space software for better results, especially on thick materials.
- Users reported improved satisfaction with cost, as projects that once required hundreds of dollars in professional fees could be completed for $15 to $30 using Cricut supplies.
- Challenges and Recommendations
- Despite its advantages, users noted that the application process requires practice. Some tricky aspects included weeding intricate designs and applying decals to curved surfaces. One user suggested that using a heat gun helps in conforming the vinyl to curves effectively.
- A popular YouTube tutorial on DIY motorcycle decals using a Cricut Explore Air 2 emphasized the need to adjust the vinyl cutter blade settings. Viewers also recommended cleaning surfaces with isopropyl alcohol and noted that large decals might benefit from having an extra set of hands during installation.
- Comparative Analysis with Professional Services
- A comparative analysis from Cycle World Magazine established that while Cricut decals are cost-effective, they may not match the precision of professional installations for larger or complex designs. With professional services, costs range from $100 to $300, highlighting a significant price gap.
- Cricut might not be suitable for large-scale commercial work, but it serves as an excellent tool for DIY enthusiasts looking to personalize their motorcycles without paying a premium.
Conclusion
Cricut machines are proving to be a valuable asset for motorcycle owners who wish to customize their vehicles affordably and creatively. The consensus among users indicates that while there may be a learning curve involved, especially in the application process and material preparations, the overall results are highly satisfying. By combining cost savings with the potential for unique design personalization, Cricut stands out as a top choice for motorcycle graphics among DIYers.
Whether you’re looking to refresh your bike with new graphics or take on a small business venture in custom decals, Cricut’s capabilities provide an exciting opportunity for creativity. Explore more dirt bike graphics available that can be enhanced using Cricut technology for a truly unique touch.
This summary covers the essential user experiences with Cricut for motorcycle graphics, showcasing the strengths and challenges riders face when opting for this DIY solution.
Step-by-Step Guide for Creating Dirt Bike Graphics with Cricut
Creating custom dirt bike graphics using a Cricut machine can enhance the style of your motorcycle while adding protection and personalization. This guide will walk you through the entire process from design to application.
Step 1: Gather Your Supplies
Before starting, ensure you have all necessary tools and materials:
- Cricut Machine (Explore, Maker, or any model that cuts vinyl)
- Vinyl Material (Recommended: Cricut Outdoor Vinyl for durability)
- Transfer Tape
- Squeegee Tool
- Rotary Blade/Premium Fine Point Blade
- Computer/Tablet (to design graphics)
- Isopropyl Alcohol (for cleaning the bike surface)
- Heat Gun or EasyPress (optional, for curved surfaces)
Step 2: Design Your Graphics
- Open Cricut Design Space: Launch the software or app and create a new project.
- Choose Your Graphics: You can either upload a custom design or use the built-in templates and images in Design Space.
- Adjust Dimensions: Ensure your design fits the specific areas of your dirt bike. Use the measurement tools to assist.
- Layering: If you’re using different colors, remember to create separate layers for each color before cutting.
- Preview and Save: Preview your design and save it to your Canvas.
Step 3: Select and Prepare the Vinyl
-
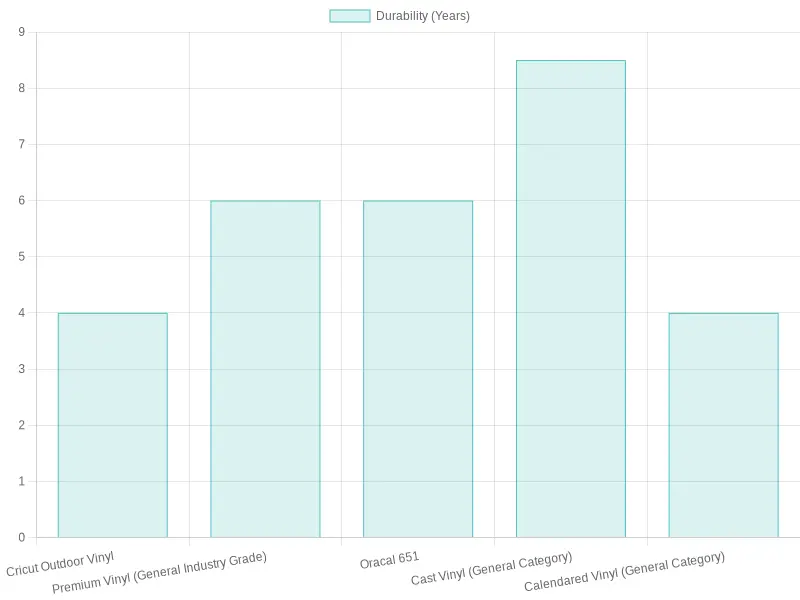
Material Selection: Based on your project, choose the right vinyl type:
Material Type Durability (Years) Key Features Cricut Outdoor Vinyl 3-5 UV, water, and abrasion resistant Premium Vinyl 5-7+ Excellent adhesion and flexibility for curves Oracal 651 5-7 High durability, used widely in applications For comparison, see the vinyl durability chart below:
-
Clean the Bike Surface: Use isopropyl alcohol to clean the area on the dirt bike where you’ll be applying the graphics. This ensures better adhesion.
Step 4: Cut Your Design
- Load the Vinyl: Place the vinyl on the cutting mat and load it into the Cricut machine. Make sure to use the correct settings for the type of vinyl selected (e.g., Outdoor Vinyl).
- Select Material Settings: In Design Space, select the material you are using from the menu.
- Adjust Blade and Cut: Ensure the correct blade is installed and select “cut.” The machine will then process your design.
Step 5: Weeding the Design
- Remove Excess Vinyl: After cutting, use a weeding tool to remove the vinyl surrounding your design carefully. This step is crucial to ensure only your design is left on the backing.
Step 6: Apply Transfer Tape
- Cut Transfer Tape: Cut a piece of transfer tape that covers your design.
- Apply Over the Design: Place the tape firmly over your weeded design and use a squeegee to ensure it sticks well to the vinyl.
Step 7: Apply Graphics to the Dirt Bike
- Position Your Design: Carefully peel the backing away from the design and position it on the cleaned area of your dirt bike.
- Smooth Application: Use the squeegee to press the design onto the bike, starting from the center and moving outward to eliminate air bubbles.
- Use a Heat Gun (Optional): For complex curves or areas, use a heat gun to warm the vinyl slightly, allowing it to conform better to the surface.
- Cure the Vinyl: Allow the graphics to cure for 24 to 48 hours before exposing them to intense conditions or riding.
Additional Tips
- Testing: Always test your designs on a small scrap piece before the main application to avoid errors.
- Avoid Direct Sunlight: Do not apply your graphics in direct sunlight to prevent bubbling.
- Troubleshooting: If bubbles occur during application, gently lift the vinyl and reapply, or puncture the bubble with a pin and smooth it out.
Conclusion
Creating your own dirt bike graphics with a Cricut machine is not only a fun project but also allows you to personalize your motorcycle according to your style. By following this step-by-step guide and choosing the right materials, you can achieve professional-looking results.
For those looking for ready-made options, check out our collection of dirt bike graphics for various models.

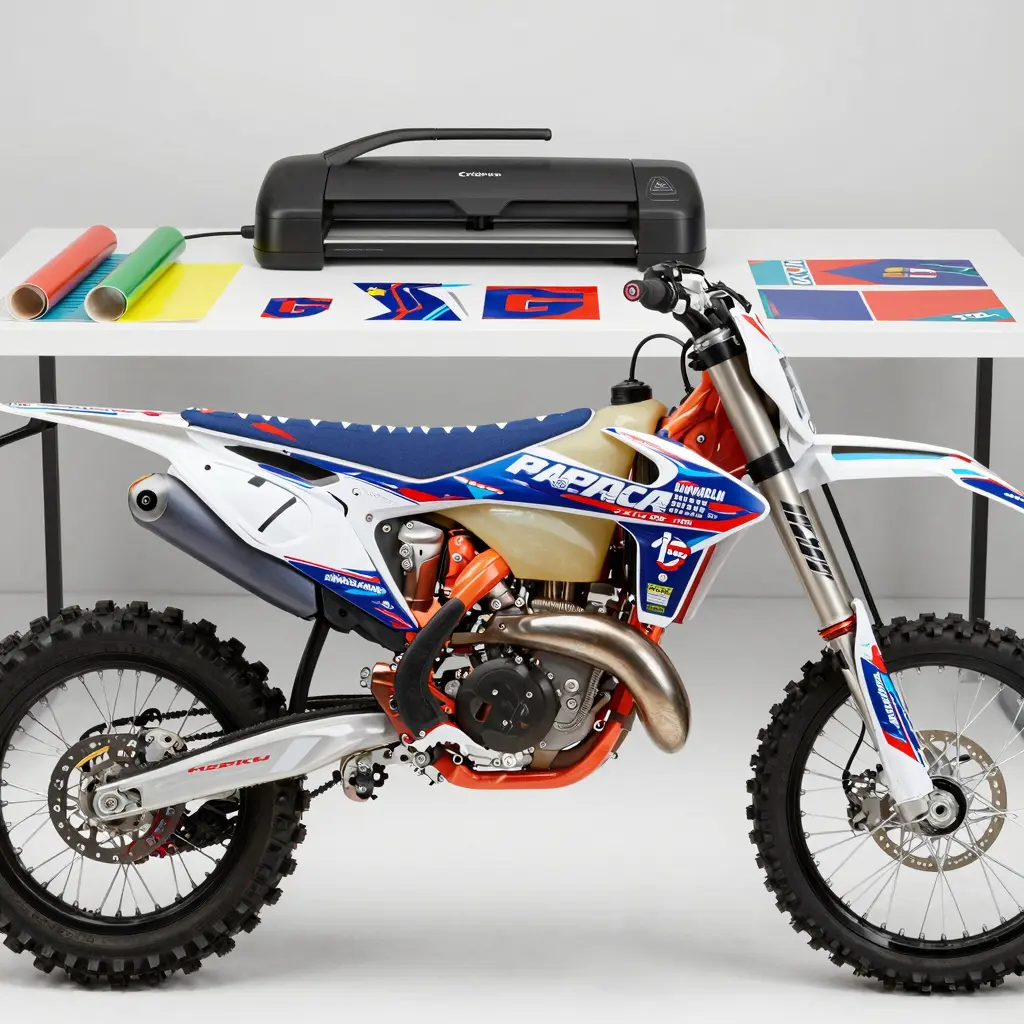
An illustrative image showcasing a dirt bike with custom graphics designed with a Cricut machine. This visual representation appeals to motorcycle owners looking to personalize their bikes effectively.
Best Practices for Maintaining Dirt Bike Graphics
Keeping your dirt bike graphics in top condition not only enhances its aesthetic appeal but also prolongs the life of your bike’s protective features. Whether you’re a motorcycle owner or a technician, following these best practices for maintenance will ensure your graphics remain vibrant and intact. Here’s a comprehensive guide on cleaning, protection, and repairs.
1. Regular Cleaning
To maintain the integrity of your graphics, regular cleaning is essential. Here’s how to do it properly:
- Use Mild Soap: Choose a mild soap and warm water for washing to avoid any harsh reactions with the graphics.
- Soft Brushes: Utilize a soft brush or microfiber cloth to gently clean the vinyl and painted surfaces, avoiding scratches.
- Avoid Pressure Washers: High-pressure washers can lift edges or damage adhesive; always opt for hand washing.
2. Protect from UV Damage
Sun exposure can cause fading and degradation. Here are some tips to protect your dirt bike graphics:
- UV-Protective Wax: Apply a UV-protective wax or clear coat spray specifically designed for graphics every few months. This helps prevent fading and protects against environmental wear.
- Garage Storage: Store your dirt bike in a garage or covered area when not in use to minimize exposure to sunlight and other damaging elements.
3. Monthly Inspections
Conducting monthly inspections can prevent minor issues from turning into major repairs:
- Look for Bubbles or Peeling: Inspect graphics for any signs of bubbling, peeling, or cracking. If detected, using a hairdryer or heat gun can help re-smooth affected areas.
- Address Problems Early: Early detection and resolution can extend the life of your graphics significantly (up to 50%).
4. Proper Technique Post-Ride
After each ride, there are specific practices to follow:
- Wash within 24 Hours: To prevent dirt and grime from building up, wash your bike within 24 hours after a ride. Use lukewarm water and avoid harsh cleaning agents.
- Dry Appropriately: Use a microfiber towel for drying, which is less abrasive and helps to avoid creating scratches.
5. Protect from Damage
Taking proactive measures can significantly extend the life of your graphics:
- Avoid Extreme Conditions: Steer clear of riding in muddy or sandy environments where debris can scratch or chip your graphics.
- Sealant Application: After washing, consider applying a matte or satin finish sealant for added protection against abrasions.
6. Repairing Damaged Graphics
If your graphics suffer damage, proper repair techniques are crucial:
- Professional Help: Unless you have training in vinyl wraps, seek professional assistance for damage repairs to ensure quality restoration.
- Vinyl Wrap Services: Look into professional vinyl wrap services for replacements rather than attempting DIY fixes unless confident in your skills.
Conclusion
Keeping your dirt bike graphics looking fresh requires dedication and proper care. By following these maintenance tips, you will not only enhance your bike’s aesthetic appeal but also its overall value. For quality graphics tailored to your bike, check out MOTOGRAPHICS bike graphics.
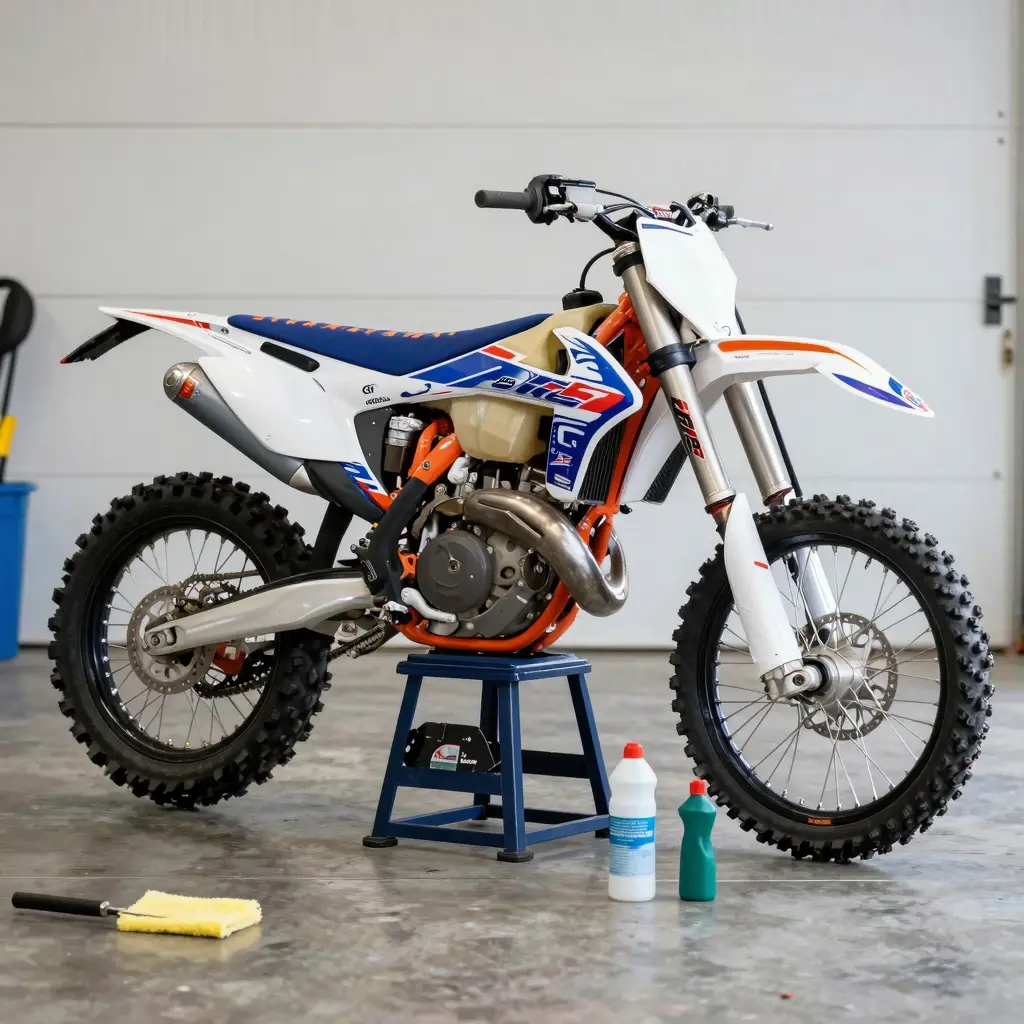
Image showing a clean and well-maintained dirt bike with vibrant graphics.
Dive deeper into maintenance best practices by reading about how to protect and preserve your dirt bike’s custom graphics.
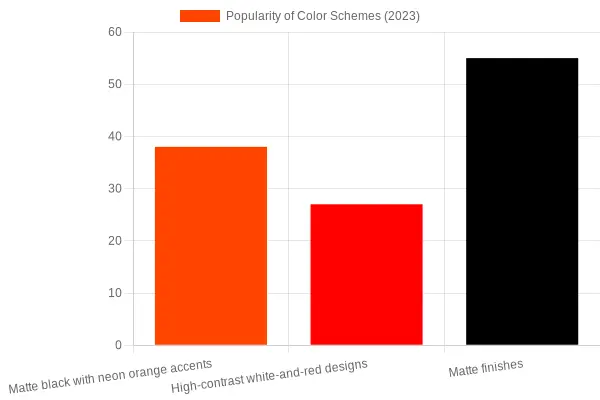
Popularity of Graphics Trends in Dirt Bike Graphics
In recent years, the dirt bike graphics scene has evolved significantly, with various color schemes and design trends gaining popularity. A recent survey reveals the leading preferences among motocross riders for 2023. The data illustrates a clear inclination towards certain trends, emphasizing the evolving needs and preferences for graphic designs.
Key Color Schemes and Their Popularity
Here are some notable findings:
| Color Scheme / Design Trend | Popularity Percentage (2023) | Notes |
|---|---|---|
| Matte black with neon orange accents | 38% | Most popular color scheme among motocross riders |
| High-contrast white-and-red designs | 27% | Classic, bold look favored in competitive racing |
| Urban camo designs | Not specified | Rapidly increasing in popularity, especially in street riding |
| Vibrant colors (e.g., electric blue) | Not specified | Popular among younger riders |
| Matte finishes | 55% increase in demand | Significant rise in preference for non-reflective surfaces |
Design Preferences
Additionally, the survey highlighted design trends such as:
| Design Preference | Description |
|---|---|
| Minimalistic silhouettes | Clean, simple outlines that emphasize the bike’s form |
| Geometric patterns | Structured, symmetrical designs often used in modern graphics |
| Hand-painted flames | Custom, artistic flame motifs popular on show bikes and custom builds |
| Tribal motifs | Cultural-inspired patterns, often seen in personalized builds |
These insights reflect the current demand and are essential for motorcycle owners, repair shops, and technicians to understand the evolving landscape of dirt bike graphics. For more tailored designs, check out our full range of bike graphics.
This graph visually represents the data, indicating not only what is trending but also how preferences have shifted over time in the motocross community.