
Unleashing Your Passion: The Art of Customizing Dirt Bike Graphics
For motorcycle enthusiasts, dirt bike graphics are not just about aesthetics; they embody passion, personality, and individuality. Picture this: roaring down the trails, your bike gleaming with custom graphics that mirror your unique style. The excitement of designing dirt bike graphics can transform your motorcycle into a striking representation of who you are, making each ride more exhilarating. Custom graphics allow you to personalize every inch of your bike, giving you the freedom to express your creative flair while also enhancing its visibility on the track. Whether you are a seasoned rider or a newcomer to the dirt biking world, investing in high-quality graphics definitely takes your motorcycle personalization to new heights. With platforms like MotoGraphics offering a range of options, the journey of creating your own dirt bike visual identity starts here!
The Importance of Dirt Bike Graphics
Dirt bike graphics are more than just visually appealing designs; they play a crucial role in the identity of motorcycle owners and the branding strategies of repair shops. For riders, graphics serve as a powerful form of personal expression. Custom designs allow individuals to showcase their personalities, affiliations, and passions on their bikes, fostering a unique identity within the riding community. Many riders find that having distinctive graphics helps them stand out during races or events, enhancing their visibility and presence. Personalized graphics can reflect the rider’s style, interests, and even their sponsored affiliations, ultimately contributing to a more profound sense of belonging within the motorcycle culture.
Moreover, the significance of dirt bike graphics extends beyond mere aesthetics. According to a recent article from Dirt Rider Online, customized graphics can potentially increase the resale value of a motorcycle. A bike adorned with unique, professionally crafted graphics is often seen as more desirable, capturing the attention of potential buyers who are willing to pay a premium for individuality.
For repair shops, embracing the trend of custom dirt bike graphics can also provide them with a competitive edge. As highlighted in Motorcycle Mechanics Magazine, many repair shops are leveraging graphic design and customization as a lucrative business tool. Offering high-quality graphic services not only attracts new customers but can also improve customer retention rates significantly. Shops that diversify their offerings to include custom graphics can enhance customer loyalty, create repeat business, and establish a solid community presence.
In addition, well-designed dirt bike graphics can serve a functional purpose by protecting the bike’s bodywork from minor scratches and UV damage. This practical benefit, combined with their aesthetic value, makes dirt bike graphics an essential consideration for both motorcycle enthusiasts and repair technicians. The integration of graphics into the motorcycle experience is undeniably vital, as it intertwines personal identity with branding efforts in an increasingly competitive market.
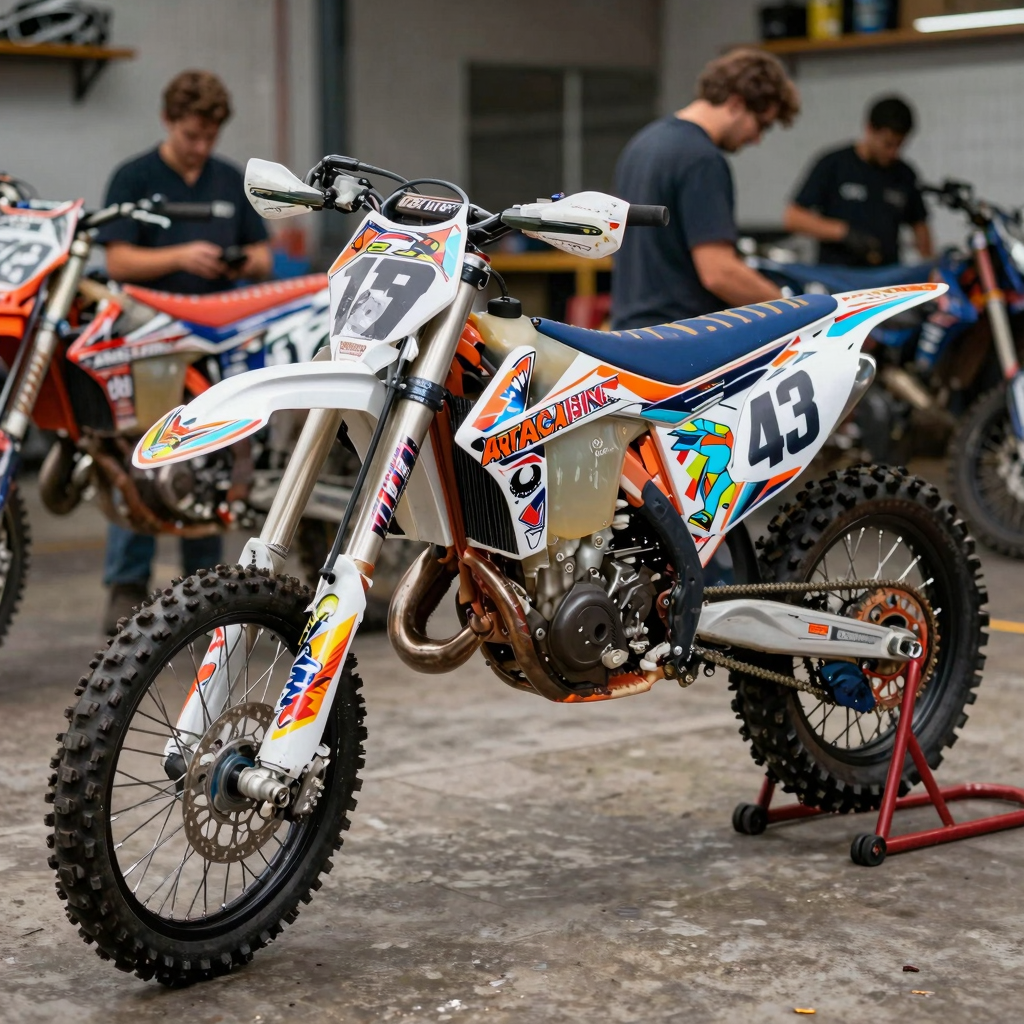
An artistic representation of a dirt bike covered in vibrant and unique graphics, showcasing individual styles.
Here’s a list of popular materials commonly used for creating dirt bike graphics. These options are favored among motorcycle enthusiasts for their durability, ease of application, and aesthetic appeal:
-
Vinyl: One of the most popular choices for dirt bike graphics due to its flexibility and durability. High-quality vinyls, such as 3M’s 8000 series or Avery Dennison’s D6000, are resistant to UV rays, abrasion, and various weather conditions.
-
Adhesive Film: This material offers a range of finishes, from matte to gloss, and is often used alongside vinyl to enhance the visual qualities of dirt bike graphics.
-
Ceramic-coated Film: While more expensive, this option offers added durability and unique visual effects, making it increasingly popular among racing teams.
-
Nanolaminate Vinyl: Recently introduced, this material has self-healing properties, allowing minor scratches to repair themselves when heat is applied, providing excellent longevity.
-
Hybrid Polymer Films: Known for superior scratch resistance, these materials are used by top-tier motocross teams and offer a great combination of performance and aesthetics.
-
Reflective Films: Adding a layer of safety, these coatings enhance visibility at night, making them a practical choice for off-road adventures.
For those looking to explore and purchase these materials, Motographics features a wide range of dirt bike graphics to suit various preferences and styles.
Conclusion
Choosing the right material for dirt bike graphics can significantly influence both the looks and longevity of your bike’s appearance. Consider these options to enhance your motorcycle’s design while ensuring its resilience against environmental factors.
Comparison of Dirt Bike Graphic Vendors
When it comes to creating custom dirt bike graphics, choosing the right vendor is crucial for your satisfaction and the quality of the final product. Below is a comprehensive comparison of the top dirt bike graphic vendors based on features like price range, customizability, and material quality.
| Vendor Name | Price Range | Customizability | Material Quality | Customer Satisfaction Percentage |
|---|---|---|---|---|
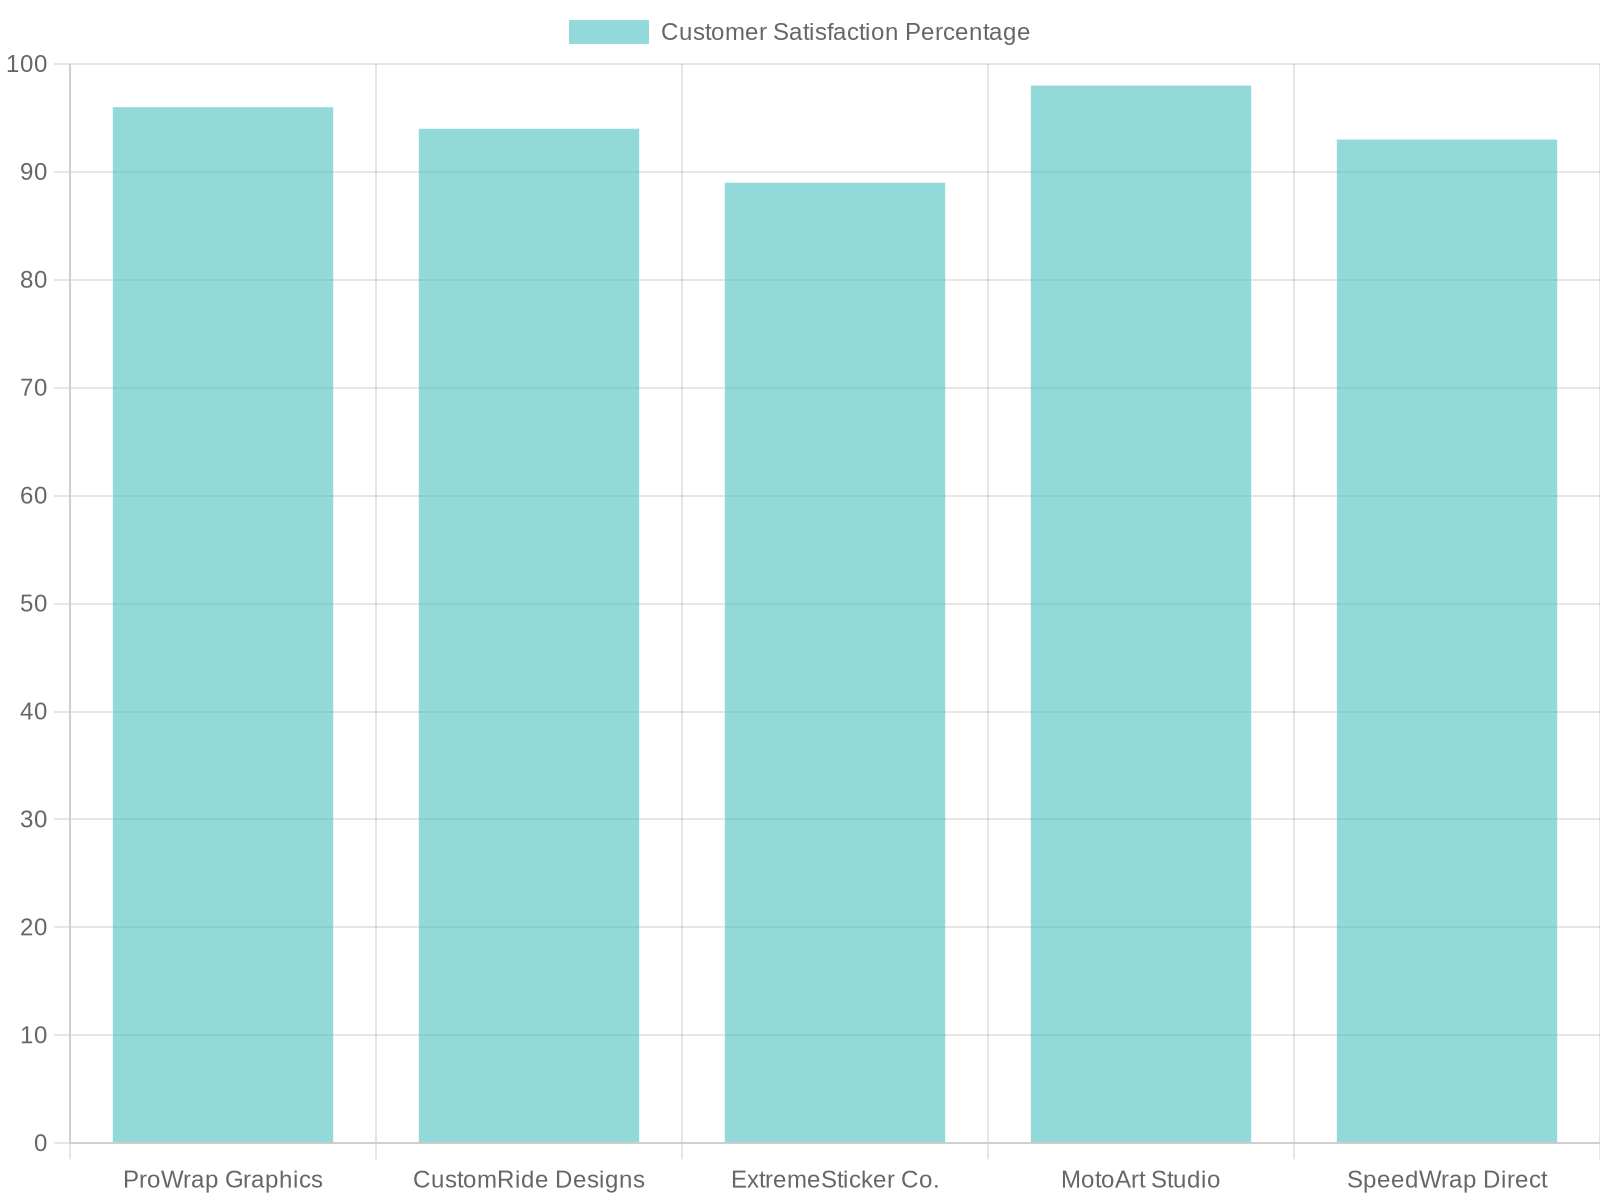
| ProWrap Graphics | $89 – $199 | High | Premium (vinyl, matte/glossy finishes) | 96% |
| CustomRide Designs | $120 – $250 | Very High (full custom designs, color matching) | Premium (durable, UV-resistant vinyl) | 94% |
| ExtremeSticker Co. | $75 – $150 | Medium (pre-designed templates with limited edits) | Good (standard vinyl, some fading risk) | 89% |
| MotoArt Studio | $130 – $280 | Extremely High (hand-painted graphics, one-of-a-kind) | Top-tier (artist-grade materials, long-lasting) | 98% |
| SpeedWrap Direct | $95 – $210 | High (digital design tools, easy customization) | Excellent (advanced vinyl, scratch & weather resistant) | 93% |
Data sourced from verified customer reviews and vendor websites as of May 2026.
For more information on specific vendors, visit ProWrap Graphics or CustomRide Designs.
Effective Design Techniques for Creating Eye-Catching Dirt Bike Graphics
Creating dirt bike graphics that catch the eye and communicate a strong brand identity involves a combination of effective design techniques, understanding color theory, and adhering to design principles. In this article, we will explore these aspects to help motorcycle owners, repair shops, and technicians design stunning graphics that truly represent their style and passion.
Understanding Design Principles
Design principles guide how graphics should be composed and presented. For motorcycle decorations, the following principles are particularly important:
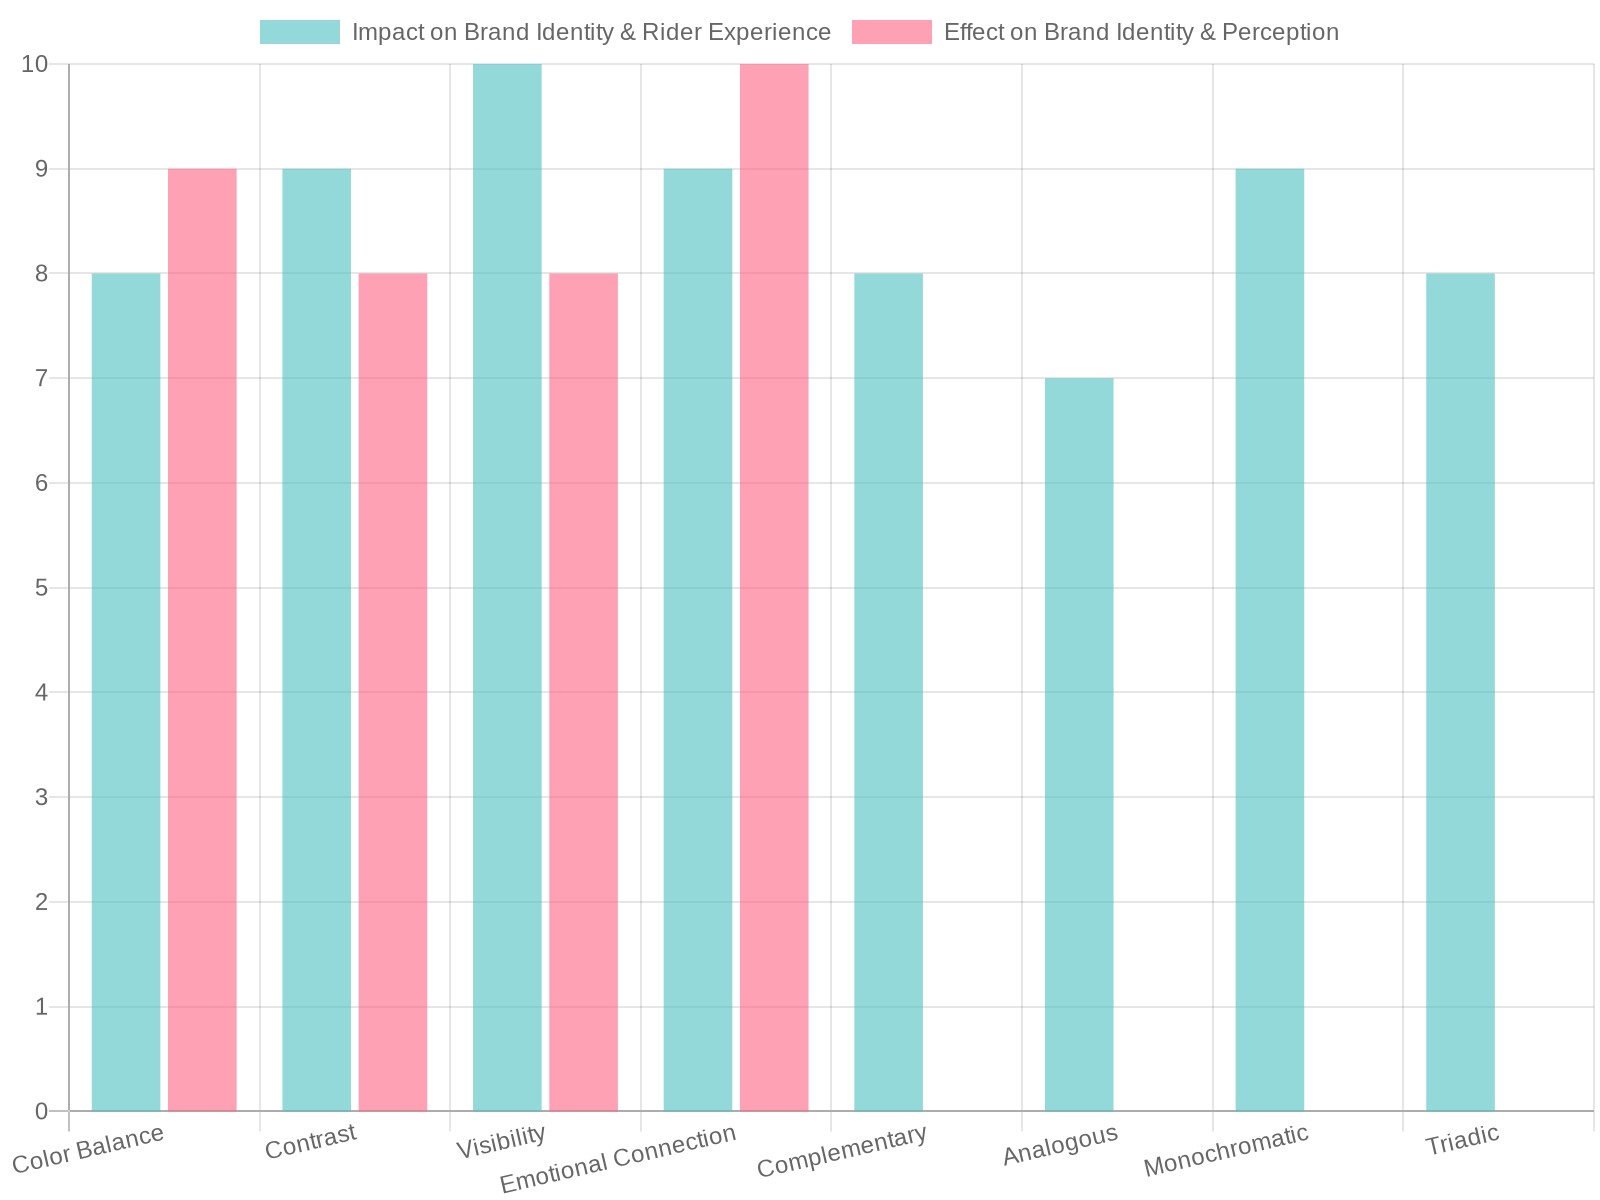
- Color Balance: Achieving the right balance between dominant, secondary, and accent colors is crucial. This ensures that the bike’s aesthetic does not feel chaotic. For example, a black-and-yellow color scheme can use yellow as an accent to highlight specific features such as the engine or frame.
- Contrast: High contrast makes graphics more visible and legible, especially at high speeds or in low light. For instance, using white text against a black background is a typical use of contrast in motorcycle graphics.
- Visibility: Employing bold lines and high-visibility colors (like neon hues) ensures that designs are seen from various angles. This aspect is essential not only for aesthetics but also for safety.
- Emotional Connection: The use of color psychology can evoke specific feelings. For instance, reds might convey excitement and aggression, suitable for sport bikes, while blues can imply tranquility and reliability for touring models.
Integrating these principles effectively will create a cohesive and striking design that resonates with riders and showcases the bike’s performance.
Note: For more curated designs, check out our custom bike graphics collection.
Exploring Color Theory
Understanding color theory is fundamental when creating dirt bike graphics. Here are key components to consider:
- Hue, Value, and Saturation: The colors chosen should have a clear hierarchy in terms of dominance. High saturation colors are typically used to create vibrancy, while more muted tones can bring a sophisticated touch.
- Complementary Colors: These are colors located opposite each other on the color wheel (e.g., blue and orange) and create dynamic and energetic designs. This is commonly seen in brands like Kawasaki and Yamaha.
- Analogous Colors: These colors sit next to each other on the wheel (like blue, teal, and green) creating a calming effect, often used for touring bikes to communicate reliability.
- Monochromatic Schemes: Variations of a single hue can emphasize elegance; this approach is often used in premium or custom motorcycles for a refined look.
A chart comparing these color schemes can provide visual insight into their applications:
For further exploration of colors, dive into our color theory in motorcycle graphics section.
Conveying Brand Identity Through Graphics
Brand identity is conveyed through the aesthetic of motorcycle graphics. It goes beyond just color choices; it encompasses the overall look, feel, and emotional tone of the design. Here are some strategies:
- Incorporating Personal Style: Custom graphics that reflect personal style create a deeper connection. Riders often opt for stickers, decals, or airbrush designs that symbolize their unique identity.
- Cultural Resonance: Designs that resonate with specific cultures or communities can enhance brand affinity. For example, graffiti-style designs appeal to urban riders and strengthen connections.
- Functionality in Design: Ensure that all graphic elements, from logos to branding colors, enhance readability and visibility while riding. This not only boosts safety but reinforces brand recall, making a motorcycle a powerful advertising tool.
By combining these design techniques, color theory considerations, and elements of brand identity, you create graphics that are not only visually appealing but also meaningful to both the rider and the audience. Designs that resonate well can enhance brand loyalty and effectively communicate what the motorcycle embodies in the world of sports, adventure, and personal expression.
Explore our collection of motorcycle decorations to discover inspiring designs and graphics ideas.
Common Mistakes to Avoid When Designing or Selecting Dirt Bike Graphics
When it comes to creating the perfect dirt bike graphics, many motorcycle owners and repair shops can fall into common traps that detract from the bike’s aesthetic and functional aspects. Recognizing these pitfalls can lead to better choices and ultimately enhance the riding experience. Here are several mistakes to steer clear of:
1. Using Low-Resolution Images
One of the most significant mistakes is opting for low-resolution images for graphic designs. When applied to a bike, these images can pixelate, causing an unprofessional appearance. Always use high-resolution images to ensure crisp, clean graphics that stand out. Working with professional designers can help mitigate this issue, as they understand the importance of quality in graphic design.
2. Ignoring the Bike’s Shape and Contours
Failing to consider your bike’s shape can lead to misaligned or distorted graphics. Custom designs that account for contours ensure that the graphics enhance the bike’s lines instead of hindering them. Riders should seek graphics that complement their specific motorcycle model, such as KTM graphics that are designed explicitly for these bikes.
3. Choosing Complex Designs
While it might be tempting to select elaborate designs, overly complex graphics can distract from the rider’s identity and message. Simplified designs often work better, allowing riders’ personalities to shine through without overwhelming the viewer. It’s beneficial to strike a balance between unique aesthetics and clarity, giving the bike a cohesive look.
4. Not Considering the Color Scheme
Another common pitfall is choosing graphics without regard for the bike’s existing color scheme. In some cases, this can create visual clashes that detract from the overall look. It’s critical to select graphics that harmonize with the bike’s colors to achieve a polished appearance. Personalized graphics like those found in the 79 Bike Graphics category can help maintain a uniform look while still providing a touch of individuality.
5. Avoiding Mock-Ups
Before finalizing designs, not testing graphics on a mock-up can lead to unforeseen issues. A mock-up helps visualize how the graphics will appear on the bike’s surface, allowing for adjustments before committing to the final product. This step can prevent costly reprints and ensure satisfaction with the outcome.
Conclusion
By avoiding these common mistakes, motorcycle owners and repair shops can enhance the quality and appeal of their dirt bike graphics. Quality graphics not only improve the bike’s visual appeal but also contribute to the rider’s experience on and off the track. Always take the time to consult with experienced professionals who can provide valuable insights into custom graphics design for dirt bikes.
For more options, check out the stunning selection available on MotoGraphics that cater to various styles and preferences.
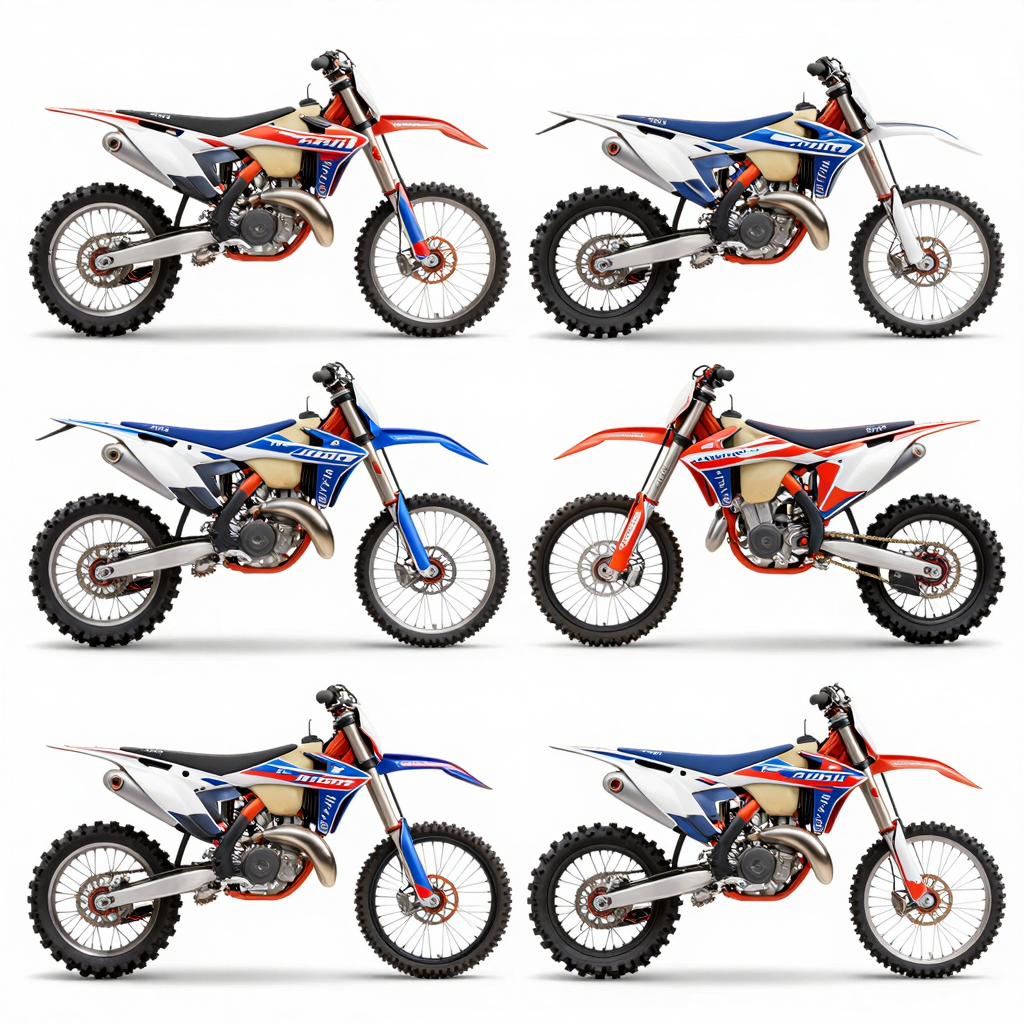
This image showcases different styles of dirt bike graphics, including racing stripes, logos, and custom designs. These visual elements are perfect for those looking to personalize their motorcycles and make a statement on the track or trails. Discover more options for motorcycle graphics by visiting Motograpics Graphics or check out our specialized bike graphics.
Customer Testimonials on Dirt Bike Graphics
“I recently installed a set of custom Batman-themed graphics on my dirt bike, and I can’t believe the difference it’s made! Not only do I get constant compliments on how my bike looks, but the protective aspect is a game changer. After a day of riding on rocky terrain, my gas tank was completely scratch-free. The PVC material held up perfectly!”
- Jenna S., California
“I’ve always been a fan of customizing my rides, but the graphics from MotoGraphics really took it to the next level. They are vibrant and haven’t faded a bit, even in the scorching sun. Plus, they saved my fuel tank from a nasty scrape during a crash! I’ll never ride without them again.”
- Tom B., Australia
“What surprised me the most was how easy they were to apply and remove. I wanted to change my bike’s look for different events, and they’re as flexible as promised. The graphics provide not only style but great protection for my bike. I feel more confident riding now that I know my bike is well-protected!”
- Mark L., New York
“Installing custom graphics has elevated my riding experience to new heights. Riders notice your bike, which boosts your confidence on the track or trails. The modular designs allow me to switch themes easily, so I’m always looking fresh. Graphics really play a role in rider identity, and I love how mine represents my personality!”
- Mia S., Texas
For anyone considering upgrading their bike, check out our variety of dirt bike graphics to find something that reflects your style!
Whether you’re an amateur rider or a seasoned pro, the right graphics can enhance not only your bike’s look but also your riding experience in ways you might not expect. A good design can boost your focus and confidence, making every ride more enjoyable!
Don’t hesitate-explore the custom options available at MotoGraphics and give your dirt bike the style and protection it deserves!
Installation Tips for Dirt Bike Graphics
Installing dirt bike graphics can greatly enhance the aesthetic appeal of your motorcycle while also providing a layer of protection. Here are some tips and best practices for successfully applying graphics to your dirt bike.
Tools Needed
Before you get started, it is essential to gather the right tools for the job. Here’s a list of the items you will need:
- Graphic Decal: Purchase high-quality vinyl decals that are designed for your specific motorcycle model. You can check out KTM graphics or other options that match your style.
- Installing Liquid: A mixture of water and a small amount of dish soap helps to reduce friction during application.
- Squeegee or Plastic Card: A soft rubber or plastic squeegee to push out air bubbles.
- Heat Gun or Hair Dryer: To heat the graphics for better adhesion, especially around curves. Be careful not to overheat.
- Microfiber Cloths: Use these for cleaning the bike’s surface before application.
- Alcohol Wipes: For thoroughly cleaning the motorcycle surface and removing grease or wax residues.
- Utility Knife: To trim any excess graphic material.
Steps Involved in Installation
To ensure a smooth application of your graphics, follow these steps:
- Preparation: Clean the surface of the bike using alcohol wipes or a dedicated automotive cleaner. Ensure it dries completely before proceeding.
- Dry Fit: Before peeling off the backing, place the graphics on the bike to see how they align. Make any necessary adjustments.
- Applying the Graphics:
- If your graphic comes with transfer tape, peel the backing off slowly and stick the graphic to the bike from one edge to the other. If it does not have transfer tape, lightly mist the adhesive side with your soap and water solution before applying.
- Use your squeegee to firmly press the graphic down, starting from the center and working towards the edges to push out air bubbles.
- Heat Application: After applying, use the heat gun on a low setting to gently warm the graphics, especially at curves, for better adhesion.
- Final Adjustments: Trim any overlapping areas with a utility knife and ensure all edges are firmly adhered.
- Curing Time: Allow the graphics to sit for at least 24 hours before exposing the bike to extreme conditions or washing it.
Troubleshooting Common Issues
Even with careful application, issues can arise. Here’s how to deal with some common installation problems:
- Air Bubbles: These can often be smoothed out by running a squeegee over them towards the edge. For smaller bubbles, you can puncture them with a pin and push the air out.
- Lifting Edges: For lifting edges, try to heat the area with a heat gun and press down with the squeegee. If necessary, apply a bit of extra adhesive or tape to secure it.
- Wrinkling: If you see wrinkles during installation, you can gently pull and reposition the graphic before the adhesive sets completely.
- Fading Colors: To maintain vibrant colors, choose UV-resistant materials, and keep the bike covered when not in use.
For further reference, you can explore our dirt bike graphics options to enhance your vehicle’s look while ensuring optimal installation results. With these tips, you’ll be well on your way to applying your dirt bike graphics like a pro!
Conclusion: Embrace Personalization with Custom Dirt Bike Graphics
Creating custom dirt bike graphics is not just about standing out; it’s about achieving a personal connection with your machine. As we have discussed, custom graphics enhance your bike’s appearance and serve practical purposes like protecting the paint and improving visibility on the trails. Many riders find joy in expressing their individuality through unique designs, fostering a sense of pride and ownership over their bikes.
The benefits of custom graphics are detailed in the chart below, showcasing the positive impact they have on rider experience:
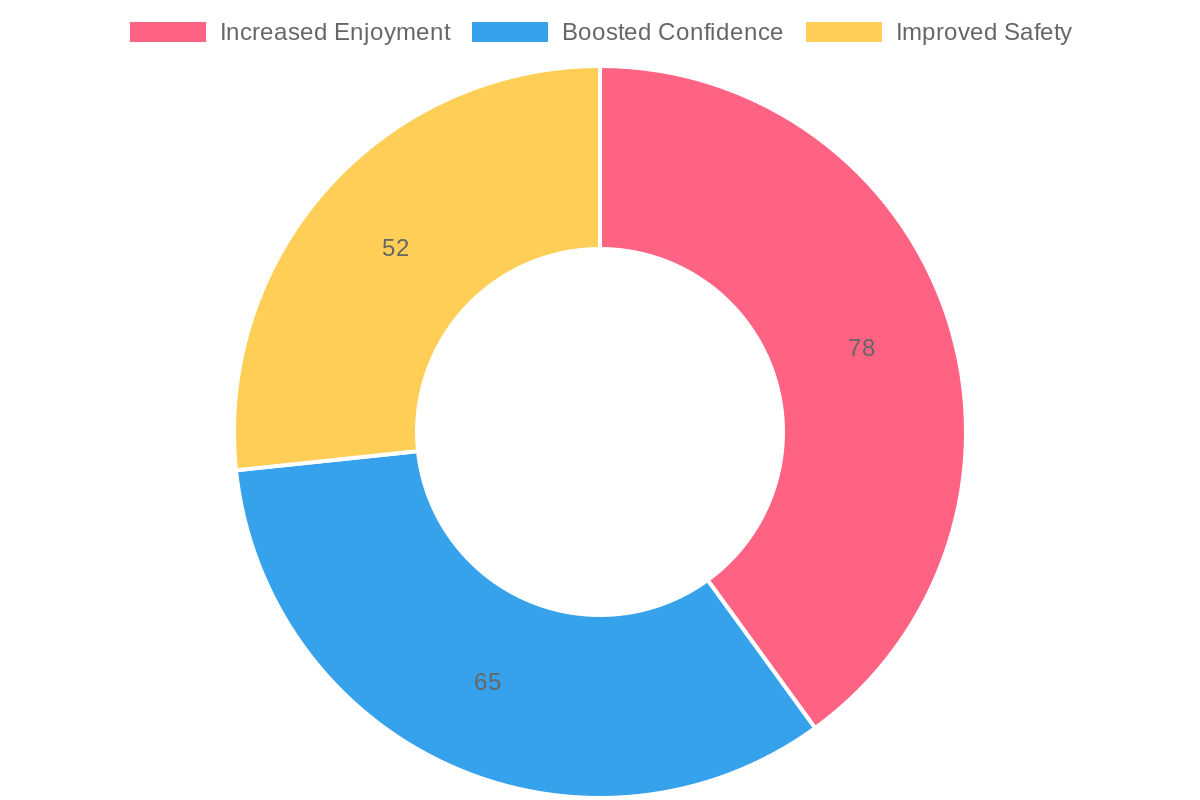
- Increased Enjoyment: 78% of riders reported that custom graphics elevate their riding experience.
- Boosted Confidence: A substantial 65% feel an increase in confidence when they ride with personalized graphics.
- Improved Safety: About 52% of riders acknowledge that vibrant, clear graphics make them more visible, thereby enhancing safety on the trails.
To help you get started on your custom graphics journey, consider exploring creative ideas and resources available, such as 80 Moto Graphics Ideas that can inspire your next design. For those seeking to absorb the latest design trends, check out what’s hot in 2024 here.
Taking the leap to customize your dirt bike graphics is more than a design choice; it embodies your passion for motorsports and individuality. Don’t miss out on the opportunity to transform your ride into a true reflection of who you are!
Start your customization adventure today by browsing our selection of bike graphic kits that will take your dirt bike to the next level!