
Defining the Visibility Question
How visible a bike is on a night trail comes down to materials, not styling. When riders compare cool dirt bike graphics for night trail rides, the decision that matters is reflective vinyl against standard vinyl. Reflective film is a pressure-sensitive material built around a layer of microscopic glass beads or micro-prisms; light that hits it comes back toward wherever it came from, so the graphic flares when a headlight or helmet lamp finds it. Standard vinyl is a printed or solid-color adhesive film with no optical layer, seen by contrast and color alone.
After dark there is very little ambient light to work with. Riders see what their own lamps and the lamps of the group ahead reveal, and anything that does not return light stays effectively invisible until it is close. For a shop owner, rental fleet manager or event operator, that gap in standard vinyl visibility affects rider spacing, group briefings and how fast a bike is identified on a dark section of trail. Riders on electric platforms such as Surron Light Bee graphics meet the same problem with one extra twist: a quiet drivetrain gives less audible warning of an approaching bike.
This article compares the two across five practical criteria: reflectivity, durability, cost, installation and maintenance.
How Reflective and Standard Vinyl Behave Under Light
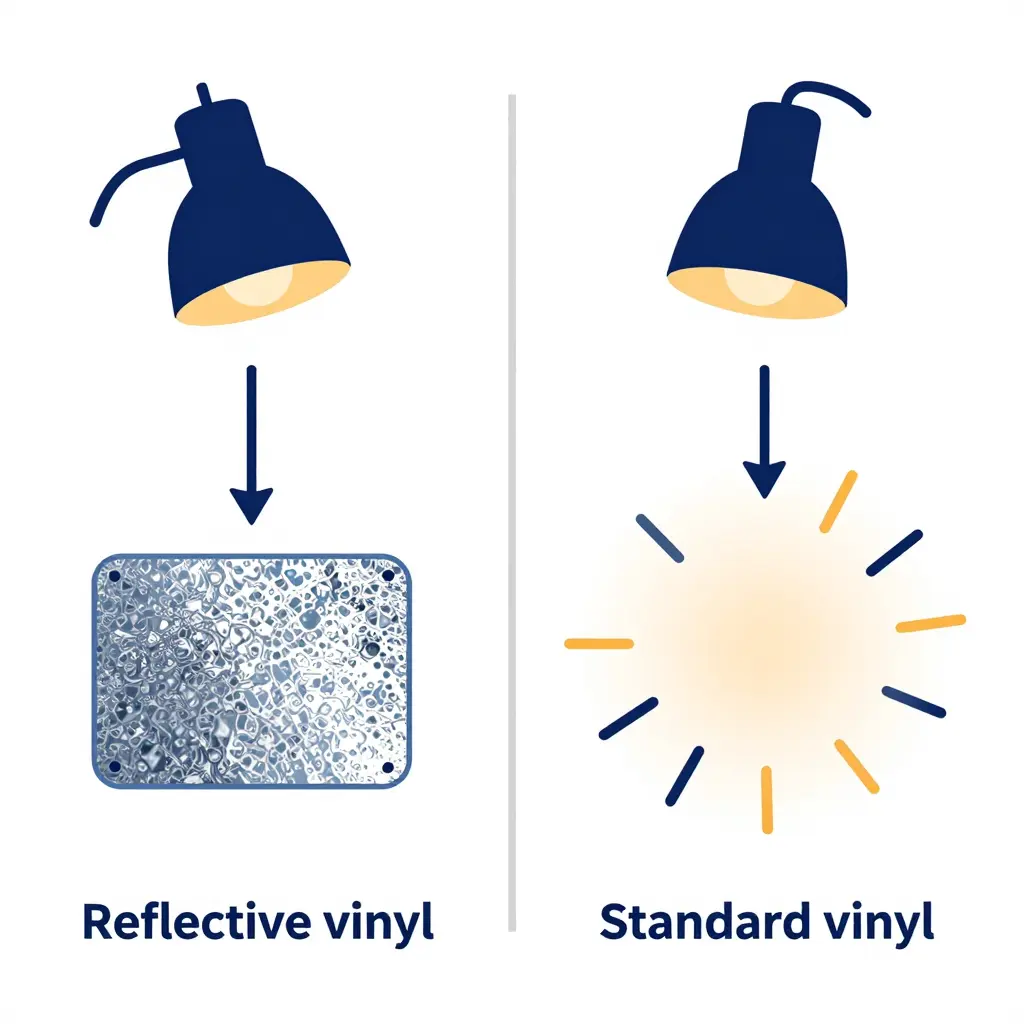
Everything here follows from retroreflection. A retroreflective surface catches incoming light and sends it back along almost the same path it arrived on, so the beam travels back to whoever is holding the lamp. A printed or painted surface does something else: it scatters light in every direction, and only a thin slice of that energy reaches an eye.
What Is Inside Each Film
Reflective vinyl is built in optical layers. Beneath the printed face sits a layer of micro-prisms or glass beads, bonded to a flexible base and sealed under a clear top film. Light entering that layer is bent at the front surface, redirected by the internal geometry of a prism or bead, and refracted out again nearly parallel to the beam that came in.
Standard vinyl has no optical layer. It is ink, a laminate and a backing sheet. Its surface reflects diffusely: bright under a floodlight, fading fast as the viewing angle widens.
| Behavior | Reflective vinyl | Standard vinyl |
|---|---|---|
| Light return | Concentrated back toward the source | Spread evenly in all directions |
| Headlight response | Bright flash from a distance | Mild, angle-limited glow |
| Helmet lamp at close range | Sharp, readable edges | Soft wash of color |
| Low ambient light | Visible outline and shapes | Mostly silhouette |
Headlights, Helmet Lamps, and Low Ambient Light
Under headlights, reflective film throws a concentrated return straight back at the vehicle, so decals appear to ignite long before the bike itself is lit. Standard vinyl brightens only the panel facing the beam, and that brightness collapses as the angle shifts.
Helmet lamps reward reflective film even more, because the lamp sits close to the rider’s eyes and the return travels almost straight back to the viewer. The same lamp on a diffuse surface produces a flat, muddy glow with weak edge definition.
In low ambient light a diffuse surface has almost nothing to work with. Reflective film does not create light and it does not amplify what it receives; it sends a much larger share of that light back toward the lamp. That is what makes it work for a chase bike’s headlight, a lamp behind you, or a lantern at a marshal point.
Contrast Against Dark Terrain
Legibility is a contrast problem. Dark soil, wet roots and shadowed foliage swallow diffuse reflection, leaving a decal that is technically there and functionally invisible. A retroreflective return draws a bright edge against that backdrop, so shapes and color blocks read as graphics instead of a vague smudge. That edge is what makes a bike recognizable at a glance, and it is the reason reflective film earns a place on a night kit. To see the difference on your own machine, our reflective-ready dirt bike graphics kits show the finish options.
How the Light Actually Travels
Standard vinyl has a smooth, matte-to-satin face, so a headlight beam strikes it and scatters in every direction: a little light reaches the rider’s eyes, most of it is lost in the dark. Micro-prismatic reflective vinyl carries thousands of tiny corner-cube structures that catch the incoming beam and bounce it back along the exact path it came from. That is why a reflective kit lights up in the headlights of whoever is behind you while a standard kit stays flat.
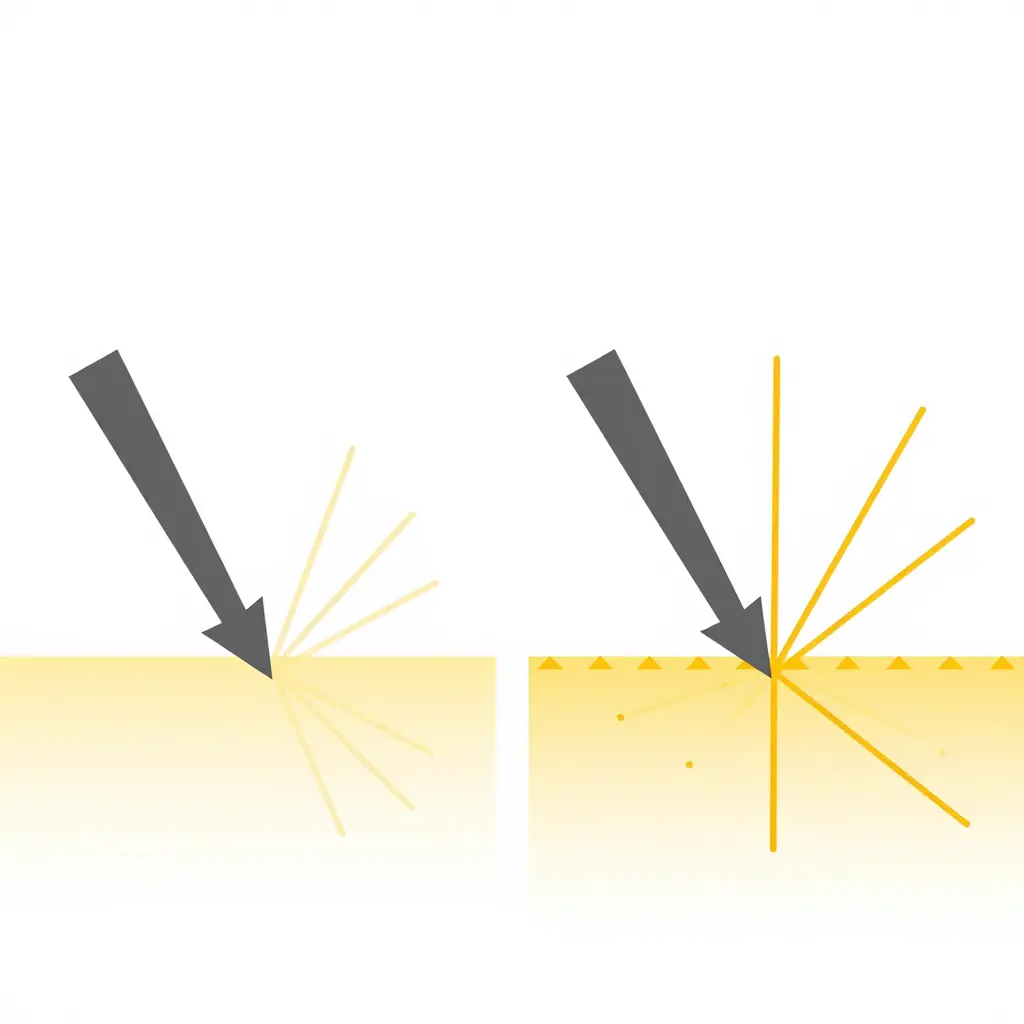
One practical consequence for shop owners: retroreflection is directional, so the angle of the graphics on the shroud, fender and number plates matters as much as the material. A panel angled far off the incoming beam returns very little of it. To see how these prism-backed films look once they are cut and laid down on a real machine, compare the finish options in our reflective dirt bike graphic kits.
Choosing a Reflective Kit: What to Check
When you specify a reflective kit, these are the details that decide whether the extra money buys visibility or just a different look.
- Reflectivity grade. Ask for the film’s grade and light-return rating rather than a vague “glows at night” claim. Match the grade to the trails your customers actually ride: a mid-grade film is fine for lit fire roads, while unlit single-track wants the highest return available.
- Coverage area and placement. Reflectivity only works where light lands, so check how much of the kit is reflective and whether those zones sit on forward-facing shrouds, fork guards and side panels. A handful of reflective logos looks sharp and does very little for visibility.
- Color and graphic contrast. Contrast between the reflective elements and the base vinyl keeps the bike readable in low light and in another rider’s mirrors. Bright reflective against a dark background earns its keep; low-contrast mud tones disappear at dusk.
- Top-film finish. Gloss picks up ambient light better, matte hides scratches and trail grime, satin sits between them. Ask whether the top film is UV-stabilized, because a cheap laminate can dull the reflective layer underneath within a season.
- Adhesive type. Confirm a pressure-sensitive, air-release adhesive that lets an installer squeegee out bubbles instead of trapping them. Repositionable adhesive is worth the extra cost for staff doing bulk installs on curved plastics.
- Fade resistance. Ask for UV data or a warranty. A reflective layer that yellows turns a premium kit into a maintenance complaint, and it loses light return long before it visibly cracks.
- Cleaning tolerance. Check that the graphics survive pressure washing, brushes and solvent-free cleaners without lifting edges or clouding the surface. If your customers wash aggressively, matte laminates and sealed edges hold up better.
- Panel compatibility. Match the cut pattern to the exact model and plastic shape; generic sheets wrinkle on complex shrouds. KTM graphics show how model-specific templates handle tight contours and compound curves.
The table below narrows the same decision to features you can check on a spec sheet.
| Feature | Reflective Vinyl | Standard Vinyl |
|---|---|---|
| Night visibility | Retroreflective beads or prisms throw the beam back toward its source, so the kit reads bright from a distance | Scatters light diffusely, so only a small share returns to the headlight and the panel fades out early |
| Daytime appearance | Slightly satin sheen that reads almost like premium gloss | Deep, punchy color in matte, gloss, or chrome finishes |
| Material construction | Cast vinyl with an embedded bead or prism layer under a clear protective laminate | Printed cast or calendered film with gloss or matte overlaminate |
| Expected lifespan | Three to five years outdoors with routine hand cleaning | Two to four years, often shorter under intense sun exposure |
| Fade resistance | Pigments hold saturation longer, with a UV-stabilized laminate between the print and the sun | Solid initial color that softens gradually under constant sunlight |
| Relative cost | Typically 30 to 60 percent more per full kit | Budget-friendly and the cheapest way to refresh tired plastics |
| Installation difficulty | Comparable to standard vinyl, though thicker film needs firm squeegee pressure | Forgiving and easy to lift and reposition during first contact |
| Maintenance needs | Hand wash only, since abrasive brushes dull the reflective surface | Handles pressure washing and normal trail grime without fuss |
| Best-fit use case | Night riders, group trail runs, and anyone sharing roads after dusk | Daytime trail riders chasing maximum style choice at lower cost |
Choose reflective vinyl where genuine night visibility protects your riders, and standard vinyl where daytime style variety plus budget lead the decision. Either way, matching the material to how the bike is actually ridden keeps model-specific graphics kits looking sharp for years.
Detection distance by lighting condition
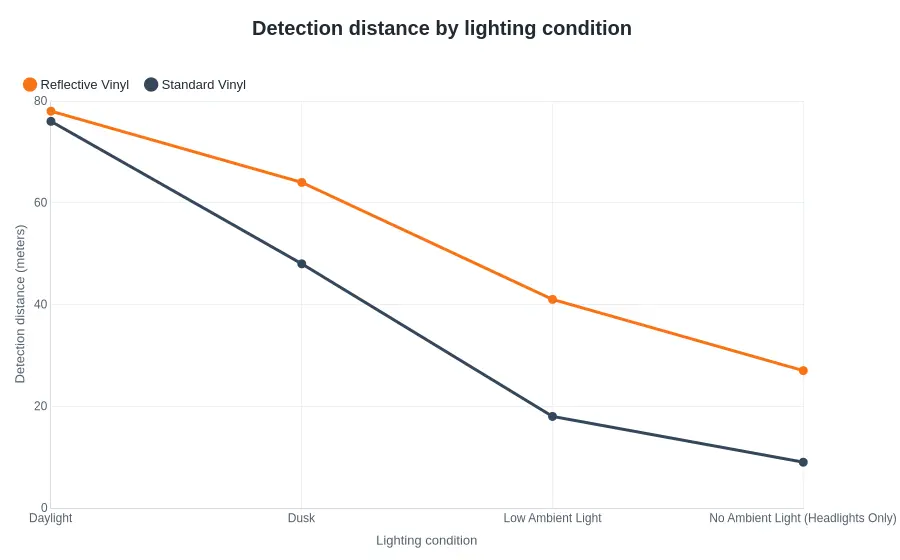
What the lines show: in daylight both films are detected at nearly the same distance, about 78 meters for reflective vinyl and 76 meters for standard. As ambient light falls, detection distance drops for both, but reflective vinyl declines far more slowly: roughly 27 meters with headlights only, against about 9 meters for standard vinyl.
Durability and Fade Resistance: How Each Vinyl Holds Up
Night rides are hard on graphics in ways daytime riders rarely notice. Moisture, mud, temperature swings and long daytime storage all attack the same decal from different angles, and the difference between reflective vinyl and standard cast vinyl shows up over months, not minutes.
Moisture, mud, and wash cycles
Both materials rely on a pressure-sensitive adhesive that bonds best to clean, cured plastics. Wet mud followed by high-pressure washing is the real test, because water creeps under any lifted edge and lifts it further. Good reflective vinyl carries a sealed top film that resists the creep; cheaper standard vinyl frays at corners and edges first. Hand washing with mild soap and a soft mitt, then a quick dry, adds seasons to either one.
Temperature swings and UV storage
Cold nights make vinyl stiffer and less forgiving; hot afternoons soften adhesive and let edges migrate. That cycling is manageable. The bigger threat is daytime UV while the bike sits outside. UV breaks down pigments and clear coats, so colors go chalky and whites yellow before the film ever peels.
Why fade resistance matters for both materials
Fade resistance protects two things at once: the look you paid for and, on reflective film, the performance. Once a reflective layer oxidizes it scatters light instead of returning it, so the drop in reflectivity lands exactly when night visibility matters. On standard vinyl, fading is cosmetic, but it still makes a kit look tired long before the adhesive fails.
Top-film quality is the longevity lever
A cast vinyl base under a quality laminate is what separates a kit that lasts from one that fails early. The laminate takes the abrasion from boots and pressure washing, blocks UV and keeps the edges sealed. Thin laminates save money upfront and cost a replacement kit mid-season. Our premium fade-resistant graphics kits list laminate specs you can compare before ordering.
Realistic service life
The ranges in the comparison above assume routine hand cleaning. A bike that lives outdoors, gets washed with a pressure washer and sees mud most weekends sits at the bottom of them: one to two years from standard vinyl, two to three from well-laminated reflective vinyl. Store the bike covered between rides and the top of each range is realistic. For most riders, choosing dirt bike graphics with a proper top film costs little more and pays that back in fewer replacements.
Cost and Inventory Planning: Reflective vs. Standard Vinyl Kits
If you are deciding what to stock, treat the two products as two different businesses. Standard vinyl kits behave like a commodity: low material cost, familiar production steps, and pricing set by what the rest of the market charges. Reflective graphics behave more like an accessory line, with a higher input cost per square foot and more careful handling, but far more room to position the product as a premium tier, especially for riders hunting cool dirt bike graphics that stay visible on night trail rides.
The cost picture, side by side
| Cost factor | Standard vinyl | Reflective graphics |
|---|---|---|
| Material | Calendered or cast base film, lowest cost per sq ft | Retroreflective sheeting, typically a multiple of base film cost |
| Printing | Standard eco-solvent inks, forgiving color match | Requires ink/laminate compatibility checks and more test prints |
| Cutting and weeding | Fast contour cutting, simple weeding | Film dulls blades sooner, slower weeding, more blade changes |
| Lamination | Optional gloss or matte | Usually required to protect both print and retroreflective performance |
| Design time | Base artwork only | Same artwork plus a lighter base layer so graphics read clearly when unlit |
| Scrap rate | Lower | Higher, because test prints are unavoidable |
| Price headroom | Tight, market-anchored | Wider, supported by the novelty and visibility angle |
| Inventory turn | Fast, sell several designs deep | Slower, hold one or two units per design |
Positioning the two tiers
Keep standard vinyl as the volume seller: several designs deep, priced competitively, carrying the day-to-day traffic. Build the reflective line as a deliberate premium tier, with three to five hero designs drawn from the existing catalog, such as these popular dirt bike graphics kits, priced roughly 1.4x to 1.8x the standard equivalent. Describe the mechanism factually: retroreflective sheeting returns light toward its source, so the kit appears bright under a headlight. Avoid promising crash protection or safety outcomes.
Calculating margin per kit
Use one formula and apply it to both tiers:
- Landed cost per kit = material + inks + laminate + cutting and weeding labor + packaging + freight and duty + expected scrap (add roughly 8-12% on reflective runs).
- Design amortization = design and proofing cost / units you realistically expect to sell.
- Gross margin per kit = retail price – (landed cost + amortized design).
- Gross margin % = margin per kit / retail price.
A standard kit retailing at 89 with a landed cost of 30 returns 59 per kit; a reflective kit at 139 with a landed cost of 58 returns 81. The reflective sale earns more dollars but a thinner percentage, 58 against 66, and it ties up more cash per unit. Track margin per kit alongside units turned per month before you commit shelf space.
Cost Composition of a Reflective Graphics Upgrade
Reflective vinyl changes the sticker budget, though less than many shop owners assume. The surprise is rarely the film itself; it is the extra handling time and the care the install takes. The breakdown below is typical when a kit moves from standard vinyl to a reflective build for night trail riding.
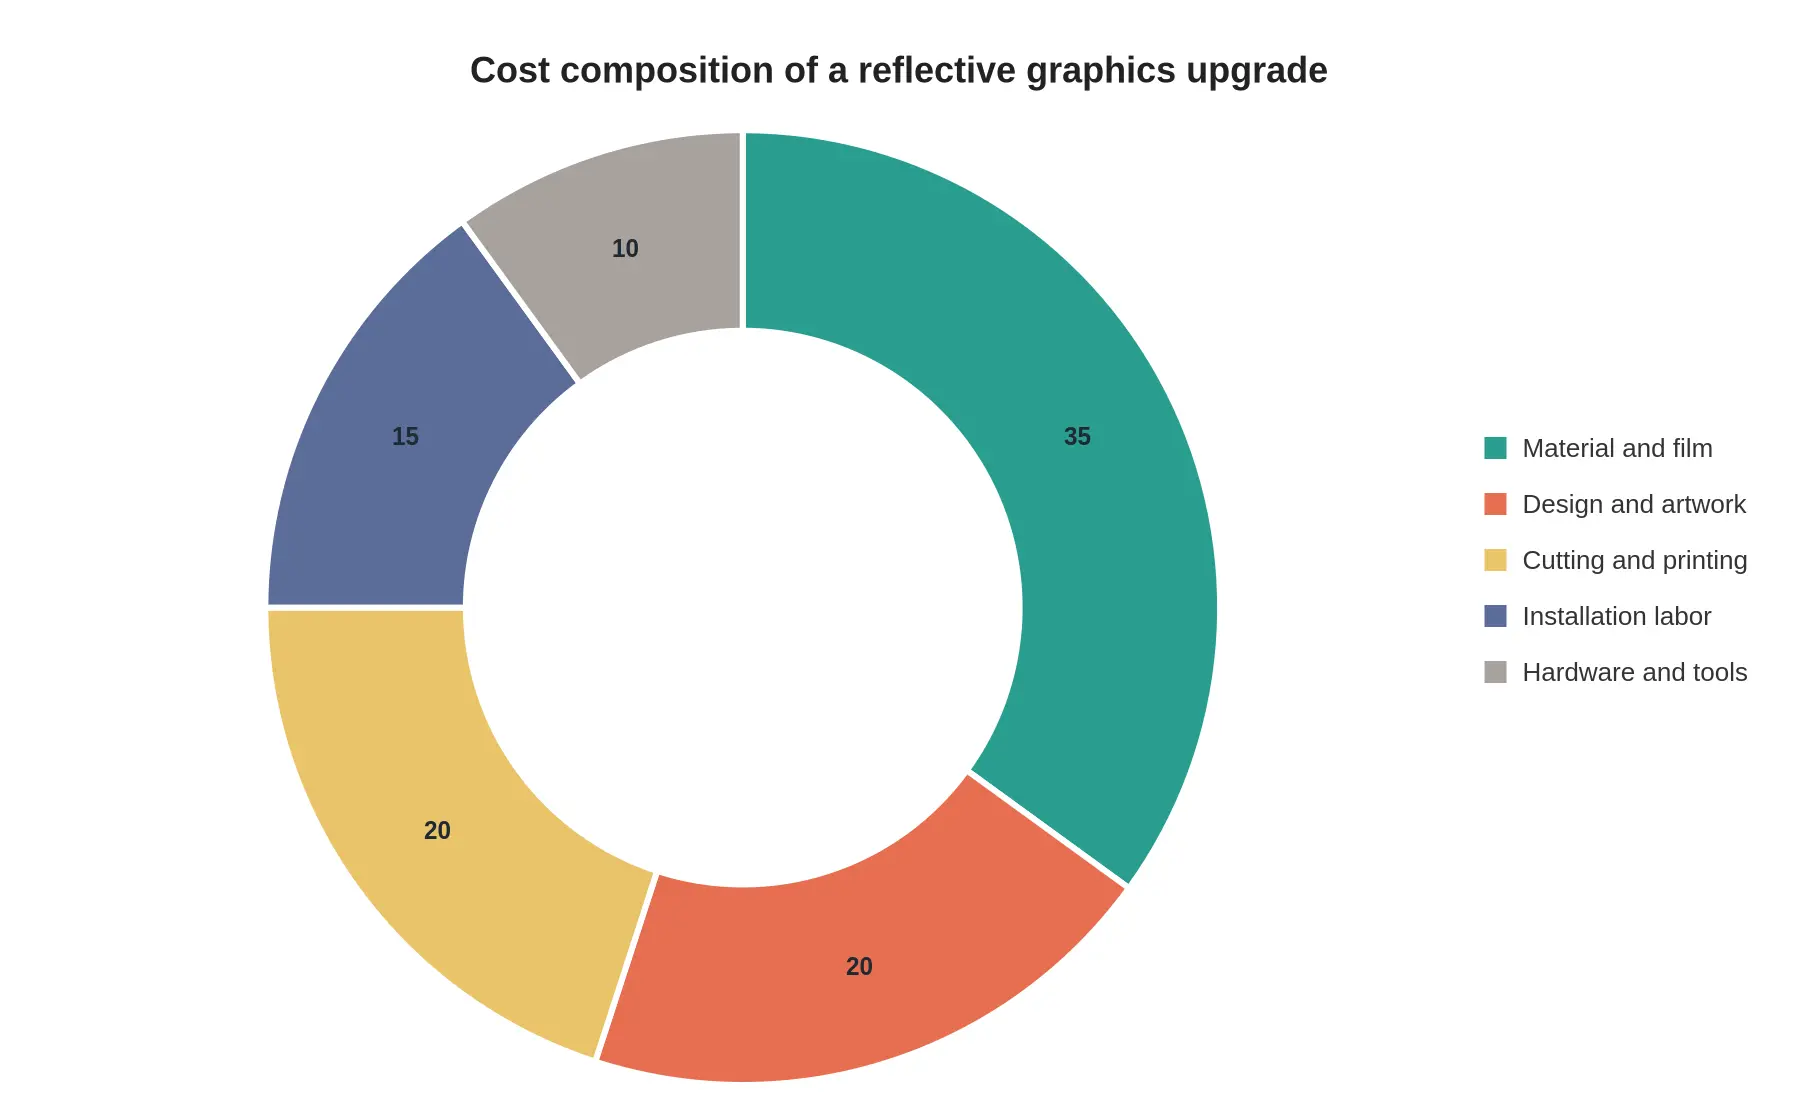
The percentages above are approximate planning estimates for a typical reflective graphics upgrade and will shift with kit size, film brand, and local labor rates. Treat them as a budgeting guide, not a quoted price breakdown.
What the numbers tell you
Material and film is the biggest single line item, which follows from the price of reflective sheeting: several times the per-square-meter cost of standard calendered or cast vinyl. Design and artwork holds near a fifth, because reflective stock is unforgiving of artwork that leans on fine gradients; solid shapes and clean edges are what read at night.
Cutting and printing land in the same range. Reflective sheets wear blades faster, weeding small details takes longer, and print layers have to be compatible with the film’s optics. Installation labor takes about 15 percent, since reflective panels are stiffer and less tacky, which rewards a patient installer. Hardware and tools is the smallest slice, and skipping it is how you end up with lifting edges after the first wet trail ride.
If you are weighing the upgrade for a specific bike, compare across models first: the KTM graphics kits range shows how much base price already varies with coverage and print complexity. For a shop selling to night riders, the practical move is to quote the reflective upgrade as a materials-driven line item rather than a labor surcharge. The margin conversation gets easier once the cost sits where it belongs.
Two Builds, One Obvious Difference
Strip the graphics down to a cross-section and the story gets simple. Both materials share the same clear top film, the same printed ink layer and the same adhesive underneath. The fork comes in the middle: standard calendered vinyl uses a dyed vinyl base, while reflective vinyl replaces that base with a retroreflective layer of microscopic glass beads or micro-prisms. That layer is what grabs a headlight beam at night and throws it back at the rider behind you.
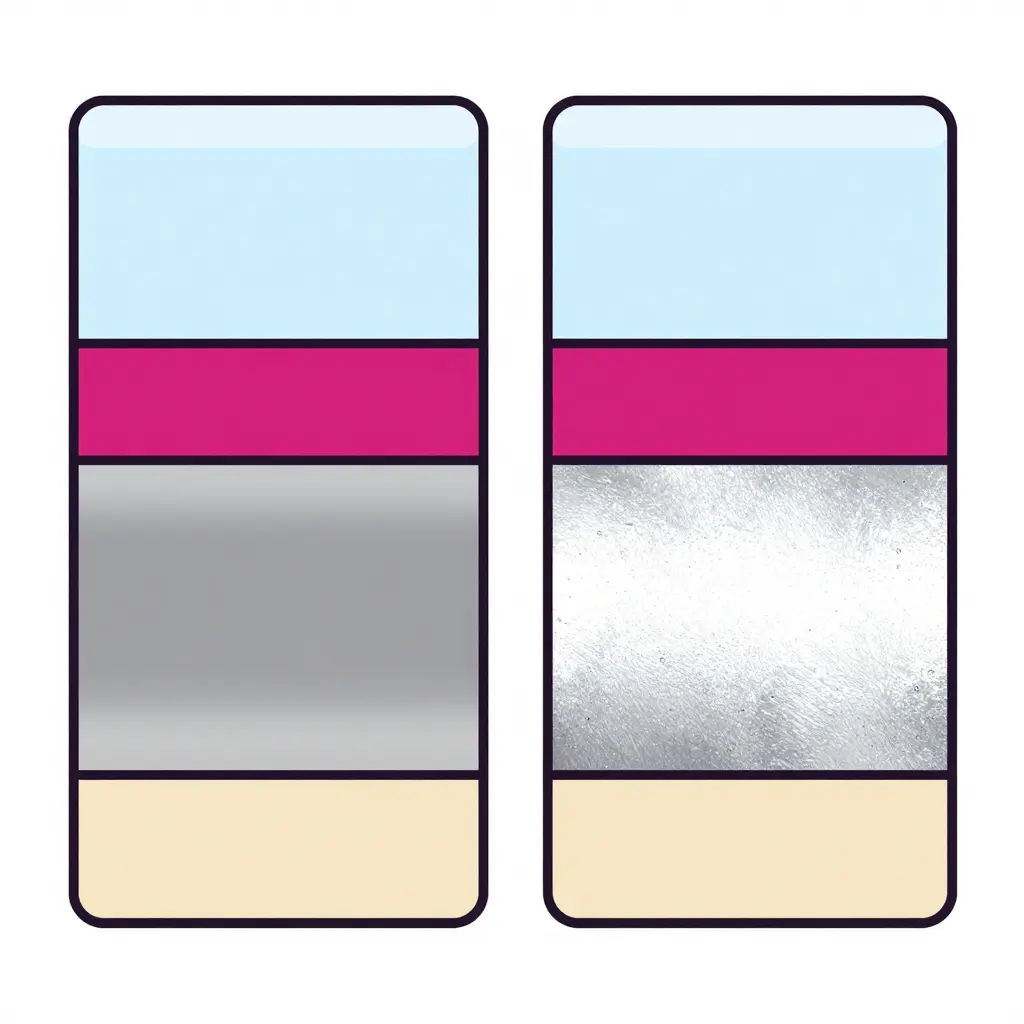
The extra layer is also why reflective kits cut a little differently and ask more of the installer. If you are weighing the upgrade for a specific bike, the KTM graphics lineup shows which kits come in the reflective build.
Installing and Maintaining Reflective vs. Standard Dirt Bike Decals
Fitting a kit is one job; keeping the finish alive is another. Reflective film behaves differently from standard cast vinyl at every stage, from prep to the wash bay, so it pays to have one process your techs repeat every time.
Prep the surface before you peel anything
Both films want the same clean stage: wash the plastics with mild soap, rinse, wipe the panel with isopropyl alcohol and let it flash off completely. Skip that and standard decals lock in dust, while reflective vinyl loses grip at the edges first. Freshly painted or porous plastics need 24 to 48 hours of cure time, because outgassing under a decal shows up as a blister a week later.
Respect the temperature window
Apply between roughly 20 and 30 °C (68 to 86 °F). Cold film cracks instead of conforming, and heat above 35 °C makes reflective film stretch and dulls its micro-prisms. Warm the panel, not the sheet.
Squeegee technique for trapped air
Use a felt-wrapped squeegee at about 45 degrees and work from the center outward in overlapping strokes. Reflective film is thicker and stiffer than standard material, so run two passes and chase a trapped bubble by lifting an edge rather than stabbing it with a pin. A pinhole is a permanent entry point for moisture.
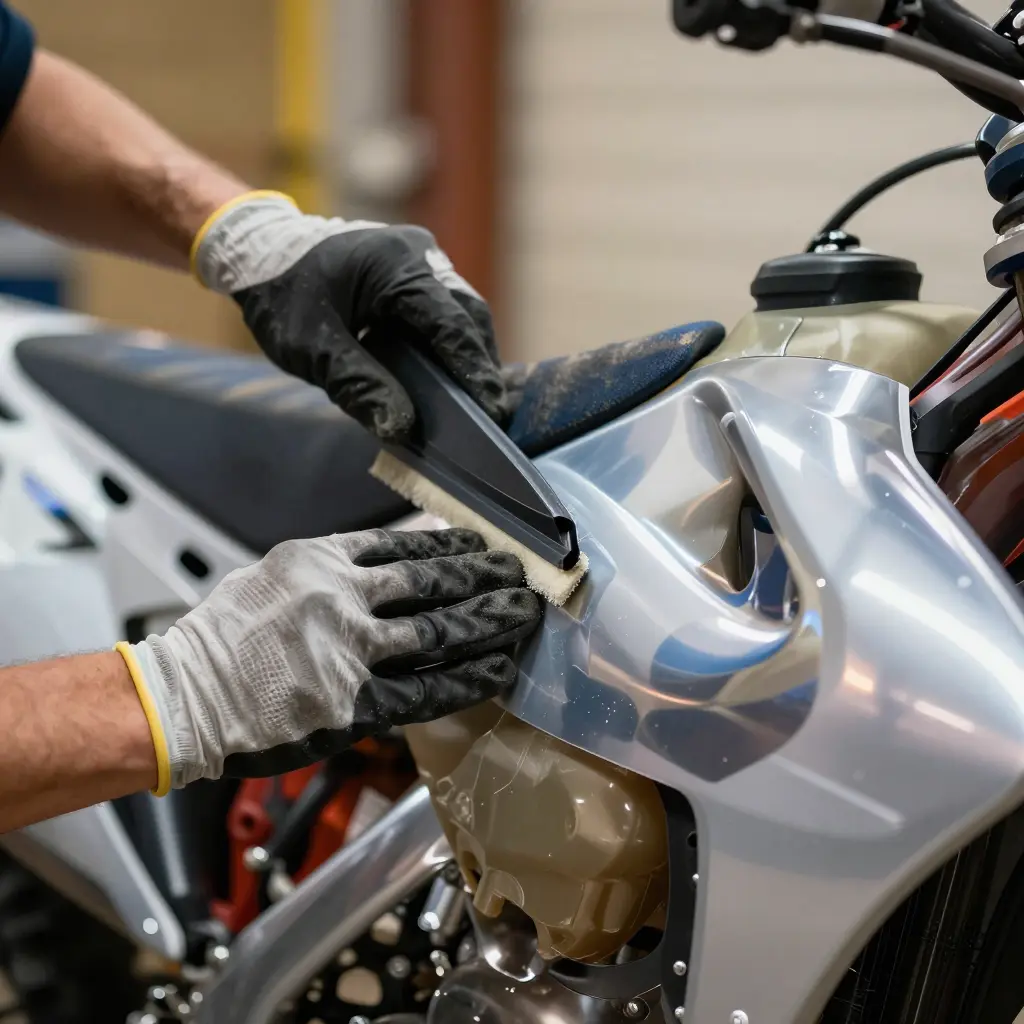
Trim around the reflective layer
Cut with a fresh blade at a low angle and always trim away from a reflective edge, never across it. Dragging a dull blade over the layer lifts the foil and kills the retroreflective effect. Leave a 2 to 3 mm border on compound curves so the film has somewhere to relax.
Wash and chemical care that preserves reflectivity
Hand wash with pH-neutral soap, keep a pressure washer at least 30 cm from the edges, and keep solvent degreasers, abrasive polishes and wax off reflective panels. Wax fills the prisms and the kit stops throwing light back at headlamps. Match the film to the conditions your customers ride in with our shop-ready graphics kits built for trail abuse.
Maintenance intervals to tell customers
| Task | Standard vinyl | Reflective vinyl |
|---|---|---|
| Full wash and rinse | Every ride | Every ride |
| Edge check and press-down | Monthly | Every two weeks |
| Inspection under bright light | Quarterly | Monthly |
| Full replacement | 2-3 years | 3-5 years |
Give every customer the same script: check edges after each wash, skip automated brush tunnels, and book a free edge-seal inspection at the first monthly service. That habit keeps dirt bike decals looking sharp and keeps reflective kits reflecting.
Matching Graphics Kits to Your Specific Platform
Reflective vinyl only works where it actually sits on the bike. A kit cut for the wrong model leaves gaps at shroud curves, overlaps bolt holes and forces installers to trim away the panels that carry the reflective layer. Fitment accuracy and panel shape decide how much reflective coverage survives installation, which is why a model-specific kit beats a universal sheet trimmed by hand in a dim garage at 11 pm.
For electric platforms, bodywork geometry varies from brand to brand. The compact panels behind 79bike graphics reward tight, pre-cut shapes, while the broader side plates on eride graphics accept larger reflective blocks without awkward seams. Full-size electric motocross machines need coverage that follows the tall shroud line so the reflective strip stays readable at speed, which is what the Stark Varg MXEX graphics range is templated for. Smaller-run builds get the same treatment through Rerode R1 graphics and Arctic Leopard graphics, where accurate templates matter more because aftermarket panel swaps are common.
Traditional dirt bikes still dominate the trail, and riders on the orange marque should start with KTM graphics built around the stock shroud and fender profile.
The Surron family splits into three distinct shapes, so ordering the wrong one costs coverage. Pair Surron Light Bee graphics with the compact frame, step up to Surron Ultra Bee panels for the mid-size chassis, and use Surron Hyper Bee graphics for the smaller-wheel spec.
Talaria owners face the same decision. The Talaria XXX graphics kit follows that bike’s sharp, angular panels, Talaria MX3 and MX4 graphics are templated as one family across both generations, and the Talaria MX5 and Talaria Komodo each carry their own revised moldings. For a shop stocking a mixed fleet, mapping panel shapes before you order is the fastest way to make sure the reflective area buyers pay for is the reflective area they can actually see.
Frequently Asked Questions: Reflective vs. Standard Dirt Bike Graphics
Does reflective vinyl look different in daylight?
In daylight it usually reads as a soft silver, white or light gray surface rather than a mirror finish. The beads or prisms that make it glow at night are close to invisible under normal ambient light, so printed colors sit on a slightly metallic base. The material changes character only when a headlight or helmet lamp points at it directly.
Can reflective graphics be printed in full color?
Yes. Reflective vinyl takes full-color printing, including multi-color logos, gradients and photographic artwork. Colors read slightly softer or more metallic than the same artwork on standard vinyl, because the reflective base changes how light returns to the eye. Dark shades absorb more light and return less, so designs built on pale panels tend to perform best at night.
How long does reflective vinyl stay effective?
Reflectivity is usually the last thing to go. Quality film can keep returning light for five to seven years outdoors when it is cleaned regularly and kept out of prolonged harsh sun, and the printed color layer or the edges typically fail well before that, which is why the practical service life above is shorter than the five-to-seven figure. Abrasion from boots and roost dulls high-wear zones early, so inspect those areas periodically.
Is reflective vinyl harder to install?
Reflective vinyl is thicker and stiffer than standard film, so it conforms less easily to tight curves, deep recesses and compound shapes. Installers need more heat, a slower pace and extra care to avoid trapping air or over-stretching the reflective layer. Flat panels and gently curved shrouds are straightforward; sharply contoured areas are where the extra effort shows.
Can standard and reflective vinyl be combined on one bike?
Combining both in a single kit is common and practical. Standard vinyl handles large base panels and full-color artwork, while reflective pieces cover numbers, stripes and outlines, which gives standard vinyl visibility a nighttime boost without changing the daytime look. Many kits, including popular KTM dirt bike graphics sets, use this layered approach to balance cost, weight and low-light visibility.
The Verdict: Reflective for the Dark, Standard for the Daylight
The answer depends less on marketing than on where the bike spends its hours. Reflective vinyl measurably improves night visibility: it returns light from headlamps, chase bikes and trailside lamps straight back to the people who need to see you, and its layered construction suits premium builds where finish quality and night visibility both carry weight. Standard vinyl stays the practical default. It costs less, prints crisp saturated color, scales across high-volume fleet and dealer orders, and does everything a daytime bike needs.
A simple framework keeps ordering decisions clean. Start by asking whether your riders honestly log night trail rides, because only genuine after-dark use justifies paying for the upgrade. Then weigh budget against build tier, so stock daytime bikes get standard film while flagship or customer-facing show builds get reflective. Apply that logic per model rather than across the whole catalog, since cool dirt bike graphics sell best when each bike is spec’d for the conditions it actually rides in.
Motograpics produces fade-resistant vinyl decals for motorcycle custom graphics, covering both pre-made designs and custom artwork, including Surron Light Bee graphics for one of the most popular electric dirt bike platforms. Reflective and standard films share identical print artwork; the only difference is how each film returns light once the sun goes down.