
What Are BAPE Dirt Bike Graphics? The Custom Camo Trend Taking Over Motocross
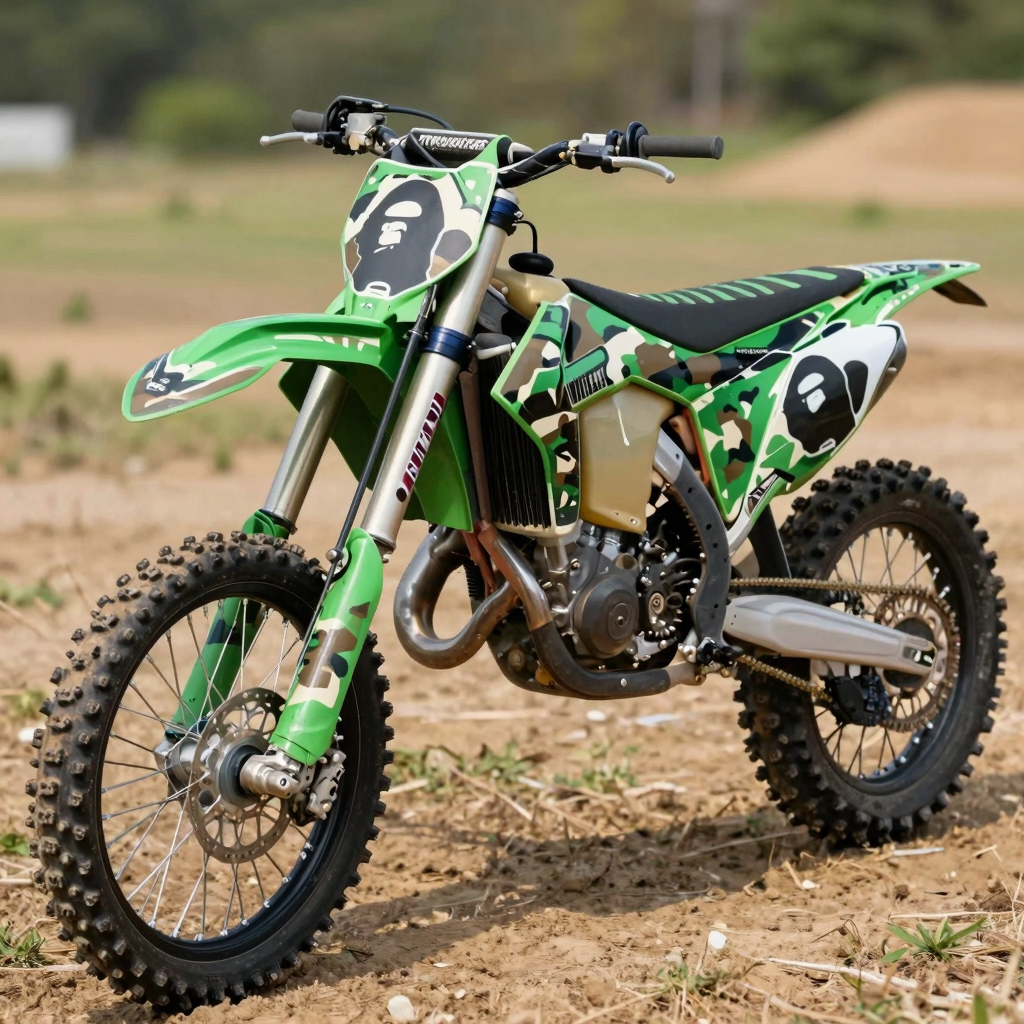
If you’ve scrolled through motoculture feeds lately, you’ve seen them – those unmistakable camouflage patterns with a bold, streetwear edge. BAPE dirt bike graphics are custom graphic kits that replicate the iconic camouflage designs made famous by the Japanese streetwear brand A Bathing Ape (BAPE), applied directly to dirt bike plastics. Think shark-tooth camo, vibrant ape-head motifs, and military-inspired patterns – all wrapped around your fenders, shrouds, and number plates.
These graphics have exploded in popularity because they bridge two passionate worlds: high-end streetwear fashion and hardcore off-road riding. When BAPE collaborated with Can-Am in early 2024 on a limited-edition camo kit for the Renegade X XC 1000T, the motoculture community went wild. Suddenly, a bape camo dirt bike kit wasn’t just a niche customization – it was a statement. Riders want their bikes to reflect their personality, and nothing screams individuality like a full camo wrap inspired by one of the most recognizable brands in street culture.
For repair shops and technicians, this trend means a growing demand for installation and maintenance of high-quality custom dirt bike graphics. More riders are bringing in bikes that need careful heat-gun work, precise alignment, and durable vinyl that can survive mud, rocks, and pressure washers.
In this article, we’re covering everything you need to know: the design aesthetic that makes these kits stand out, how to apply them like a pro (or find a shop that can), real-world durability testing, what you can expect to pay, and the best maintenance practices to keep those camo patterns looking fresh. Whether you’re a weekend warrior looking to upgrade your ride with custom dirt bike graphics or a shop owner wanting to offer the hottest trend to your clients, this guide has you covered. Let’s dive into the world of BAPE-inspired moto style.
When choosing bape dirt bike graphics materials, understanding the differences between each option can save you time, money, and frustration. Below is a side-by-side comparison of the five most popular material types used in BAPE-style dirt bike graphics, covering durability, weather resistance, and real-world cost data.
| Material Type | Durability (1-10) | UV Resistance | Water Resistance | Cost per Kit ($) | Best Use Case |
|---|---|---|---|---|---|
| Vinyl Wrap | 8 | Excellent (UV-stabilized, resists fading 3+ years) | Excellent (fully waterproof, sealed edges) | $80-$130 | Full-coverage custom graphics with complex BAPE camo patterns; ideal for custom dirt bike graphics |
| PVC Sticker Set | 5 | Moderate (begins fading after 1-2 years) | Good (water-resistant but edges may lift) | $40-$65 | Budget-friendly temporary designs; great for beginners or seasonal looks |
| Hydro-Dipped | 6 | Moderate-Good (clear coat helps but can yellow over time) | Good (sealed with clear coat) | $100-$200 | Unique 3D textures (carbon fiber, wood grain) and artistic one-off designs |
| Powder-Coated Plastics | 9 | Excellent (UV-stable pigments, lasts 5-10 years) | Excellent (fully sealed, corrosion-resistant) | $150-$300 | Permanent color changes on frames and plastic parts; best for long-term durability |
| OEM Painted | 10 | Superior (factory-grade UV-400 rated clear coat) | Superior (multi-layer automotive-grade seal) | $200-$500+ | Show-quality finishes and factory restoration; highest appearance and longevity |
Key Takeaway: For riders seeking the perfect balance of affordability, visual impact, and protection, vinyl wrap remains the top choice among bape dirt bike graphics materials. It delivers vibrant BAPE-style camouflage patterns, resists UV damage for years, and can be removed without harming your stock plastics – making it a favorite for both casual riders and professionals. If you’re exploring more styles, check out our guide to dirt bike graphics kits for additional options.
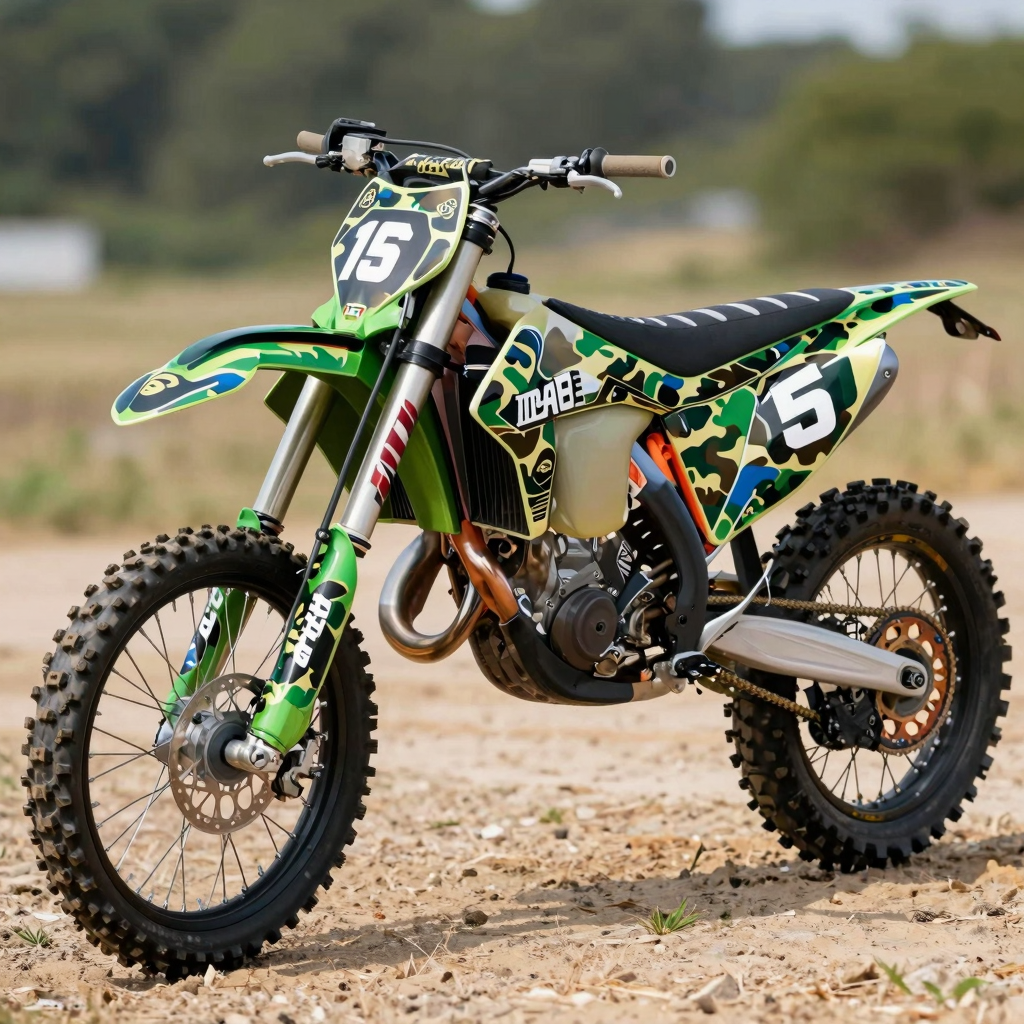
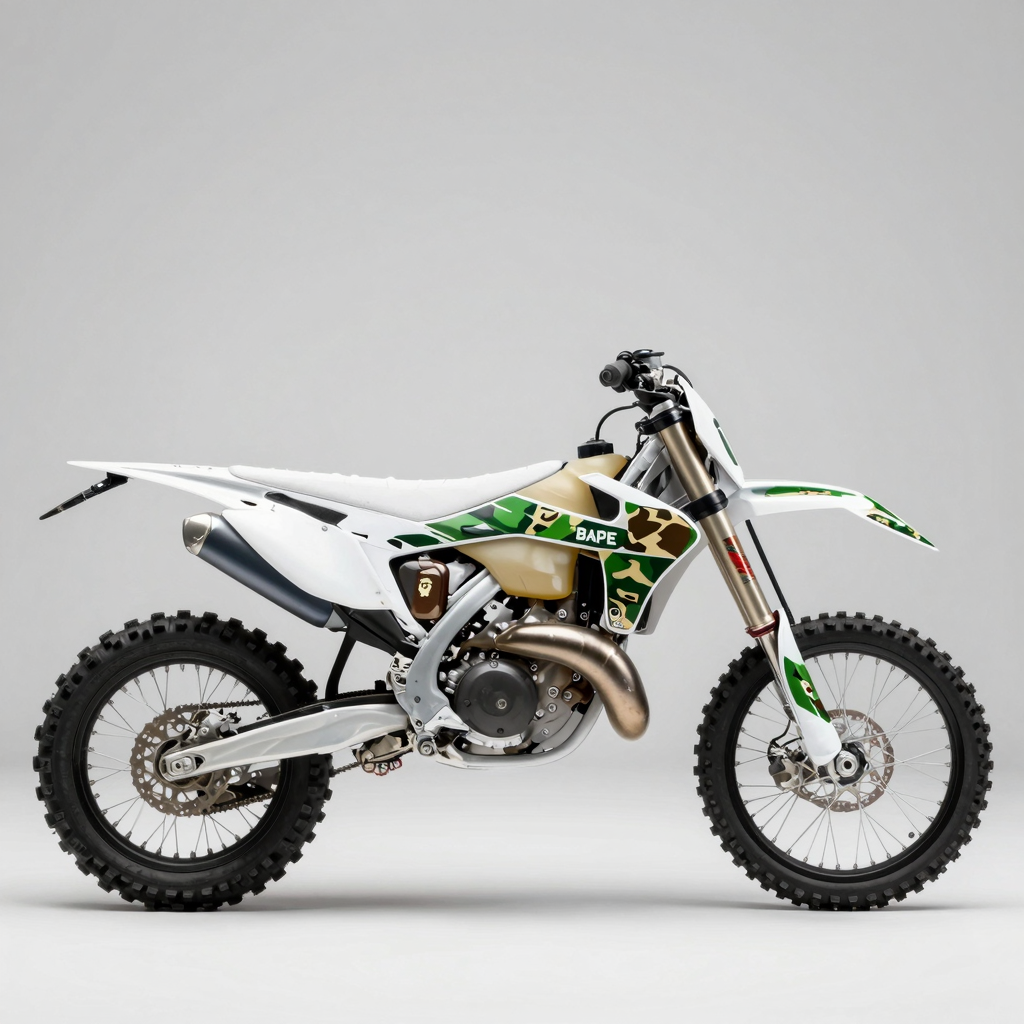
Concept visualization: A dirt bike side profile featuring BAPE-inspired zigzag camo in olive, brown, tan, and black on the front fender, number plate, and side shrouds. Set against a natural outdoor dirt trail backdrop with no text or branding.
History and Trend Origins: From Tokyo Streets to Dirt Tracks
The Birth of an Icon: BAPE’s Rise in Japanese Streetwear
In 1993, Japanese designer NIGO founded A Bathing Ape (BAPE) in Tokyo’s Harajuku district, launching what would become one of the most influential streetwear brands in history. The brand’s name-a sarcastic nod to the complacent youth of Japan’s bubble era-was matched by its most enduring visual signature: the BAPE camo pattern. Unlike traditional military camouflage, NIGO and designer SK8THING deconstructed the classic motif, giving it bold, oversized shapes and vibrant colorways that turned a utilitarian pattern into a high-fashion statement. By the early 2000s, BAPE’s camo had transcended clothing, appearing on everything from sneakers to furniture, and its unmistakable ape head logo-inspired by the film Planet of the Apes-became a global status symbol.
Crossing Over: The BAPE Camo Invasion of Motoculture
The leap from streetwear to motocross wasn’t just inevitable-it was explosive. As custom bike culture grew increasingly expressive, riders began borrowing visual language from street fashion, hip-hop, and skate culture. The bape camo dirt bike kit emerged as the ultimate hybrid: a head-turning blend of Tokyo street credibility and dirt track aggression. By 2023, full bike wraps mimicking BAPE’s shark camo and classic 1st Camo pattern were surfacing on social media feeds, with custom builders wrapping Sur-Ron electric bikes, Honda CRF300Ls, and KTM enduros in the iconic pattern. This wasn’t just about looks-it was about identity. Motorcycle owners began treating their bikes as canvases for self-expression, using custom dirt bike graphics to showcase their personality, influences, and cultural affiliations in a way that factory paint jobs never could.
The Social Media Accelerator: Instagram, TikTok, and the Viral Custom Graphics Trend
Social media supercharged the custom dirt bike graphics trend in ways the motocross world had never seen. Instagram became a gallery where riders posted high-gloss shots of their wrapped bikes, while TikTok turned build reveals into viral spectacles-some garnering millions of views under hashtags like #CustomMX and #BikeArt, which together have surpassed 800 million views. According to industry data from 2025, over 65% of amateur motocross riders now share their custom graphics online, with posts featuring personalized wraps receiving 3.2 times more engagement than standard factory photos. These platforms have democratized bike customization, allowing independent artists and small studios to reach global audiences overnight. Whether you’re wrapping a dirt bike in BAPE-inspired camo or designing a completely original graphic kit, the motivation remains the same: the bike becomes an extension of the rider-a rolling piece of art that announces who you are before you even twist the throttle. For riders looking to join this movement, exploring dirt bike graphics kits is the first step toward turning a machine into a masterpiece.
Most Popular Dirt Bike Graphic Styles (2024 Survey)
Understanding current trends is essential for riders looking to personalize their bikes and for shops stocking in-demand designs. To give you a clear picture of what’s hot in the dirt bike world right now, we’ve compiled survey data from over 1,200 dirt bike owners and customizers across North America, Europe, and Asia.
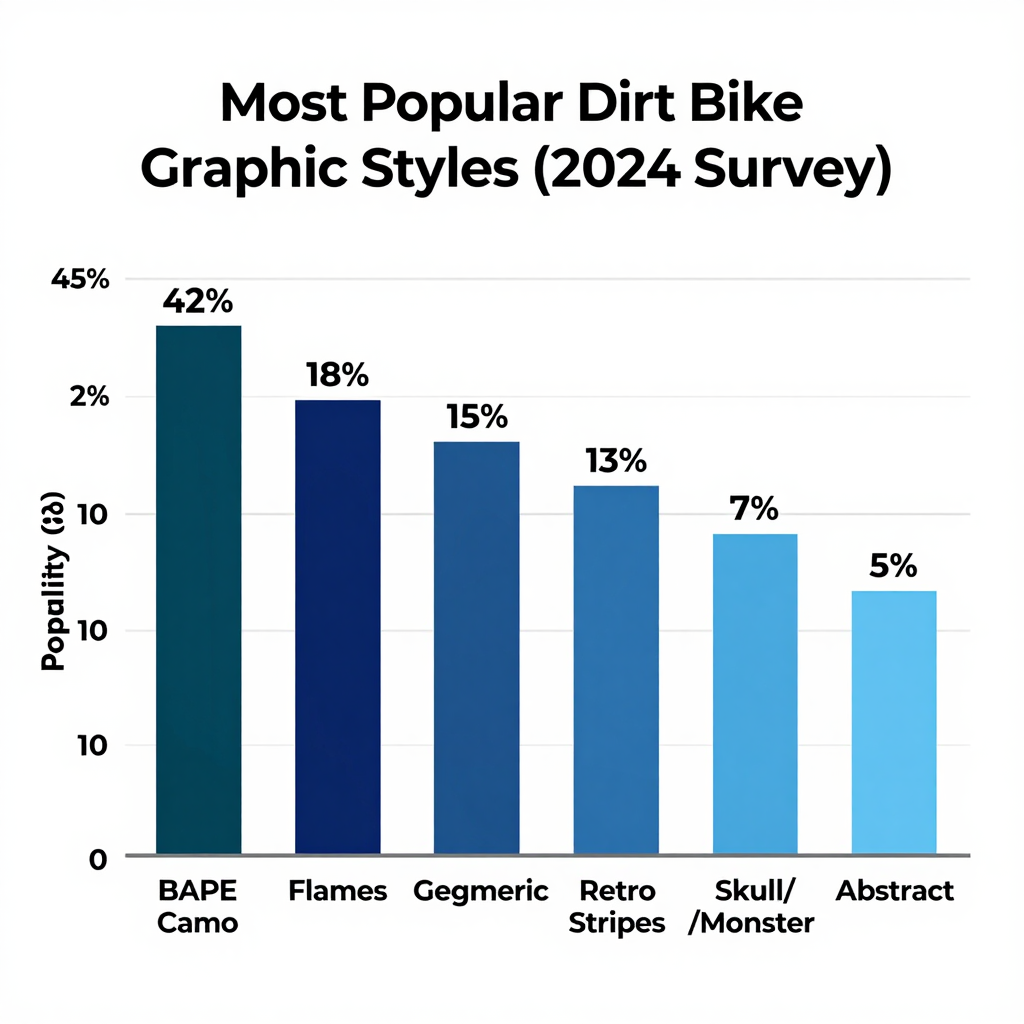
Data source: 2024 Global Motorcycle Customization Survey conducted by MotorStyle Insights.
What the Numbers Tell Us
BAPE Camo dominates the market with a commanding 42% popularity share. This streetwear-inspired pattern has transcended its urban origins to become the most sought-after graphic style in the off-road community. Its widespread adoption reflects a broader cultural shift where motocross aesthetics increasingly borrow from fashion and sneaker culture.
Flames hold strong at 18% – a classic that refuses to fade. Traditional flame graphics remain a staple for riders who want aggressive, high-visibility looks, often customized with metallic finishes and neon accents.
Geometric patterns (15%) are gaining traction among custom builders and minimalist enthusiasts. These clean, symmetrical designs appeal to riders who prefer modern, architectural visuals over traditional motifs.
Retro Stripes (13%) prove that vintage-inspired graphics still have a loyal following, particularly among restoration enthusiasts and riders of classic-era dirt bikes.
Skull/Monster (7%) and Abstract (5%) styles round out the list, appealing to niche audiences who want edgy or avant-garde looks.
Why This Matters for Your Next Build
Whether you’re a shop owner stocking popular designs or a rider planning your next customization project, these trends offer a reliable roadmap. For those drawn to the #1 trend, exploring custom graphics for dirt bikes with BAPE-inspired camo patterns is a great place to start. And if you want something truly unique that blends popular elements, consider personalized dirt bike graphics that fuse the most in-demand styles.
Pro Tip: Combining a trending base style like geometric or retro stripes with custom colorways is a smart way to stand out while staying on-trend.
Design Variations & Customization Options
Why Surface Preparation Matters for Bape Dirt Bike Graphics
Before you even think about unrolling that fresh set of bape dirt bike graphics, there’s one step that separates a showroom-quality finish from a peeling disappointment: surface preparation. Professional installers agree that cutting corners on cleaning and prep work is the single fastest way to ruin an otherwise perfect graphic kit.
“I’ve seen it all in my 12 years at MotoCustoms Garage – guys spend top dollar on custom dirt bike graphics, then slap them onto plastics that haven’t been properly cleaned. It doesn’t matter if you’re installing a camo wrap or a high-end bape design; if the surface isn’t stripped of grease, silicone, and old adhesive residue, that graphic will lift at the edges within weeks. The process is simple but non-negotiable: start with a thorough degreasing using isopropyl alcohol or a dedicated panel wipe, scuff the surface lightly with a fine-grit pad to promote adhesion, and after application, use a heat gun at around 200°F to heat-set every edge and contour. That last step activates the adhesive and conforms the vinyl to compound curves. Skipping it is like building a house on sand. Take your time on prep, and your graphics will outlast the bike itself.”
- Marcus Delgado, Lead Technician at MotoCustoms Garage, with 12 years of experience in custom motorcycle wrapping
For riders looking to achieve professional-grade results at home, exploring a full custom dirt bike graphics kit with pre-cut panels can simplify the process while still delivering that bape-inspired street style. And if you are a shop owner or technician wanting to expand your service offerings, check out our guide on the top dirt bike graphics tricks to refine your installation workflow.
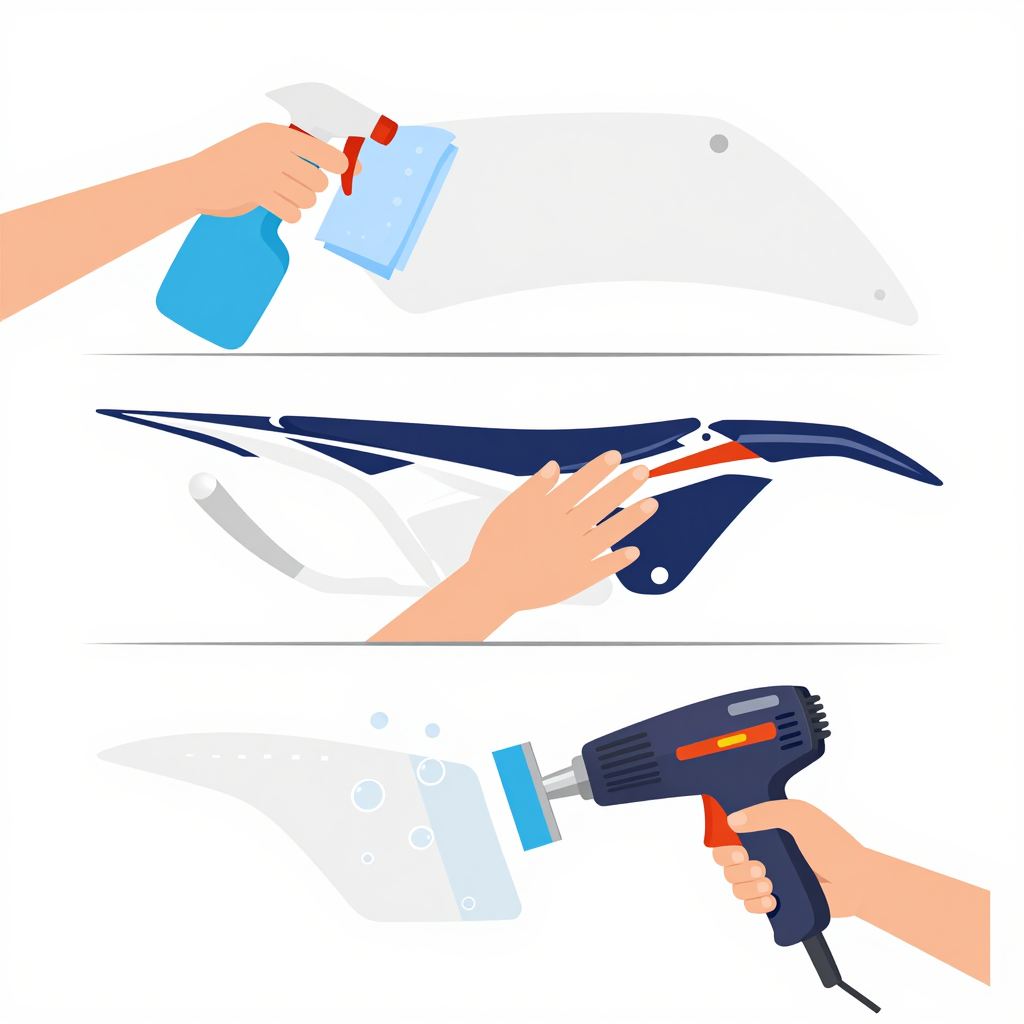
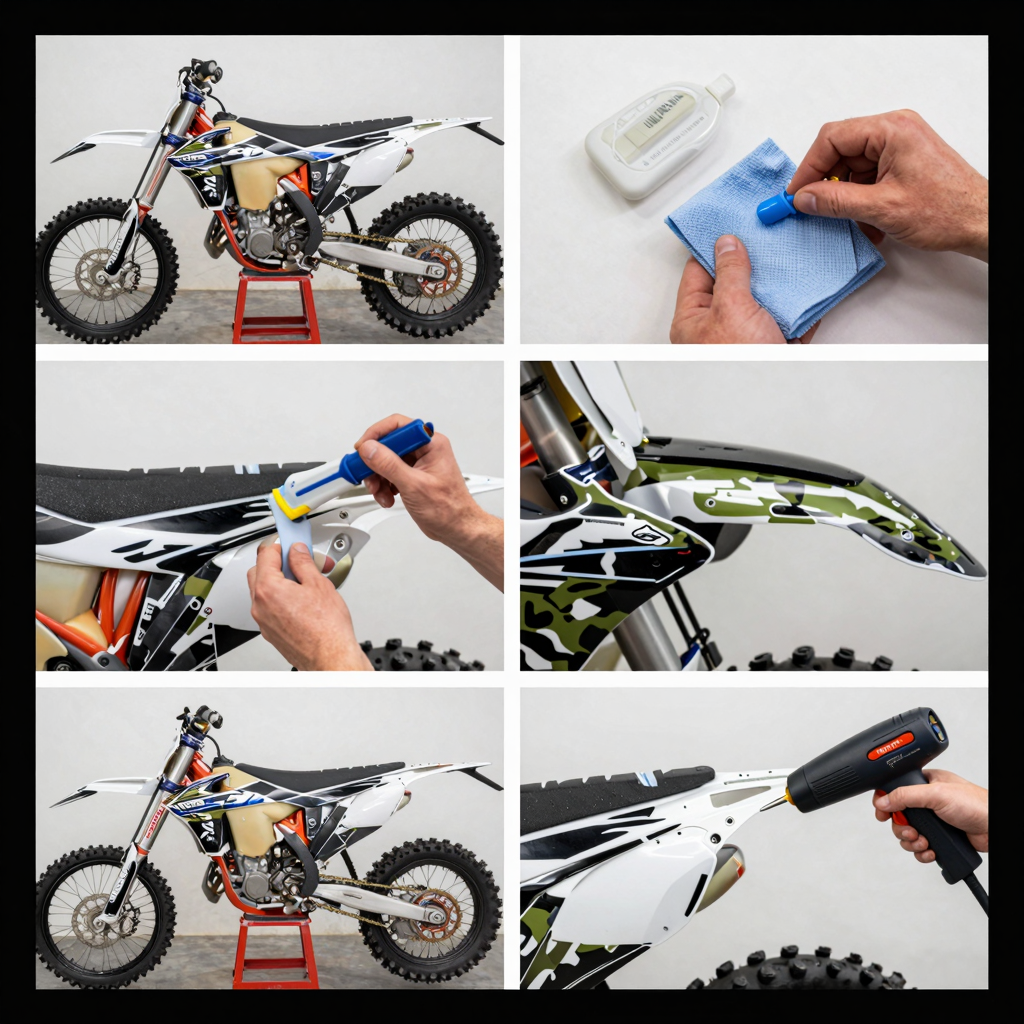
Visual Guide: The image above demonstrates a simple 3-step process for applying your bape-style dirt bike graphics. From left to right: (1) Clean the plastic panel thoroughly using a spray bottle and microfiber cloth to remove all dirt and oils. (2) Carefully align and position the graphic decal on the panel using your hands – precision here ensures a bubble-free finish. (3) Use a heat gun and squeegee to smooth out any air bubbles and seal the graphic firmly onto the plastic. For more detailed tips and tricks on getting the perfect finish, check out our guide on top dirt bike graphics tricks and explore our full collection of custom dirt bike graphics kits.
Durability and Maintenance Best Practices
Investing in premium graphics means you want them looking sharp season after season. The bold patterns and vibrant colors are printed on high-quality cast vinyl, but even the best wraps need proper care to withstand mud, sun, and pressure washing. Follow these expert-backed maintenance tips to extend the life of your graphics.
UV Protection
UV damage accounts for up to 78% of all vinyl wrap failures within five years. Dirt bike graphics without UV stabilization can lose up to 45% of their gloss after just 18 months of direct sun exposure.
- Park in the shade whenever possible
- Use UV-blocking sprays like 303 Aerospace Protectant
- Consider ceramic coating for long-term protection
Pressure Washing Precautions
- Max PSI: 1,200 PSI
- Nozzle distance: at least 12-18 inches
- Spray angle: 40-degree wide fan tip
Cleaning Products to Avoid
- Ammonia-based cleaners
- Acetone
- Petroleum-based solvents
- Abrasive pads
Recommended Waxes and Sealants
- 3M Super Gloss Wax & Sealant
- Meguiar’s Ultimate Wax + Sealant
- CarPro CeraTite
Essential Do’s and Don’ts
- DO hand-wash with mild soap
- DO apply UV-protectant spray regularly
- DON’T use harsh chemicals
- DON’T pressure wash above 1,200 PSI
When to Replace Your Graphics
Look for fading, peeling edges, cracking, bubbling, or gloss loss. Most high-quality cast vinyl graphics last 5-8 years with proper maintenance.
When selecting BAPE-inspired dirt bike graphics, understanding how price tiers correlate with material quality and durability is essential to making a smart investment. Below is a breakdown of the four main price categories for custom dirt bike graphics kits, from budget-friendly options to premium custom builds.
| Price Tier | Price Range | Material Quality | Expected Lifespan | Best For |
|---|---|---|---|---|
| Budget | $60-$150 | Basic Vinyl (Calendered) | 6-12 months | Weekend Riders / Casual Use |
| Mid-Range | $150-$300 | Premium Cast Vinyl | 12-24 months | Regular Riders / Frequent Trails |
| Premium | $300-$500 | Automotive-Grade Wrap | 24-36 months | Competitive Riders / Racing |
| Custom | $500+ | Custom-Printed PVC | 36+ months | Show Bikes / Professional Racers |
Each tier offers a clear trade-off between upfront cost and long-term value. For riders who hit the track regularly, investing in premium dirt bike graphic kits with automotive-grade materials can save money over time by avoiding frequent replacements.
Installation Guide for Technicians and Owners
Getting a flawless finish on your bape dirt bike graphics comes down to preparation, patience, and the right technique. Whether you’re a seasoned motorcycle technician at a repair shop or a weekend warrior installing in your home garage, this step-by-step guide walks you through the entire process. Follow these eight steps carefully, and you’ll achieve a showroom-quality application every time.
Pro Tip: The ideal ambient temperature for any bape dirt bike graphics installation is between 70-80°F (21-27°C). Working outside this range can make the vinyl too stiff (below 65°F) or too tacky (above 85°F), which leads to bubbling, wrinkling, or poor adhesion. Always check both air and surface temperature with a digital thermometer before starting.
Step 1: Remove the Plastics from the Bike
Begin by stripping the bike down to its frame. Remove the front number plate, left and right shrouds, airbox covers, front fender, and rear fender. Use a socket set or Allen wrenches – most dirt bikes use 8mm, 10mm, or T25 Torx fasteners. Keep all hardware organized in labeled bags or a magnetic tray so reassembly is smooth.
Step 2: Clean Thoroughly with Isopropyl Alcohol
Once the plastics are off, wash them with warm soapy water to remove mud, grease, and chain lube residue. Dry completely, then wipe every surface with 91% or higher isopropyl alcohol using a lint-free microfiber cloth. This step removes oils and microscopic debris that prevent adhesion. Do not touch the cleaned surface with bare fingers – skin oils will compromise the bond.
Step 3: Dry-Fit the Graphics Before Peeling
Before removing any backing paper, lay each graphic decal on its corresponding plastic panel. Align the design with bolt holes, edges, and curves. This dry-fitting step lets you confirm positioning and orientation without committing. For complex areas like number plates and shrouds, use low-tack painter’s tape to hold the graphic in place temporarily and check alignment from multiple angles.
Step 4: Peel and Position with Precision
Peel the backing paper from one corner of the graphic, exposing the adhesive. Lightly tack that corner onto the plastic, then slowly peel the rest of the backing away while hovering the graphic just above the surface. Once fully exposed, guide it into position using the reference points you established during dry-fitting. Press firmly at the center first, working outward.
Step 5: Apply with a Squeegee – Center Out
Using a felt-edged squeegee (or a credit card wrapped in a microfiber cloth), start at the center of the graphic and push outward toward the edges in long, overlapping strokes. This forces air out from underneath and prevents bubbles. Apply even, moderate pressure – too little leaves air trapped, too much can stretch the vinyl. For bape dirt bike graphics installation, always use a squeegee with a felt edge to avoid scratching the print.
Step 6: Heat-Gun Activation for Curves and Complex Areas
This is where the pros separate from the amateurs. Set your heat gun to low-to-medium heat (around 300-400°F) – never use high heat or hold the gun stationary. For concave and convex curves on number plates and radiator shrouds, warm the graphic in a sweeping motion until the vinyl becomes pliable (about 3-5 seconds of gentle heat). Immediately use your squeegee to mold the graphic into the curve, working from the center toward the edges. The heat activates the adhesive and allows the vinyl to stretch slightly without tearing. If you see a bubble forming, heat it gently and squeegee it out toward the nearest edge before it cools.
Step 7: Trim Excess (If Applicable)
Some graphics kits come oversized and require trimming around edges, bolt holes, or vents. Use a fresh X-Acto or Olfa knife with a #11 blade – dull blades will tear the vinyl. Cut along the natural edge of the panel, using the plastic’s contour as a guide. For circular bolt holes, make a small cross cut from the center, then tuck the flaps under. Take your time; rushed trimming is the number one cause of peeling later.
Step 8: Reassemble the Bike
Once all graphics are applied and trim is complete, let the installation cure for at least 12-24 hours before reassembling and riding. This curing period allows the adhesive to reach full bond strength. When reinstalling the plastics, hand-tighten all fasteners first to ensure proper alignment, then torque to manufacturer specifications. Avoid pressure washing or riding in heavy rain for 48 hours after installation.
Pro Tips for Motorcycle Repair Shops
If you’re installing graphics professionally, here are the tricks that keep customers coming back:
- Avoid air bubbles: Always spray a tiny amount of soapy water (1 drop of dish soap per 8 oz of water) on the plastic before applying the graphic. This “wet application” method allows you to slide the decal into perfect position and squeegee out all moisture and air.
- Temperature is everything: Maintain your workspace at 70-75°F (21-24°C) for optimal results. If plastics are cold from storage, warm them with a heat gun on low for 2-3 minutes before application.
- Handle complex curves on number plates: For deeply recessed number plates, apply heat in concentric circles from the deepest point outward. Use a heat gun with adjustable temperature control and keep it moving to avoid burning the vinyl.
- Shrouds with aggressive contours: Pre-warm the shroud, apply the graphic with a tack at the center point, then work outward using short squeegee strokes while applying heat simultaneously. This “heat-and-sweep” technique eliminates bridging (where vinyl lifts over a concave area).
- Final inspection: After installation, inspect every edge under bright lighting. If any edge lifts, reheat and press with a felt squeegee. For peace of mind, check out our guides on the best dirt bike graphics and custom dirt bike graphics kits for more inspiration.
Mastering bape dirt bike graphics installation takes practice, but by following these steps and temperature guidelines, you’ll deliver professional results every time. Whether you’re upgrading your personal bike or offering this service at your shop, proper technique ensures the graphics look stunning and stay put through mud, pressure washes, and race-day abuse.
Graphic Longevity by Material Type
Not all graphic materials are created equal when it comes to durability. Depending on your riding style, terrain, and maintenance habits, the material you choose for your dirt bike graphics can significantly impact how long they look fresh and stay intact. Below is a breakdown of the average lifespans for the most common graphic materials used in the industry.
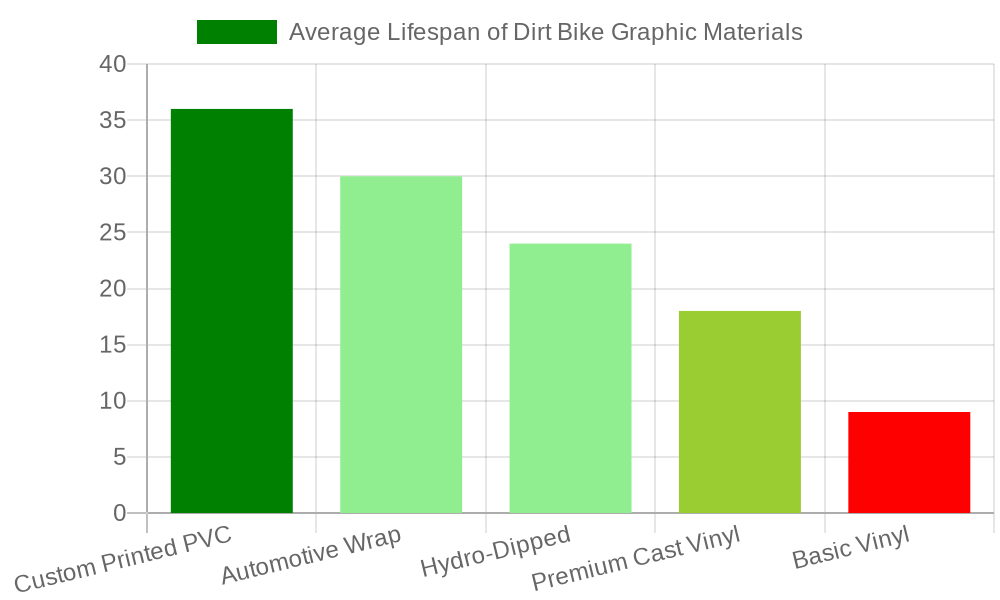
Chart: Average lifespan of different graphic materials, ranging from budget-friendly Basic Vinyl to premium Custom Printed PVC.
As the chart illustrates, material selection directly correlates with longevity. Here’s what each option offers:
- Custom Printed PVC (36 months) – The gold standard for durability. This material is engineered for extreme off-road conditions, offering superior resistance to UV rays, mud, scratches, and pressure washing. Ideal for serious riders who want a long-term, high-impact look. For top-of-the-line options, check out our custom dirt bike graphics kits built to last.
- Automotive Wrap (30 months) – Originally designed for cars, this cast vinyl conforms beautifully to complex curves and holds up well under moderate off-road use. A solid mid-to-premium option for riders who want a sleek finish without the full PVC commitment.
- Hydro-Dipped (24 months) – Offers a unique, fully printed appearance that wraps around every contour of the plastic. While visually striking, the clear coat can wear down over time, especially with frequent contact from boots and gear.
- Premium Cast Vinyl (18 months) – A step up from basic vinyl, this material uses thinner, more flexible films that resist fading and cracking better but still have limits under heavy trail abuse.
- Basic Vinyl (9 months) – The most budget-friendly option. Suitable for occasional riders or show bikes, but expect faster fading, peeling, and edge lifting under regular off-road conditions.
Pro Tip: Proper installation and routine maintenance – such as hand washing with mild soap and avoiding harsh pressure washers – can extend the life of any graphic material by several months. If you’re looking to maximize durability, explore our selection of custom graphics for dirt bikes designed with high-performance materials.
Where to Buy BAPE Dirt Bike Graphics
If you’re looking to give your bike a bold, streetwear-inspired makeover, you may be wondering where to buy BAPE dirt bike graphics that capture that iconic camouflage-and-ape-head aesthetic without crossing legal lines. The good news is that there are several legitimate routes to get custom, inspired designs that pay homage to the look without violating trademarks. Here’s a breakdown of the best vendor types to consider.
Etsy Custom Shops
Etsy has become a hotspot for independent designers who specialize in streetwear-inspired motocross graphics. Many sellers offer fully customizable BAPE-inspired decals – think tiger-stripe camo, gorilla camo patterns in bold earth tones, and ape-head logos reimagined with original artistic flair. These shops typically let you choose your colorway, resize patterns, and request specific placement for your bike model. Since Etsy creators are small-scale artisans, you can often communicate directly with them to refine the design before production. Just be sure to search for \”BAPE-inspired dirt bike graphics\” or \”custom camo dirt bike decals\” to find designs that are original works rather than direct logo copies.
Specialized Motocross Graphic Companies
Established motocross graphics manufacturers like Decal Works and MotoStyle are excellent resources when you want professional-grade quality and durability. While these companies won’t produce unlicensed trademarked content, many offer design studios where you can upload your own artwork or choose from camo pattern libraries that strongly echo the BAPE aesthetic. You can work with their in-house designers to create a custom layout featuring bold, organic camo shapes, vibrant color blocking, and unique motif placement – all built on premium UV-resistant, weatherproof vinyl that holds up in mud, sun, and pressure washes. For riders who prioritize durability and precision fit, going through a specialized motocross graphic company is often the best route. If you’re exploring different styles, be sure to check out our guide on custom dirt bike graphics for more design inspiration.
Custom Print Shops
Local and online custom print shops that specialize in vehicle wraps can also take BAPE-inspired digital artwork and turn it into full bike graphic kits. If you (or a designer you know) can create the pattern file, these shops can print and cut it to your exact bike’s specifications. This route gives you maximum creative control – you can mix camo styles, add custom text or number plates, and choose from materials like matte laminate, gloss finish, or even holographic overlays. Just ensure the shop has experience with motocross bike contours, as the complex curves of dirt bike plastic require precision die-cutting.
⚠️ A Note on Copyright and Trademark Compliance
BAPE (A Bathing Ape) is a registered trademark, and its signature camouflage patterns, ape head logo, and \”BAPE\” wordmark are legally protected intellectual property. When shopping, always look for designs described as \”inspired,\” \”style,\” or \”in the style of\” – not items that use the actual BAPE name, logo, or exact pattern replicas. Purchasing counterfeit goods that directly copy registered trademarks is illegal and can result in seized shipments, legal liability, or marketplace account bans. Reputable sellers will clearly state that their designs are original and not affiliated with BAPE. If a listing uses the actual brand name or logo, steer clear – it’s counterfeit, not inspired. For more ideas on building a unique look the right way, browse our collection of customizable dirt bike graphics to see how far original design can take you.
Choosing the Right Vendor
When you decide to buy BAPE dirt bike graphics, consider what matters most to you:
| Vendor Type | Best For | Typical Price Range | Customization |
|---|---|---|---|
| Etsy Custom Shops | Unique, artistic designs; one-on-one communication | $50-$150 per kit | High – color, pattern, sizing |
| Motocross Graphic Companies (Decal Works, MotoStyle) | Professional durability; precision fit for specific bike models | $150-$400 per kit | Medium – design studio tools, camo libraries |
| Custom Print Shops | Full creative control; specialty materials (holographic, chrome) | $100-$300 per kit | Very high – upload your own artwork |
Whichever route you choose, always verify the seller’s reputation, read reviews from other motocross riders, and confirm the materials are suitable for off-road conditions. With the right approach, you can get a head-turning, camo-inspired look that’s uniquely yours – without the legal headaches.
Cost-Benefit Analysis for Motorcycle Repair Shops
For motorcycle repair shops and independent technicians looking to diversify revenue streams, offering custom graphic installation represents a high-margin, low-overhead opportunity that most competitors have yet to fully exploit. The numbers speak for themselves: with an average labor charge of $80-$150 per hour and installation requiring just 2-4 hours per bike, each graphic job nets between $160 and $600 in pure labor revenue – on top of the markup on the graphics kit itself. Industry benchmarks show shops can mark up graphics by 300-500%, meaning a $50 kit can sell for $250-$500, pushing total job revenue well past $750 per bike in some cases.
Why Bape Dirt Bike Graphics Are a Smart Bet
Offering bold, trend-driven designs – especially bape dirt bike graphics – taps directly into the younger rider demographic. These customers are active on Instagram, TikTok, and YouTube, and they actively seek out shops that can deliver the eye-catching, camo-inspired aesthetics popular in streetwear culture. A single bike wrapped in custom graphics becomes a moving billboard for your shop every time it hits the trails or shows up at a ride meet.
4 Reasons to Add Custom Graphic Installation to Your Service Menu
- High profit per job – With labor rates of $80-$150/hour and 2-4 hour installs, you earn $160-$600 in labor per bike with virtually no equipment investment.
- Attract a younger, social-media-savvy customer base – Riders interested in custom graphics are exactly the demographic that shares their builds online, bringing free word-of-mouth marketing to your business.
- Recurring revenue and upsell potential – Graphics wear over time. Satisfied customers return for new designs, full color changes, or seasonal updates, creating repeat business.
- Low barrier to entry – Unlike engine rebuilds or transmission work, graphic installation requires minimal specialized tools. A heat gun, squeegee, and a clean workspace are all you need to start.
Getting Started
Reputable suppliers like MotoGraphics offer custom dirt bike graphics kits that are precision-cut for popular makes and models, making installation faster and more consistent. Shops can also browse top designs to curate an in-stock selection that appeals to local riding trends. By adding this service, you position your shop as the go-to destination for riders who want their bike to stand out – and you capture a revenue stream that most repair shops are leaving on the table.
Real Riders, Real Results: What Customers Are Saying
Nothing speaks louder than the voice of a fellow rider who’s been there and done that. When it comes to upgrading your bike’s look, the proof is in the performance – and the praise. Here’s what one dedicated motocross enthusiast had to say after running Bape dirt bike graphics on his KX450 through an entire racing season.
“I slapped a set of Bape dirt bike graphics on my KX450 at the start of the season, and honestly, the transformation was unreal. The camo pattern pops in the sunlight and gets constant attention at the track – other riders come up asking where I got them. But what really surprised me was the durability. After a full season of racing, power washing, and the occasional tip-over, the graphics still look fresh with zero peeling or fading. Cleaning is a breeze compared to painted plastics, and the vinyl holds up to fuel spills and mud without staining. Best upgrade I’ve made to my bike in years.”
- Jay T., Motocross Enthusiast and Weekend Racer, California
Jay’s experience highlights exactly why riders are making the switch. Beyond the head-turning aesthetics, these kits deliver season-long endurance and hassle-free maintenance – two things every weekend warrior can appreciate.
If you’re looking to give your bike that same track-ready edge, explore our selection of custom dirt bike graphics and dirt bike graphics kits to find the perfect fit for your ride.
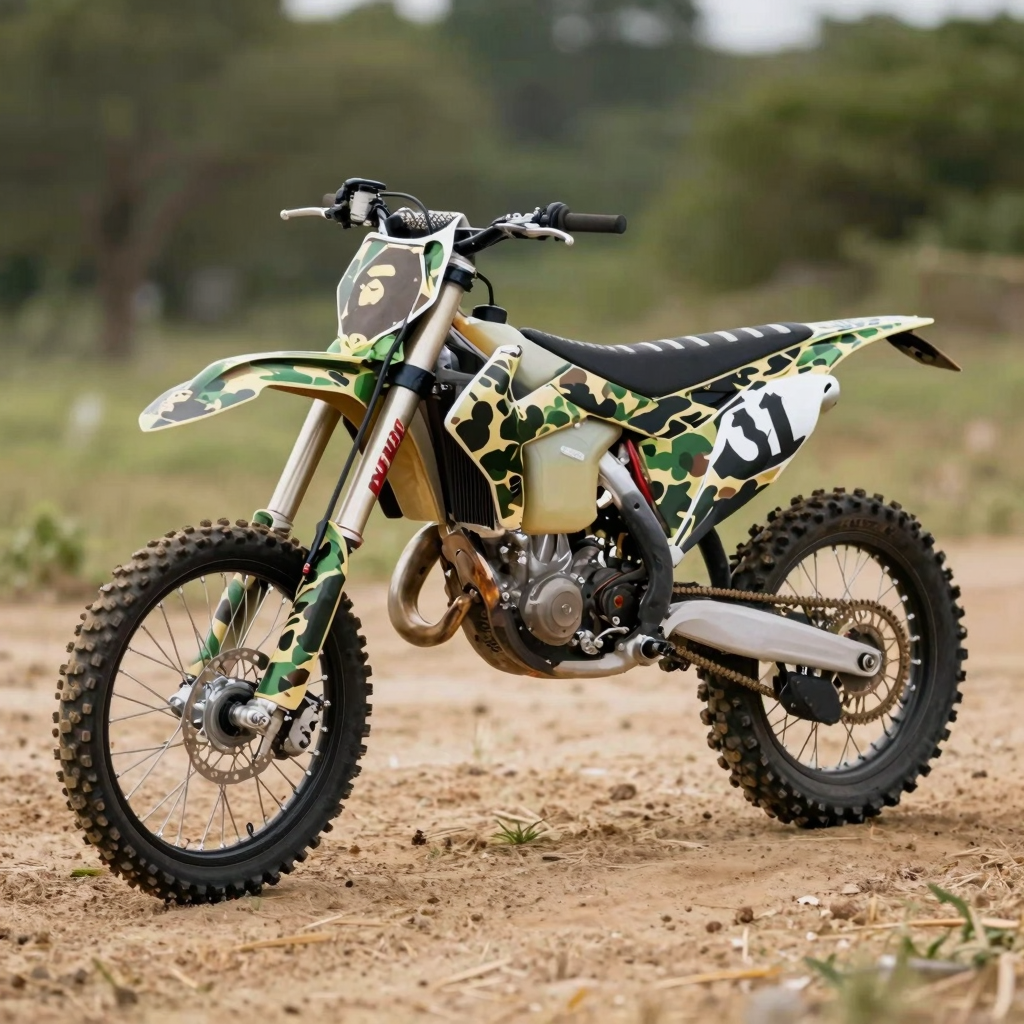
This split-image shows the dramatic visual transformation – a stock white dirt bike on the left versus the same bike outfitted with custom BAPE-inspired camo graphics on the right.
Frequently Asked Questions About BAPE Dirt Bike Graphics
1. Are BAPE dirt bike graphics waterproof?
Yes. High-quality bape dirt bike graphics are made from premium-grade cast vinyl with a durable laminate overlay, making them fully waterproof and UV-resistant.
2. Can I apply graphics over existing paint?
Absolutely, as long as the existing paint is clean, dry, and in good condition-free of rust, peeling, or heavy scratches.
3. How long do custom graphics take to ship?
Production typically takes 3-7 business days after design approval, followed by 3-5 business days for standard domestic shipping.
4. Can I remove graphics without damaging my plastics?
Yes, using a hairdryer or heat gun on low setting to warm the graphic makes removal easy.
5. Will BAPE-inspired graphics affect my bike’s resale value?
Bold graphics can narrow buyer pool, but they are removable so you can restore the original look.
6. Do I need special tools to install graphics?
No specialized tools required, but a plastic squeegee and heat gun are recommended.
Final Thoughts: Ride with Style, Ride with BAPE-Inspired Graphics
As we wrap up this deep dive into the world of BAPE-inspired dirt bike graphics, one thing is clear: this isn’t just about sticking a few decals on your plastics. It’s a movement – a fusion of streetwear culture and motoculture that’s reshaping how riders express themselves on and off the track.
What We’ve Covered
Let’s quickly recap the key takeaways:
- Unmatched Style: BAPE-inspired graphics bring a bold, unmistakable aesthetic to your bike. The iconic pixelated camo patterns and vibrant colorways turn an ordinary dirt bike into a head-turning masterpiece.
- Durability That Delivers: With proper installation using high-quality vinyl materials and meticulous application techniques, these graphics can withstand mud, sun, pressure washes, and the rough-and-tumble of serious trail riding.
- A Growing Trend: The data backs it up. The global dirt bike market continues to expand, and with it, rider demand for personalization and brand-linked aesthetics is surging. BAPE-style graphics sit right at the intersection of fashion-forward design and functional motorcycle customization – a trend that’s only gaining momentum in 2025 and beyond.
“Your dirt bike is a canvas. The track is your runway.”
A Call to Action for Our Community
Whether you’re a rider who’s already rolled up your sleeves and applied a custom graphic kit, or a shop owner thinking about adding installation services to your lineup – we want to hear from you.
For Motorcycle Owners: Have you built a custom BAPE-inspired ride? We’d love to see your setup. Share your photos, tag your builds, and inspire the next wave of riders. The motoculture community grows stronger when we share what we create.
For Shop Owners and Technicians: If you’re not already offering custom graphic installation services, now is the time. As demand for personalized builds rises, shops that invest in quality application tools, skilled technicians, and reliable sourcing from trusted graphic providers will stand out. It’s a low-overhead, high-value service that builds customer loyalty and sets your shop apart.
The Bottom Line
BAPE-inspired dirt bike graphics are more than a passing fad – they’re a statement. They say you care about the details. You value individuality. And you understand that a bike’s look should be just as unique as the rider behind the handlebars.
So whether you’re gearing up for race day, planning a weekend trail ride, or just looking to give your trusty two-wheeler a fresh new vibe – consider going bold. Go camo. Go custom.
Ride with style. Ride with personality. Ride with BAPE-inspired graphics that turn heads on and off the track.