
Best Custom Dirt Bike Graphics on Mini and Kids Bikes: Scale Artwork to Smaller Shrouds Before You Print
A shroud set drawn at full-size proportions does not transfer onto a kid’s bike. Bolt spacing, panel curvature and edge radius all move at the smaller dimensions, and the file that measured correctly on the full-size machine will not sit on the production panel unless someone rescales it against real measurements before it reaches the printer.
Shops and resellers order custom dirt bike graphics as print-ready production files and finished decal kits for a named model: shroud plates, number plates and swingarm decals, carrying sponsor logos, rider names and team colourways. Rescale those files before production and three expensive failures stay out of the run — logos stretched off their true aspect ratio, type nobody can read at arm’s length, cut lines that no longer follow the panel edge.
Why the Full-Size File Cannot Be Reused
A full-size shroud and a mini shroud are not proportional copies of each other. Uniform scaling of a design drawn for a 450 pushes elements off the moulded edges or crowds them into the tightest part of the curve. Measure the mini panel, treat it as its own substrate, and rebuild the layout against those numbers instead of shrinking the old file.
What Rescaling Protects in the Print Run
Each failure mode below costs money at a different stage of the job. That is why rescaling belongs in pre-press rather than in finishing.
| Failure mode | Where it shows up | Business impact |
|---|---|---|
| Distorted logos | Sponsor marks stretched off their true aspect ratio | Rejected proofs and client complaints |
| Unreadable type | Fine type and thin strokes collapsing at reduced size | Unusable kits, reprints at your cost |
| Misaligned cut lines | Trim paths no longer following the panel edge | Wasted vinyl and hand-trimming labour |
Scaling decisions also cross product families, so settle which model line the file is for before you set panel dimensions. A Surron Light Bee graphics shroud is not a scaled-down 450 shroud, and it belongs in its own template set rather than borrowed geometry.
Why Smaller Shrouds Demand Rescaled Artwork
Usable graphic surface area is the part of a plastic panel you can print onto and still expect the vinyl to stay put: roughly the flat-to-gently-curved middle, minus fastener holes, vent cut-outs, raised ribs and the tight roll at every edge. A full-size motocross shroud gives that area enough room for fine pinstripes, small sponsor text and layered shading. Squeeze the same file onto a mini or kids bike shroud and the compound curvature tightens while usable area can drop by half or more.
Scale that artwork down by a flat percentage and the geometry refuses to cooperate: 2 mm lines fall below a millimetre, lettering smears at arm’s length, and wide colour fields are asked to wrap a radius they were never drawn for. The mini bike graphics kit that comes out of it lifts at the corners, wrinkles across the curve and loses exactly the detail that made the design look premium on screen.
That is the difference between uniform scaling and per-panel sizing. Uniform scaling treats the bike as one unit and multiplies every dimension by the same number. Per-panel sizing measures each shroud template on its own and fits the artwork to that shape, its curvature and its hardware. A kids shroud is narrow, short and heavily curved, so a redrawn layout usually needs heavier minimum stroke weights, larger and fewer text elements, simplified shapes, and logos pulled inward from the edges. None of those changes happen by themselves. Someone has to reopen the vector file and re-lay it out against the panel template, checking each element against the space that is genuinely usable rather than against the outer bounding box. This is why the workflow starts with templates and per-panel proofs instead of a percentage slider.
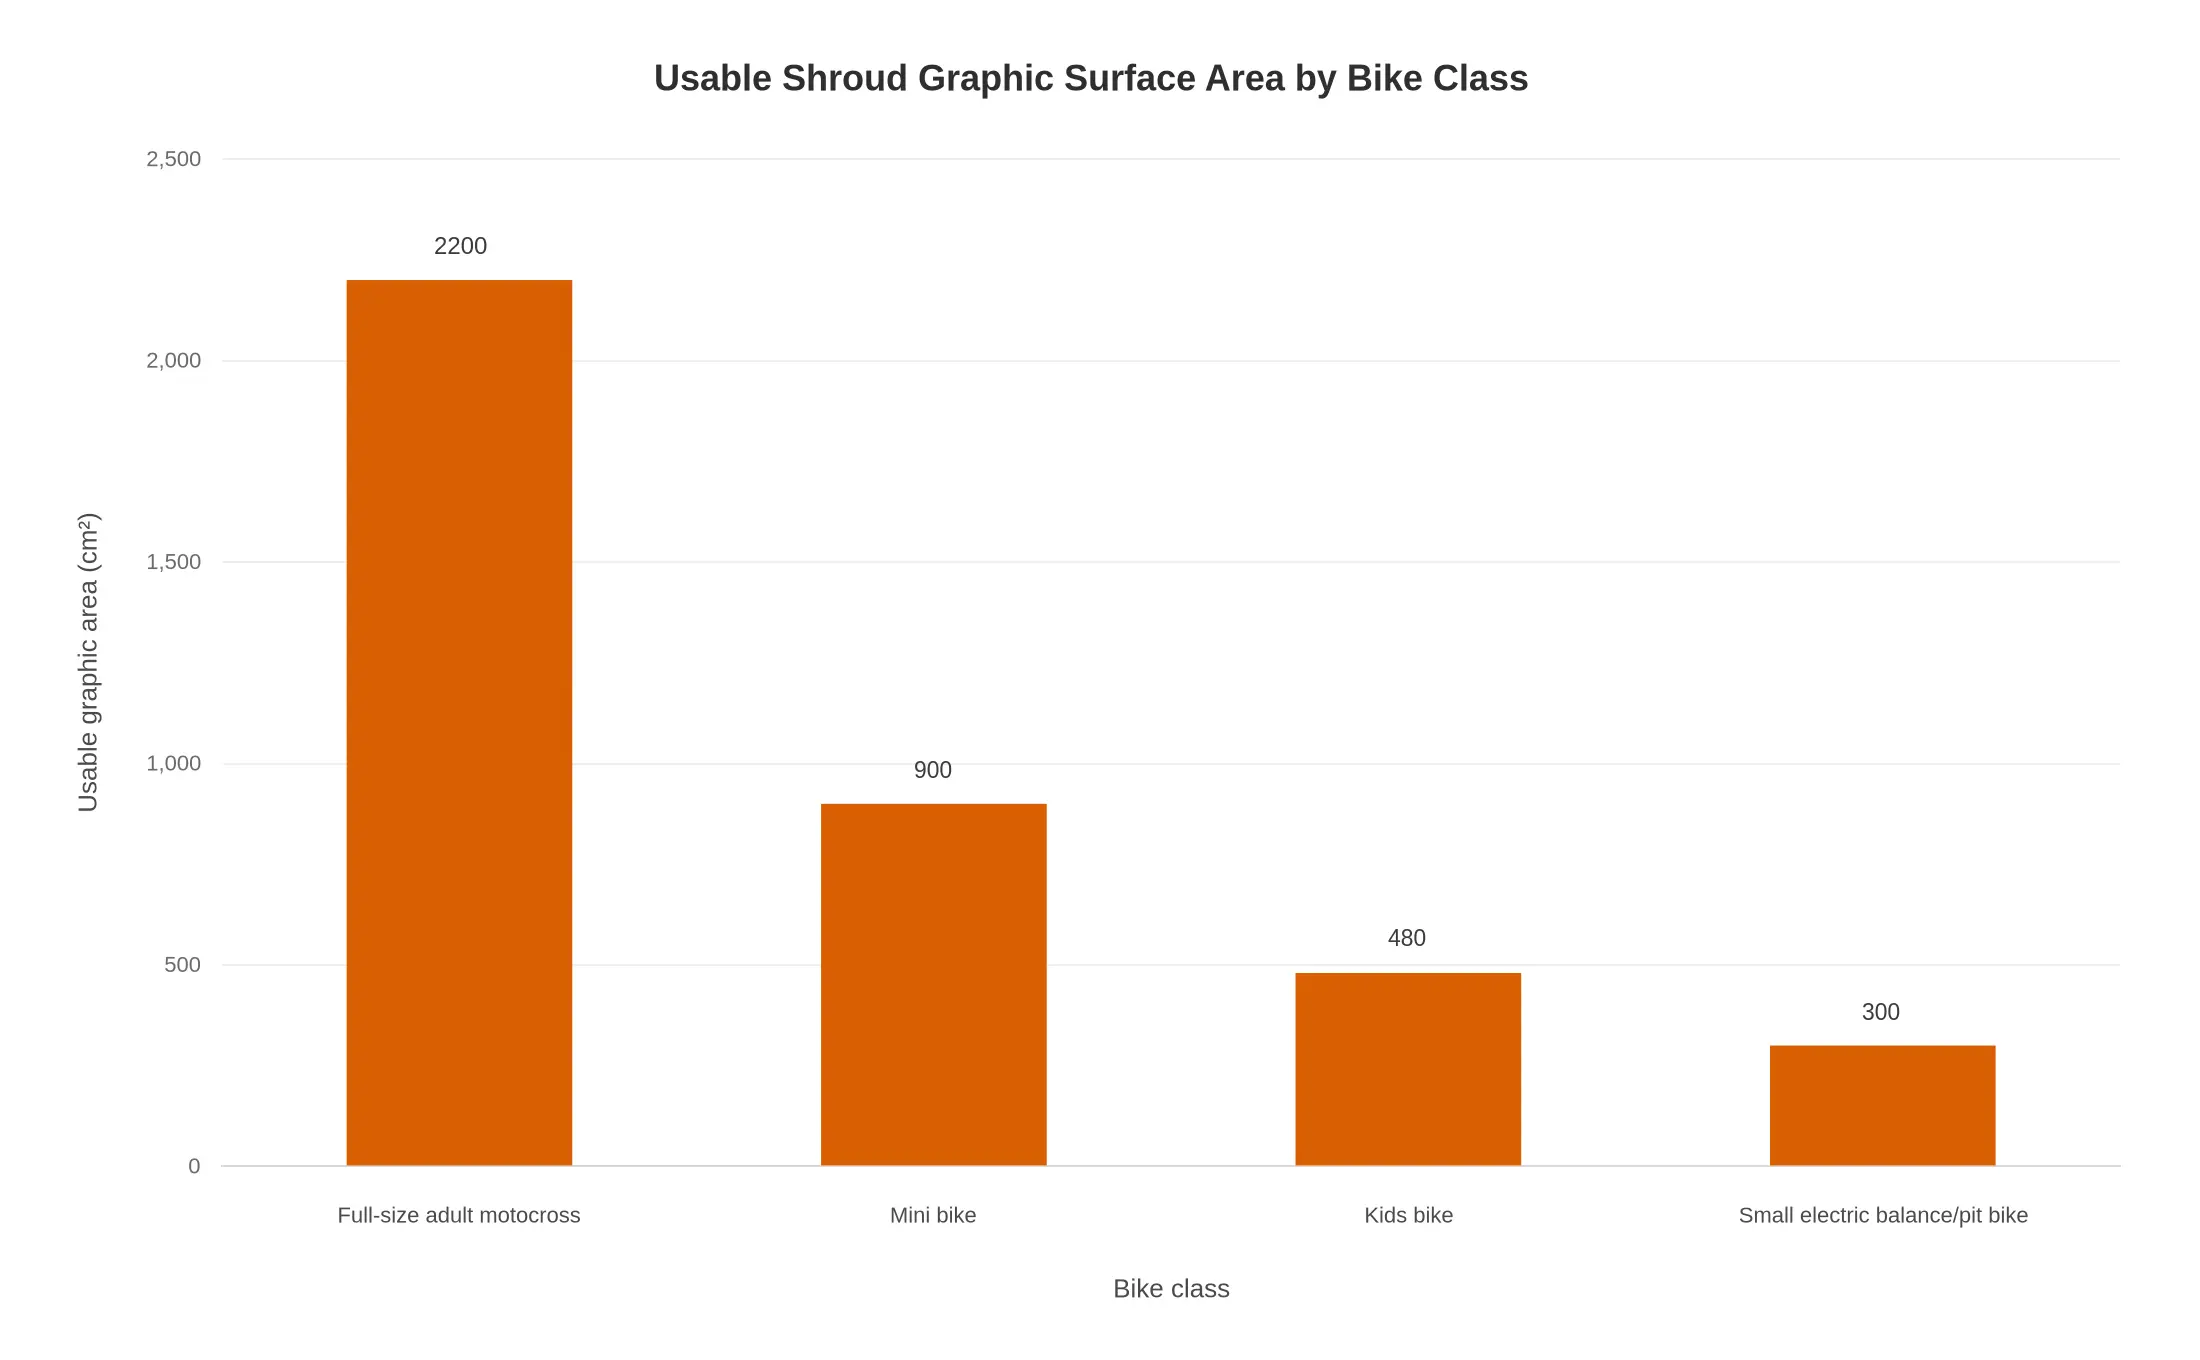
Smaller shroud panels proportionally reduce usable graphic area, which is why artwork density has to be reduced as bike class gets smaller.
Illustrative approximate values, rounded for planning purposes.
Scale Artwork to Smaller Shrouds: The Step-by-Step Workflow
Every shroud, number plate and radiator scoop has its own proportions, so scaling artwork onto a mini or kids bike means rebuilding the layout for a smaller canvas. Work the steps in this order: each decision rests on a number verified in the step before it.
- Pull the actual panel template. Use the manufacturer’s 1:1 outline if one exists, otherwise scan or trace the physical shroud from our smaller-shroud graphics kits and confirm the contour matches the real part. Working from a guessed shape is where most reprints begin.
- Mark the usable area inside the cut line. Offset 3 to 5 mm inward from the trim contour and treat that inner boundary as your true canvas, so no key logo drifts into the cut.
- Choose a scale factor per panel. A front plate might only need a 30 percent reduction while a rear shroud needs 45, so set each panel individually instead of applying one global percentage.
- Re-lay out logotype and sponsor marks at the new size. A locked group scaled as one block keeps the old hierarchy, so re-set it: the brand name stays dominant and the smaller sponsor marks stay readable from a distance.
- Check minimum line weights. Any stroke under about 0.3 mm on the finished panel will clog or fill in on vinyl, so thicken fine outlines and micro type before anything reaches the RIP.
- Export with correct bleed and no scaling. Set the bleed the panel needs (8 mm on mini shrouds, 6 mm on kids panels), export CMYK at 300 dpi at actual size, and switch off any fit-to-page option in the print dialogue.
Skip the template check and the scale factor is guesswork; skip the line weight check and a correct layout still prints as mush. Errors compound quietly downstream, and by the time one shows up on press the vinyl is already paid for.
Working numbers by bike class, to be confirmed against the actual panel:
| Bike class | Typical shroud panel height (mm) | Typical usable width (mm) | Recommended artwork scale factor | Minimum bleed (mm) | Maximum suggested line weight after scaling (mm) |
|---|---|---|---|---|---|
| Full-size adult (250/450) | 340 | 210 | 1.00 (reference) | 10 | 1.5 |
| Mini bike (110-125cc) | 250 | 155 | 0.75 – 0.85 | 8 | 1.1 |
| Small electric (light e-moto) | 210 | 130 | 0.65 – 0.75 | 6 | 0.9 |
| Kids bike (50-65cc) | 165 | 105 | 0.55 – 0.65 | 6 | 0.8 |
| Pit bike / micro | 130 | 80 | 0.45 – 0.55 | 5 | 0.6 |
Always confirm every measurement against the actual bike or OEM panel before printing.
Aspect Ratio, Distortion, and Proportional Traps
The commonest failure is treating every panel as a rubber sheet. One file gets stretched onto a shroud here, a number plate there and a rear fender somewhere else, so a layout drawn at a single ratio is pulled into three. Non-uniform scaling does the rest: a circular logo dragged by one corner becomes an oval, sponsor lettering gains weight on one axis, pinstripes thicken unevenly. Padding is the third trap. Every panel carries its own bleed and safe margin, and margins copied from a large-format template push sponsor marks off the panel edge or into the mounting bolts. None of it shows on screen, only on the printed sheet.
So scale each panel group independently, never the whole sheet. Split the layout by panel type (left and right shrouds, number plates, fender), resize each group to its own trim size, then reposition decals inside the new safe area. Lock the aspect ratio on every logo lockup and type block before touching scale, so a circle stays a circle and a wordmark keeps its proportions; where a mark must read smaller, reduce the whole lockup rather than squashing it. Rebuild background fills as solid colour, gradient or vector shapes instead of a stretched raster texture. Order custom dirt bike graphics as true vector artwork, so gradients, outlines and sponsor marks resample cleanly at 40 percent scale. Output the kit at final panel dimensions, and inspect each panel at 100 percent zoom before proofing.
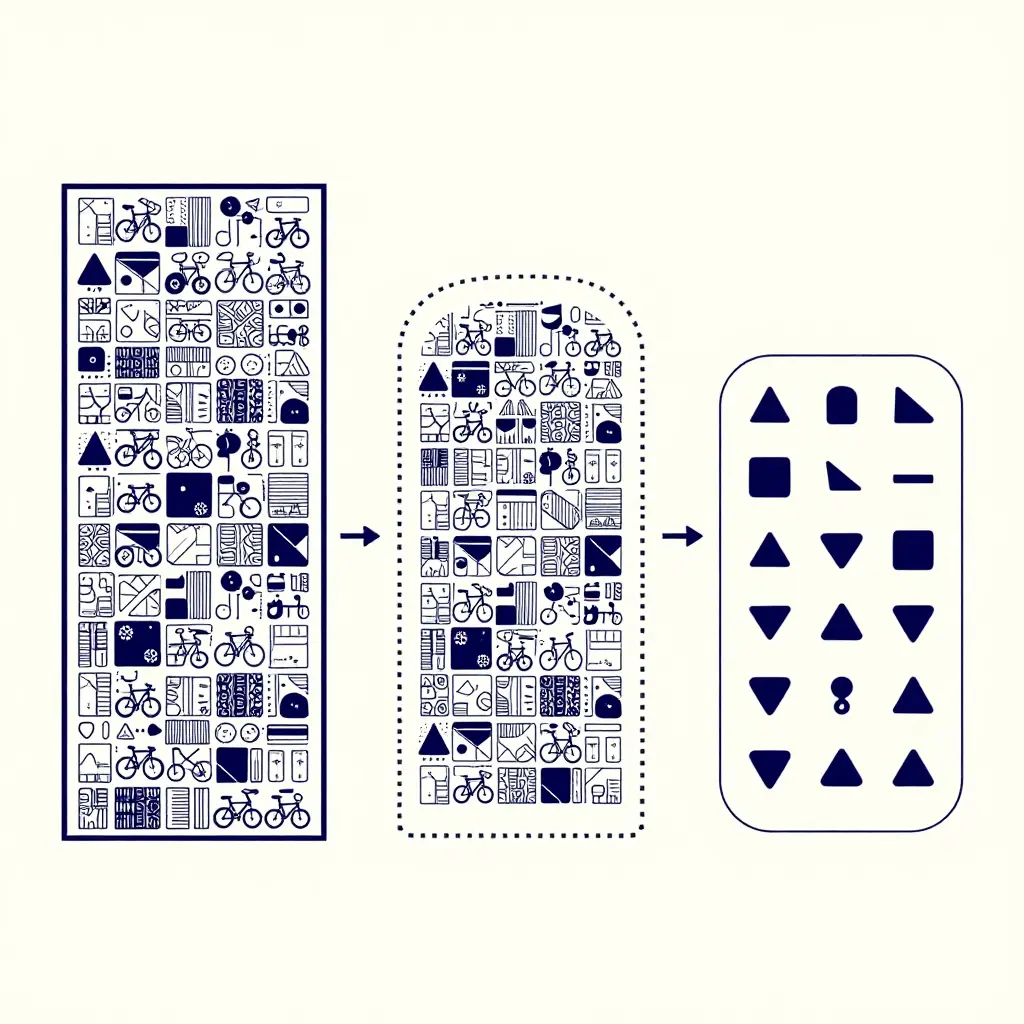
What the diagram shows: Stage one is the full-size kit at 100%. Stage two drops that artwork onto the smaller mini-bike shroud template, with the dashed line marking the cut path and the thin outer band marking bleed. Stage three is the version that goes to print: fewer, bolder shapes proportioned to the smaller panel, so nothing looks cramped or gets lost under a bolt hole or a hard edge.
Run that check before files go to the shop. The same sequence applies when artwork is adapted across the range, including KTM graphics kits for junior bikes.
Line Weight, Type Size, and Detail Density After Downscaling
Artwork drawn for a full-size shroud often shrinks by thirty to fifty percent in each direction, and every stroke travels with it. A 0.5 mm outline lands at 0.25 mm once the file is reduced. Most shops quote reliable output at roughly 0.3 mm for solid strokes, so anything thinner can break up, print faint or disappear entirely depending on the press, the ink and the vinyl. Measure stroke weight on the final scaled file rather than the source, and keep graphic lines at or above about 0.3 mm.
Type behaves the same way and fails sooner, because letterforms lose their counters and internal spacing before they lose their outlines. As a working number, hold body copy at 4 mm cap height or larger on a mini shroud, and treat anything under 3 mm as decoration rather than information. If a rider name or sponsor line has to be read, set it at 4-5 mm and proof it on paper at final size before you lock in print resolution settings.
Detail density needs the same discipline. Thin pinstripes, dense halftone dots, stipple shading and layered micro-textures look convincing on a monitor, then collapse into grey mush on a panel only a few centimetres tall. Delete any detail element smaller than about 1 mm on the finished panel, and swap halftone gradients for flat or two-step fills once the piece shrinks below the size of a typical number plate. Pinstripes that had 2 mm gaps in the original should widen into readable bands or come out altogether. Simplified artwork also reads faster, which matters when the viewer is standing several metres away: stronger silhouettes, fewer competing lines. If you are ordering KTM graphics for a 50 SX or a 65 SX, ask for a scaled proof and judge the decals at actual panel dimensions rather than on a full-screen zoom. Panel-size proofing is the only view that honestly reflects what the printer has to reproduce.
Bleed, Cut Lines, and Curvature on Small Panels
Once the artwork is rescaled, the technical layer of the file has to be rebuilt, not simply shrunk. Bleed goes first. An allowance is an absolute measurement in millimetres, but scaling a file scales the allowance with it, so a generous strip on a full-size panel arrives on a mini or kids shroud narrower than the panel class needs. Go back into the layout and reset the bleed to the absolute width for that class — 8 mm on mini shrouds, 6 mm on kids panels, per the table above — extending the background colour or pattern outward rather than letting the software drag it down with the scale. Do the same for the cut line: smaller panels have proportionally less material to absorb error, so a trimming path drawn tight to the artwork leaves almost no room for a hand-applied graphic to land correctly. Keep a deliberate buffer between the printed edge and the cut line, and check that fine details, logos and sponsor marks sit well inside it.
Curvature is where small panels punish careless files. A kids bike shroud bends through a tighter radius than an adult panel, so the vinyl travels further around the curve relative to its own size, which concentrates stretch along the outer edge and encourages edge lift. That is the argument for a wrap margin instead of trimming exactly to a shape line. Trim to the line and you get a clean silhouette with zero forgiveness: any misalignment shows immediately as a sliver of exposed plastic or an overlapping stripe. A wrap margin lets the film fold past the visible edge and tuck behind the panel, hiding the seam and holding the edge down against the curve. The catch is proportion. The margin that works on a full-size panel is usually excessive on a kids bike panel, where it can swallow a noticeable share of the printable area and crowd the graphics into the middle of the shroud. Scale the margin down, test-fit, then commit the print run. If you are building out a small-format range, start from artwork already drawn for compact shrouds, such as these 79Bike graphics, rather than force-fitting full-size custom dirt bike graphics into a tighter shape.
The Pre-Print Checklist Every Rescaled Graphic Needs
Shrinking artwork is half the job. The other half is catching the small mistakes that stay invisible until the vinyl is cut and the customer is holding a shroud that does not line up. Run through this list before any rescaled file leaves your screen, whether you are prepping a run of mini bike graphics or a single kids’ kit.
- Confirm every panel template against the actual bike, not last season’s measurements.
- Verify the aspect ratio lock is active on all logo lockups before resizing.
- Check minimum line weight and type size so nothing clogs or blurs.
- Confirm bleed and cut-line offsets match your plotter and material width.
- Review colour values in print terms, not RGB screen values.
- Proof the scaled layout on screen at true size over a shroud photo.
- Archive the rescaled master file with a clear version name and scale note.
The routine takes a couple of minutes per file, and it holds up on every mini and kids bike order you send out.
Material and Durability Considerations for Smaller Decals
Rescaled artwork only performs as intended when the substrate is matched to the panel it covers. On mini and kids bikes, shrouds and side plates combine limited surface area with tight curvature, so a fade-resistant cast vinyl with a compatible adhesive is the baseline; it holds colour under UV exposure without becoming brittle. Where the decal wraps around pronounced bends, a conformable film lets the graphic follow the contour without lifting at the edges. A laminated top film adds a protective clear layer that resists abrasion on panels that contact boots, knee braces and gear, which is common on smaller machines where the rider’s legs sit close to the bodywork.
Ink layout matters as much as film choice. Heavy ink coverage concentrated in a small area changes how the decal behaves during conforming: multiple overlapping layers add thickness and can crack, edge-lift or pull away at curves. Clean, simple colour blocking with controlled ink limits adheres better and fits more predictably. On mini and kids bikes, how long a decal lasts depends on the file as well as the film, so the layout gets simplified for the panel instead of scaled down with every original layer intact. When specifying compact-bike graphic kits, confirm that the laminate and vinyl series suit the actual shroud material and curvature.
Match Scaled Artwork to the Right Model-Specific Collection
With artwork scaled and print-ready, the fastest path to a clean fit is a collection built around the exact machine. Finished designs sit alongside KTM graphics kits for full-size motocross plastics, and each smaller platform has its own pages: Talaria MX3 and MX4 graphics, Talaria XXX graphics, Surron Light Bee graphics, Surron Ultra Bee graphics, eRide graphics and Arctic Leopard graphics. Each page is organised by panel, so dimensions can be compared before a print run is committed and panel fit confirmed before artwork is scaled. That keeps proportions, number placement and logo spacing true from shroud to shroud.
FAQ
Questions that come up before shops and riders approve artwork for smaller machines.
Can a full-size graphics kit simply be scaled down to fit a kids bike?
No. Shroud proportions, bolt holes and vent cut-outs differ on mini and kids bikes, so resizing distorts spacing and leaves graphics short of the edges. Every smaller panel shape needs artwork rebuilt for it.
How many millimetres of bleed do mini and kids bike shrouds need after scaling?
Set bleed as an absolute width instead of letting the scale factor shrink it: 8 mm per edge on mini shrouds and 6 mm on kids panels, the same figures as the table above. That includes the Talaria MX3 and MX4 graphics sets. Small shrouds have tight curves, and that margin keeps colour past the cut line so trimming and wrap do not open white slivers.
Do logos and type need to be redrawn rather than resized?
Redraw them. Shrinking outlines thins strokes below printable weight and closes letter counters, so each element gets reset at the smaller size with adjusted stroke weight to keep custom dirt bike graphics legible.
How do you confirm a panel template matches the actual bike?
Print the template at 100 percent and lay it flat on the bare plastic before cutting vinyl. Check bolt holes, vent slots and edge overlap, then correct any gap in the outline. A physical test-fit is the only reliable confirmation.
Can rescaled artwork still be printed with fade-resistant vinyl?
Yes. A file built at the correct smaller dimensions with adequate bleed prints normally on fade-resistant vinyl. UV-stable inks and a laminated top film keep decals on mini and kids bikes protected from sunlight and repeated pressure washing.
Making Rescaling Standard Practice
The work itself is not complicated; consistency is where shops slip. Scale panel by panel instead of shrinking a full-size file in one pass, check the result against the template for the bike in front of you, and keep the verified master once it is confirmed. Each run then lands where it should: proportions that sit on the shroud, number plates that stay readable, a finish that matches the approved proof.
A verified scaled master also stops being a single job. It becomes a production asset that shops and dealers pull, reprint and apply to the next customer on the same platform, a Light Bee graphics build for instance, without rebuilding the layout from scratch. As more small-bike models reach the market, the businesses whose fit and appearance stay predictable, order after order, will be the ones that made scaling standard.