
What Dirt Bike Graphic Kit Shelf Life Actually Means
Dirt bike graphic kit shelf life is the usable window during which an unopened kit’s printed vinyl decals, adhesive layer and protective laminate remain within installation specification. No expiry date is printed anywhere on it. What you are working with is the stretch of time in which a kit still lays down cleanly on a plastic panel, holds its edges, and survives a pressure wash once fitted.
The clock starts earlier than most shops assume, and printing resets it. 3M’s bulletin for its Scotchcal IJ35 film puts shelf life at no more than two years from the date of manufacture on the original box, and shortens that to one year from the processing date once the film has been printed or cut. Avery Dennison’s data sheet for HP 750 opaque film states two years from manufacture when stock is held at 20–25 °C and 50 ± 5% RH. A printed kit is a processed product, so the shorter number is the one that applies to it.
Temperature is the part a shop can actually control. A pallet left in a hot back room or an unheated container ages out well ahead of the same stock held at a steady 20 °C, and the cost arrives later as edge lift, trapped air, warranty claims and labour nobody invoices.
The four sections below cover how the materials degrade, the ranges worth holding stock to, the inspection signals that flag a compromised kit, and the rotation practice that keeps old stock off a bike. None of it is specific to one brand: the same rules apply to a shelf of KTM graphics kits or any other model range.
How Storage Temperature Affects Vinyl Graphic Kits
A kit does not expire on a stamped date. It degrades on a temperature curve, and every layer in the stack takes part: carrier film, vinyl face, pressure-sensitive adhesive and release liner each respond to storage temperature at a different rate. Those responses decide whether a graphic kit installation ends in a clean, conforming bond or comes back with lifted edges.
Heat: Adhesive Transfer and Edge Oozing
A pressure-sensitive adhesive is a viscoelastic polymer. Warm it and the chains gain mobility: the adhesive softens, flows, and wets out against whatever it is touching, including the liner. Sustained warmth does a second thing that matters more. It drives plasticizer out of the vinyl face film and into the adhesive layer, where it accumulates and deadens tack. Arlon’s technical note on film shelf life names that transfer as the main limit on shelf life, together with how sensitive a given adhesive is to plasticizer contamination.
Both effects show at the same place. Adhesive oozes past trimmed edges and transfers onto the release paper, so a vinyl decal reaches the shroud with part of its grip already spent. Visible later as weak initial tack, edge lift, and a sticky film on the liner where the adhesive used to be.
Cold: Stiff Adhesive, Stiff Carrier
Cold works in the other direction, and it is the more reversible of the two. A cold adhesive loses tack, and a cold carrier film stiffens and gives up the elongation it needs to stretch around a compound curve. Bring the kit back to room temperature and most of that comes back.
That makes cold a handling problem more than a storage one. Install a kit straight out of a cold container and it will bridge across curves, tent at the edges and silver, and the installer spends the next hour chasing bubbles with a heat gun. Condensation is the other cost: a cold kit carried into a warm bay collects moisture on the liner and on the adhesive face, and that moisture does not always dry out before application.
Plasticizer Migration and What the Liner Does
The release liner absorbs most of the blame for shelf-life failures and causes fewer of them than people assume. The plasticizer that deadens an adhesive comes out of the vinyl, not out of the liner. Arlon’s technical note describes the mechanism from the film side: plasticizing oils transfer into the adhesive coating, saturate it, and leave it with less cohesive strength. The adhesive then feels greasy, leaves residue behind and anchors poorly, whatever the installer does.
What the liner contributes is a moisture problem.
Humidity and Liner Curl
In a damp stockroom the paper liner takes on water, the silicone release coating turns inconsistent, and the clay layer over the paper can lift away with the adhesive when the kit is weeded. Arlon’s guidance lists the visible results: a mottled liner surface, paper that curls or waves on unwind, and weeding that fights back. A curled liner also exposes tacky adhesive to dust and throws the flat-pack geometry of the kit out of line, which slows every handling step that follows.
| Condition | Material change | Installation outcome |
|---|---|---|
| Sustained heat | Adhesive softens and flows; plasticizer migrates from the vinyl into the adhesive | Oozing and transfer; weak tack, edge lift |
| Cold storage | Adhesive loses tack; carrier film stiffens | Recovers at room temperature; a cold install bridges and tents |
| High humidity | Paper liner takes on moisture, curls, releases its coating | Exposed adhesive, contamination, misfeeding |
The Degradation Chain in Three Steps
- Storage drifts out of range: heat, cold or humidity loads the material stack.
- The adhesive, face film or liner changes state, flowing, stiffening or curling.
- Installation quality drops, and the kit comes back as rework.
Treat Storage as Process Control
Keep kits sealed, flat and dry at a steady room temperature, and pull the oldest stock first. The rest of this article turns that sentence into a procedure you can hand to whoever runs the stockroom.
What the Storage Temperature Curve Actually Tells You
The chart below is the working curve behind most of the advice in this article. It tracks adhesive retention after twelve months across five temperature bands, and the shape is the useful part: retention holds up through cool storage, falls away sharply between 25 and 35 °C, and is roughly halved above 35 °C.
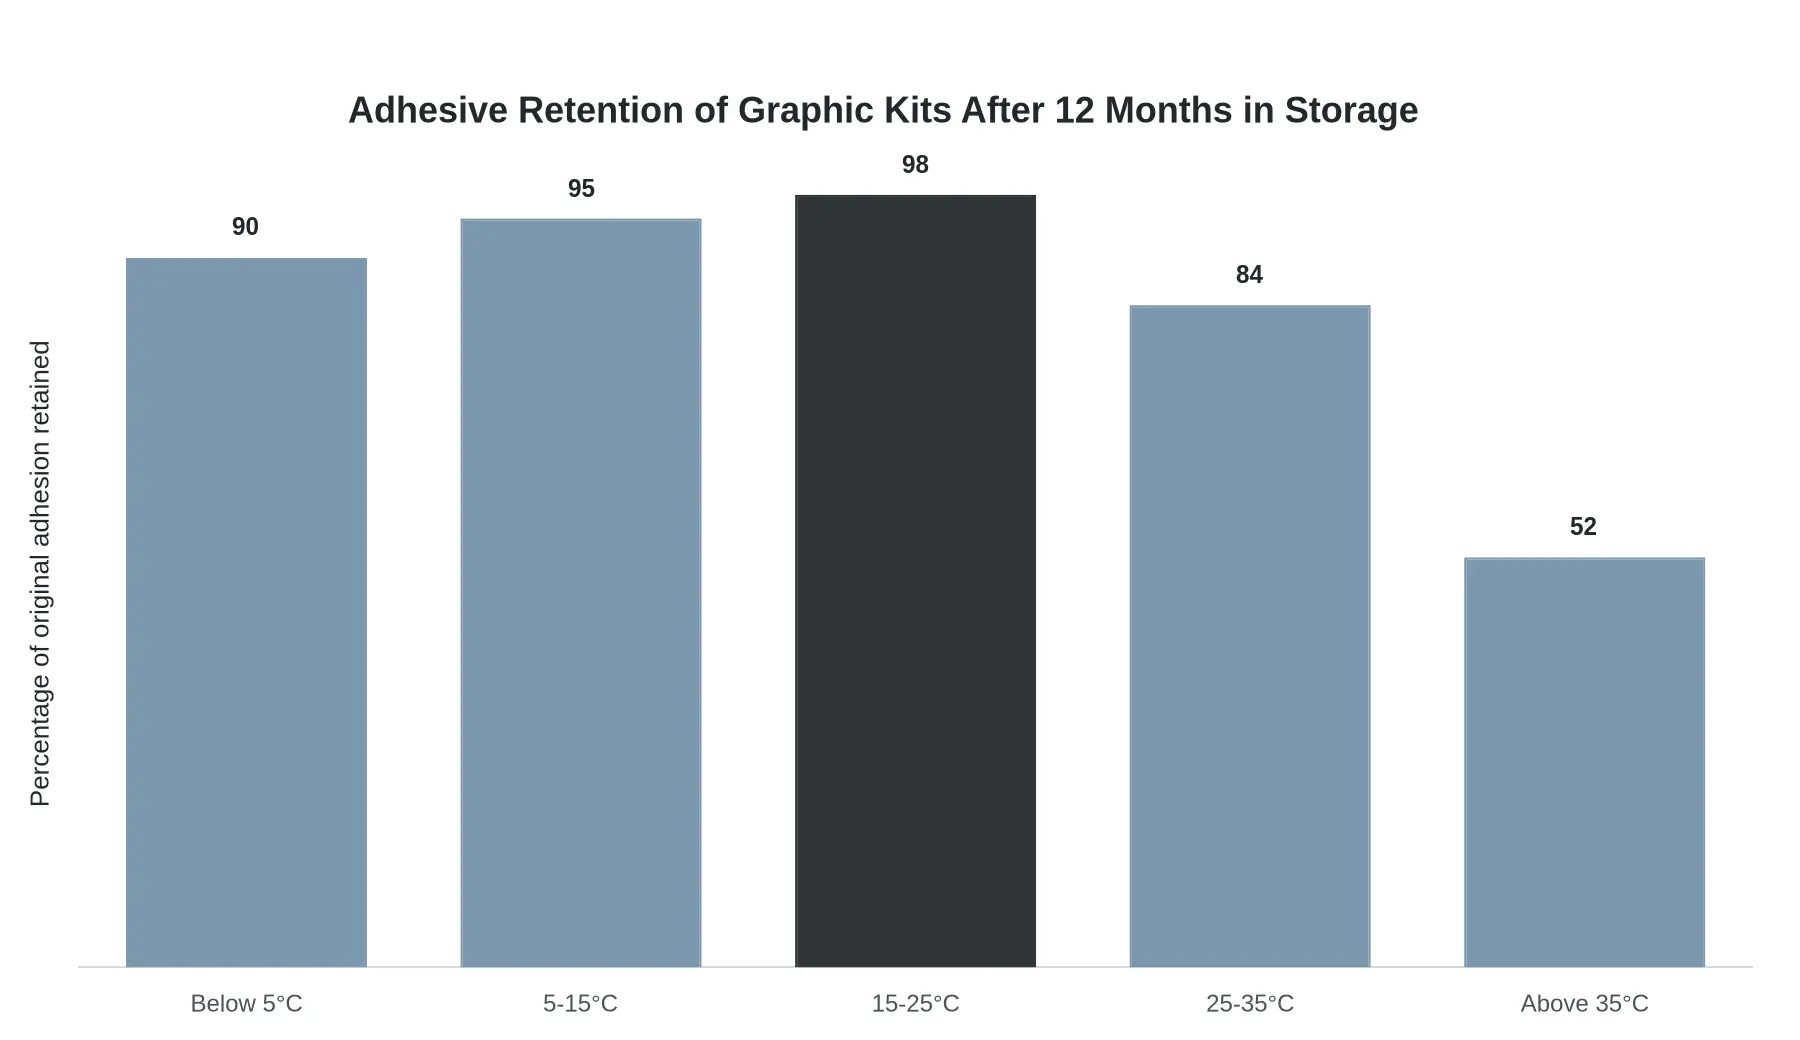
Adhesive left at 15-25 °C still measures close to its original grip at month twelve; stock held above 35 °C has lost roughly half of it, with the packaging unchanged.
Read the percentages as a relative guide rather than a lab result for your own film. The absolute number depends on the product, since a cast film built on high molecular weight polymeric plasticizer holds up better than a calendered film on monomeric plasticizer, and it depends on the liner and on how the kit was printed. What carries across products is the slope. Heat costs adhesion far faster than cold does.
Why Cold Is Slow and Heat Is Fast
Cold storage barely touches the adhesive chemistry. At low temperature, plasticizer migration slows to almost nothing and the adhesive simply sits dormant. The lower retention figure in the sub-5 °C band fits the condensation story better than it fits chemistry, and it reverses once the kit is warmed and dried out.
Heat is cumulative in a way cold is not. Warm the adhesive and it flows; push plasticizer into it and it stays there. That is why the fall after 25 °C is steeper than the climb before it, and why a week in a cool store cannot undo a summer in a shipping container.
A Simple Rule for Inventory Managers
| Storage Band | Adhesion Retained at 12 Months | Practical Read |
|---|---|---|
| Below 5 °C | 90% | Adhesive is fine; condensation and stiff film are the risk |
| 5-15 °C | 95% | Safe for long-term stock; acclimatise before install |
| 15-25 °C | 98% | The band to hold stock in |
| 25-35 °C | 84% | Shorten cycles; pull this stock first |
| Above 35 °C | 52% | No finished kits stored here |
Aim at 15-25 °C and few installation complaints will trace back to your warehouse. Rotate oldest first, keep pallets off a cold concrete floor and away from compressors and radiators, and put a cheap data logger in the storeroom so you can prove conditions if a batch ever misbehaves. High-turnover ranges make the discipline more valuable, not less: a KTM graphics set can sit for months waiting for the right model year to sell, and that wait is exactly when the adhesive ages.
What This Means Before You Install
If a kit has been stored warm, do not answer it with more heat and a harder squeegee. Let it sit indoors for 24 hours, clean the plastics properly, and run a test piece on a hidden panel. Five minutes on an offcut is cheaper than re-wrapping a customer’s bike.
Recommended Storage Temperature and Humidity for Graphic Kits
These are the numbers worth printing on a card and taping to the rack. Held inside this window, a graphic kit stays install-ready for the full shelf life the film maker specifies, whether you carry one spare set or ninety.
- Target storage temperature: 15°C to 25°C.
- Target storage temperature in Fahrenheit: 59°F to 77°F.
- Acceptable short-term tolerance band (up to 72 hours): 10°C to 30°C.
- Acceptable short-term tolerance band in Fahrenheit: 50°F to 86°F.
- Relative humidity range: 40% to 60%.
- Short-term humidity tolerance (up to 72 hours): 30% to 70%.
| Parameter | Target | Short-Term Tolerance (72 hrs) |
|---|---|---|
| Temperature (°C) | 15 to 25 | 10 to 30 |
| Temperature (°F) | 59 to 77 | 50 to 86 |
| Relative humidity | 40% to 60% | 30% to 70% |
Why Stability Beats a Perfect Number
A single ideal number looks tidy on a spec sheet; stability is what protects the stock. Adhesive rarely fails because it was warm once. It fails because it cycled warm, cold, warm again, dozens of times over a season.
Hot days and cold nights are the hard part. The liner and the vinyl expand at different rates, which works air under the edges and lets contamination into the adhesive. One summer of that in an uninsulated container is enough to produce a kit that lifts at the corners on install day.
Stable air keeps the liner flat as well, so sheets feed without curling or grabbing themselves. That is why every set gets dated and stored in its own labelled tube, first in first out, including each motocross graphics set that waits for a specific model year.
Get this right and a kit runs out its stated shelf life rather than half of it. Get it wrong and you are explaining to a customer why the adhesive feels like old tape.
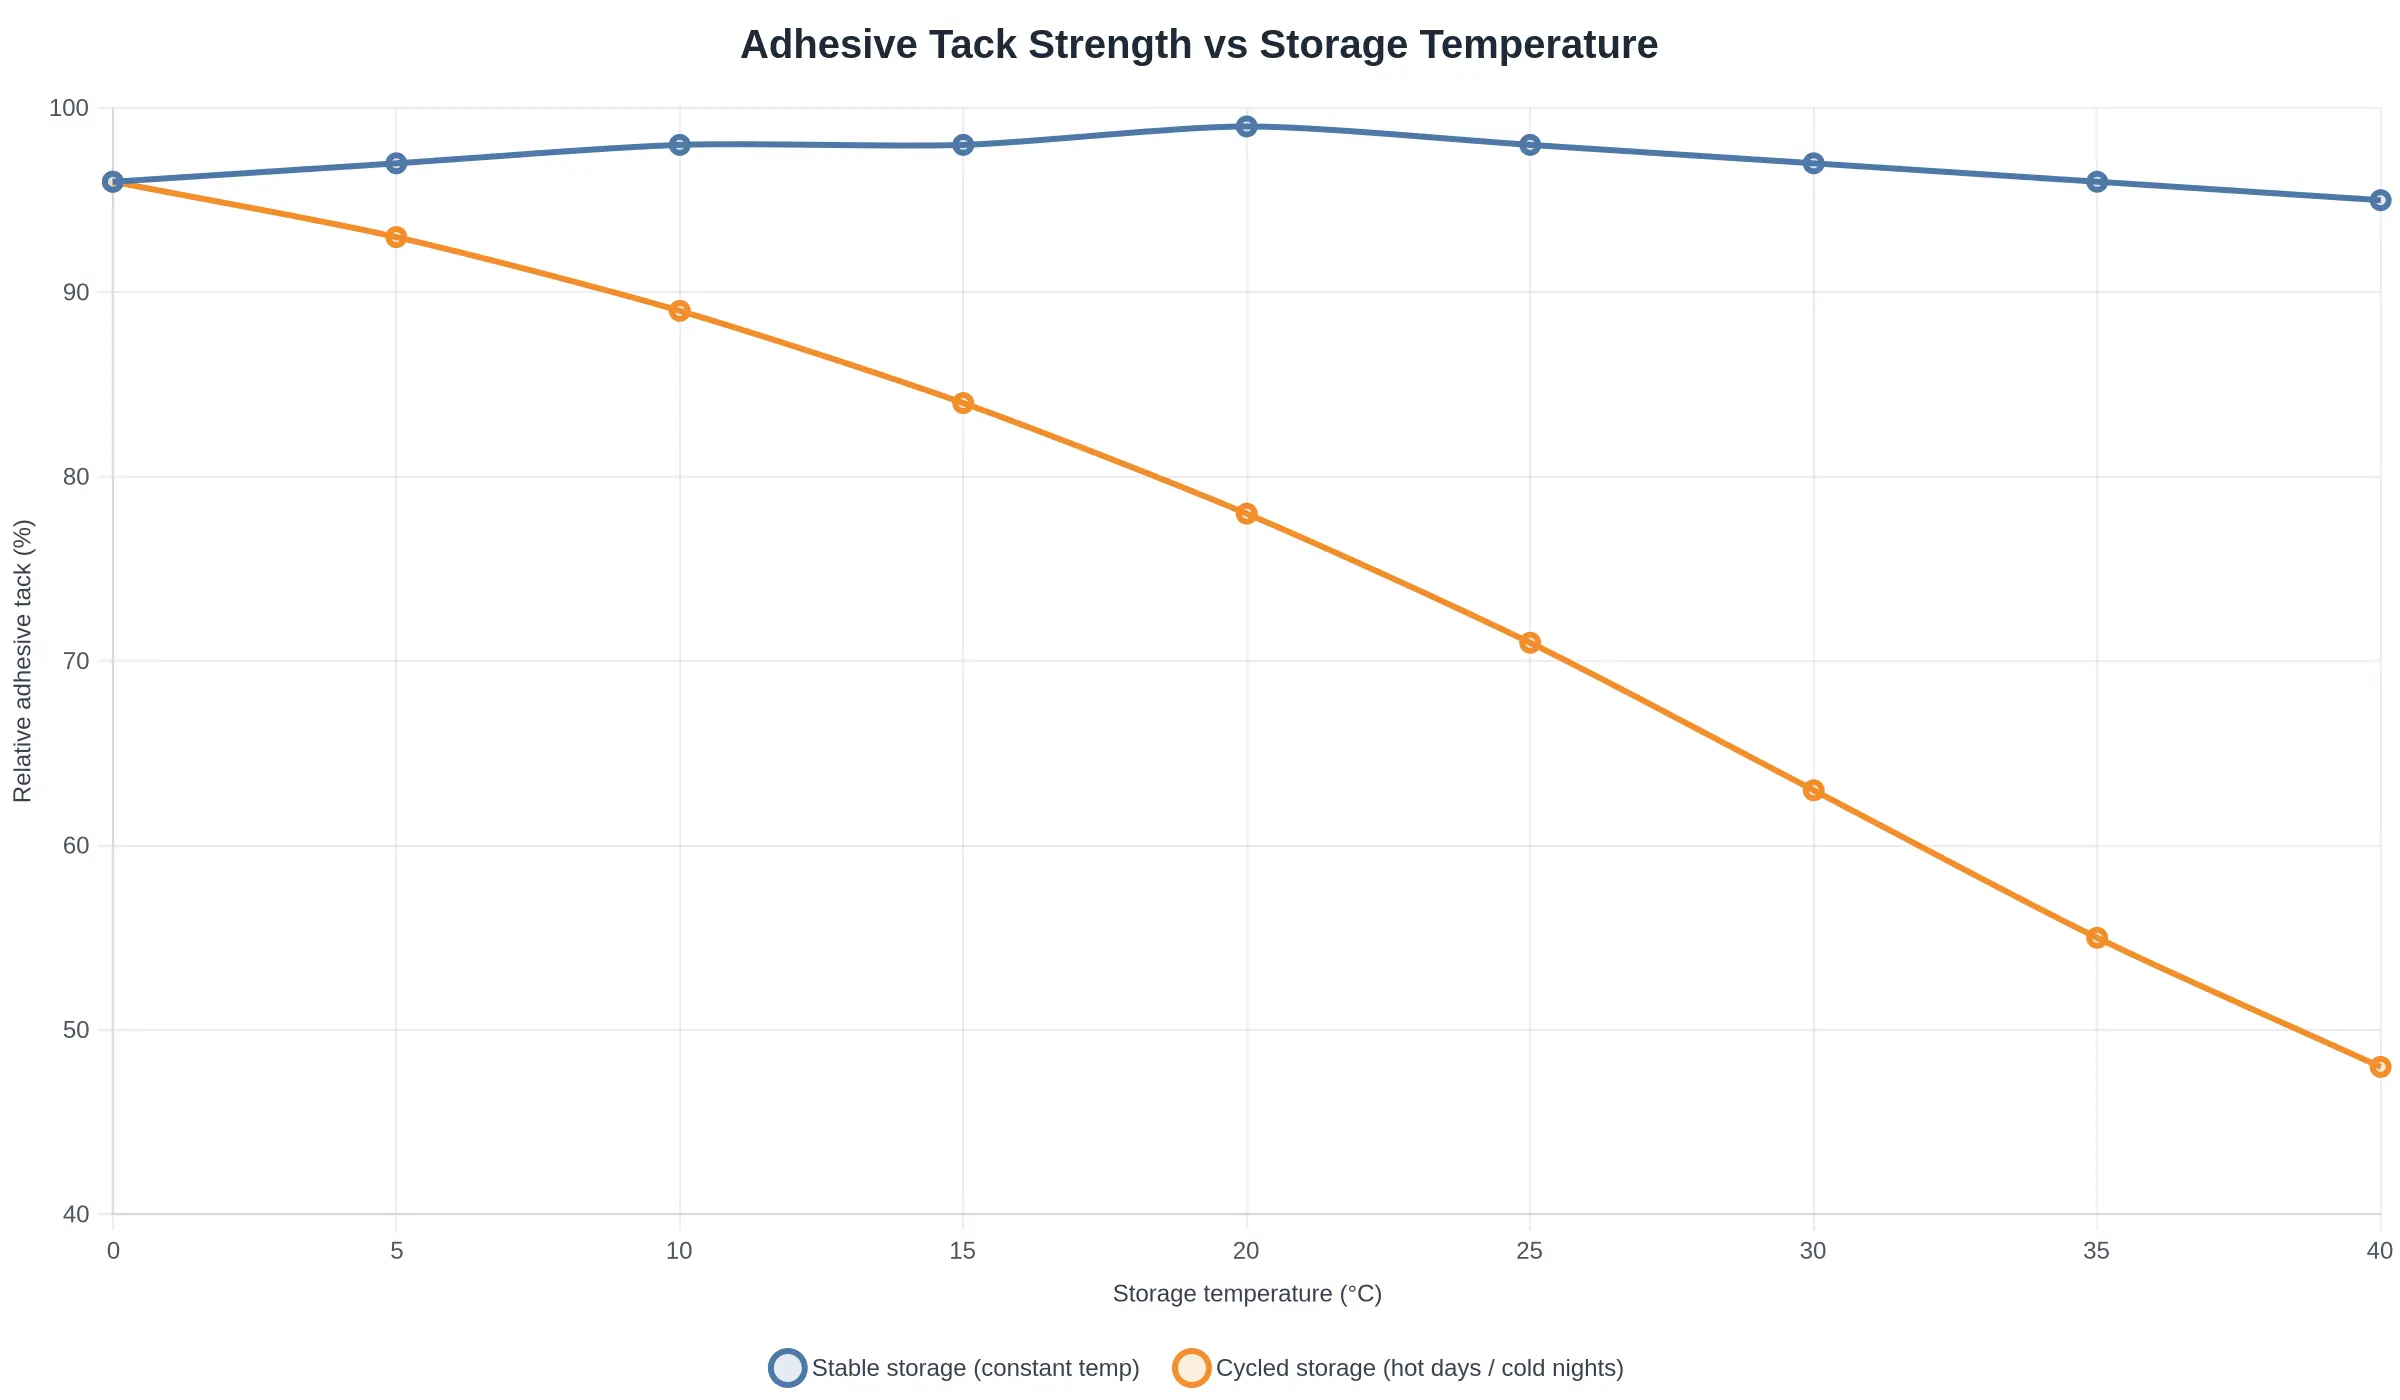
Rule of thumb: if the room is comfortable in a t-shirt and the thermometer barely moves between day and night, the stock is safe. If it swings more than 10 °C in a day, move the stock.
The table below matches where kits actually sit (shop shelf, trailer, garage loft) to the shelf life you can expect there, and to the action worth taking.
| Temperature Band | Expected Shelf Life | Adhesive Condition | Installation Risk | Recommended Action |
|---|---|---|---|---|
| Below 5 °C | Not for long-term stock | Firm, dormant | Condensation on thaw; stiff film | Warm and dry before install |
| 5 to 15 °C | Close to the stated figure | Firm, dry | Low | Acclimatise indoors 24 h |
| 15 to 25 °C | The stated shelf life, up to 2 years | Fresh, flexible | Lowest | Default zone |
| 25 to 30 °C | Shortened; rotate first | Soft, tacky | Moderate | Install this stock next |
| 30 to 40 °C | Months, not years | Oozing, plasticizer migration | High | Inspect, install soon, stop buying here |
| Above 40 °C | Weeks to a couple of months | Degraded, greasy | High | Write off, or patch test first |
All figures are relative to the shelf life the film maker states for unopened stock in its original packaging, which is commonly one to two years from manufacture. Freeze-thaw condensation and damp storage shorten those windows further.
Warning Signs a Stored Graphic Kit Has Aged
A box can look factory-fresh while the material inside is already past its best. An inspection at goods-in protects your reputation: catching a degraded kit before it is sold or booked into a graphic kit installation costs you one replacement sheet, while missing it costs a reprint, an hour of labour and a customer.
- Liner lifting or curling at the edges. A liner that has taken on moisture expands and curls away from the adhesive, especially under stacked stock. Once the edge lifts it collects dust and loses tack, and the panel will not lie flat during application.
- Adhesive residue left on the liner when peeled. Adhesive transferring onto the release paper means the bond has already migrated or the liner coating has broken down. The film will grip unevenly, grabbing early in one area and releasing late in another.
- Visible adhesive ooze around die-cuts. Adhesive pushed out through the cut lines points to storage that ran too warm or to stock that sat under too much weight. Oozing edges collect contamination and lift along every contour.
- Film that stays stiff or wavy after warming. A healthy cast film relaxes within minutes at room temperature. A stiff, rippled sheet has lost plasticizer and will not conform to compound curves, so the installer over-stretches it and the kit pre-lifts a month later.
- Discoloration or yellowing of the clear laminate. UV exposure and age oxidise the clear coat, shifting it yellow or cloudy. Everything printed underneath is filtered through that cast, so the finished kit no longer matches the approved sample.
- Artwork that will not register. Wavy edges, banded colour or stretched graphics mean the media shifted during printing or cutting. This is a production fault rather than an ageing one, but it lands in the same place: the panel will not align with its mounting points, and no amount of care at installation fixes it.
Any single symptom justifies quarantine and a call to the supplier. Storage temperature logs sitting next to those physical checks give you a defensible record of how the stock was kept, which is what the conversation usually turns on.
One Kit, Three Very Different Behaviours
The diagram below shows the same decal shape in three storage zones and how film and liner respond in each.

Read it left to right:
- Cold zone – the film turns stiff and curls back on itself, fights you during installation and traps air.
- Ideal zone – the decal stays flat, supple and relaxed, which is the state you want at the moment of application.
- Hot zone – the adhesive softens early, the liner lifts at the edges, and wrinkles set in before the kit reaches the bike.
Stock sitting in either outer zone should be moved toward the middle band and left to settle for a day before installation. The shelves should look like the centre of that picture, not the edges.
Turn Temperature Control Into an Inventory Policy
If you stock graphics for resale, shelf life is a cash flow line. Vinyl adhesive has a working window, storage temperature sets how fast you move through it, and the shop absorbs the loss when a kit goes past the end. Heat softens the adhesive and drives plasticizer into it; cold makes the film brittle on install day. Your invoice to the customer does not change either way.
The Five Rules Worth Printing on the Wall
- Rotate first in, first out. Load new arrivals behind existing stock and pull from the front. If the team has to dig for a kit, the rotation has already failed.
- Cap stock age. Set a hard ceiling and write it on the bin, not just in the spreadsheet: two years from the batch date for unprinted stock, one year from the print date for finished kits. Any dirt bike graphic kit shelf life estimate is a guess until you know when the kit was made.
- Store flat or in shallow trays. Tight rolls put continuous stress on adhesive and liner. Lay kits flat, or use shallow trays with nothing heavy stacked on top, so a finished custom graphics set goes onto the plastics without fighting its own memory.
- Keep stock off exterior walls and away from skylights. Those are the two spots in a workshop that swing hardest between a hot afternoon and a cold night. An interior shelf at chest height beats the convenient spot by the roller door.
- Monitor with a cheap min-max thermometer. A data logger is nice; a five-dollar min-max unit that tells you the stockroom touched 45 °C in July answers the only question a customer will ask about a failed install.
What Skipping This Actually Costs
- Reprints at your expense, because the supplier will argue, reasonably, that the film left in good condition.
- Returns and refunds that eat the margin on three or four good sales.
- Installer labour – a brittle or adhesive-starved kit turns a 90-minute job into a two-hour fight, and that is billable time you cannot recover.
- Reputation, which is the expensive one. A rider who posts a peeling kit blames the shop, not the vinyl, and the standing you built with that rider is slow to rebuild.
A date stamp, a thermometer and a flat shelf carry most of the policy. Cheap to run, and it protects the part of the business that is hardest to restock.
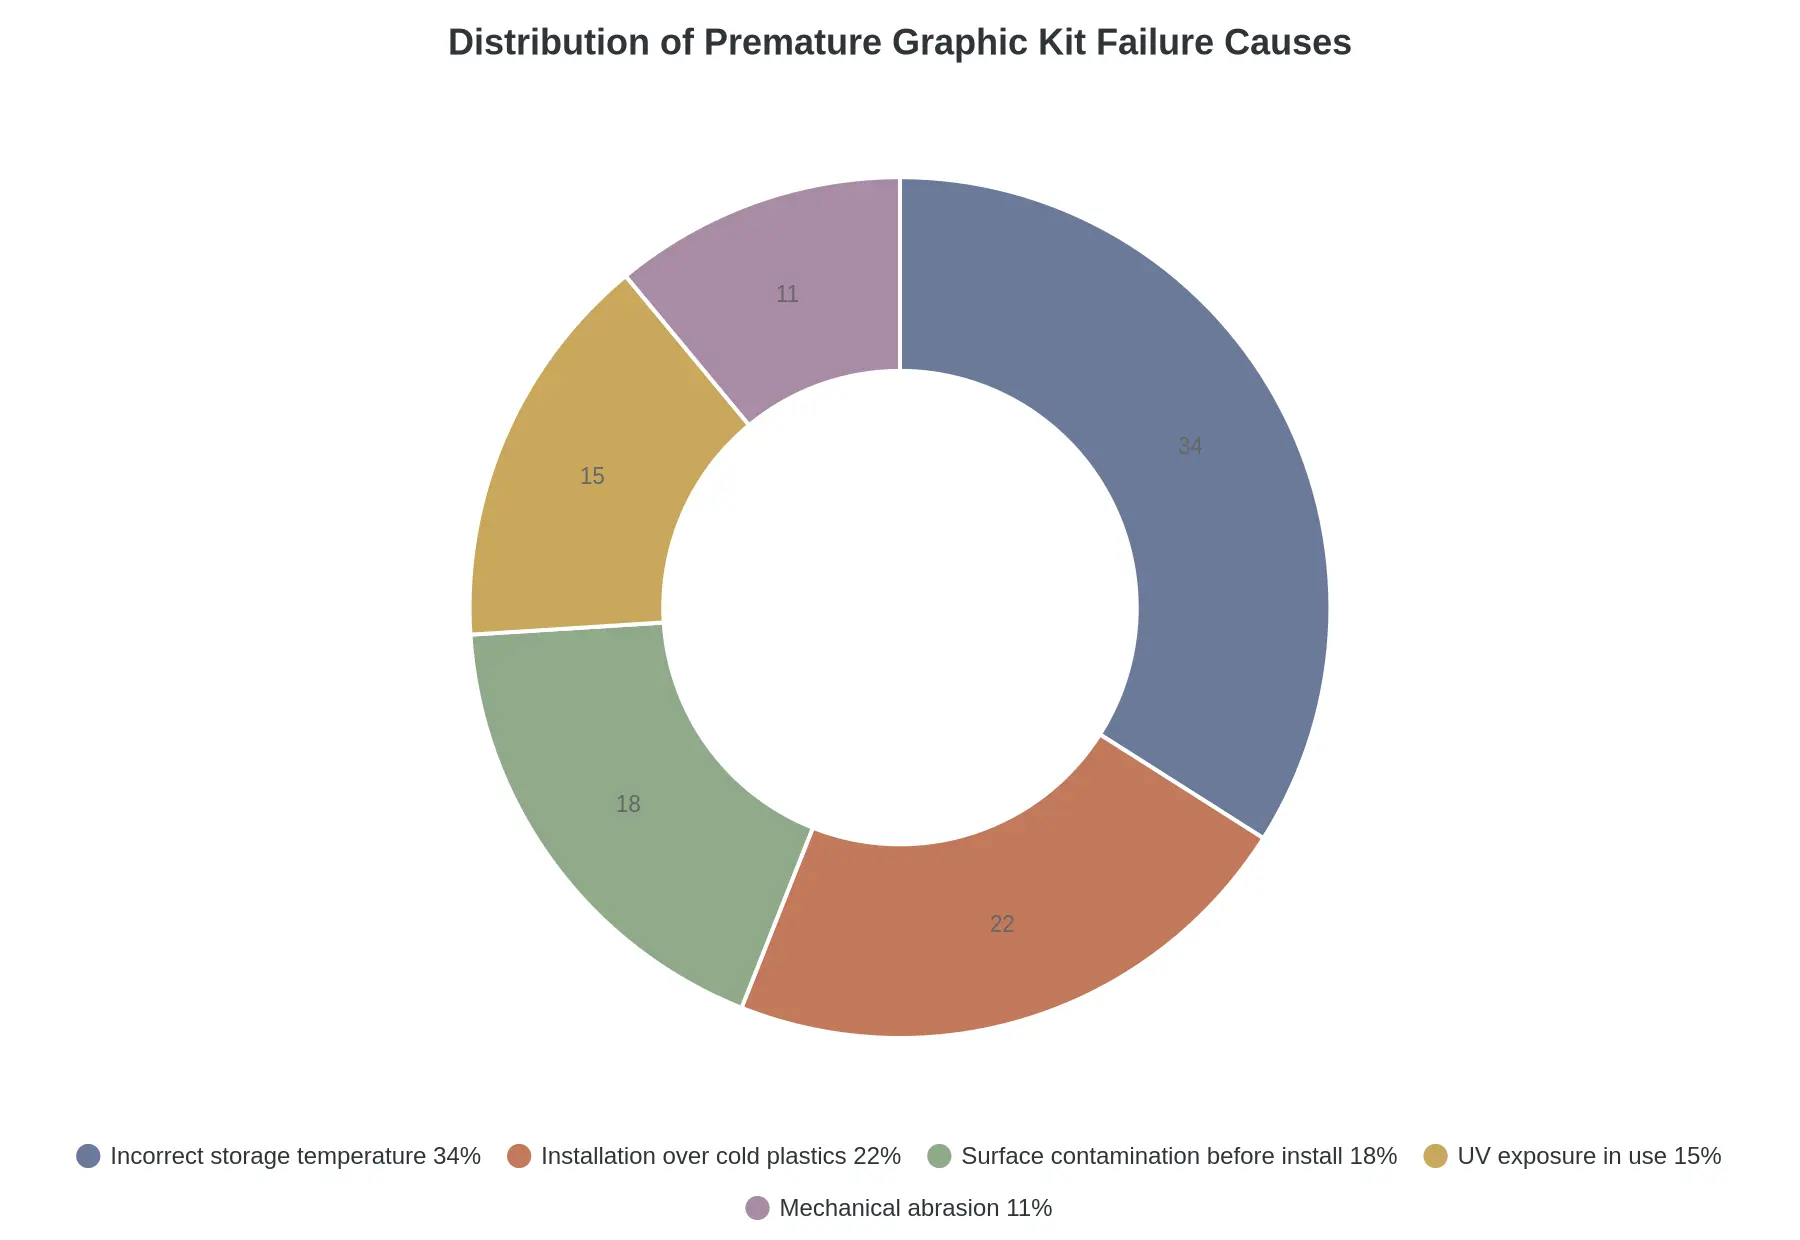
Caption: incorrect storage temperature is the largest single category in this breakdown of premature failures at 34%, ahead of installation over cold plastics at 22%, surface contamination at 18%, UV exposure at 15% and mechanical abrasion at 11%. It is also the only item on that list a shop decides entirely for itself.
Pre-Installation Temperature Checklist
A kit that spent three weeks in a cold container will not behave like one held at a stable storage temperature, so give every box the same inspection before anyone picks up a squeegee.
- Check the bay temperature against the recommended band, ideally 18 °C to 24 °C, before the box is opened.
- Lay the packaged kit flat and let it acclimatise for the full time stated on the label, usually a few hours, longer for thick multi-layer prints.
- Measure the surface temperature of the plastics with an infrared gauge rather than trusting the workshop thermostat.
- Peel a corner of liner to confirm it releases cleanly; brittle or tearing liner means the film is still too cold to bond.
- Warm stiff film gradually with a heat gun on a low setting, sweeping side to side from a safe distance until the material relaxes.
- Check the humidity in the bay, since damp air can leave moisture trapped under the adhesive.
- Record the batch and print dates on the job sheet, so shelf life stays traceable and future deliveries can be compared against the same baseline.
Skip any one of these and the effective shelf life shortens quietly, showing up later as lifted edges, silvering or wrinkles that no amount of reheating will fix. Fresh stock that has been stored this way is worth more than a discount: if you need a set, shop our dirt bike graphic kits.
FAQ: Graphic Kit Storage and Shelf Life
The answers below cover the storage ranges and handling rules that decide whether a kit installs cleanly or fails on the first wash.
| Storage condition | Temperature | Result |
|---|---|---|
| Ideal | 15-25 C (59-77 F) | The stated shelf life, up to 2 years from manufacture |
| Acceptable | 10-30 C | Some adhesive softening; rotate this stock sooner |
| Risky | Above 35 C | Plasticizer migration, liner shrinkage, adhesive ooze |
| Cold | Below 5 C | Adhesive recovers on warming; condensation and stiff film make install risky |
How long does a dirt bike graphic kit last in storage under ideal conditions?
Film makers publish the number, and it is shorter than most riders expect: up to two years from the date of manufacture for unprocessed film, and one year from the processing date once the kit has been printed and cut, still capped at two years from manufacture. Avery Dennison’s data sheet for HP 750 puts it at two years from manufacture at 20-25 C (68-77 F) and 50 ± 5% relative humidity, and Arlon notes that a shop storing film properly can often use it well past the stated shelf life with little risk. Write the manufacture and print dates on the bag so nobody has to guess later.
Can I store a graphic kit in a refrigerator or freezer?
No. Cold does slow plasticizer migration, but standard vinyl decals are specified for room-temperature storage and the trade is a bad one: frozen film turns brittle, and condensation forms the moment it comes back into a warm room, often on the adhesive itself. Refrigeration adds no protection worth the handling risk, so keep kits at room temperature.
Can I install a kit that sat in a hot vehicle or shipping container?
Yes, if it passes inspection. Heat above 35 C accelerates plasticizer migration and liner shrinkage along with it, so check the backing paper for edge pull-back and press a corner to confirm the glue is still tacky rather than greasy. Wavy film or visible creasing gets replaced, not installed.
Does sealed packaging extend shelf life?
It helps, mostly by keeping moisture off the liner. The poly bag and desiccant block the humidity that mottles a paper liner and lifts its coating, and keeping the bag closed until install day preserves that margin. There is no fixed number of extra months to quote for it, and a sealed bag will not rescue stock stored in a hot room. Store sealed kits flat, never rolled tight or folded over a frame tube.
How do I know if a decal set is too old to install?
Three checks settle it: yellowed or chalky backing paper, adhesive that transfers to your fingertip when pressed, and film that cracks when you bend a corner. Any one of them means the kit is past its dirt bike graphic kit shelf life and will lift at the edges within weeks. Test a scrap piece on a clean panel before committing a full motocross graphics set to the plastics.
Closing Summary: Why Storage Temperature Decides Shelf Life
Storage temperature is the most controllable factor in dirt bike graphic kit shelf life. Kits held in a steady, cool, dry place keep their tack and printed finish far longer than kits that cycle through heat in a workshop, a van or an uninsulated storeroom, and once temperatures climb and stay there, the adhesive plasticizes ahead of schedule and the laminate loses the give it needs to conform.
Three controls, in the order they are worth doing:
- Define and protect a storage zone. Hold kits at a stable 15 °C to 25 °C (roughly 60 °F to 77 °F), between 40% and 60% relative humidity, away from direct sun, radiators, compressors and roof-only storage areas.
- Measure and record. A thermometer, a hygrometer and a weekly log turn storage temperature from an assumption into a number you can act on before the stock is compromised.
- Rotate and check age. Label incoming kits by date and install oldest first, so adhesive never ages out unnoticed at the back of a shelf.
For teams reviewing what they currently carry, the KTM graphics collection shows how kits are finished and packed before dispatch.
Whether kits are held for a week or a full season, controlled storage is what carries adhesion and print quality through to the moment of installation.