
Most used-bike refresh budgets go to one line item: new graphics. For shops and owners buying custom graphics for dirt bikes, that usually means a choice between wheel decals and shroud decals. The two do different work. One adds an accent, the other replaces the face of the machine, and they differ in kit price, fitting time and wear pattern. What matters is coverage per dollar and how each part holds up in sun, mud and pressure washing, not which kit photographs best on a product page.
Wheel decals are rim and spoke graphics: pre-cut strips and shaped panels that wrap the rim edges and, depending on the kit, the spokes and hub area. They cover a narrow band, but the band sits low, spins constantly and pulls the eye along the length of the bike. Shroud decals cover the radiator shrouds and the adjacent body panels, the large flat surfaces at the front that carry the number plates, brand marks and most of the colour. A refresh built on shroud decals changes the biggest visible area of the machine; a refresh built on wheel decals changes the parts riders notice most at speed and on the stand.
The two compete for the same budget and the same labor window, which is why shops keep weighing them against each other. A shop quoting a refresh has to decide whether the money goes into panels that read clearly in a sales listing or into wheels that hide scuffs from tire changes and trail riding. Owners of older machines often face damaged shrouds and scuffed rims at once, so the question becomes which part repairs the most visible wear per dollar. In a full set such as a KTM graphics kit, most of the sheet area and most of the fitting time goes to the shroud panels.
Five things decide it: how much of the bike gets restyled, kit cost per unit of visible change, prep and fit time on the lift, resistance to pressure washing, roost and boot rub, and the effect on asking price or time to sale.
Wheel Decals: Dressing the Part That Never Stops Moving
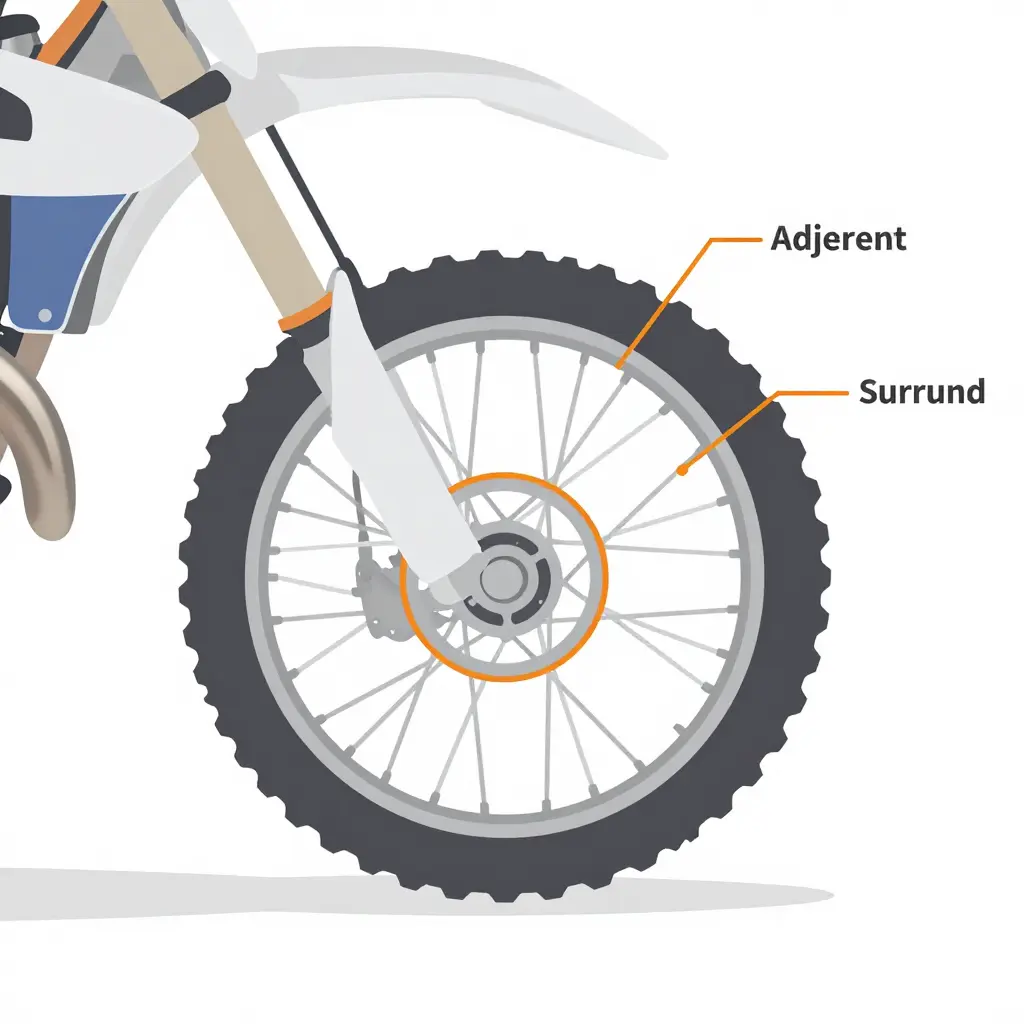
Wheel decals touch a specific set of surfaces, and each one behaves differently. The rim edge is the ring where the tire meets the hoop; it gets the most attention and takes the most abuse. Spoke-adjacent zones sit in the narrow strips between spoke nipples and the rim bed, where the curves are tight and fingers struggle. Hub surrounds frame the center of the wheel and tie the front and rear together. Three zones, not one sticker.
No flat sheet follows that geometry, so most wheel kits ship as multi-piece sets. Curved segments are pre-shaped to the rim contour and applied in sequence around the hoop, with numbered pieces or registration marks placing each strip. A well-designed kit wraps the wheel with even spacing and clean seams instead of one visible overlap. Alignment marks matter more than the number of pieces in the bag.
The trade-offs show up in use. Wheels sit low and catch roost, puddle spray, pressure-washer overspray and brake dust that grinds into edges during cleaning. Grime builds fastest at spoke junctions and hub surrounds, and scrubbing those spots is exactly what lifts a cheap edge. Fitting has to respect rotation, too: put the bike on a stand, rotate in small steps, and let each segment set before moving to the next. Clean and dry beats fast and rushed.
Sun, chemical cleaners and constant flexing are why fade-resistant vinyl is worth paying for on a rotating part. A rim cycles through UV light and dust all day, and low-grade film answers by going chalky, cracking at the spokes or peeling from an edge you cannot re-press. Fade-resistant vinyl holds colour and adhesive through that cycle, so a set of custom graphics for dirt bikes still reads as one design rather than a patched-together wheel.
If you are matching the rest of the plastics, browse model-specific graphics kits so the wheels and shrouds share a design instead of arguing with each other.
Wheel Decal Coverage Zones at a Glance
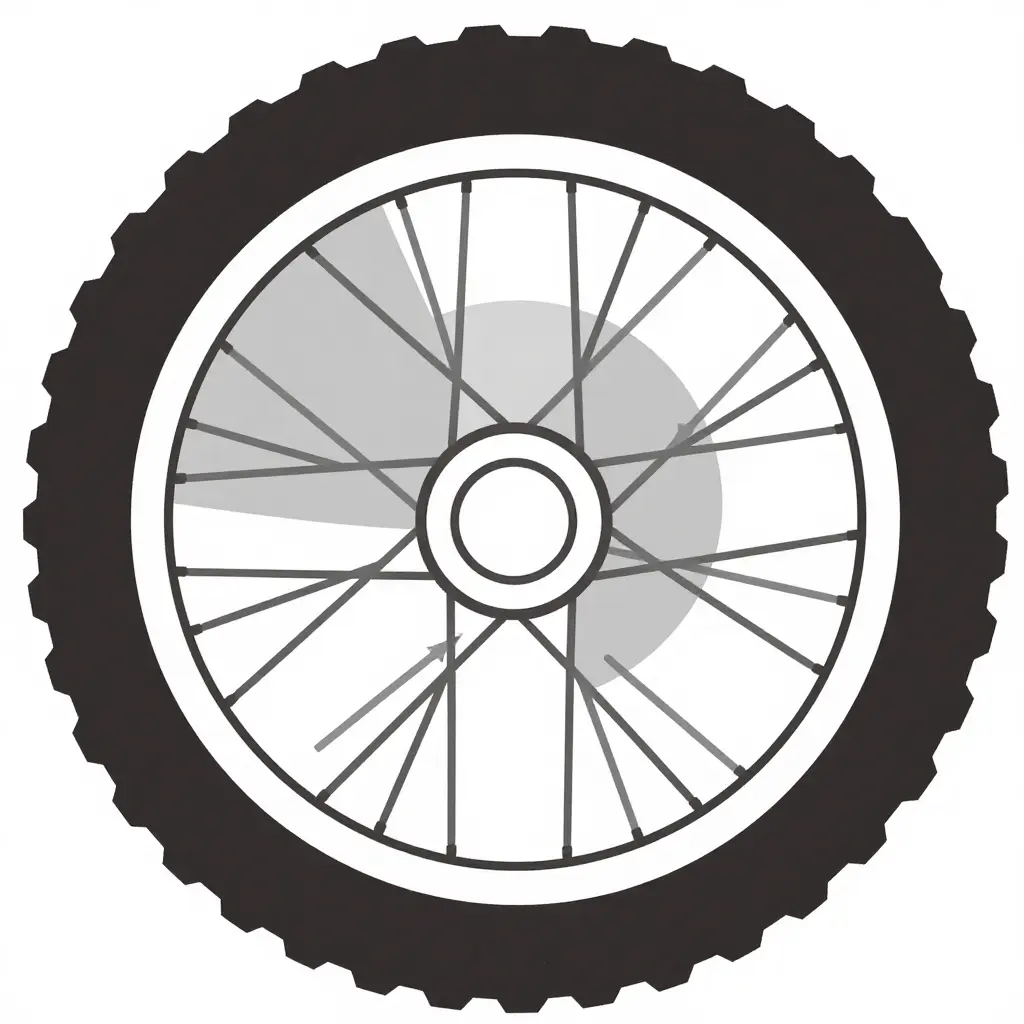
The schematic strips the wheel down to the three zones a kit actually touches. The rim edge arc wraps the outermost band where the tire meets the rim, the spoke zone covers the open wedge between spokes, and the hub surround is the small ring of real estate close to the axle. Most kits split along roughly these lines, which is why a wheel refresh can look busy up close and still read as one clean graphic at ten paces.
Shroud Decals: The Biggest Canvas on Your Bike
If wheel decals are the detail, shroud decals are the headline. Radiator shrouds and side panels are the largest flat and semi-flat surfaces on a dirt bike, and they sit where the eye lands first: framing the tank, running alongside the seat, squaring off the front of the machine. That is why graphics makers bundle them into motocross graphics kits covering both sides in one matched set rather than selling panel by panel.
Wide, visible panels carry the design. Number plates, team colours, sponsor marks, model-specific striping, the whole visual story of the bike lives there. A shroud set can make a twelve-year-old 250 look like a factory build, or match a rider’s helmet and gear without shouting. Buyers browsing custom graphics for dirt bikes usually judge the design by the shroud kit, because fork guards, swingarm and airbox decals read as supporting detail once the shrouds set the tone.
They are also the cheapest fix for tired panels, given that replacement plastics and paint both cost more. Used panels go chalky, sun-faded and scuffed long before they crack, and shroud decals cover that discoloration instead of asking you to buy new ones. Deep gouges still telegraph through, but the light-to-medium wear that makes a bike look neglected disappears under a full-coverage print.
The catch is prep and edges. Shrouds are curved and contoured, so a clean, degreased, lint-free surface matters more here than anywhere else on the bike. A speck of dust under a 40 cm panel becomes a visible bubble, and rounded corners and tight bends take the most stress, which is where lifting starts if the film is stretched dry or trimmed short. Warm the material, work from the centre out, and post-heat the overlaps, and the kit will stay put through pressure washing and roost.
For brand-matched sets, browse the KTM graphics collection to see how full shroud coverage reads on a finished bike.
Here is how the two options stack up on a tired used machine.
| Consideration | Wheel Decals | Shroud Decals |
|---|---|---|
| Surface area covered | Narrow rim strip only | Large body panels, full coverage |
| Visible impact on used bike | Subtle accent, close-up detail | Bold, instantly noticeable refresh |
| Material and fade resistance | Cast vinyl, moderate UV stability | Laminated vinyl, strong UV resistance |
| Installation time and difficulty | 30-60 minutes, fussy alignment | 1-2 hours, curved panels need careful alignment |
| Exposure to wear and cleaning | Chain lube, brushes, kerb scuffs | Mud, pressure washing, boot rub |
| Budget positioning | Cheapest cosmetic add-on | Mid-range, strongest value per dollar |
On a scuffed machine, shrouds carry the bulk of the transformation and wheels add the finishing touch that makes a full kit read as one build. Browse bike-specific kits to match your model.
Inspect First, Order Second
Before spending anything on a refresh, put the machine under good light and go over the wheels and plastics by hand. Ten minutes now saves you decals that lift at the edges, bubble over scratches, or refuse to sit flat on a warped shroud. Work the way a mechanic would: slowly, without assuming the photos told the whole story.
- Run a thumb and a flashlight along each rim edge to catch hairline cracks and stress marks.
- Flex the plastics gently at their mounting tabs to expose stress whitening before it splits.
- Drag a fingernail across scratches to flag any groove deep enough to telegraph through vinyl.
- Wipe suspect panels with a clean dry rag to reveal oil staining that will repel adhesive.
- Pick at the corner of old graphics to map leftover decal residue and raised glue ridges.
- Angle each panel into the light to compare surface texture and gloss level side to side.
- Inspect bolt holes, grommets and threaded inserts for stripped threads, ovality or missing hardware.
- Confirm the shroud, fender and rim contours match a known model year rather than trusting a fitment chart alone.
- Photograph every damaged area so you can share it with your supplier before ordering.
Deep scratches and textured or chalky surfaces usually call for thicker, more conformable vinyl with a matte or satin finish that hides imperfections, while cracks, heavy staining and residue demand a clean-up and repair first. On clean, glossy panels you can safely choose thinner cast films and high-gloss overlaminates that hold fine detail. Get this assessment right and the kit sits on a sound surface instead of fighting one.
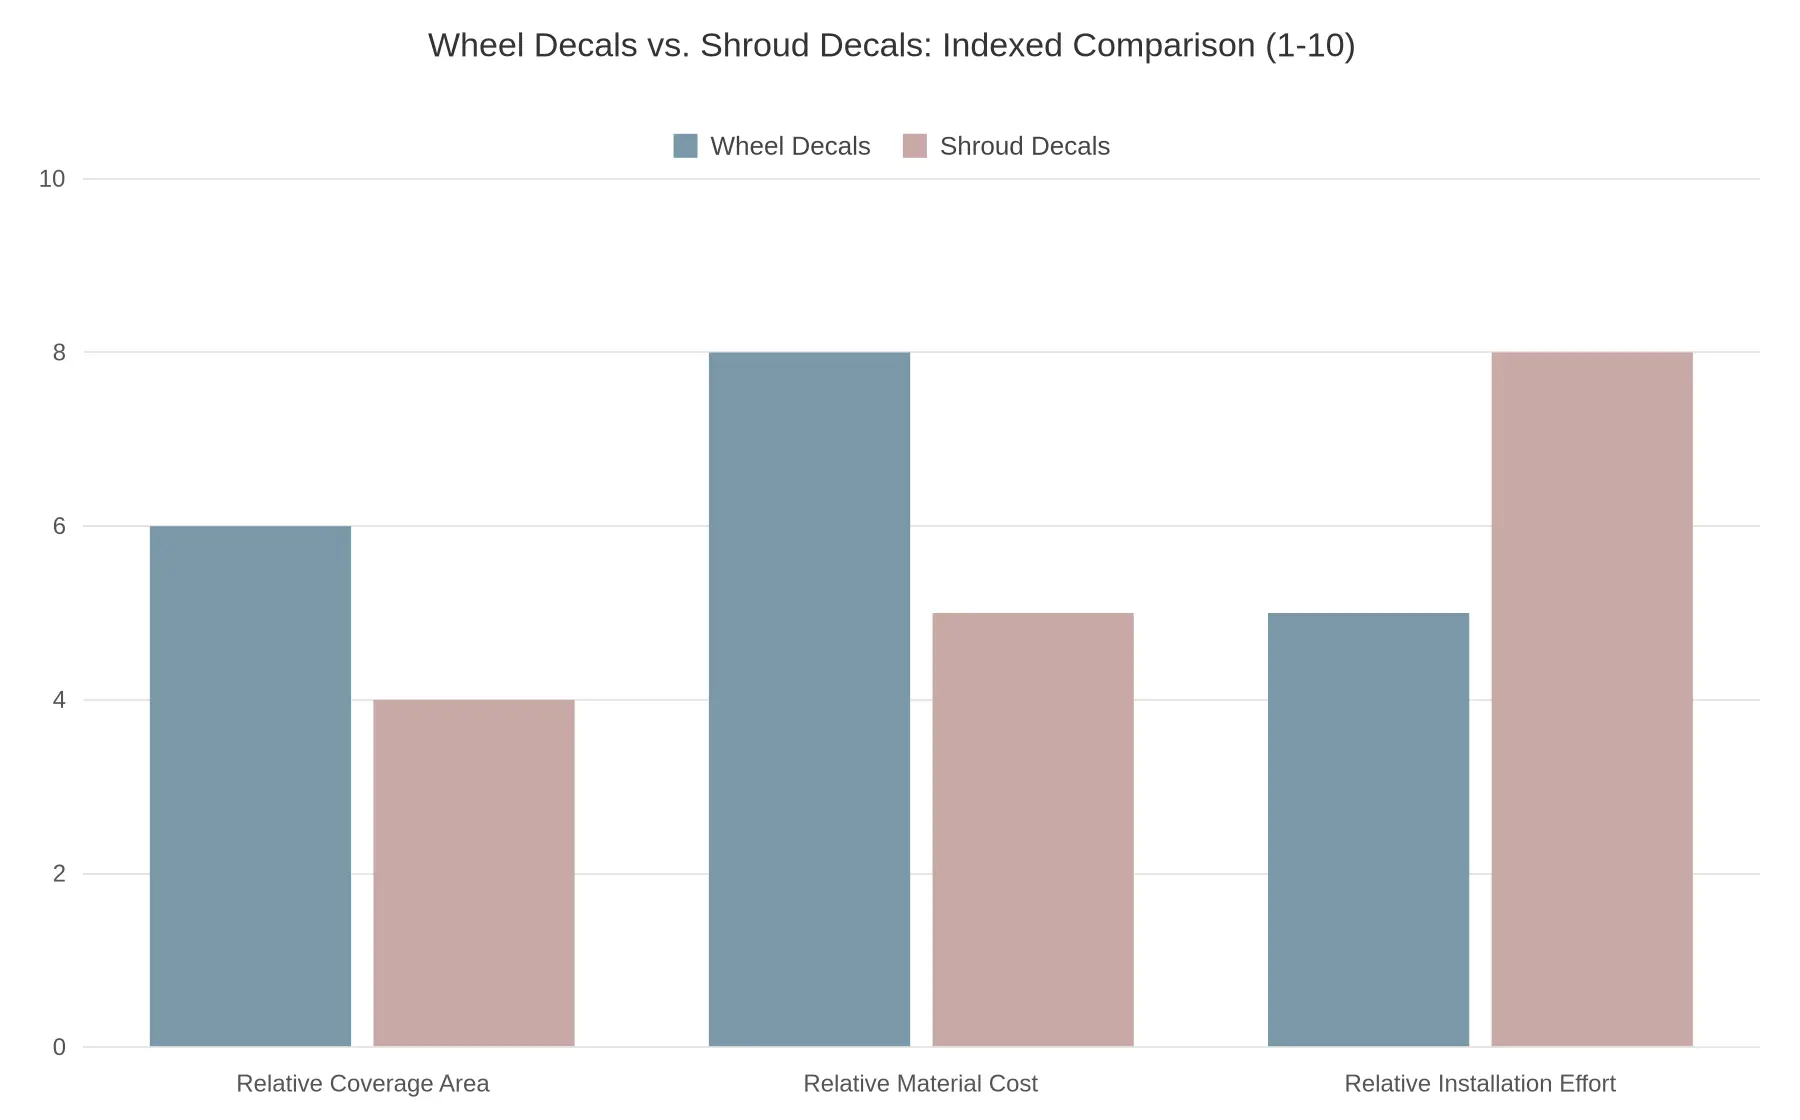
Indexed on a 1-10 scale: shroud decals cover far more of the bike and cost more in material, while wheel decals cover a narrow band and take less time to fit.
Read the chart as a planning aid rather than a scorecard. The gap that matters is covered area, because two shroud panels restyle the front of the bike while a wheel kit dresses a band. Cost and fitting time move in the same direction as coverage, which is why a full refresh costs more in both money and hours than a wheel-only job.
Turning the Comparison into a Decision Framework
The choice is less about which product is better than about what the refresh needs to accomplish. Both sit inside the same world of custom graphics for dirt bikes, and they solve different problems: one sharpens the details, the other rebuilds the visual story.
Wheel decals work at accent level. They brighten the rotating parts, break up a plain rim, and let a tired bike read as tidy without touching any bodywork. Modest investment, modest install time, so they suit owners testing a direction, freshening a bike before resale, or adding contrast without changing its identity.
Shroud decals work at the opposite end. Shrouds and side panels are the largest flat surfaces on the machine and usually the first to fade, scuff and yellow. Covering them resets the bike’s face in a single step, which is also why it is the bigger decision: more surface to align, a bolder design to commit to, and more reason to plan before you peel.
When the aim is a refresh that reads as one design instead of a collection of parts, fit both. Matching colours, line weights and logo spacing across wheels and shrouds is what makes graphics look factory-intentional rather than added afterward.
- Choose wheel decals if the goal is accent-level change with low commitment.
- Choose shroud decals if the priority is transforming worn plastics.
- Choose both if the refresh should read as one coherent design.
If you want coordinated coverage across both areas, browse ready-made graphics kits and compare complete designs instead of piecing a look together a panel at a time.
What Actually Keeps a Decal From Fading and Peeling
It helps to know what a decal is. The cross-section diagram further down shows the four-layer stack: release liner, adhesive, printed vinyl and protective laminate. The liner only carries the sheet until install day. The adhesive decides whether the edge stays stuck through pressure washing and roost. The printed vinyl carries the colour. The laminate is the sacrificial shield that absorbs UV, grit and elbow grease so the ink underneath does not.
That is why a cheap single-ply sticker goes chalky on a rear wheel while a properly built kit keeps its colour. On a spinning wheel the edge lives under constant shear stress; on a shroud the same edge faces impact and scrubbing. Either way, a thicker laminate and a high-tack adhesive do more for longevity than any design choice. When you spec a set, look at the layer construction behind the artwork, which is the same reasoning that applies across premium multi-layer graphics kits.
Durability and Fade Resistance: What Actually Makes a Decal Last
Two decals can look identical on install day and age in completely different ways. The difference is rarely the artwork. It comes down to five things: the vinyl family, the ink system, the laminate, surface preparation and edge sealing.
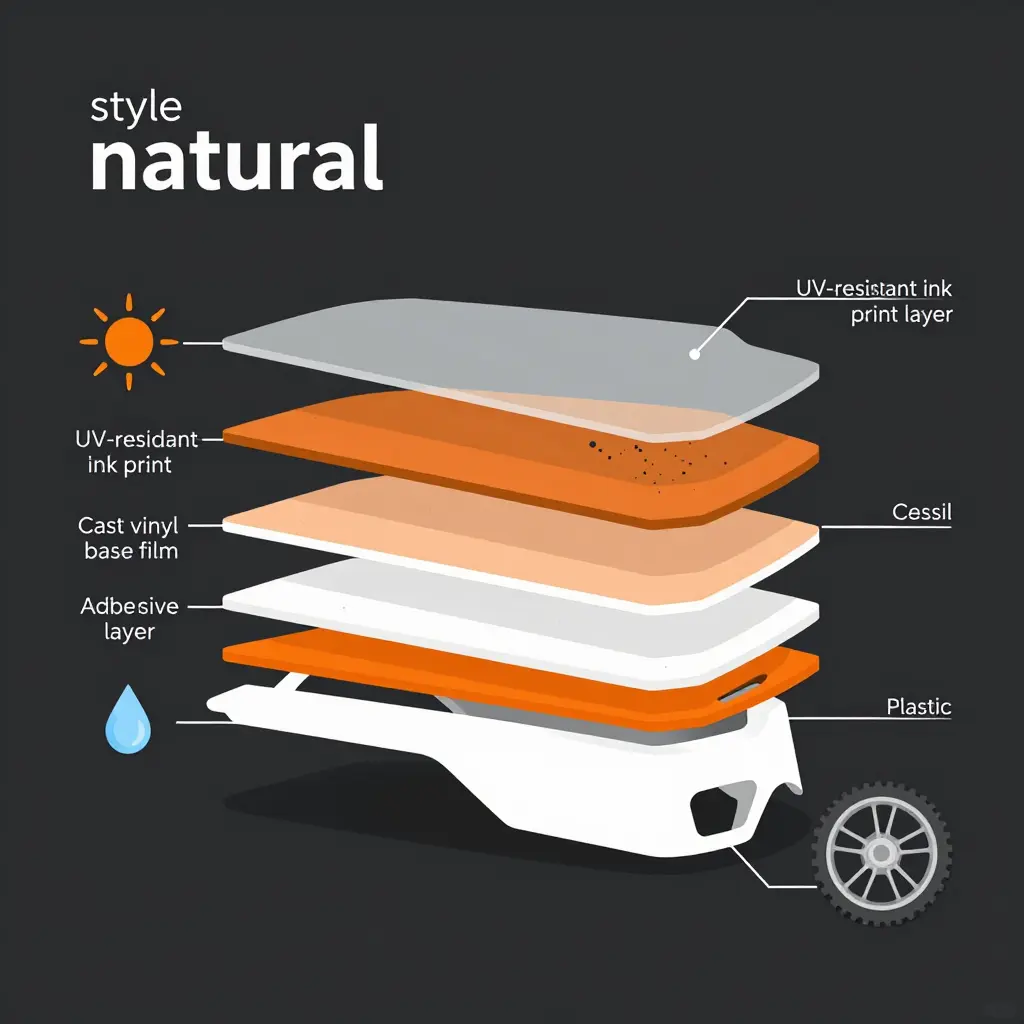
Calendered versus cast vinyl
Calendered vinyl is squeezed between rollers, which leaves internal stress in the film. It is affordable, thicker, and works fine on flat or gently curved panels. Cast vinyl is poured onto a liner as a liquid, so it has almost no built-in memory and stretches around compound curves without pulling back. On a dirt bike, that distinction matters most where the geometry gets tight.
| Property | Calendered vinyl | Cast vinyl |
|---|---|---|
| Manufacturing | Roller-pressed, stressed film | Cast liquid, stress-free film |
| Thickness | Thicker, stiffer | Thinner, more conformable |
| Curves and rivets | Good on flat surfaces | Excellent on complex curves |
| Lifespan outdoors | Moderate | Longer |
| Typical best use | Number plates, flat panels | Shrouds, fenders, rims |
Inks, laminate, and prep work
Solvent, latex and UV-cured inks differ in how well they hold colour against sunlight. A UV-resistant ink set slows the photo-degradation that turns reds pink and blacks grey. A clear laminate does two jobs: it filters UV before it reaches the ink, and it absorbs scuffs so the print underneath stays intact. No laminate survives poor prep. Wiping a panel with a wax-free cleaner, letting it flash off completely, and sealing exposed edges with a thin bead of clear adhesive stops water and pressure-wash spray from creeping under the film, which is the usual cause of lifting and mud staining.
Wheel decals versus shroud decals
The failure modes are not the same, so the right spec is not the same either.
- Wheel decals live with constant rotation, brake dust, chain lube and the most aggressive washing on the bike. Dust acts like a mild abrasive and high-pressure water attacks edges, so cast film with strong adhesive and sealed edges matters more here than pure UV performance.
- Shroud decals face the opposite problem: near-permanent sun exposure plus repeated abrasion from boots, knee braces and riding gear. UV fade is the leading complaint, followed by mechanical scuffing through the print, so UV-resistant inks and a thick sacrificial laminate earn their keep.
That is the reasoning behind our fade-resistant vinyl decals: materials chosen for riding conditions rather than showroom light. If you are refreshing a used bike, look for durable MX graphic kits built around cast film, UV-stable inks and a laminated top layer, then match the spec to where each piece actually sits on the machine. Applied that way, custom graphics for dirt bikes can hold colour through a season of sun, mud and wash cycles instead of fading out by mid-summer.
Locate the Right Decal Set by Bike Family and Platform
When a used bike rolls into the bay, the slowest part of a refresh quote is usually not the install. It is working out which kit fits. Sort the catalog by family first, model second and platform year third, and the lookup takes a minute instead of a quarter of an hour, whether you are quoting one walk-in or building a fleet order for a rental operation.
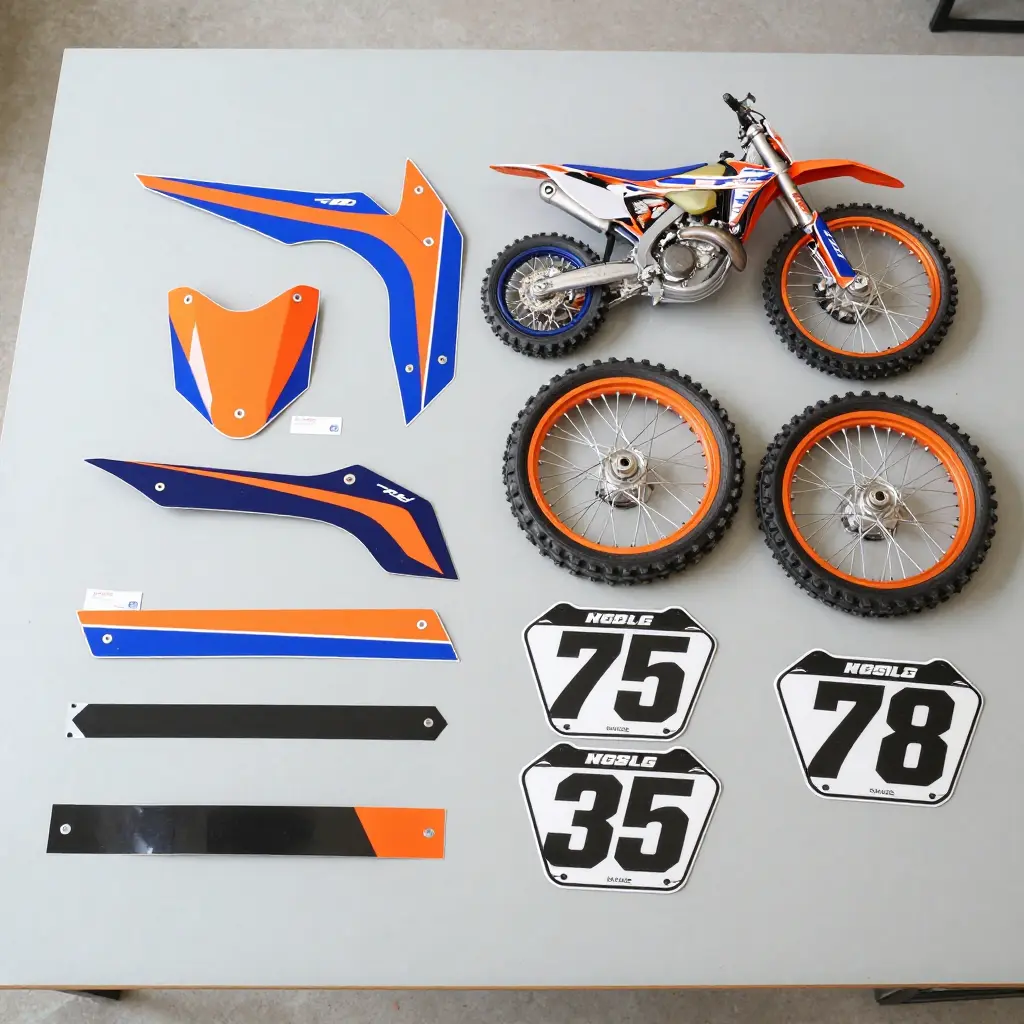
The families below cover most of what comes through a shop door. Each entry names the platform as it appears on the frame or battery sticker, so you can match the bike in front of you to the right shroud, wheel and number plate pieces.
- KTM motocross and enduro – match by displacement class and generation year before you choose a bold or OEM-inspired layout; browse KTM graphics kits for full shroud and wheel bundles.
- Surron Light Bee – the high-volume refresh bike for most shops; the Light Bee graphics section covers stock and long-travel fork setups.
- Surron Ultra Bee – a larger chassis with wider shrouds, so plan for more material; see Ultra Bee decal sets for full-body coverage.
- Surron Hyper Bee – the newest platform in the family, with its own template; order from Hyper Bee graphics so panel edges line up correctly.
- Talaria XXX – a compact, road-legal-leaning frame that rewards a wheel decal upgrade first; start with Talaria XXX graphics.
- Talaria MX3 and MX4 – shared bodywork lineage with model-specific cut lines, so keep the two sets separate on the shelf; find Talaria MX3 and MX4 graphics here.
- Talaria MX5 – the revised platform with updated shroud geometry; the Talaria MX5 graphics collection is templated to that newer shape.
- Talaria Komodo – a distinct frame that takes its own decal pattern; stock the Talaria Komodo graphics if you service trail-focused riders.
- eRide platform – an emerging e-moto line worth stocking lightly; the eRide graphics range keeps you ready for first-time refresh requests.
- Stark Varg MXEX – premium full-size electric motocross, where customers expect a factory look; choose directional layouts from the Stark Varg MXEX graphics catalog.
- ReRode R1 – a niche platform where bolt-hole alignment matters most; confirm ReRode R1 graphics before quoting a full wrap.
- Arctic Leopard – cold-weather and utility-leaning machines with their own panel shapes; the Arctic Leopard graphics section handles both partial and full kits.
- 79Bike – a popular entry point for younger riders, so kits move fast; keep 79Bike graphics in stock in two or three proven colorways.
A Quick Filter Habit That Saves Repeat Orders
Before you add anything to a cart, confirm three details: the model name as printed on the battery or frame sticker, the generation or year, and whether the customer wants shroud coverage, wheel-only decals or both. Wheel decals are the cheap entry point and the easiest upsell on a used bike; shroud decals carry the design statement. In practice, wheels often sell first and shrouds follow once the owner has seen the result.
Keep a simple log of the platforms you have fitted and the colourways that sold. After a season, that log is your stocking list, and the family-by-family navigation above becomes routine instead of research.
| Family | Primary Lookup Cue | Typical First Order |
|---|---|---|
| KTM | Displacement class plus generation | Shroud kit |
| Surron | Light Bee, Ultra Bee, Hyper Bee badge | Wheel plus shroud |
| Talaria | XXX, MX3, MX4, MX5, Komodo frame code | Wheel decals |
| Electric full-size | Stark Varg MXEX, eRide, ReRode R1 | Full wrap |
| Niche and youth | Arctic Leopard, 79Bike | Partial kit |
The Business Value of a Decal-Based Used Bike Refresh
Buyers judge a used bike long before they ask about hours, compression or service history, and graphics carry a disproportionate share of that first impression. A decal-based used bike refresh is one of the few interventions that changes how a bike is perceived without touching its mechanical specification, its price band or its honesty.
Presentation drives the price conversation
When a bike is listed online or rolled out for a viewing, faded shrouds, scuffed number plates and dull rims read as neglect, even when the engine, suspension and bearings are sound. A buyer who sees tired cosmetics opens at a lower number because they are pricing risk they think they can see. Fresh graphics reset that starting point. They cost far less than paint or replacement plastics, staff can fit them between jobs, and a good machine ends up looking like one.
Separating perceived condition from mechanical condition
The commercial goal is not to disguise wear that matters, which erodes trust and brings returns. It is to remove cosmetic noise that competes with real condition information. Decals do that cleanly: they replace tired-looking surfaces while leaving bearings, seals and engine cases visible for inspection. A coherent graphic package reads as “looked after,” which is the impression a shop wants a mechanically sound trade-in to carry.
Staging a refresh across inventory
Not every unit justifies the same spend, and decal work is easy to tier.
- Premium or fast-moving units get the full treatment, shrouds, plates and wheels, where the presentation spend is most likely to be recovered.
- Solid mid-tier inventory gets wheel-only accents, which lift the bike without committing labour to a full kit.
- Units awaiting mechanical work or parts stay untouched until their status is resolved.
Staging keeps capital allocation rational, and it lets staff refresh a bike in the window before a photo session or a weekend viewing, so the work tracks demand instead of sitting in a queue.
Wheel decals versus shroud decals
| Decal type | Commercial role | Labour profile |
|---|---|---|
| Wheel decals | Fast accent refresh, low commitment | Quick fit, minimal downtime |
| Shroud decals | Strongest visible change, defines the profile | Longer fit, higher visual return |
Wheel decals suit quick accent refreshes because rims and spokes show from every angle and from a distance, so a modest application still registers in listing photos and on the floor. Shroud decals carry the strongest visible change because they occupy the largest uninterrupted graphic surface and frame the machine’s profile. They reset how the whole bike reads, which is why they belong on the units with the highest presentation stakes.
Consistent graphics as brand presentation
A small, repeatable set of graphic identities across inventory makes a floor or a listing page look curated rather than assembled. Consistent colour families and styling help customers recognise a shop’s stock at a glance. Whether you are ordering custom graphics for dirt bikes or assembling mixed motocross graphics kits for a batch of trade-ins, treat graphics as part of a merchandising system rather than a one-off repair. That is where the commercial value compounds.
Frequently Asked Questions
Can you combine wheel decals and shroud decals on the same bike?
Yes. The two sit on different surfaces, so there is no fitting or adhesive conflict between them. The only real consideration is visual balance: repeat a colour or graphic motif across both areas so the bike reads as one design instead of two separate purchases.
How should used plastics be prepared before applying decals?
Wash the plastics with dish soap and water, then wipe them down with isopropyl alcohol to remove oils, dirt and leftover adhesive from old graphics. Check for stress cracks and deep gouges, and fill or sand only where the surface is genuinely uneven. A dry, smooth, contaminant-free panel is what determines whether the adhesive bonds.
Do decals survive pressure washing?
They generally do, as long as the spray is not aimed straight at the edges. Use a wide fan pattern, keep a sensible distance, and avoid blasting the seams where the vinyl meets the plastic. Wheel decals deserve extra care because they sit closest to the ground and take the brunt of mud and grit.
How long does fade-resistant vinyl typically last?
Cast vinyl printed with UV-resistant inks usually holds up for three to five years outdoors before noticeable colour shift appears. Real-world lifespan depends on sun exposure, how the bike is stored, and how often it is washed with harsh chemicals. Keeping the bike under cover slows fading considerably.
Are partial kits practical on a tight budget?
Yes, and a partial kit is often the smarter first move on a used bike. Start with the panels that are most visible or most damaged, shrouds or rims, then add the remaining pieces later. A small set of well-matched, model-specific graphics fitted properly usually looks better than a full set rushed onto tired plastics.
Do decals hide or highlight existing scratches?
They hide whatever they cover and highlight what they do not. Vinyl sits on top of the surface, so a scratch under a shroud decal disappears entirely, while deep gouges next to the graphic become more obvious by contrast. Prepping the plastics before fitting keeps those edges flat and the contrast minimal.
The Bottom Line on a Used Bike Refresh
Wheel decals are the lower-commitment choice. They add accent work quickly and tolerate the rotation, cleaning and contact that wheels see, which makes them a sensible starting point when you want visible change without touching the bodywork. Shroud decals carry the heavier load on worn plastics, covering the largest flat surface and delivering the broadest visible change per panel. Fitted together, the two produce a coherent refresh instead of a clean new graphic sitting beside scuffed original plastic.
- Confirm the kit matches your exact model year, plastics manufacturer and radiator shroud shape before ordering.
- Confirm whether the pieces are pre-cut for the full kit or need trimming around mounting holes and edges.
- Confirm the material and finish rating for each surface you plan to cover, including whether the wheel set is sized to your rim diameter.
Graphics wear gradually rather than failing all at once, so routine cleaning, keeping high-pressure spray away from edges, and replacing individual worn pieces will keep a refreshed bike looking current across several seasons.