
In the world of dirt biking, visual aesthetics play a crucial role in a motorcycle’s appeal, impacting not only the rider’s experience but also how the bike is perceived on and off the track. Enter split dirt bike graphics, a vibrant solution that segments the design across the bike’s body for a unique and modern flair. These graphics allow owners to express their personalities while enhancing the overall look of their vehicles. Popular among motorcycle enthusiasts and technicians alike, split graphics are not just for style; they serve to protect the bike’s surface from wear and tear. Emphasizing individuality, these graphics have gained traction in the industry, offering a perfect blend of art and functionality. For those interested in giving their engines a stylish makeover, options can be explored at MotoGraphics that cater to various models and preferences.
Benefits of Using Split Dirt Bike Graphics
Split dirt bike graphics have become increasingly popular among motorcycle owners for a variety of compelling reasons. These graphics not only enhance the aesthetic appeal of the bike but also provide protection and allow for a high degree of customization. Here’s a breakdown of the key benefits:
-
Aesthetic Enhancement: Split graphics add a unique flair to the bike’s appearance, providing a striking visual that stands out on the track. They can be tailored to match personal preferences and bike designs, creating a personalized look that reflects the rider’s style. This customization allows bikes to be easily recognizable and contributes to their overall market appeal.
-
Surface Protection: Not only do they look good, but split graphics also offer vital protection for the bike’s surface. Made from durable materials, these graphics can safeguard against scratches, dirt, and minor impacts, preserving the underlying paint and finish. This is particularly important for motocross and off-road bikes that endure harsh conditions.
-
Customization Options: The versatility of split graphics means they can accommodate various styles, colors, and logos, catering to individual tastes. Riders can express their personal identity or brand through their bike’s graphics, with many options available from specialized suppliers like MotoGraphics. Furthermore, split designs can enhance the functionality of the bike’s bodywork, ensuring all graphics align perfectly with the manufacturer’s specifications, which can improve visibility and performance on the track.
-
Market Appeal: For those looking to sell their bikes, having appealing graphics can increase the resale value. Bikes that look well-maintained and stylish are often more attractive to potential buyers.
In conclusion, split dirt bike graphics are a worthwhile investment for anyone looking to enhance their motorcycle’s aesthetic, protect its surface, and allow for personalized customization. For more options, check out the various graphic types available that can fit your specific model and style.
Comparison of Split Dirt Bike Graphics Vendors
Whether you are looking to customize your dirt bike with eye-catching graphics or want to enhance its protection and aesthetic appeal, several vendors offer unique features, pricing options, and customer experiences. Here’s a comparison table of leading dirt bike graphics vendors:
| Vendor Name | Key Features | Price Range | Customer Ratings |
|---|---|---|---|
| OMX Graphics | – Custom designs – Free proofs and revisions – Worldwide shipping |
$$ – $$$ | 4.45/5 (76 reviews) |
| Backyard Design USA | – Online design tool – Premium quality graphics – Fast shipping |
$ – $$ | 4.5/5 (120 reviews) |
| Decal MX | – Variety of design options – Customized directly online |
$ – $$ | 4.2/5 (50 reviews) |
| Amazon | – Numerous choices – Customer reviews available – Various pricing |
$ – $$$ | Varies (based on product) |
Summary of Each Vendor
- OMX Graphics: Known for high-quality and customizable dirt bike graphics, OMX offers unique designs tailored to individual needs with positive customer feedback regarding speed and quality of service.
- Backyard Design USA: Offers a robust design tool allowing bike owners to create unique graphics quickly. They emphasize fast shipping and premium materials.
- Decal MX: Their platform allows users to create designs specific to their models, focusing on personalization.
- Amazon: Features a wide selection of graphic kits for various dirt bike models with varying customer reviews and ratings, allowing for easy price comparisons among vendors.
For those interested in enhancing their bikes’ looks with stunning graphics, these vendors provide multiple options to suit different styles and budgets. By understanding each vendor’s strengths, motorcycle owners can make informed choices. For more specific products, consider browsing additional graphics options like check out our KTM graphics and exploring our eRide graphics range.
The Importance of Graphics in Motorcycle Sales
Graphics play a crucial role in the sale of motorcycles, particularly for dirt bikes. Custom graphics not only enhance the visual appeal but can also significantly influence customer purchasing decisions. As noted by industry experts:
“High-quality graphics can dramatically improve a motorcycle’s aesthetic, attracting more customers and increasing sales.”
Research indicates that well-designed graphics enhance the perception of bikes, making them more appealing to potential buyers. For example:
- Visual Impact: Engaging visuals help in capturing attention, often leading to increased interest and inquiries.
- Brand Identity: Unique graphics can help establish a brand’s identity, differentiating it from competitors.
In the competitive motorcycle market, striking graphics can be the deciding factor for many customers. If you’re looking to elevate your bike’s appearance with custom designs, check out our dirt bike graphics for the latest options available.
Installation Process of Split Dirt Bike Graphics
Installing split dirt bike graphics is not only an artistic way to personalize your motorcycle but also an opportunity to protect its surface. The following steps detail the installation process, emphasizing preparation, application techniques, and tips for achieving the best results.
Preparation for Installation
Before diving into the installation, proper preparation is key to ensuring a smooth application of the graphics. Start by gathering the necessary tools and materials:
- Tools Required:
- Heat gun or hairdryer
- Squeegee or plastic application tool
- Isopropyl alcohol or a degreaser
- Clean, lint-free cloths
- Cleaning the Surface:
Clean the bike’s bodywork thoroughly using isopropyl alcohol. This step is crucial as it removes any dirt, grease, and old adhesive residue that might affect the adhesive of the new graphics. Make sure the surface is completely dry prior to proceeding.
Applying the Graphics
Once everything is clean and ready, follow these application techniques for the best outcome:
- Positioning the Graphics:
Unroll the graphics and lay them on a flat surface to ensure they are crease-free. Start positioning the graphics on the bike without removing the backing. This allows you to visualize the layout and make adjustments if necessary. - Securing the Graphics:
Use low-tack tape to temporarily hold the graphics in place. This helps avoid misalignment during application. Make sure to align the graphics with any predefined shapes or stickers for a consistent look. - Peeling and Applying the Graphics:
Start peeling the backing from one corner and apply the graphic slowly, pressing it onto the bike surface. Use a squeegee to push out any air bubbles as you go. It’s wise to work from the center outwards to prevent trapping air beneath the surface. - Heat Application:
If you encounter areas with curves or contours, apply heat from a heat gun or hairdryer to make the graphics more pliable. This helps the vinyl conform better to the surface and ensures a snug fit.
Final Tips for Best Results
- Patience is Key:
Take your time during the installation. Rushing can lead to mistakes, such as trapping air or misalignment, which will be hard to fix later. - Correct Temperature:
The ideal temperature for application is between 70°F to 80°F (21°C to 27°C). Warmer temperatures facilitate better adhesion of the vinyl. - Post-Installation Care:
Avoid washing your bike for at least 48 hours after installing the graphics. This allows the adhesive to set properly.
For those looking for quality graphics options, check out our variety of dirt bike graphics available here. You can customize your ride to reflect your personal style while ensuring premium quality and durability.
Remember that while this is a DIY task, following these guidelines will obtain a professional-looking result, whether you are a motorcycle owner, technician, or run a motorcycle repair shop. Happy riding!
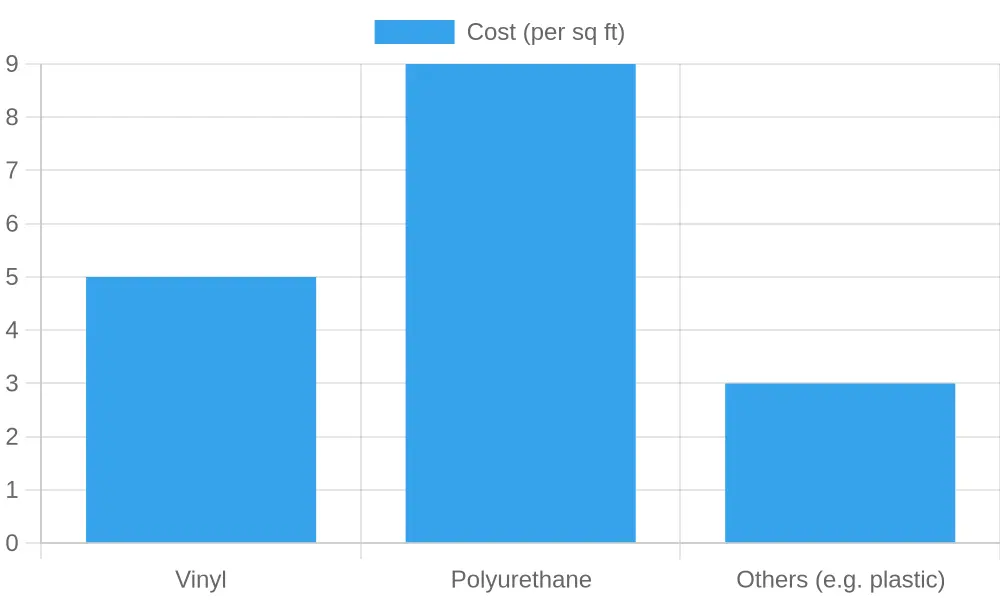
| Material | Durability Rating | Cost (per sq ft) | Flexibility Rating |
|---|---|---|---|
| Vinyl | Medium | $5 | High |
| Polyurethane | High | $9 | Medium |
| Others (e.g. plastic) | Low | $3 | Low |
Sources
FAQ on Split Dirt Bike Graphics
1. How durable are split dirt bike graphics?
Split dirt bike graphics are made from materials specifically designed to withstand outdoor conditions, including dirt, moisture, and UV rays. High-quality graphics can last several years with proper care. However, their lifespan may be reduced if subjected to harsh conditions regularly. Learn more about durability.
2. What can I expect in terms of pricing for dirt bike graphics?
Pricing for split dirt bike graphics can vary based on customization options and the complexity of the design. Generally, prices range from around AU$69.95 to AU$109.95 for various graphic kits, depending on the specific styles and brands. Check out options on MotoGraphics.
3. Can I customize my dirt bike graphics?
Yes, many providers offer customizable options, allowing riders to tailor graphics to match their personal style and preferences. Services often include design studios to create unique looks for your bike, making the personalization process easy and efficient. See customization options here.
4. How do I install split dirt bike graphics?
Installing split dirt bike graphics typically involves prepping the bike’s surface, using the right tools, and following specific techniques for application. Guides and tutorials are available for a thorough understanding of the installation process. Find an installation guide here.
Conclusion on Split Dirt Bike Graphics
In summary, split dirt bike graphics offer numerous advantages for motorcycle enthusiasts. These graphics not only enhance the aesthetic appeal of your bike but also serve a protective function against scratches and wear. The installation process is straightforward, ensuring that you can personalize your motorcycle with ease. By properly preparing your bike and following the installation guidelines, you can achieve a professional-looking finish that enhances visibility and individuality.
When considering where to purchase, several reputable vendors stand out, including Rivalink Design Co., known for their premium quality graphics kits, and OMX Graphics, which offers tailored designs and free proofs.
Explore the world of split dirt bike graphics today, and give your motorcycle the customization it deserves!
Are you ready to transform your ride and stand out on the dirt track? Choose split dirt bike graphics for your motorcycle and experience a blend of style and performance that is unbeatable. These graphics not only enhance the aesthetics of your bike but also protect its surface from wear and tear while riding. By opting for split graphics, you ensure your bike captures attention and expresses your unique personality.
Explore our extensive collection of standout designs that fit various models. Whether you’re looking for something edgy and colorful or sleek and subtle, we have the perfect graphics for you. Don’t wait to give your bike the upgrade it deserves! Check out our split dirt bike graphics collection and make your bike the envy of your peers today!