
The Importance of Custom Dirt Bike Graphics
Custom dirt bike graphics are more than just a way to enhance the aesthetic appeal of a motorcycle; they are a vibrant canvas for personal expression that resonates deeply within the motorcycle community. For motorcycle enthusiasts, the ride is not merely about speed or adrenaline; it’s a journey of self-identity and style. Custom graphics allow riders to showcase their personality, preferences, and even their narrative. By selecting unique designs, colors, and themes, they transform a standard dirt bike into a distinct reflection of individuality.
In the off-road motorcycle culture, customization has become a norm, as riders seek to differentiate themselves from the crowd. The visual impact of these graphics can be as striking as the performance modifications made to a bike. It’s about making a bold statement that appeals to the rider’s sense of style while also attracting the admiration of onlookers. Whether it’s a sleek, modern graphic or a retro design, adopting custom decals and wraps can elevate a dirt bike’s appearance significantly and can even affect its resale value. As you explore the possibilities of customizing your own dirt bike, dive into our extensive collection of dirt bike graphics and see how you can personalize your ride.
Ultimately, custom dirt bike graphics serve as a form of self-expression, empowering riders to narrate their stories visually through their machines. Embracing this aspect of motorcycle culture enriches the experience of riding, transforming bikes into much more than just vehicles-it turns them into personalized works of art that carry the essence of every unique rider.
Popular Materials for Dirt Bike Graphics
When it comes to customizing dirt bikes, the type of graphic material used plays a crucial role in both durability and visual appeal. Here’s a list of common materials used for dirt bike graphics, including their benefits:
-
Vinyl
-
Durability: Vinyl graphics are known for their high durability, allowing them to withstand various weather conditions and rough terrains. They resist tearing and are less prone to fading, making them long-lasting.
-
Visual Appeal: Available in a wide array of colors and finishes, vinyl can be printed with vibrant designs to make a bike stand out on the track.
-
Easy Application and Removal: Vinyl graphics can be easily applied and, when necessary, removed without damaging the bike’s surface underneath.
-
Polyester
-
Strength and Durability: Polyester is incredibly durable and can endure harsh elements such as mud, water, and high speeds common in dirt biking.
-
Vibrant Colors: It is excellent for dye-sublimation printing, allowing for bright and long-lasting colors that enhance visibility and style.
-
Lightweight: Being lightweight, polyester graphics won’t add significant weight to the bike, which helps maintain performance.
-
Stain Resistance: Its hydrophobic nature makes it resistant to stains, making the graphics easier to clean and maintain.
-
Cost-Effectiveness: Polyester is more economical compared to other materials, allowing for frequent updates without high costs.
Both vinyl and polyester graphics offer unique advantages that can substantially enhance a dirt bike’s appearance and longevity. Riders can choose based on their individual needs and preferences. For a variety of stunning dirt bike graphics, explore options that fit your style!
Types of Dirt Bike Graphics
When it comes to customizing your dirt bike, graphics play a crucial role in both appearance and functionality. Various types of dirt bike graphics available include wraps, decals, and stickers, each of which has unique features and applications that appeal to different riders. Understanding these differences can help motorcycle owners make informed choices for their customization needs.
1. Wraps
Dirt bike wraps cover large areas of the bike’s body, providing extensive visual customization. Made from high-quality vinyl material, these wraps are designed to withstand harsh conditions. Key features include:
- Full Coverage: Wraps can cover the entire bike, creating a unified look.
- Durability: Resistant to tearing, UV rays, and weather elements.
- Protection: Helps protect the underlying paintwork from scratches and damage.
Wraps are ideal for riders who want a complete overhaul of their bike’s aesthetic. Popular among competitive racers and enthusiasts looking for a standout appearance, wraps can also incorporate custom designs or sponsor logos, enhancing the bike’s professional look.
2. Decals
Decals are smaller, more specific graphic elements that can be placed on particular areas of the bike, such as number plates, fenders, or gas tanks. Features include:
- Versatility: Can be layered and combined for a more personal touch.
- Easy Application: Generally easier to apply than wraps; many come with peel-and-stick backing.
- Custom Designs: Riders can choose from a variety of designs or create their own.
Decals are particularly appealing to those looking to add personalized touches or to replace worn-out graphics. They provide flexibility for customizing specific parts of the bike rather than the entire surface.
3. Stickers
Stickers are similar to decals but often come in even smaller sizes and less intricate designs. They can serve both decorative and functional purposes. Key features include:
- Affordability: Typically less expensive than wraps and decals, making them accessible for most riders.
- Simplicity: Easy to apply and remove without leaving residue, perfect for adding temporary designs.
- Sponsorship: Often useful for displaying sponsor logos, especially for team riders.
Stickers are great for riders who want minor customizations or want to regularly change designs. They are also popular among younger riders or those new to the customization game.
Conclusion
Selecting the right type of graphics for your dirt bike hinges on personal style, the extent of customization desired, and the specific application. Whether it’s a full wrap for a complete transformation, decals for specific enhancements, or stickers for quick changes, each type offers distinct advantages that cater to the diverse needs of motorcycle owners. If you’re looking to explore options, consider visiting MotoGraphics for a wide range of dirt bike graphics that fit your style and needs.
| Vendor Name | Price Range | Customization Options | Material Quality |
|---|---|---|---|
| MotoGraphics | $50 – $200 | Full customization available | High-quality vinyl |
| DecalWorks | $75 – $250 | Custom designs and colors | Premium-grade materials |
| Factory Effex | $60 – $220 | Custom number & name options | Durable and weather-resistant |
| TLD Graphics | $40 – $150 | Limited customization | Medium quality vinyl |
| 100% Graphics | $70 – $180 | Custom logos and designs | High-grade materials |
Applying graphics to your dirt bike is more than just a cosmetic upgrade; it’s a way to express your personality and make your bike stand out on the trails. However, to ensure a smooth and effective application process, having the right tools at your disposal is essential. Below is a list of must-have tools for applying dirt bike graphics, including useful tips for each item.
1. Squeegees
A squeegee is one of the most fundamental tools for applying graphics. It allows you to press the vinyl firmly against the bike’s surface, eliminating air bubbles and ensuring a smooth finish. Choose a squeegee that has a felt edge to prevent scratching the vinyl. When using it, start from the center of the graphic and move outward to push out any trapped air.
2. Heat Gun
A heat gun, or even a hair dryer, can be incredibly helpful during the graphic application process. Heating the vinyl slightly makes it more pliable, which allows for easier manipulation and positioning on the bike. Be cautious-excessive heat can cause the vinyl to warp or shrink, so use it sparingly and at a safe distance.
3. Cleaning Supplies
Before beginning the application, it’s crucial to clean the area where you’ll apply the graphics thoroughly. Use mild soap and water to scrub off any dirt, grease, or residue from old graphics. After washing, dry the surface completely. Rubbing alcohol can also be used for a final wipe-down to ensure that the surface is clean and free of oils that may hinder adhesive performance.
4. Utility Knife or Scissors
Once the graphics are applied, you may need to trim excess material, especially around edges. A utility knife or sharp scissors will allow for precise cuts without damaging the remaining graphics. Always cut away from the bike to avoid accidental scratches.
5. Masking Tape
Using masking tape can help with alignment before you start applying the graphics. By temporarily holding the graphics in place, you can step back and assess their position before making the final application.
Best Practices for Smooth Application
- Surface Preparation: Clean the dirt bike’s surface thoroughly to ensure adhesion.
- Heat Application: Slightly heat the graphics to make them pliable.
- Alignment Check: Position the graphics before peeling off the backing for optimal alignment.
- Squeegee Techniques: Use the squeegee carefully to avoid air bubbles and wrinkles.
- Post-Care: Avoid washing your bike for at least 24 hours after application to let the adhesive set properly.
Investing in these tools and following best practices will help you achieve a professional-looking finish on your dirt bike graphics. For a wide range of dirt bike graphics available to customize your ride, check out MotoGraphics’ collection.
With the right tools and techniques, you can ensure that your dirt bike not only looks great but also stands out on the trails. Happy riding!
User Testimonials on Dirt Bike Graphics
Dirt bike graphics have become an essential aspect of customizing motorcycles, offering not only aesthetic enhancement but also personalization that riders crave. Here’s a summary of user experiences and key takeaways about their application and satisfaction levels based on recent testimonials and reviews.
Highlights from User Testimonials:
- Visual Appeal and Personalization: Many users express that dirt bike graphics significantly enhance the visual appeal of their bikes. Personalization options allow riders to express their unique personalities and styles. For instance, one user mentioned,
“Adding custom graphics transformed my bike into a reflection of my personality. It’s not just a vehicle; it feels like a part of me now.”
- Application Experience: Feedback related to the application process of graphics varies. Quality products often come with detailed instructions, facilitating a smoother installation. A user noted:
“The application was straightforward with a professional kit from OMXGraphics. It didn’t take long to get everything on right.”
- Durability and Quality: Riders highlight the importance of durable graphics that withstand harsh outdoor conditions. Users point out that high-quality materials are essential for longevity. One review stated:
“I’ve had my graphics on for months, and they still look fresh. The durability is impressive!”
- Performance Perception: Although graphics do not improve the horsepower of a bike, users believe they enhance the overall riding experience. The association of aesthetics with performance was a common theme. Riders often remarked that feeling good about their bike positively impacts their confidence and performance on the track.
General Satisfaction Levels
The general satisfaction levels among users are quite high, particularly when opting for reputable brands that offer customizable options. Reports indicate that riders investing in graphics kits from sources such as OMXGraphics appreciate both the design and function, viewing them as a valuable upgrade for their bikes. Key benefits that reinforce rider satisfaction include:
- Enhanced Visibility and Safety
- Increased Protection against Elements
- Greater Bike Identification
In fact, a significant number of users affirm that the return on investment in dirt bike graphics is worth it, citing both the aesthetic appeal and the enhanced personal connection to their motorcycle.
Conclusion
Overall, testimonials reveal that dirt bike graphics not only elevate the visual appeal and personal expression of motorcycles but also positively influence the riding experience. For those considering graphics for their dirt bikes, it’s advisable to choose high-quality products and services that promise lasting effects. For further insights, you can check out our range of decorative graphics suited for various models.
Step-by-Step Guide to Applying Dirt Bike Graphics
Applying graphics to your dirt bike can enhance its appearance and make it stand out on the track. However, the process requires careful preparation and application techniques to achieve a flawless finish. Here’s how to do it.
Step 1: Gather Required Materials
Before starting the application process, ensure you have the following materials:
- Dirt bike graphics kit
- Isopropyl alcohol or a specialized cleaner
- Clean microfiber cloths
- Squeegee or plastic card
- Heat gun or hair dryer
- Utility knife or razor blade
- Application tape (if necessary)
Step 2: Surface Preparation
The key to a successful graphics application lies in thorough surface preparation. Follow these sub-steps:
-
Clean the Surface: Use isopropyl alcohol to wipe down all areas where the graphics will be applied. This step removes dirt, oils, and previous sticker residue, ensuring a smooth and clean surface. Make sure the surface is completely dry before proceeding.
-
Inspect for Damage: Check for any dents, scratches, or imperfections on the bike’s surface. Fix these flaws as they can affect the adhesion and appearance of the graphics.
-
Choose the Right Temperature: The ideal temperature for application is typically between 60°F and 80°F (15°C to 27°C). Avoid applying graphics in cold or overly humid conditions as it can impact adhesion.
Step 3: Application of Graphics
With the surface prepared, it’s time to start applying the graphics:
-
Position the Graphics: Before removing the backing, lay the graphic over the area to assess the fit. Make sure it aligns correctly with the contours of the bike.
-
Remove the Backing: Slowly peel off the backing paper from the graphic, taking care not to touch the adhesive side.
-
Start Applying: Begin adhering the graphic from one edge. Use a squeegee or plastic card to smooth it down, working from the center outward to push out air bubbles.
- Tip: If you feel resistance or notice the graphic doesn’t want to stick, gently reheat it with a heat gun or hairdryer. This makes the vinyl more pliable, helping it conform to curves.
-
Release Bubbles: If any air bubbles form, use a squeegee to push them out towards the edges. For stubborn bubbles, you can gently puncture them with a pin and push the air out with your finger or the squeegee.
Step 4: Finishing Touches
After all the graphics are applied, it’s time for the final steps:
-
Trimming the Edges: Use a utility knife to carefully trim any excess vinyl around edges and openings. Be cautious to avoid cutting too deep and damaging the surface.
-
Final Inspection: Once all graphics are applied, inspect the entire area for misaligned graphics, bubbles, or wrinkles. If any remain, apply gentle pressure with a heat gun to soften the vinyl for readjustment.
-
Curing Time: Allow the graphics to set for a minimum of 24 hours. Avoid washing or exposing your bike to extreme conditions during this period to ensure proper adhesion.
Additional Tips to Avoid Common Mistakes
-
Use Application Tape: For larger transfers, you may find it easier to apply the graphics using application tape to handle multiple pieces at once.
-
Avoid Touching the Adhesive: Try not to touch the underside of the graphic to maintain its adhesive quality.
-
Manage Overlaps: If your graphic design contains overlaps, apply the base layer first, allowing the upper layer to sit on top without bubbles forming.
Conclusion
Applying dirt bike graphics doesn’t have to be daunting if you follow the right steps and techniques. Preparation is key, as is attention to detail during application. When done correctly, your bike will look great on and off the trail, showcasing your personal style and creativity. For different styles and custom designs, check out our collection of dirt bike graphics!
Importance of Quality Graphics in Motorcycles
-
Visual Appeal: Quality graphics significantly enhance the aesthetics of motorcycles, making them more visually appealing to potential buyers and current owners. This visual allure can heavily influence purchasing decisions.
-
Brand Differentiation: In a competitive motorcycle market, effective and unique graphics help to set a brand apart. Custom designs contribute to establishing a brand identity and enable customers to associate particular styles with specific manufacturers.
-
Performance Perception: Good graphics can elevate the perceived performance of a motorcycle. High-quality visuals often create an association between the graphics and the overall quality and performance of the bike, improving the brand image.
-
Marketing and Merchandise: Quality graphics are crucial in marketing strategies and play an integral role in merchandise, including clothing and accessories. Effective graphics help build a lifestyle around motorcycle culture.
This overview illustrates the broad importance of high-quality graphics in promoting not just the visual appeal of motorcycles but also their market performance and branding strategies.
Average Costs for Dirt Bike Graphics
Here’s a comprehensive breakdown of the average costs associated with purchasing and applying dirt bike graphics:
| Category | Average Cost (USD) |
|---|---|
| Materials | $100 to $300 |
| Labor | $50 to $150 |
| Additional Offerings | $50 to $100 |
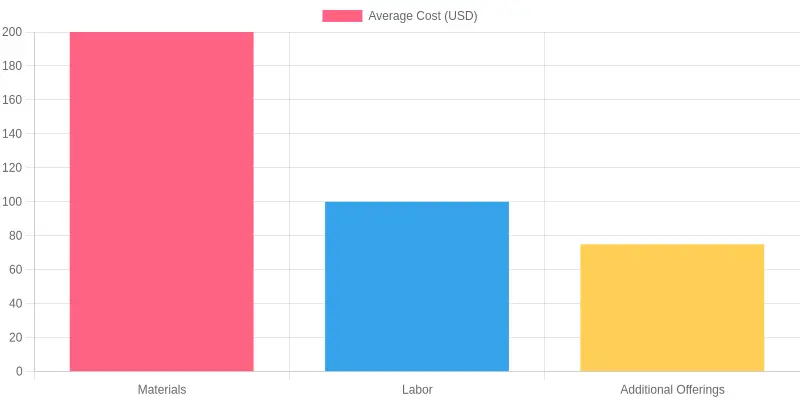
These costs vary depending on factors such as the complexity of the graphics, material quality, and whether customization options are selected. For more information on various options available, check out our product categories for motorcycle graphics and KTM graphics.