
Unleash Your Creativity: The Thrill of Customizing Dirt Bike Graphics
In the adrenaline-fueled world of motocross, a dirt bike isn’t just a mode of transportation; it’s an extension of one’s personality. The growing trend among motorcycle enthusiasts to design their own dirt bike graphics is revolutionizing how riders express their identity on the trails. Gone are the days when riders settled for generic designs; more and more are embracing the art of customization, bringing their unique visions to life. Whether you’re a seasoned racer or a weekend warrior, customizing your dirt bike graphics can enhance your ride’s visual appeal and boost your confidence on the track.
The benefits of DIY graphics extend far beyond aesthetics. Personalizing your bike can improve its resale value, as many potential buyers are often swayed by flashy and unique designs. Additionally, crafting your graphic design allows you the freedom to experiment with color schemes, themes, and motifs that truly reflect who you are. Enthusiasts can choose from a plethora of designs inspired by personal interests, favorite brands, or even pop culture references, making the bike not just a vehicle, but a canvas for artistic expression.
As you embark on the journey of creating your personalized dirt bike graphics, not only do you engage in a fun, creative project, but you also join a community of like-minded riders who appreciate individuality and innovation. The availability of custom dirt bike graphics has made it easier than ever to unleash your creativity and showcase your style.
In this article, we will delve deeper into the world of customizing dirt bike graphics, offering tips, inspiration, and resources to help you on your way. Get ready to turn heads and make a statement every time you hit the dirt!
Benefits of Designing Custom Dirt Bike Graphics
Custom dirt bike graphics offer a myriad of advantages for motorcycle owners, repair shops, and technicians alike. Here are some key benefits to consider:
-
Personalization: Custom graphics allow riders to express their individuality. Tailoring your dirt bike’s graphics to reflect your personal style or preferences makes each ride feel unique, setting you apart on the trails. Learn more about personalized graphics.
-
Brand Representation: For shops and riders involved in professional racing, custom graphics serve as a powerful branding tool. Displaying logos and designs on the bike not only enhances visibility but also represents the rider’s identity and allegiance to sponsors respective to their racing events.
-
Improved Visibility: Bright and distinctive graphics can significantly enhance visibility on the track. This is crucial for safety, ensuring that your bike stands out in a crowded environment, especially in competitive scenarios where quick recognition can be vital. Explore more on the importance of visibility.
-
Cost-Effectiveness: Investing in custom graphics can actually save money in the long run by protecting the bike’s plastic from scratches and environmental wear. High-quality graphics can also increase the bike’s resale value, making it a smart investment for owners.
-
Aesthetic Appeal: Custom designs contribute to the overall aesthetic of the bike, enhancing its appearance. Riders who prioritize how their bike looks will appreciate the difference custom graphics can make.
Understanding Graphic Design Basics for Dirt Bike Customization
Graphic design is more than just an art form; it plays a significant role in customizing your dirt bike to reflect your personality and style. A well-designed graphic can transform the overall look of your bike while also providing essential protection to its surfaces. For motorcycle owners, enthusiasts, and technicians alike, understanding the fundamentals of graphic design can enhance the customization process significantly. Here are some key concepts essential for dirt bike customization:
Color Theory
Color theory is crucial in graphic design, influencing emotions and perceptions. It involves understanding how colors interact, their meaning, and how combinations can affect visibility and aesthetic appeal. Here are a few essentials:
- Primary, Secondary, and Tertiary Colors: Using a mix of these can create a vibrant palette, attracting attention to your bike.
- Color Harmony: Combinations such as complementary or analogous colors can create visual interest and balance.
- Visibility: Bright colors like neon shades not only look cool but enhance visibility for safety while riding. When choosing colors for your graphics, consider how they stand out against your bike’s base color.
Typography
Typography, the art of arranging text, is another essential element in graphic design. Different fonts convey various themes and emotions. For dirt bike graphics:
- Font Selection: Choose fonts that reflect the personality of your bike and your personal style. For example, a bold and aggressive font might suit a racing-themed graphic, while a rounded, friendly font could work better for a casual look.
- Readability: Ensure that any text is legible from a distance. Avoid overly decorative fonts that can be hard to read. This enhances not just style but also functionality when names, numbers, or team logos are involved.
Layout and Composition
The layout refers to how elements are arranged in your design. A good layout guides the viewer’s eye and highlights key components:
- Balance: This concept involves distributing visual weight evenly. An unbalanced design can look chaotic. Consider balancing graphics, logos, and text across the bike.
- Focal Point: Every design needs a focal point. This can be achieved through color, size, or placement. Place the most important elements where they’ll naturally draw attention-think of it as the first thing people notice about your bike.
- Whitespace: Don’t overcrowd your design; whitespace (or negative space) can make your graphics more appealing. Adequate space allows each element to breathe and stand out.
Integrating Functionality and Aesthetics
- Durability: Since dirt bikes are exposed to various elements, durable materials must be used. Quality graphics can withstand mud, water, and sun without fading or peeling. Consider selecting graphics that are specifically designed for dirt bikes to ensure longevity and protection, like those discussed in this article on the importance of graphics.
- Personalization: Customization enables riders to express individuality. Whether it’s through unique colors, patterns, or personal logos, every design has a story to tell. For inspiration, explore more customizable options in this guide about personalized dirt bike graphics.
Conclusion
Understanding the fundamentals of graphic design is key to creating a unique and functional dirt bike customization. By mastering color theory, typography, layout, and ensuring durability, both novice and experienced motorcycle enthusiasts can design graphics that not only look good but also perform well on the trails. Take the time to experiment with your designs, think creatively, and don’t hesitate to seek inspiration from other custom bike graphics you admire.
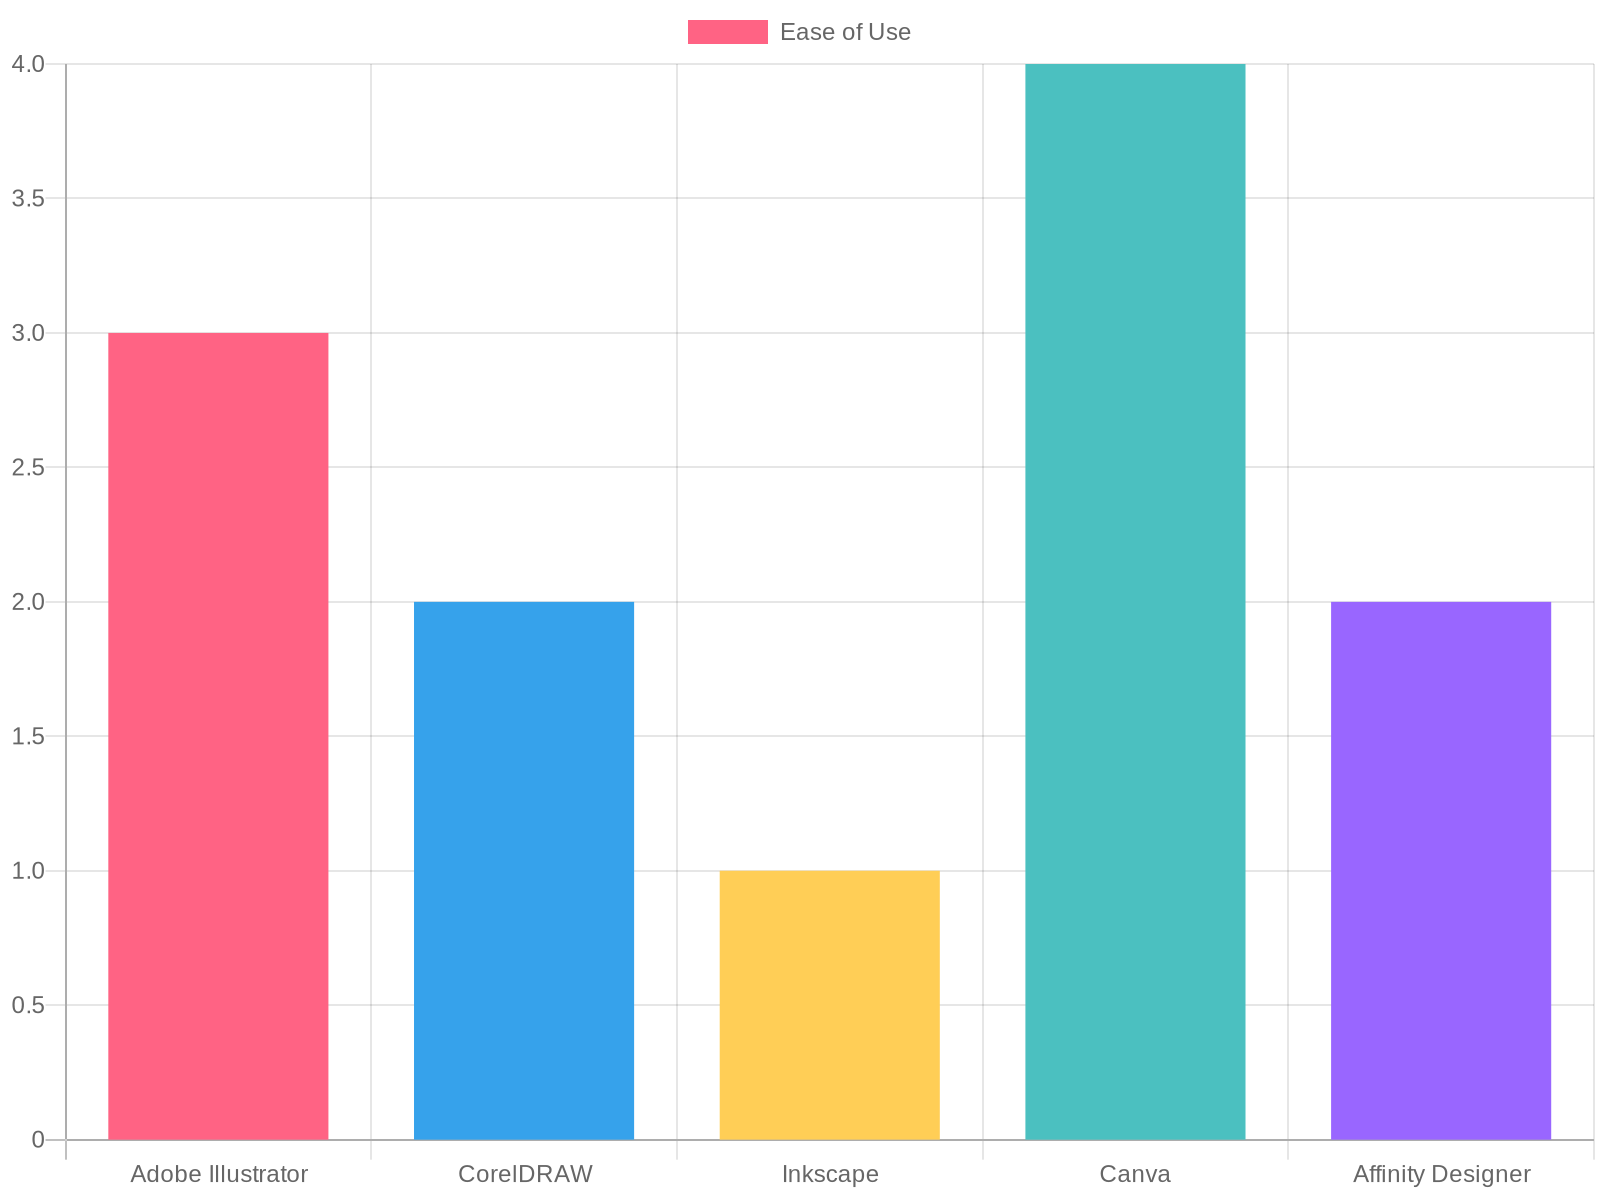
Comparing Graphic Design Software for Dirt Bike Graphics
Creating custom graphics for dirt bikes requires the right tools. Various graphic design software caters to both beginners and professionals. Here’s a comparison of popular options based on ease of use, features, pricing, and target users:
| Feature | Adobe Illustrator | CorelDRAW | Inkscape | Canva | Affinity Designer |
|---|---|---|---|---|---|
| Ease of Use | Moderate to High (steep learning curve for beginners, but powerful tools) | Moderate (intuitive interface with robust toolset) | Low to Moderate (free and open-source, but less polished UI) | Very High (drag-and-drop, beginner-friendly templates) | Moderate (clean interface, requires some learning) |
| Key Features | Vector-based design, advanced typography, extensive brush tools, integration with Adobe Creative Cloud, supports complex illustrations and logos | Comprehensive vector editing, layout tools, color management, built-in photo editing | Open-source, SVG support, basic vector tools, scripting support | Template library, drag-and-drop elements, AI-powered design tools, social media optimization | Professional-grade vector tools, pixel and vector layers, non-destructive editing, real-time collaboration |
| Pricing (as of 2026) | $22.99/month (subscription), $549.99/year (annual plan), or $1,879.99 for full Creative Cloud suite | $549.99 one-time purchase (perpetual license), $39.99/month (subscription) | Free (open-source, no cost) | Free tier available; Pro plan: $12.99/month (billed annually), $15.99/month (monthly) | $59.99 one-time purchase (perpetual license), $14.99/month (subscription) |
| Target User | Professionals, designers, illustrators, branding teams | Design professionals, illustrators, print and digital artists | Beginners, hobbyists, educators, budget-conscious users | Beginners, marketers, social media creators, non-designers | Professionals, freelance designers, creatives seeking affordable alternatives |
For more insights into creating graphics, check out our article on custom dirt bike graphics.
User Preferences for Graphics Style Among Dirt Bike Enthusiasts
In 2023, dirt bike enthusiasts demonstrate a diverse set of preferences when it comes to graphic styles for their rides. According to insights from recent articles, several key trends stand out:
- Bold Color Blocking: Many riders are gravitating toward designs that use striking color contrasts to create eye-catching looks. These palettes not only enhance visibility but also express the rider’s individuality.
- Minimalist Aesthetics: A significant number of enthusiasts are opting for clean, minimalist designs that convey a sleek and modern look without overwhelming the viewer. This trend aligns with the increasing popularity of custom graphics that emphasize personal style without excessive flair.
- Retros and Classics: The revival of retro-styled graphics is also prevalent, allowing riders to pay homage to classic designs while incorporating modern materials and techniques for durability.
- Chrome and Holographic Finishes: There’s a noticeable interest in chrome and holographic graphics, which add a unique dimension to bike design. These finishes reflect light in various ways, making the bike stand out in any setting.
- Customized Styles: Custom graphics are increasingly favored, allowing riders to create a unique identity. Personalization is crucial, with many enthusiasts looking for designs that resonate with their personalities and riding experiences.
The blend of these styles shows that riders want both functionality and a means of self-expression through their dirt bikes. Whether through vibrant colors, streamlined designs, or retro influences, the choices in graphic styles are as unique as the riders themselves. For more on how to translate these trends into your own bike designs, check out custom dirt bike graphics or explore top dirt bike graphic trends.
 \n
\n
Choosing the Right Materials for Custom Graphics
When designing custom graphics for dirt bikes, selecting the right materials is critical to ensuring durability, aesthetic appeal, and ease of application. Whether you’re a DIY enthusiast or a technician at a repair shop, understanding the properties of vinyl types, adhesive qualities, and durability considerations will help you make informed decisions. Here’s a breakdown of essential factors to consider:
1. Vinyl Types
Vinyl is the primary material used for graphics, and several types are available:
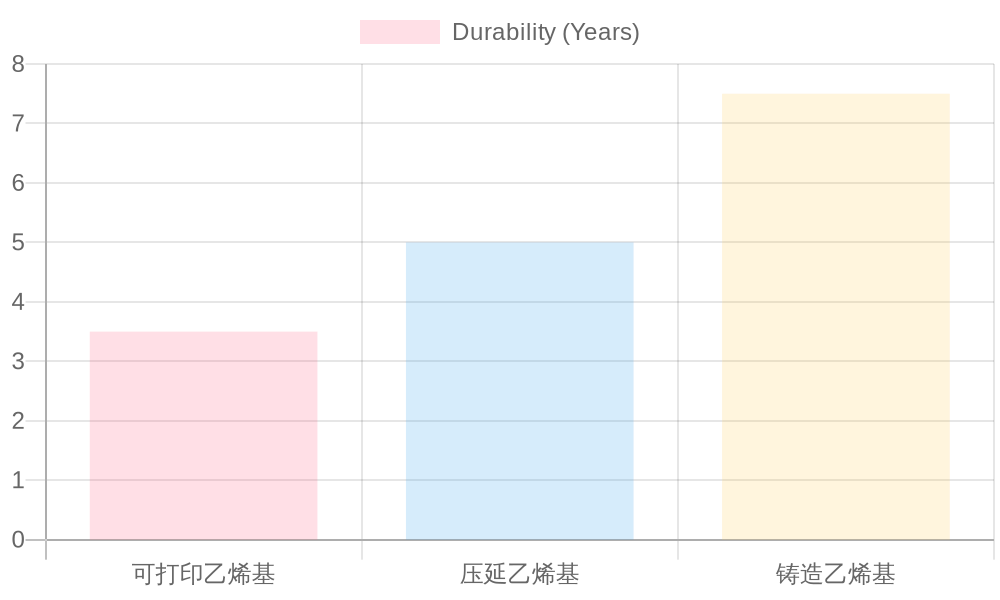
- Printable Vinyl: This type allows for full-color printing and can display vibrant colors and intricate designs. Suitable for short- to medium-term applications, it typically lasts around 2-5 years, depending on environmental exposure.
- Calendared Vinyl: A thicker vinyl designed for durability, calendared vinyl is generally less expensive and ideal for flat surfaces. Its lifespan ranges from 3-7 years and is perfect for outdoor graphics.
- Cast Vinyl: Known for its exceptional durability and flexibility, cast vinyl can conform to curves and contours better than other types. It typically lasts over 5 years, making it the best option for aggressive riding conditions and high-end graphics.
2. Adhesive Qualities
The effectiveness of vinyl graphics significantly relies on adhesive properties. Different adhesives cater to various uses:
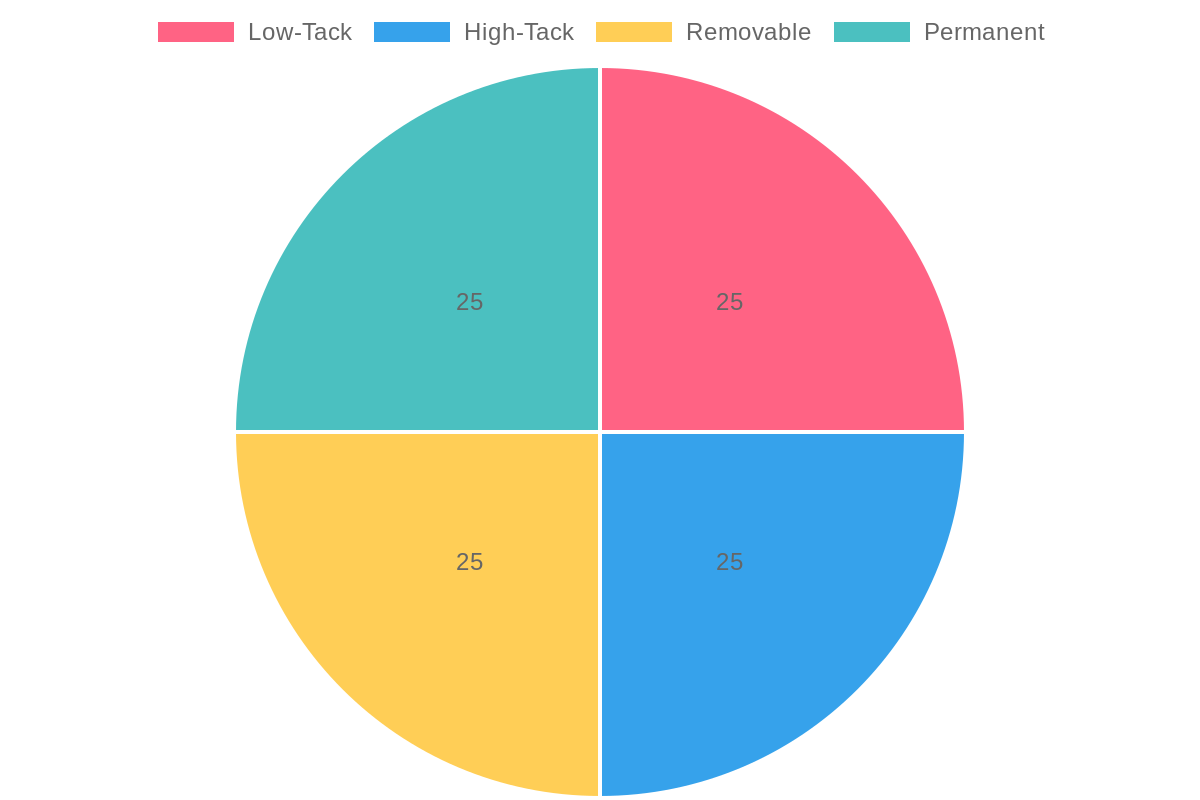
- Low-Tack Adhesive: Great for temporary fixes or interior applications, this type of adhesive allows easy repositioning without damage. Ideal for short-term displays within showrooms or exhibitions.
- High-Tack Adhesive: With strong bonding capabilities, high-tack adhesives are best for permanent outdoor applications. This type provides a reliable hold even in adverse weather conditions.
- Removable Adhesive: Designed for graphics that need to be removed after a certain period, this adhesive ensures that surfaces remain undamaged. It’s perfect for seasonal displays or event-specific graphics.
- Permanent Adhesive: Intended for long-lasting applications, this adhesive type bonds securely and is ideal for vehicle graphics, ensuring that they withstand environmental impacts without peeling or fading.
3. Durability Considerations
When choosing materials, consider the following durability-related factors:
- Environmental Resistance: Choose materials that can withstand UV light, moisture, and abrasions, especially for outdoor applications where exposure to elements is constant.
- Intended Use: Consider the types of surfaces and conditions the graphics will endure. Dirt bikes face challenging environments, so investing in high-quality, durable materials is crucial.
- Maintenance Needs: Some vinyl materials require more care than others. Understanding the maintenance demands of your selected materials will affect their longevity and appearance over time.
Conclusion
Selecting the right materials for custom dirt bike graphics involves careful consideration of the types of vinyl and adhesive qualities. A strong grasp of durability factors can make a substantial difference in the external appearance and integrity of bike graphics. For a deeper dive into various styles and ideas for custom graphics, explore our article on custom dirt bike graphics and discover the top-rated vinyl products you might consider for your next project.
“Custom graphics are not just about aesthetics; they define the identity of the rider and elevate brand presence in the crowded market of motorcycle enthusiasts.” – Unknown Motorcycle Branding Expert
Incorporating custom graphics into your dirt bike not only personalizes your ride but also introduces a distinct identity that resonates with other riders. For riders looking to stand out on the trails or the tracks, custom dirt bike graphics offer a unique opportunity to express individuality and passion for the sport. You can also explore top dirt bike wraps to find inspiration for your design!
Step-by-Step Guide to Designing Your Own Dirt Bike Graphics
Designing your own dirt bike graphics can be an exciting and rewarding endeavor. Whether you’re a motorcycle owner looking to personalize your bike or a repair shop professional wanting to offer more customization options, this comprehensive guide will walk you through the steps.
Step 1: Brainstorming Ideas
Before diving into the design process, spend some time brainstorming ideas that resonate with your style and the message you want to convey. Here are some tips to help you get started:
- Look for Inspiration: Check out designs from other dirt bikes or explore graphic design platforms like Pinterest. Websites like Decallab offer inspiration on color choices and themes.
- Consider Your Brand: Think about any logos or themes that might represent you or your style as a rider.
- Use Keywords: Jot down keywords that describe your desired aesthetics-bold, sleek, retro, etc. This can guide your design direction.
Step 2: Sketching Your Designs
Once you have a clear concept of what you want, it’s time to sketch your designs.
- Draft Different Designs: Start with rough sketches. Don’t be afraid to try different layouts and color schemes to see what resonates.
- Focus on Key Elements: Think about the colors, shapes, and patterns that will be prominent in your design. Use references from existing graphics while ensuring originality.
- Select Shapes and Symbols: Incorporate shapes or icons that resonate with your theme, whether they reflect speed, aggression, or adventure.
Step 3: Choosing the Right Software
Select graphic design software to bring your sketches to life. Popular choices include:
- Adobe Photoshop: Great for raster graphics and photo editing. Ideal for detailed designs and effects. PCMag provides reviews on the best graphic design software.
- Adobe Illustrator: Best for creating vector-based designs that can scale without losing quality.
- Canva: A user-friendly platform that offers pre-made templates for those who prefer simplicity.
- Inkscape: A free alternative to Adobe Illustrator, suitable for vector graphics.
- Procreate: Ideal for iPad users who prefer sketching directly onto their device.
Step 4: Creating Digital Mockups
Now that you’ve selected your software, create digital mockups of your designs.
- Import Your Sketches: Start by scanning your sketches or using a stylus to draw directly on your tablet.
- Refine Your Design: Use the software tools to refine shapes, adjust colors, and add details. Layers can help you manage different elements without disrupting your base design.
- Consider Material and Size: Think about how your finished design will look once it’s actually printed and applied to your bike.
Step 5: Finalizing Your Design
Before printing, finalize your design:
- Seek Feedback: Show your designs to friends or fellow riders for their opinions. This can help you catch any improvements you might not have seen initially.
- Make Adjustments: Based on feedback, adjust your design for clarity and impact-ensure it’s vibrant and sharp for printing.
- Save in the Right Format: Save your final design in a high-resolution format suitable for printing, such as PNG or PDF.
Step 6: Printing Your Graphics
After finalizing your design, it’s time to have your graphics printed.
- Choose a Reputable Printer: Look for companies that specialize in custom dirt bike graphics, like MotoGraphics. They can provide durable decals that will withstand harsh riding conditions.
- Discuss Material Options: Depending on your riding style, inquire into material durability, adhesive quality, and options for finish (matte or gloss).
Step 7: Applying the Graphics
With your graphics printed, apply them skillfully to your dirt bike:
- Clean the Surface: Thoroughly clean and dry the plastics of your dirt bike to ensure the graphics adhere properly.
- Use Warmth: Warming the graphics with a heat gun can make them more pliable and easier to apply, reducing the risk of bubbles.
- Take Your Time: Slowly apply the graphics, smoothing out any air bubbles as you go to achieve a professional finish. Resources like Backyard Design provide step-by-step instructions for applying graphic kits effectively.
Conclusion
Designing your own dirt bike graphics allows you to express individuality while enhancing your bike’s aesthetics. By following this guide, you will have the necessary steps to bring your vision to reality. Embrace the process, and enjoy customizing your ride!
For more insights on creative graphic designs, check out Top 10 Dirt Bike Graphics Tricks.
In summary, designing custom dirt bike graphics is not just about aesthetics; it plays a crucial role in personalizing your ride, enhancing visibility on the track, and protecting your bike from wear and tear. As discussed, these custom graphics provide riders with the ability to express their individual style, making their dirt bikes truly their own. With options ranging from vibrant color schemes to unique designs, riders can create a look that reflects their personality and preferences.
Moreover, investing in custom graphics has practical benefits. Quality graphics kits are designed to withstand harsh conditions, ensuring that they not only look good but also last long. For instance, a well-designed graphics kit can protect your bike’s plastic bodywork from scratches and damage, maintaining its resale value while enhancing its appearance. As noted in various resources, including insights from MotoGraphics and Global Gurus, the right graphics can make a significant difference in both performance and presentation.
So why wait? If you’re a motorcycle owner or part of a repair shop, consider trying your hand at creating your own custom dirt bike graphics. Whether you choose to dive into DIY design or consult with professionals for guidance, the journey of customization can be incredibly rewarding. Explore the endless possibilities of custom dirt bike graphics today and transform your ride into a masterpiece that stands out on any track!