
Scuffed Plastics Versus Graphics Kits: The Core Decision
Scuffed plastics on a dirt bike can be brought back to a clean, sale-ready finish in one of two ways: refinishing them with paint, or fitting a custom dirt bike graphics kit. Paint restores colour by reworking the surface itself, while a graphics kit covers the original plastic with printed, laminated vinyl cut to the bike’s own panel shapes.
Four things decide which route pays for a workshop: cost per bike, booth time, how the finish stands up to scratches and panel flex, and how easily the work can be undone.
Scuffed plastics is the usual starting point – scratched shrouds and faded fenders on ex-demo stock, rental units and practice bikes that still have plenty of mechanical life in them. Covering the damage is not the hard part. Doing it twenty times over without losing money on each one is.
Supply is where the two routes diverge. A refinish ties up a booth, a painter and drying time, whereas kits for many popular models are stocked as ready ranges, including the KTM graphics line, so a replacement set can be ordered per bike with no paint match on file. That matters when panels have to look consistent across a mixed fleet rather than perfect on one machine.
What Causes Scuffed Plastics
“Scuffed plastics” is the workshop shorthand for bodywork whose surface has turned cloudy, scratched or chalky. The pigment is still there, but the top layer no longer reflects light evenly, so the panel looks tired even when it is structurally fine. On dirt bikes this is almost always a cumulative condition rather than the result of one big hit, and five forces do most of the damage.
Abrasion from boots, knee braces and body contact
Rider contact is the largest single source of wear. Boots, knee braces and riding pants rub against the shrouds, side panels and rear fender on every lap. Grit trapped between plastic and gear turns that rubbing into fine sandpaper, polishing the gloss off in patches long before anything cracks.
Roost and debris impact
Sand, gravel and stones thrown up by other machines strike the panels at speed and pit the surface with micro-craters. Each impact scatters light instead of reflecting it, which reads to the eye as dullness and a grey haze.
Low-speed tip-overs
A bike that goes down in the pits or falls over in a slow corner rarely cracks a panel, but it does grind the plastic across abrasive ground. Corners, edges and graphic lettering take the worst of it, and repeated small slides add up to a visible scuff pattern.
Pressure washing and solvent-heavy cleaners
High-pressure water drives grit and moisture past panel edges, while aggressive degreasers and solvent-based cleaners attack the plastic surface and wash out the additives that keep it from chalking. The result is hazing, whitening and a dry texture that no polish will hold for long.
UV exposure
Sunlight does the slow damage. Ultraviolet radiation oxidizes both pigment and surface resin, so colours shift and gloss fades to a flat, dusty finish. This happens on bikes that are never raced, which is why garage and trailer storage matters as much as riding time.
Why paint is rarely the answer
Most modern dirt bike plastics are made from flexible polyolefin compounds such as polypropylene and TPO. These materials are non-polar, which gives them very low surface energy, and paint struggles to wet out and bond to them. A respray therefore sits on the panel as a separate film while the plastic underneath keeps flexing, so it cracks, chips and peels at the first real impact. Fade-resistant vinyl decals avoid that mismatch because they move with the panel instead of fighting it.
Paint Is Bonded. A Kit Is Applied.
The two methods stack differently on the same panel, and that stack explains most of the other differences between them. The diagram below shows two cross-sections of the same plastic side panel.

On the left, paint becomes part of the panel. Four layers are chemically and mechanically locked together, which is why a deep scratch does not just mark the surface but removes the colour itself. Repair means sanding back, re-priming, re-colouring and re-clearing, and matching a factory finish by hand is never free.
On the right, the film sits on top of the panel as a discrete, removable layer. The plastic underneath is untouched, and the sacrificial layer is a replaceable overlaminate, the cheapest part of the stack to swap when a rock or a boot gets through it.
- Left stack: plastic substrate, primer, colour coat, clear coat – bonded coating, permanent by design.
- Right stack: plastic panel, adhesive layer, printed vinyl film, protective overlaminate – applied film, serviceable by design.
Paint changes the panel; a kit changes the surface of the panel. On plastics that are already scuffed, that is the difference between booking the booth and finishing the bike this afternoon. If you are weighing a refresh across a mixed fleet, pre-cut graphics kits for common dirt bike plastic sets show how the layer on the right gets applied in practice.
Full Respray vs Custom Graphics Kit: Side-by-Side Comparison
The two options fix the same problem, scuffed and sun-faded plastics, but they differ in cost, workshop time and how easily the result can be undone. Kits are sold and priced per set, so you can run the numbers for popular platforms such as these KTM graphics kits against a paint quote before committing.
| Factor | Full Respray | Custom Graphics Kit |
|---|---|---|
| Upfront cost per bike | ~$400 to ~$900 per bike | ~$150 to ~$350 per kit |
| Prep work required | Sanding, masking, primer, booth time | Degrease panels, apply, squeegee |
| Vehicle downtime | ~3 to ~7 days in shop | ~1 to ~3 hours per bike |
| Durability against scuffs and flex | Cracks and chips under flex | Flexible vinyl absorbs panel flex |
| Spot repair after damage | Blend or reshoot whole panel | Swap the single damaged decal |
| Design and colour flexibility | Limited to mixed paint formulas | Full-colour printed artwork, any layout |
| Reversibility at resale | Permanent; strip and repaint to undo | Peels off; original finish stays |
| Effect on resale or rental presentation | Looks fresh until first scuff | Refresh presentation each season cheaply |
| Fleet colour consistency | Batch mix drift between bikes | Repeatable print files, identical sets |
Durability, Downtime, and Operating Cost: What Actually Hits Your P&L
A finish only earns its keep if it survives mud, boot soles, tie-downs and pressure washers, and if the bike is back on the rental line the same week it got scuffed. On those terms the gap between paint and a graphics kit comes down to how many units are sitting still.
Paint never really bonds to polyolefin plastics
Modern dirt bike and e-MX bodywork is typically polypropylene or TPO, polyolefins with very low surface energy: non-porous, waxy-feeling and chemically hostile to coatings. A shop can work around this with flame treatment, adhesion promoters and primer, but the bond that forms is still mechanical and relatively brittle. Flex a rear fender or side shroud in a crash and the paint film cracks along the fold, then lifts at the edges and peels in sheets.
A graphics kit uses a pressure-sensitive adhesive engineered for low-energy plastics, so the film stretches with the panel instead of fracturing on top of it. The operational consequence is straightforward: fewer bikes pulled out of rotation after a ride day for cosmetic triage, and fewer panels written off because a peel line has crept across the whole shroud.
Days in the booth versus hours in the bay
A respray is a chain of dependent steps: strip the panels, sand, degrease, apply promoter, prime, base coat, clear coat, then wait out a cure that cannot be rushed without risking solvent pop or a soft finish. Realistically that is two to four days of booth time per bike plus reassembly, and it usually forces you to batch jobs so your sprayer isn’t idle.
Every day a unit spends curing is a day it is not being rented, demoed or delivered, which is why booth time rather than paint is the line item to watch. A vinyl kit collapses that timeline to one to three hours per bike with no cure window, and the machine rolls out of the bay into service the same afternoon.
Repair one panel, not a whole set
Paint does not stop at panel edges. Once one shroud is cracked or ground down, colour matching across the rest of the set becomes the problem, so the sensible shop repaints everything and bills the customer for a full set rather than a fender. Vinyl turns that into a consumable decision: keep a spare sheet per livery, cut the damaged decal, and 20 to 30 minutes later the bike is presentable again.
Because vinyl decals for motorcycles are supplied panel by panel, your repair cost scales with the damage instead of with the whole machine. That changes how you price deposits at handover: a scuff becomes a small, predictable charge instead of an argument about a four-panel respray.
Fade resistance under UV is what protects resale value
Cheap graphics and cheap paint both bleach out, but quality fade-resistant vinyl pairs UV-stable inks with a protective laminate that holds colour and gloss through three to five seasons of sun, wash cycles and storage. On a rental fleet that matters commercially: matching, sharp-looking bikes photograph better and command better rates. On a dealer’s forecourt it hits trade-in optics, because a two-year-old bike that still looks current sells faster and closer to asking price.
How the costs actually accumulate
A respray is not one expense; it is a repeating cycle. Each damaged panel triggers booth time, labour and a colour-match risk, and each season of UV exposure quietly resets the clock. Vinyl front-loads a smaller number and then answers every future scuff with a decal.
| Operating metric | Respray | Vinyl graphics kit |
|---|---|---|
| Turnaround per bike | 2 to 4 days in booth | 1 to 3 hours |
| Cure or handling restriction | Required before reassembly | None – ride immediately |
| Panel-level repair | Full set, colour matched | Single decal replaced |
| Repair time after a scuff | Days | 20 to 30 minutes |
| Repeat cycle | Each damage event | Each damage event, decal only |
| Labour skill required | Booth, sprayer, prep bay | Hand tools and a heat gun |
Most owners underestimate the repeat cycle. Across a ten-bike fleet over two years, the respray route typically drifts toward several times the outlay of a graphics programme, not because any single respray is outrageous but because the cycle never ends.
The comparison assumes ten bikes, two respray cycles plus touch-ups over 24 months, against one initial kit fit and a handful of single-panel replacements.
Run the numbers on your own fleet and the cheaper finish turns out to be the one that keeps bikes out of the workshop.
Image: Close-up comparison image of a dirt bike plastic side panel: cracked, peeling spray paint flaking off a flexed fender edge on the left, clean matte vinyl graphics wrap with crisp cut lines on the right.
Alt text: Cracked and peeling spray paint on a flexible dirt bike fender beside a clean matte vinyl graphics kit panel.
Chart: Line chart comparing the cumulative operating cost of a ten-bike fleet over 24 months: respray rises from $2,500 to $8,100, while vinyl graphics kits rise from $1,200 to $1,960.
Alt text: Line chart showing cumulative 24-month operating cost of a 10-bike fleet: respray reaching $8,100 versus vinyl graphics kits at $1,960.
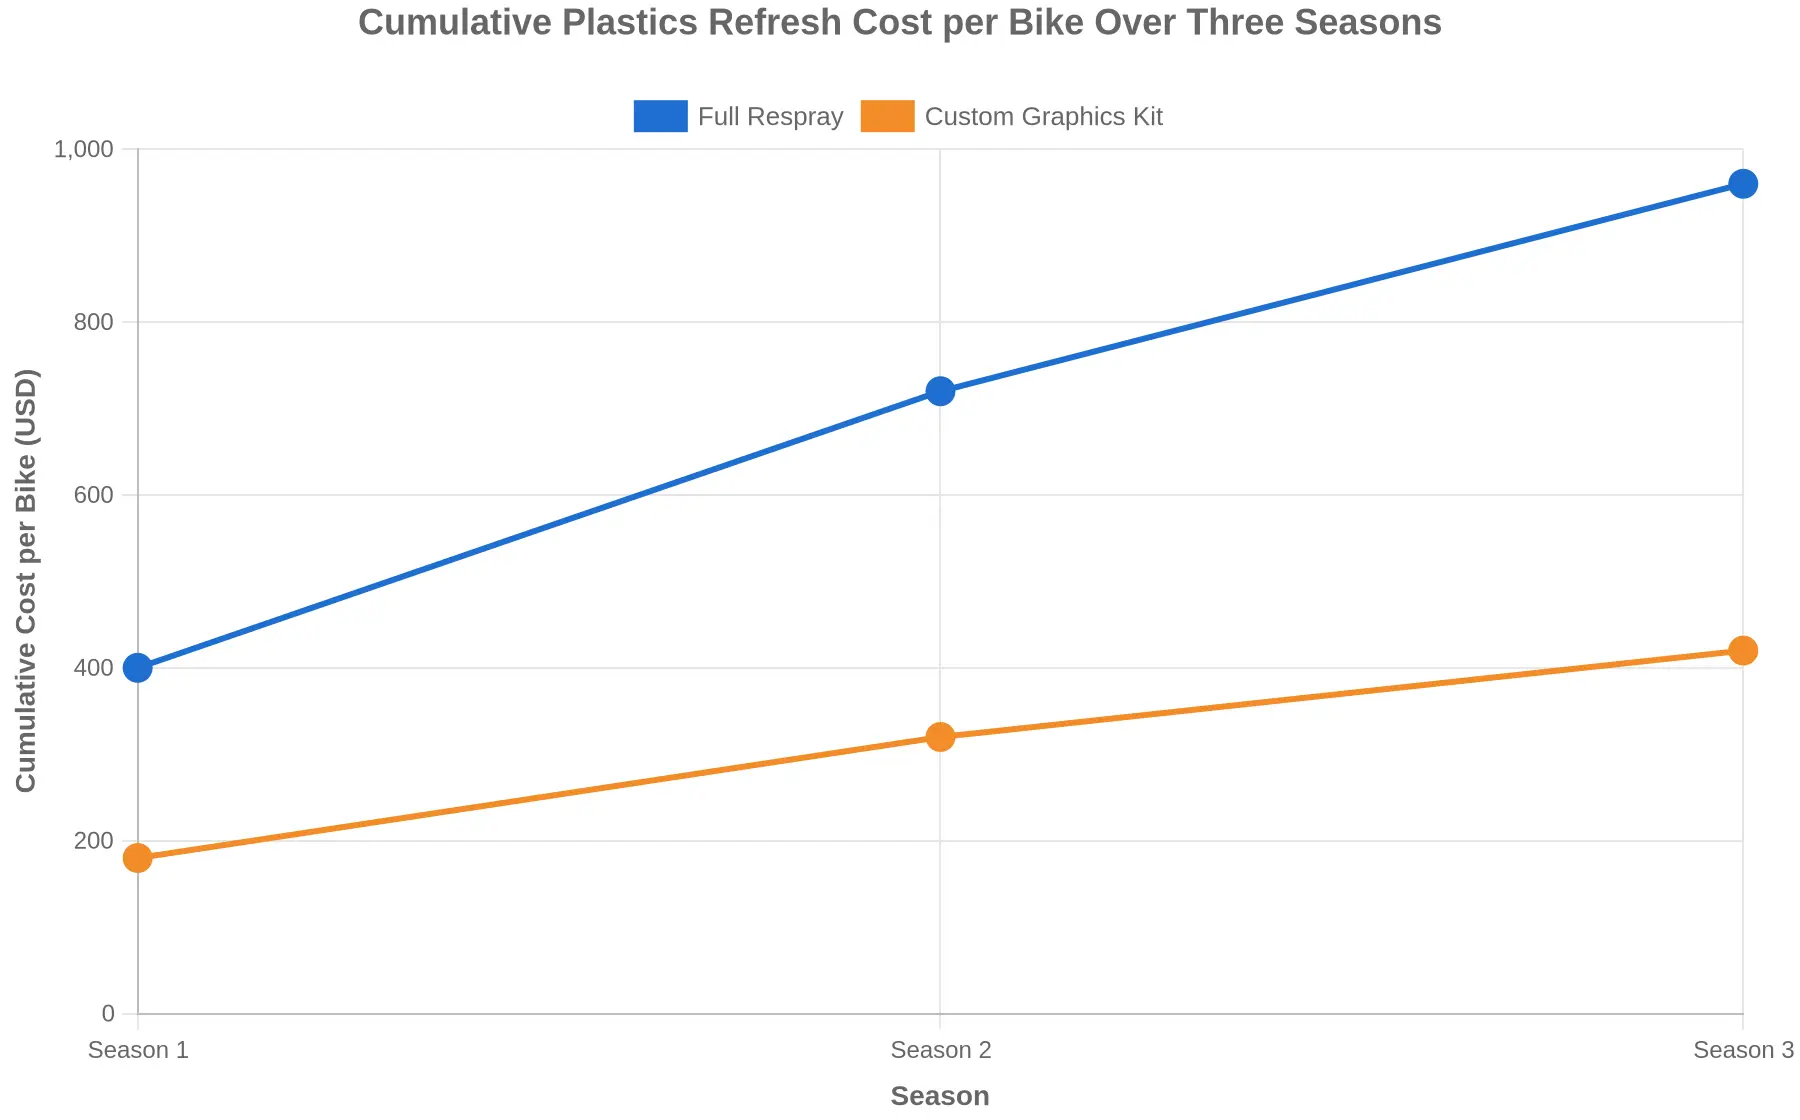
Caption: Over three consecutive seasons, a full respray accumulates 960 USD per bike while a custom graphics kit accumulates 420 USD, a 540 USD gap.
When a Graphics Kit Makes More Sense
Paint is a permanent commitment; a graphics kit is a decision you can revisit. For an owner running more than one machine, five signals usually settle it.
- Multiple units in rotation where downtime costs more than materials. When every hour off the track or off the job bills against you, a peel-and-apply kit beats a multi-day spray and cure cycle, and the labour saved outweighs the cost of the vinyl itself.
- Plastics that are structurally sound but cosmetically worn. If the panels still mount cleanly and hold their shape, scuffs and fading are a surface problem rather than a replacement problem. A precut bike graphics kit covers the damage without touching the moulding.
- A brand or livery identity that must be updated periodically. Sponsor changes, seasonal campaigns and refreshed colourways are far easier to action when the design lives on removable film instead of under a clear coat.
- Bodywork that flexes and has already rejected or cracked a previous paint job. Flexible panels and rigid paint are a poor match, and cracking or lifting is the predictable outcome. A conformable film moves with the plastic instead of fighting it.
- A requirement to restore the original factory appearance later. Resale conversations, lease terms and trade-in valuations all reward reversible changes. Graphics come away cleanly and the finish underneath is still the original finish.
Paint fits a surface that is stable and a result that should be permanent. A custom dirt bike graphics kit fits when turnaround, reversibility and seasonal restyling matter more than a sprayed finish.
When Paint Is Still the Better Call
A graphics kit solves a specific problem, worn or faded surfaces on sound plastics. It is not a replacement for paint in every case, and three situations in particular still call for a booth or a painter.
Cracked or structurally damaged plastics
A kit is a thin adhesive film, and it sits on top of whatever is underneath it. It covers scratches, scuffs and discolouration, but it does not repair cracks, bridge gaps or replace missing material. If a panel is split, stress-cracked around a mounting point, or has a piece broken away, that damage has to be addressed first through plastic welding, reinforcement or replacement. Applying graphics over a live crack only masks it briefly, because the substrate keeps flexing underneath and the film follows. Structural repair is a bodywork job, and paint is the finish that follows it.
Restorations that need an exact factory colour
When the goal is an original-spec machine, colour accuracy decides rather than convenience. Paint can be mixed to a specific code or scanned from an existing panel, which matters when a single panel is being corrected or when a period-correct shade is required. A kit is limited to the shades and layouts a supplier already produces, so an exact match is not always achievable. Before committing, it is worth comparing what the model-specific ranges, such as the graphics available for KTM models, actually offer against the reference colour on the machine.
Rigid substrates rather than flexible ones
Paint performs well on metal, rigid ABS and painted steel frames, where there is little movement and no need for conformability. These surfaces hold a coating evenly and tolerate sanding, priming and clear-coating as part of a proper refinish. Flexible plastics behave differently, which is why decal film with conformable adhesive is usually specified for them. On a rigid part, a painted finish is often the cleaner and more durable answer than an adhesive layer.
What it comes down to: a kit is the efficient fix for surface wear on flexible plastics; paint is the right call when the panel needs repair, an exact colour, or a rigid substrate.
The Real Cost Split Behind a Full Plastics Respray
Ask a painter what a full respray costs per bike and you’ll get one number. What you rarely get is the breakdown. Paint itself is cheap; the hours wrapped around the paint are what hurt.
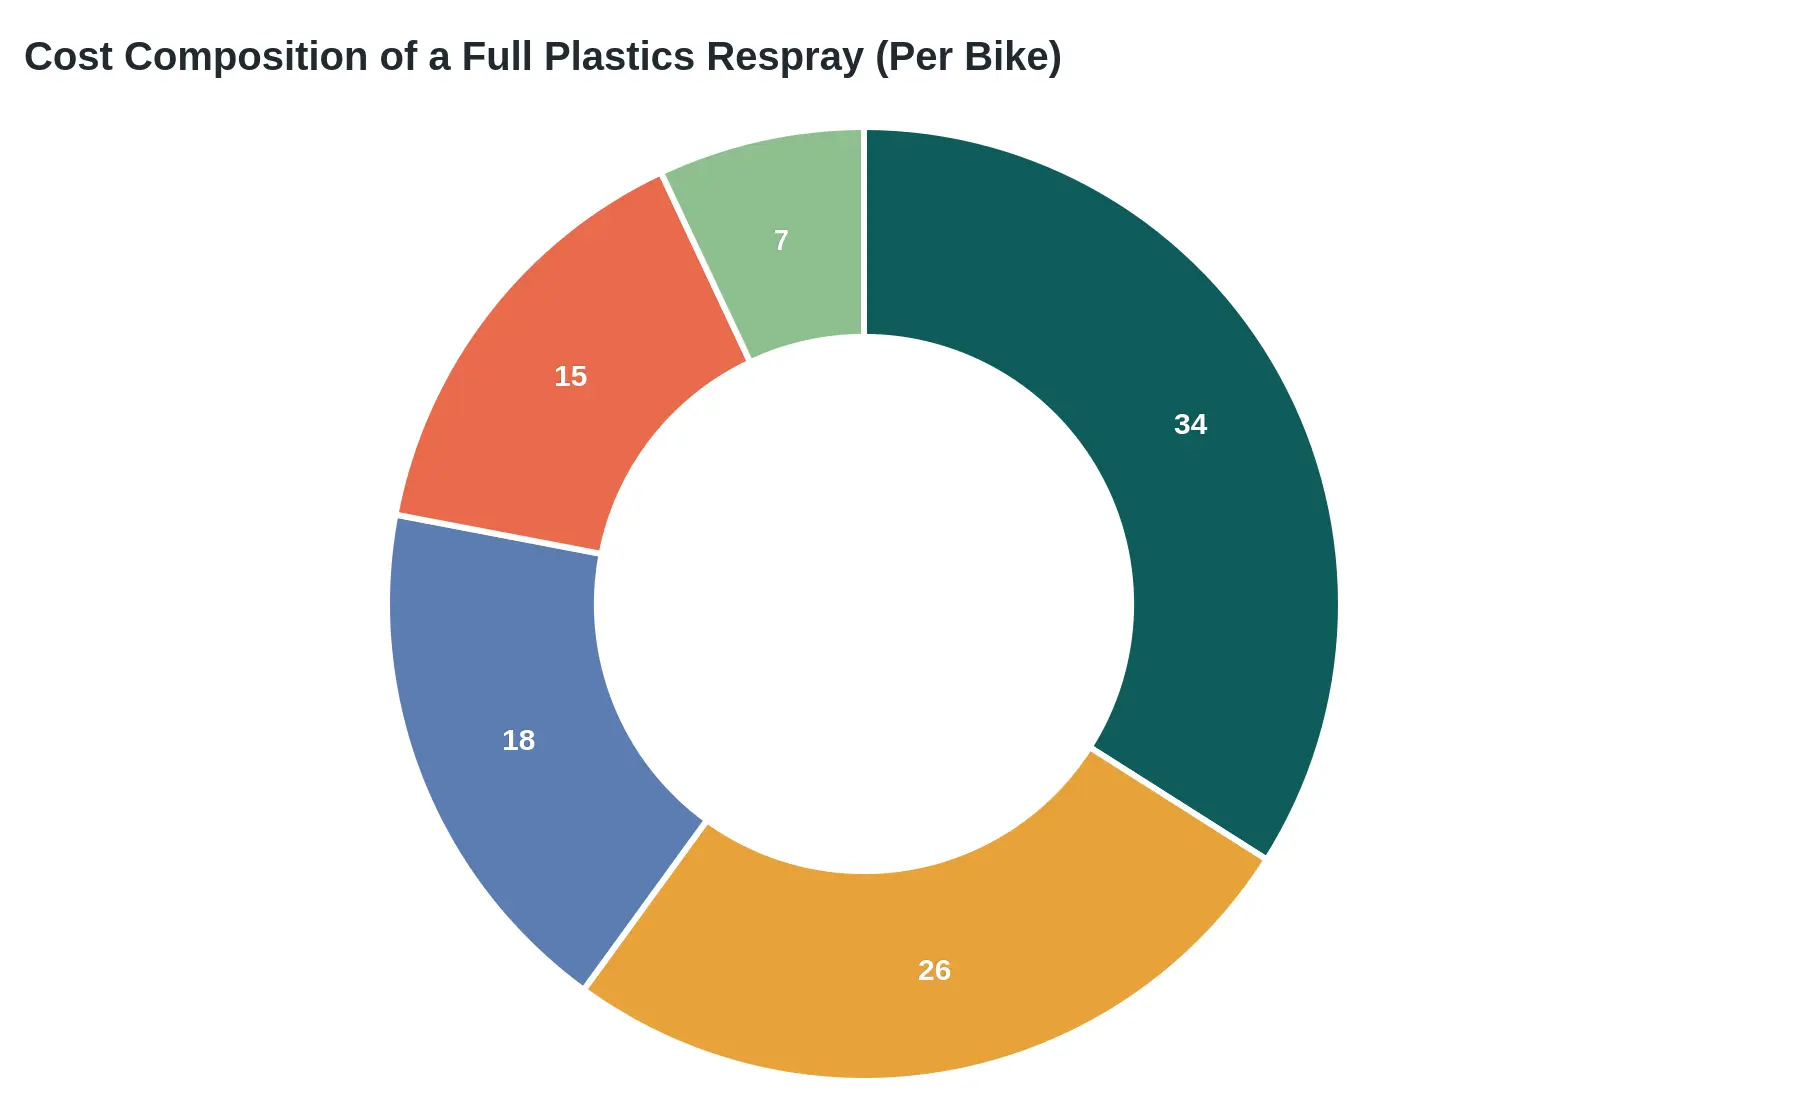
Downtime and labour dominate the total bill, which is why a kit compares favourably on cost.
Look at where the money goes. Surface prep and sanding (18%) plus reassembly and finishing (7%) is a full quarter of the budget spent stripping and rebuilding an old finish. Add labour at 34% and downtime at 26% and 85% of the invoice is hours and waiting; paint and consumables account for the remaining 15%. None of that appears as a line on the quote.
So a respray quote hides a queue. Every day a bike sits waiting on paint is a day it isn’t being ridden, demoed or hired out, and that 26% slice rarely shows up anywhere the customer can see it. A kit keeps that waiting close to zero, because the plastics stay on the bike and a full set goes down in one evening. If that trade-off sounds like the better deal, shop pre-cut kits shaped for your specific plastics and compare the same bike, same look, without the queue.
Selecting the Right Kit for Each Model
Buying graphics for one bike is simple. Buying them for a workshop full of bikes is not. A kit that fits a 2021 450 like a glove can leave gaps on the 2023 model, and a cheap laminate that survives a season of trail riding can fail after three race weekends.
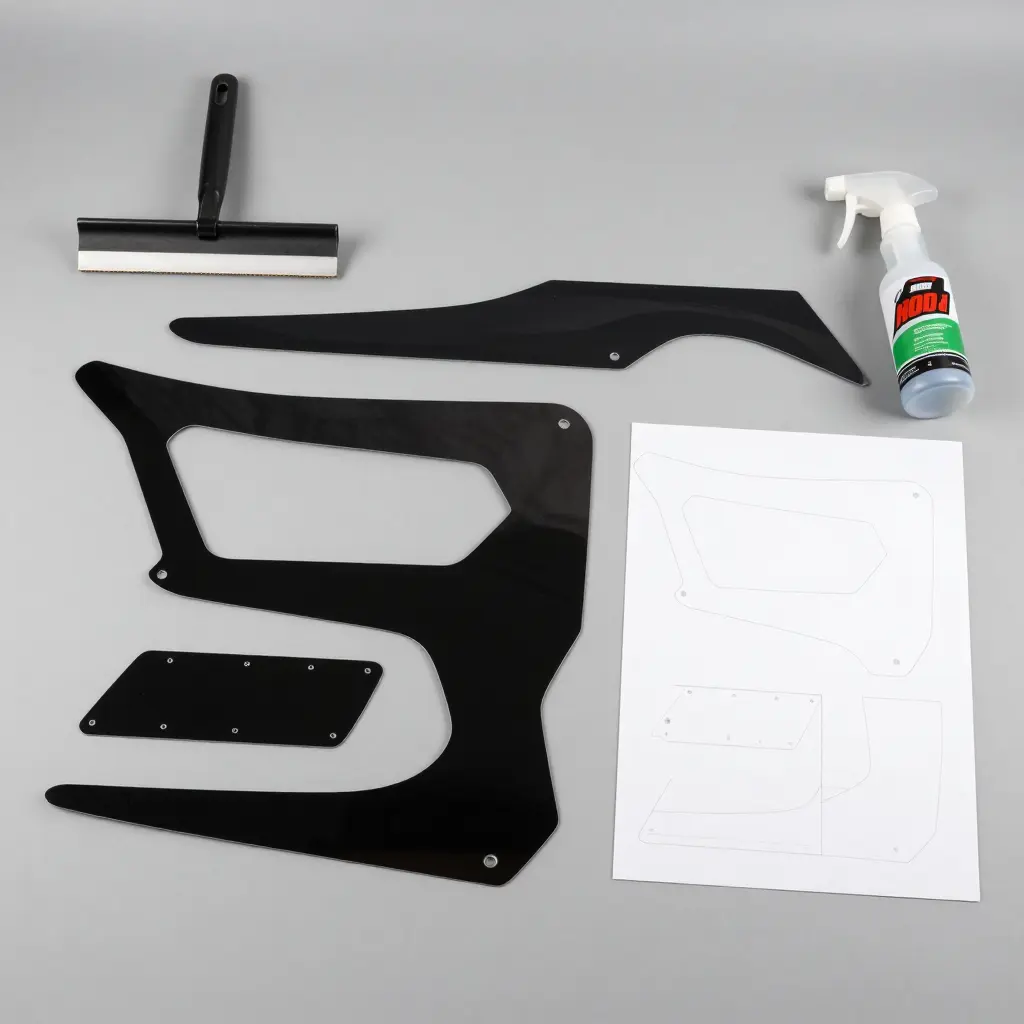
Template accuracy and model-specific fit
Start with the template, not the design. Plastics change shape between model years even when the badge stays the same, and shroud, radiator scoop and airbox cut-outs are where bad kits show first.
- Confirm the exact model, year and trim before ordering, and ask whether the template covers your plastics supplier’s aftermarket parts too.
- Check the high-stress areas: seat bolt holes, fuel tank overlap, front fender edges and number plate curves.
- Request a physical or digital proof of the panel outlines, not just the artwork.
A misaligned set wastes vinyl and labour hours, and the customer notices the bubbling before you do.
Material quality and overlaminate choice
Thickness alone is not the answer. A conformable cast vinyl with a proper overlaminate handles curves and pressure washing better than a thick, stiff film that lifts at the corners.
| Material setup | Best suited to | Watch-outs |
|---|---|---|
| Standard calendared vinyl, gloss laminate | Low-use play bikes and short-term resale prep | Less stretch around tight scoops |
| Conformable cast vinyl, gloss overlaminate | Race bikes and rental fleets | Higher cost per set |
| Cast vinyl, matte or textured overlaminate | Modern plastics and stealth-style builds | Matte shows scuffs sooner; clean carefully |
| Cast vinyl with extra-clear laminate | High-wash, high-hour commercial use | Requires careful heat-setting on install |
Ask how the laminate behaves under UV and how easily it releases if a panel needs replacing. On a working bike, replaceable individual panels matter more than one big sheet.
Colour and sponsor-space options
Match colour to the bike’s factory palette first, then decide where sponsor logos live. On-screen proofs can shift, so ask for a proof in daylight before signing off a fleet order.
Leave deliberate clear zones on the number plates, side panels and front fender for dealer decals and contingency logos. If your branding changes mid-season, plan kits with replaceable number plate sections instead of full sets.
Quantity considerations for multi-bike operations
Count your fleet by model group, not by bike. Two 250s from the same year share a template; a 2024 and a 2021 do not. Ordering in model blocks keeps stock simple and cuts reprint costs.
- Hold one spare set per five bikes for crash replacements.
- Keep a small laminated sample of each material spec so staff quote consistently.
- Log template versions against bike model years so reorders match.
Where to Start
If you are building a fleet programme, browse the KTM graphics kits for template-led fitment, the Sur-Ron Light Bee graphics range for lightweight electric builds, the Talaria MX3 and MX4 graphics for year-specific panels, the Stark Varg MX and EX graphics for late-model electric motocross, and the eRide graphics collection for mixed-brand workshop stock. Between them they show how custom motorcycle graphics are specified per model, so you can compare templates, laminates and panel coverage before committing to a volume order.
The Five-Step Application Process, at a Glance
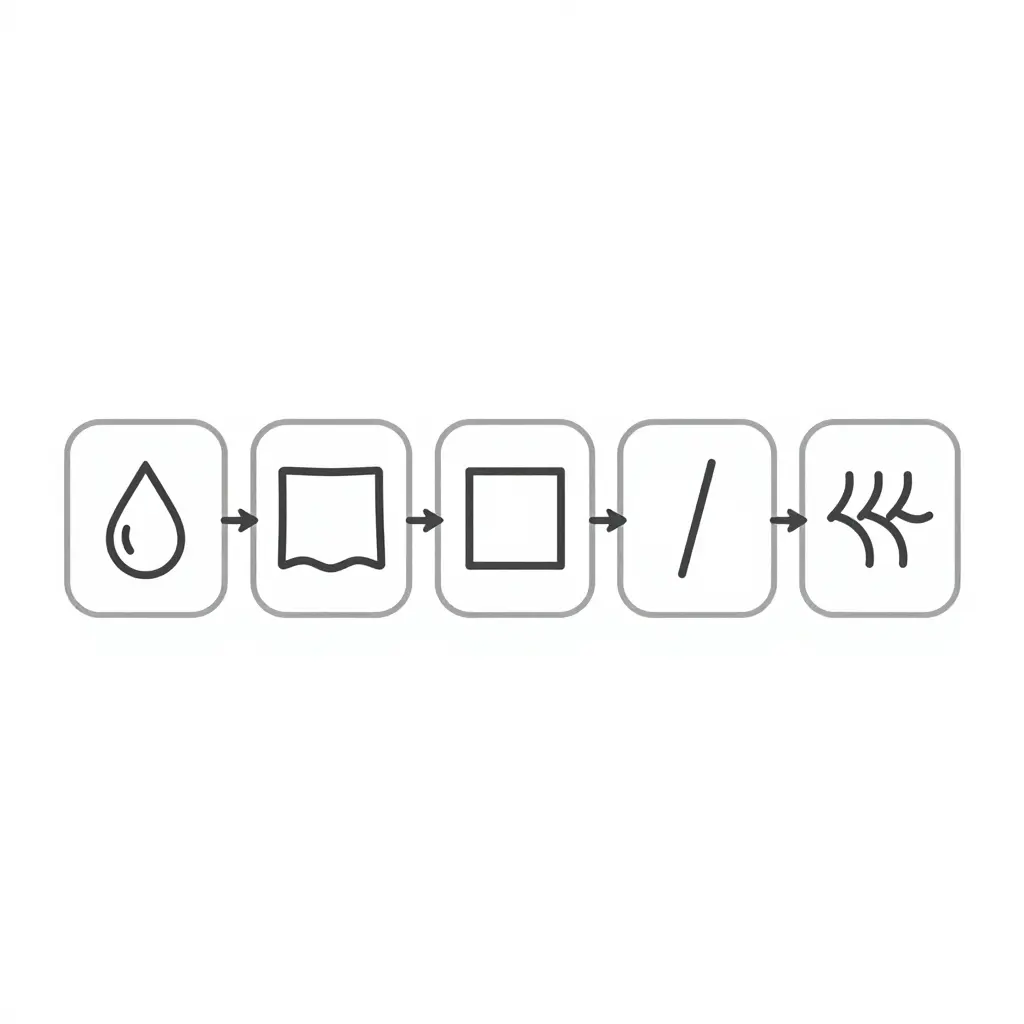
A graphics kit is not a repaint. The work runs in a fixed sequence, and on a sound set of plastics it fits inside one shop visit, which matters when a bike is either earning money or sitting idle.
Reading the diagram
- Clean – the droplet. Wash off mud, dust and old residue. Everything after this step depends on it.
- Degrease – the cloth square. Wipe the plastic with an alcohol-based cleaner so the adhesive can actually bond.
- Align – the panel outline. Dry-fit each decal, set the centerline, and check symmetry before removing any backing paper.
- Squeegee – the straight-edge line. Work the air out from the middle outward, one panel at a time.
- Heat set – the heat-wave symbol. Warm the edges and recesses so the vinyl relaxes into curves and stays put.
Why the short cycle matters
| Consideration | Graphics Kit | Paint Cycle |
|---|---|---|
| Typical shop time | One session, hours | Multi-day cure and dry time |
| Reversible | Yes, removable vinyl | No, requires sanding or repaint |
| Panel prep | Clean and degrease | Sand, prime, base, clear |
| Touch-up cost | Replace one panel decal | Blend or respray a panel |
| Downtime for a working bike | Minimal | Days off the track or job |
For a business, the practical difference is schedule risk. Paint ties up a bike and a bay for days while dust settles and clear coat cures, and any scuff after that means starting over on that panel. A kit compresses the whole job into a controlled sequence you can plan around.
Where plastics stop cooperating
Deep gouges, cracks and badly faded panels still need repair before anything sticks. For the common case, scuffed or cosmetically tired plastics that are structurally fine, the kit wins on turnaround and on reversibility. If you are refreshing a fleet or a single race bike, the KTM graphics range shows how bike-specific pre-cut panels map onto these five steps.
Five steps, one visit, and a finish that comes off again when the taste or the sponsor changes.
Frequently Asked Questions About Graphics Kits and Painted Plastics
How long does a vinyl graphics kit typically last on off-road plastics?
It depends on material quality, riding conditions and how the bike is cleaned. A well-made cast vinyl kit with a protective laminate commonly holds up for multiple seasons on a trail or track bike, while heavy mud, frequent pressure washing, abrasive roost and long UV exposure shorten that lifespan. Edges and high-flex areas such as shrouds and fork guards show wear first, because those points take the most punishment.
Can a kit be applied over existing paint or scuffed plastics?
In most cases, yes, provided the surface is clean, dry and structurally sound. Vinyl adhesive bonds well to painted panels and to most original plastic surfaces, including scuffed plastics that have lost their factory sheen but still have an intact surface. Prep is what decides it: degrease, remove silicone residue, and wipe down with isopropyl alcohol so the adhesive can grip.
Does a kit hide deep scratches and cracks?
Graphics cover light scratches, discoloration and the dull oxidized look of older plastics, which is often enough for a fleet or trail bike. Deeper gouges, cracks and raised edges sit proud of the surface, so vinyl conforms over them and reveals their outline rather than erasing it. Cracks that flex under load eventually telegraph through the film and can make it lift, so repairing or replacing badly damaged panels first is the more reliable approach.
How does a kit affect resale or rental presentation?
A clean, coordinated kit can make a used bike read as well maintained, and consistent livery across a rental fleet helps customers recognize your brand at a glance. Buyers and renters do look closely, though, and a peeling or misaligned graphic hurts perception more than plain plastics. Removing a kit later may also reveal mismatched or faded panels underneath, so weigh that against how long you plan to keep the machine.
Can kits be removed without damaging bodywork?
Generally yes. A quality custom dirt bike graphics kit is engineered to be removable, and warming the film gently with a heat gun or hair dryer while peeling slowly at a low angle is the standard method. The realistic risks are adhesive residue, which usually cleans up with a suitable solvent, and paint lifting on panels that were previously refinished or poorly prepped. On factory plastics in good condition, removal is normally straightforward.
The Practical Decision Rule for Business Owners
For a business owner weighing paint against graphics, the rule is short. Paint is the sensible route when the plastic itself needs repair or when an exact original colour is required. A custom dirt bike graphics kit is the sensible route when the bodywork is sound but its finish is worn, when downtime is the dominant cost, and when the livery is expected to change again.
Per bike, paint costs more in labour and materials; kits cut downtime because nothing has to cure before refitting; and a kit can be removed or replaced without reworking the plastic. For a fleet, that combination makes graphics a practical way to refresh presentation at defined intervals and keep the option to change direction later.